Gymnastics for the shoulder joint: basic rules
The shoulder joint is surrounded by a muscular frame, which ensures its functionality and the ability to move in all planes. But constant monotonous movements can provoke atrophy of some muscles that are not used. Exercises to strengthen the shoulder joint help achieve positive results, but there are a number of rules that must be followed:
- Timeliness . Regularity and timeliness are important rules for success. Gymnastics must be performed in accordance with a clearly developed scheme and at a specific time.
- Safety . To prevent additional injuries, classes must be conducted with maximum safety and an individual approach. It is necessary to take into account the condition of the ligaments, the presence of diseases and their symptoms.
- Moderation . To prevent overload and restore the functionality of the muscular corset, it is important that the load on the shoulder symptom is distributed correctly. Reduce it if you feel very tired.
- Graduality . It is important to gradually increase the load. While doing the exercises, don’t be nervous, don’t rush, don’t fuss, because a lot also depends on your emotional state. It is important not to increase the load until the muscles regain normal tone. When you get the desired result, do not suddenly stop the load. It needs to be reduced smoothly and gradually.
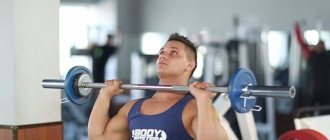
Benefits of the shoulder bridge exercise
- Improving Athletic Performance
Having a strong glute is essential for improving athletic performance. Strengthening these muscles will help you run faster, jump higher, and be one of the best in team sports. - Safety
This exercise is completely safe. Almost anyone can do it. It is great for pregnant women and those who have just given birth. Just before doing this you need to consult a doctor. - Strengthening muscles
The load when performing this exercise goes to almost all muscles. This includes the gluteus maximus muscle, the back of the thigh, the biceps femoris, and the semitendinosus and semimembranosus muscles of the thigh. Also, do not forget that the shoulder bridge exercise helps strengthen the abdominal and back muscles. - Improves posture
When performing a “shoulder bridge,” the spine is massaged. Blood circulation also improves, and all spinal regions are well developed. Improves mobility in the back. - Clothes fit better.
Toned and rounded buttocks look great under any clothing. You will look sexier and more attractive to the opposite sex.
Therapeutic gymnastics for the shoulder joint Evdokimennko
There is also gymnastics developed by resuscitator P.V. Evdokimenko, who is the author of a large number of books on joint health. His approach demonstrates effectiveness, which is why it is popular. The author of the technique insists that the main attention should be paid to the individual characteristics of the patient. There is both a simplified version of the gymnast (if the patient has limited movements) and a standard one.
Most exercises are performed in a sitting position, and only two are done standing. Typically the following exercises are recommended for the shoulder joint:
- While sitting on a chair, place your hands on your waist and relax. Then perform smooth circular movements back and forth with both shoulders - 1.5 minutes in each direction.
- Same starting position, relax your shoulders as much as possible. Pull them back, tensing your muscles, and then bring them together. Repeat the action 5-7 times.
- While sitting on a flat surface, place the palm of your healthy hand on the opposite elbow and place the other palm on the other shoulder. Relax as much as possible, very carefully pull the sore limb up, holding it by the elbow, which does not leave the shoulder. This action is aimed at achieving maximum abduction of the shoulder, when the muscles are sufficiently tense, but there is no pain. Fix your shoulder in this position for 10-15 seconds, then smoothly return to the starting position. Repeat the complex at least five times.
- In a lying position, move your arm to the side, slightly lifting it above the surface, and tense it for 5-10 seconds, then relax. The palm should be as open as possible, and the shoulder should be on the edge of the surface.
How to do the shoulder bridge exercise
If you do this simple exercise every day, the results will not be long in coming. Good luck to you in creating the perfect sports uniform
.
, Comments: 0
Position:
basic
Difficulty level:
2-4
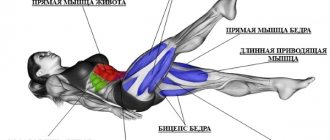
Target muscles:
gluteus maximus, biceps femoris
Additional position stabilizers:
- spinal extensors
- muscles that straighten the spine
Start of development:
hold the position continuously for 15 seconds.
Anatomy of position
Performing the exercise
The learning is discussed in detail in the video below.
Basic moments
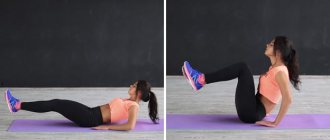
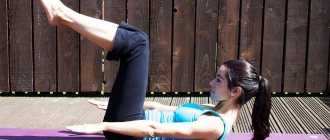
- lie on your back, bend your knees, place your feet as close to your buttocks as possible, feet hip-width apart, parallel to each other
- As you inhale, lift your hips up and enter the shoulder bridge.
- keep your back as straight as possible (avoid arching in the lower back)
- head, shoulders and feet pressed firmly to the floor
- When moving upward, we do not bring our knees together, they look clearly at the ceiling (sinking of the knees inward indicates weak adductor muscles, in this case it is recommended to hold a ball of suitable size between the knees)
- as you exhale, lower yourself to the floor
- to enhance the effectiveness of the exercise, at the top point we linger for 2-3 seconds and strain our buttocks as much as possible
- For additional complication, when lowering the pelvis down, we do not lie down on the floor with our buttocks, but only lightly touch them. This allows you to increase the load on the target muscles.
Additional comments
- “shoulder bridge” is the least traumatic position compared to other exercises for the buttocks
- with weak target muscles, this position is often performed using the strength of the hips
- When performing the exercise, we make sure that the movements remain calm and measured, and the breathing is even, without delays.
- If the back of your thigh muscles cramp during an exercise, it means you have weak gluteal muscles (cramps occur because the back of your thigh muscles are forced to take on the load that the gluteal muscles must handle)
- do the exercise once a day, timing the time, start with 15 seconds
- If the previous point is easy, it’s time to move on to the number of repetitions. Lifting the pelvis up, holding there for 2-3 seconds and lowering the pelvis down is one repetition. Start with 8-10 repetitions and gradually work your way up to 15-18. The number of approaches is 2-3.
- If the previous points have been mastered, proceed to further complicate the situation.
- doing 3 sets of 20 times – excellent
- doing 2 sets of 20 times is good
- holding the position for 1 minute is normal (it’s time to get more complicated)
- holding for less than a minute is satisfactory
- holding for less than 15-20 seconds is bad
Below are complication options.
Shoulder bridge with one leg support
1.
Straighten one leg, resting on your shoulder blades and foot, lift your hips so that your body forms a straight line from your knees to your shoulders.
2.
As you exhale, raise your leg up perpendicular to the floor, and as you exhale, lower your leg to the starting position. Repeat 15-18 times on one side, changing legs (however, you can change legs each time).
Make sure that your body does not move anywhere while balancing on one leg. To test yourself, place your foot on the floor and adjust your position.
Shoulder bridge with support
Place your feet on a bench or any other low surface. Repeat all previous points and complications.
This position engages the ischial-popliteal muscles to a greater extent compared to previous options.
Shoulder bridge on fitball
The stabilizers of the spine and legs are included in the work as much as possible. This is a very intense position.
Overweight people often experience back pain. To make her healthy again, you need to master gymnastics such as Pilates. This gymnastics is unique, since all overweight women can do it, regardless of their weight category, and even those people for whom strength training and aerobics are contraindicated. Pilates exercises
They are also used by rehabilitation doctors to restore patients who have undergone major operations, including operations on the spine.
Despite the fact that, unlike training on machines, in this gymnastics all movements are smooth and there are no shock loads, Pilates exercises
help to work out the muscles no worse, and even better. During regular training, only large superficial muscles work, while this gymnastics also involves deep ones, which support the spine and internal organs, due to which a natural muscle corset is formed.
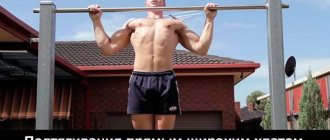
Shoulder rehabilitation exercises
After a dislocation and injury to the shoulder joint, as well as after surgery performed on it, exercises are needed to treat, rehabilitate and restore its mobility and strengthen the muscles. First, the most simple and easy movements should be performed that do not require tension within the boundaries of preserved mobility.
Exercise helps the muscles, over time, begin to have an adequate response to tissue resistance and overcome it. They are performed in three positions: lying on your back, sitting on a chair and standing.
The following exercises are performed while lying down:
- Clench your hand into a fist and unclench your fingers after half a minute. Finish each exercise by shaking your fingers.
- Bend the bows at the elbow and perform circular movements with your hands.
- Straighten your arms along your body, move your hands up and down.
- The arms need to be bent at the joint, with your fingers reach and touch the shoulder joint. Repeat 5-10 times.
- Bend your elbows and move them to the sides, then press them back to your body.
- Reach your shoulders with your fingers, then move your elbows to the sides.
- Stretch your arms along your body, move them to the sides and return to the starting position.
- Raise your arms straight up one at a time.
- Press your palms firmly onto the floor several times.
Pilates technique
Pilates is a complex gymnastics exercise, although it seems simple at first glance. The movements are performed smoothly and slowly so that every muscle can be felt. You cannot hold your breath while doing Pilates. It is necessary to constantly monitor the correct execution of the exercises: the navel should approach the back, and the spine should be extended as much as possible. The amplitude of the movements depends on the physical fitness of the person. Each exercise below should be performed continuously 5 times. If at the beginning of mastering Pilates the body does not obey well, then you should seek the help of an instructor. When performing Pilates gymnastics, they use the full breathing technique, that is, the diaphragm is involved in the work. This breathing is performed as follows:
- Place your hands on your lower ribs and connect your middle fingers.
- Inhale through the nose, directing the air flow down and into the back wall of the chest. At the same time, open the lower ribs as much as possible. Exhale through your mouth, tensing your abdominal muscles and drawing in your stomach.
SUVs with portal axles
Just a few years ago, to install large mud wheels (from 39 inches and above) on an SUV, to obtain a serious ground clearance of 40 centimeters under the axle nut, SUV builders almost universally used C303 portal axles from Volvo Laplander, which, although they were produced in about 80 years -m, but in our country they cost several hundred thousand rubles and required serious modifications, and then also scarce spare parts...
Portal axles Volvo C303 laplander
Land Cruiser and Nissan Patrol on Volvo c303 axles
Volvo portal axles and 39th INTERCO Irok on Patriot
Now on the Russian market there are a huge number of proposals for the manufacture of portal bridges for various SUVs and operating requirements.
Portal axles (geared) are bridges that have not only a central gearbox, but also side (wheel) gearboxes that raise the axis of the bridge beam above the axis of the wheel hub, providing increased clearance under the bridge and, in addition, portal axles provide a more serious reduction in torque . All this allows you to install very large wheels without stressing the transmission.
From the factory in Russia we have only military bridges and their wider variety - Bars bridges. But they have a very small portal - only 6 cm.
Portal bridges UAZ Bars
Below are photos of SUVs on portal bridges...
Photos of portal bridges:
Portal axles from voin4x4 with BTR gearbox
Portal-Axles
Wheel reducers
Final drive
The through gearbox for the third axle is used to transmit torque from one to two cardan shafts.
Portal bridge with gearbox connecting the third bridge
Axle with final drive and spring suspension
SUVs on portal axles:
Land Cruiser 105 on portal axles from Voin4x4
Toyota Tacoma on portal axles
Toyota Tacoma on portal axles rear view
Kruzak on portals
Land cruiser on portal bridges
Patrol on portal bridges with huge wheels
Nissan Patrol on portals
Niva for offroad on portals
Chevy Niva with wheel gears
Tuning Nissan Patrol on portal axles
UAZ Bukhanka on portal bridges
Loaf on portals with large wheels
UAZ Pickup, on portal axles PM-150, Avtoross wheels 35-36 inches
UAZ Hunter with portal axles
Prototype for competitions on portal bridges
Red Stoun quad car, on PM-100 portal axles, 46-inch wheels
All-terrain vehicle on portal bridges
Video of SUVs on portal bridges:
Portal axles and 42 wheels work wonders
A Nissan Patrol on portal axles with 42-inch tractor tires rolls along a wetland next to a beaver dam. The video shows that even without blocking Patrol on the portals it is impossible to plant. Cutting deep ruts, he still gets out of the mud.
Here is another video where the same patrol on portal bridges cuts a deep rut with its 42-inch tractor wheels and still gets out.
Portal bridges BMK
Video about measuring ground clearance on standard and portal axles
TLK 105 on portal bridges Barnaul
Video about the same Land Cruiser on portal bridges (photo above)
Nissan Patrol Y 60 wheel reducers VOiN4x4 RU on standard axles
In the video, the 60th Nissan Patrol storms hills and ravines on portal bridges.
Pilates gymnastics
There are the following Pilates gymnastics exercises, which should begin with exercises on the back, then on the stomach, and end with positions on the side.
Twisting up and down
Stand with your feet hip-width apart and bend your legs slightly. Shoulders should be straightened and lowered. The stomach should be tense. The top of your head needs to reach up. Breathe calmly while doing this. Imagine that your head is heavy and is being pulled down, stretch the top of your head towards the floor. After this, begin to gradually, vertebra by vertebra, bend the spine. When you reach the bottom point, straighten your back at the speed at which it was rounded, and thereby return to the starting position.
"Swimming"
Lie on your stomach. Stretch your arms forward and stretch your legs back. Your feet should be hip-width apart and your palms shoulder-width apart. Direct your gaze to the floor. The neck should continue with the spine. Straighten your right leg and left arm and at the same time raise them 20-30 centimeters above the floor, without ceasing to stretch. As you lower them down, you must at the same time begin to raise your left leg and right arm.
Kick
Lie on your stomach. Bend your elbows and rest your hands on the floor. Elbows should be under the shoulders, feet hip-width apart. Pull your socks away. Lower your shoulders, bring your shoulder blades closer to your spine. The buttocks and stomach should be tense. During the exercise, you need to hold the pose and control the position of the lumbar region. Bend your leg at the knee and make three springing movements, bringing your lower leg closer to your buttocks, and at the same time do not forget to stretch your toes up and strain the muscles of your lower leg.
"A hundred"
Lie on your back. Bend your legs at a right angle, your hips should be perpendicular to the floor. Bring your knees together. Stretch your socks away. Press your back and buttocks to the floor and raise your upper torso and head; only the lower part of your shoulder blades should touch the floor. Lower your shoulders, extend your arms along your body at a height of 10-15 centimeters parallel to the floor. Point your fingers away from you, try to stretch the entire part, starting from the shoulders and ending with the tips of the nails. The body must be motionless; for this, the stomach must be tense. Without bending your wrists and elbows and without relaxing your muscles, you need to make one hundred claps on the floor with your palms, barely touching the surface. If possible, this exercise can be complicated: raise your straight legs up and turn your toes outward.
Leg pull
Lie on your back. Bend your legs, should be hip-width apart. Pull your left knee to your chest and raise your shoulders and head and clasp it with your hands. Lower your shoulders. The head should not be thrown back and pressed to the chest. The top of the head should stretch upward, a straight line should form between the neck and the head and upper back. Having straightened your right leg, stretch your toe away from you, and the closer your leg is to the floor, the more difficult it will be to perform the exercise. Maintaining maximum extension and without lifting your buttocks, slowly extend your left leg and bend your right leg towards your chest, clasping it with your hand. The stomach should be constantly tense. Without relaxing your muscles and without stopping, perform the exercise four more times.
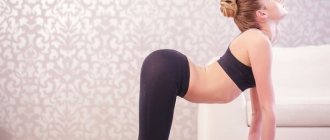
Shoulder bridge
Lie on your back with your knees bent. Place your feet hip-width apart. The spine should be elongated. Stretch the crown in one direction, the tailbone in the other. Slowly, twisting the pelvis, lift vertebra by vertebra, lift tense buttocks and lower back. The weight should not be transferred to the neck. And vertebra by vertebra return to its original position, starting from the thoracic region and ending with the pelvis.
Puzzle by the wall
Lie down against the wall on your back. Place your feet hip-width apart on the wall so that there is an angle of 45 degrees between your legs and the floor. Place your hands on the floor along your body. Bring your shoulder blades together, stretch your back, try to bring your stomach closer to your spine. Slowly raise your torso, starting from the neck, vertebra by vertebra. Stretch your chin toward your chest, then lift your shoulder blades, and so on, until only your tailbone touches the floor. Stretch your hands towards your feet. The body should resemble the letter V. Twist the pelvis, the abdominal muscles should be tense. Return also gradually to the starting position. After your head touches the floor, raise your arms above your head and stretch them up as far as possible.
"Scissors"
Lie on your back and bend your legs so that your thighs and shins form a 45-degree angle. Stretch the spine. Place your arms along your body, pressing your shoulders to the floor. Maintaining a bent knee angle, raise your right leg until your thigh is perpendicular to your torso. Stretch your toes away from you. Press your lower back to the floor. Pull the navel towards the spine. Smoothly raise your left leg and at the same time lower your right leg so that they move simultaneously. The feet should only touch the floor with their toes.
Lateral lift
Lie on your left side, extend your arm and rest your head on it. Place your other hand in front of you as a balance. Connect your legs. Stretch your toes away from you, while stretching your spine and trying to lift your side off the floor. The stomach should be constantly pulled in. Without relaxing the muscles of your legs and torso, slowly lift your leg, simultaneously extending it above the floor. Then lower it. The exercise must be performed five times, then turn on the other side and repeat with the left leg.
"Mermaid"
Lean on your straightened left arm and stretch both legs as far as possible. The muscles of the back and abdomen should be tense so that the hips do not sag, and the body weight is equally distributed between the arms and legs. Raise your straight right arm up across the side and stretch to the left, at the same time stretching the entire right side of the body and pushing the pelvis up. Perform the exercise four more times, the body should not be twisted. Then you need to turn over and stretch the left side of the body.
Easy version of "Mermaid"
Sit on your knees. Move your buttocks to the left. Place your right hand on the ankle of your right leg and rest your left hand on the floor. Stretch your head up, lower your shoulders. Raise your left hand up, with your palm facing your head, and lean to the right, simultaneously shifting your lower ribs to the left. You should try to stretch your left and right sides as much as possible. Turn your head towards your raised hand and look up. Move your buttocks from your bent legs to the right and perform the exercise in the other direction.
"Saw"
Sit down. Spread your legs to the sides. The back should be straight, the stomach should be pulled in, and the buttocks should be pressed to the floor. Raise your hands to shoulder level, stretch your fingers away from you. Turn your body to the left without rounding your back. Reach towards the little toe of your left foot with the little finger of your right hand. Try to pull your head and chest towards your left thigh. Straighten your back, turn your body and return to the starting position. Leave the lower part of the body motionless. Perform the exercise in the other direction.
People who regularly perform Pilates exercises
, notice an improvement in posture, and the absence of previously disturbing back pain caused by curvature. Reduced due to strong muscles and volumes. Stretching the spine allows the layer of fat to be distributed more evenly. Another advantage is that you can get rid of a bulging belly that could not be removed with other exercises.