Benefits of exercise and contraindications
This exercise is suitable for both beginners and experienced athletes. It can be performed with equal effectiveness both in the gym and at home. The benefits of the classes will be as follows:
- developed and strong calf muscles;
- toned appearance of calves;
- increased volume of the lower leg muscles;
- visual raising of the middle of the lower leg, which makes the ankle more defined;
- beautiful proportion of legs: slender bottom, reduced clearance between the legs;
- prevention of Achilles tendon injuries.
To speed up the process of forming beautiful calf muscles, calf raises can be alternated with jumping rope.
There are also contraindications - you should proceed with training with caution if:
- varicose veins - in this case you need to obtain permission and detailed consultation with a specialist;
- injuries to the Achilles tendon or ankle joint - stretching before the main element and performing it without weights is important here.
What is the effectiveness of the exercise?
The exercise is a type of isolation exercise, as it involves a specific muscle group - the calf muscles.
When performing, the following muscle groups are actively involved:
- caviar;
- soleus;
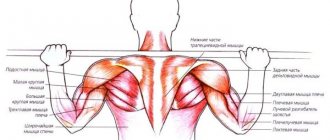
- trapezoidal;
- gluteus minimus and medius.
The benefits of the exercise are:
- development of strength endurance of the legs;
- increased muscle mass in the calf and lower leg;
- increased muscle tone;
- improving the aesthetic appearance of caviar;
- losing weight, burning fat, eliminating the “bloat” effect;
- development of coordination and sense of balance;
- preventing the risk of tendon damage.
Calf raises perfectly develop the ability to jump, which with regular training increases to 30 cm. The advantage of calf raises is considered to be the absence of impact on the knee joint when performing and lifting large weights. The exercise easily allows you to regulate the load on the muscles by using weights in the form of a barbell or dumbbells.
Common mistakes
It would seem that what could be done wrong in such a simple exercise, however, there are mistakes here too. First of all, this is the wrong position of the socks. They look outward, like those of ballet dancers, or are tucked inward, like those of a clubfooted bear, but should be exclusively forward.
In addition, when raising on their toes, many people move their heels closer to each other - this makes it easier to perform. There is no need to do this either. The key to growth is clean technology!
Another typical mistake is when the legs “flop” on the floor under the influence of the barbell pressing on them. You must lower them under control, resisting the weight. Remember: it is in the negative phase of the movement, when lowering the weight, that the most muscle fibers are damaged. But in order for them to hypertrophy, they need to tear and recover - a wise body makes them stronger so that they can withstand the load next time.
If you “plop” your heels on the floor with relief, consider that the exercise was done in vain. The soleus muscle is small, you spent very little energy, and you did not achieve muscle growth.
Standing calf raises
Working muscles
The muscles of the legs represent a fairly large number of muscle groups that are small in size. Most of them take an active part in the same movements, so standing calf raises include as many as 6 groups in the work:
- Calf – located in the middle of the upper part, behind the ankle.
- Soleus - located under the gastrocnemius.
- Plantar – located behind the knee.
- Long fibula - located on the back of the lower leg, closer to the outer part.
- Tibialis posterior - located on the back of the lower leg, in the middle, under the gastrocnemius and soleus muscles.
- Flexor pollicis longus - on the bottom and side of the back of the leg.
Despite the considerable number of muscle groups, they all perform the same function - flexion of the ankle joint. Performing this exercise is necessary not only to give a beautiful shape to the calves, but also to strengthen the ankle, which is a very fragile joint - this will reduce the risk of injury.
When, who and why should you do calf raises?
Due to the importance and effectiveness of the exercise, it should be constantly included in the training complex for athletes of all levels. For the calf muscles, raises are essentially a basic exercise.
By the way, except for bodybuilders, it is performed by all, without exception, professional athletes whose sport, one way or another, loads the ankle joint. Among them are football players, basketball players, tennis players, volleyball players, track and field athletes, and so on.
When?
In fact, calf raises can be done all year round. Calves are not the back or the abs, and they, in principle, do not require gaining muscle mass and further “drying”. Doing the exercise regularly is all that is needed.
Usually the lifts are placed at the end of the training complex. As an option, they can be done as a superset, in between sets of other leg exercises.
To whom?
Relevant for athletes of all levels of training. The only caveat is that for beginners who have recently started training, it is better to concentrate and spend all their energy on completing the “base”. However, if there is a reserve of energy left, and everything that is needed has already been done, then you can also perform calf raises.
Why do lifts?
Firstly - to get beautiful and convex calves, and secondly (and no less important) - to strengthen the ankle joint, which receives significant load during many exercises, and even just when walking
Execution technique
The most effective and easiest way to do lifts is in a simulator specially designed for this, which is now available in any gym.
- We place the edges of the feet (the front third) on the platform of the simulator. In this case, the distance between them is approximately the width of the shoulders, and the socks either stand parallel to each other or “look” slightly apart. We rest our shoulders against special cushions and straighten up completely. This is the original one.
- We begin the movement by lowering our heels down as far as possible.
- Inhaling and holding your breath, we quickly straighten the ankle joint, rising as high as possible above the level of the platform. At the top point, we hold for a short time, tensing the calf muscles as much as possible.
- Exhale and gently lower your heels down again.
- Repeat as many times as necessary.
Important nuances and aspects
- Working weight. It is most effective to use an average weight - too small will not load the muscles enough, and maximum will not allow you to do a large number of repetitions, which is one of the main criteria in this exercise.
- Number of repetitions. Working out these muscle groups requires a large number of repetitions. Optimally – 10-20 times in 3-5 approaches.
- Body and legs. Make sure your heels, pelvis and shoulders are in the same vertical line. The spine should be completely straight and the head motionless. The action is performed only at the ankle joint.
- Amplitude. The wider the range of motion, the more load the calves receive. So try to go as high as possible and go as low as possible.
- Breath. The hold is necessary to help keep the spine straight during the movement.
- Execution speed. The descent should be smooth, especially when working with heavy weights, to avoid possible stretching or even tearing of the tendons. You can rise sharply and powerfully, straining your calves as much as possible.
- Delay at the bottom. In principle, it is not needed, but it can be used if you want to stretch your muscles and tendons. It should not be performed while working with maximum weight.
- Delay at the top. Allows you to create maximum tension on the muscles.
From the article “How to pump up your legs,” you can learn more about pumping up your legs.
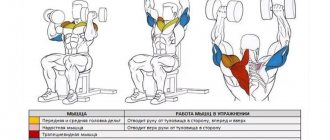
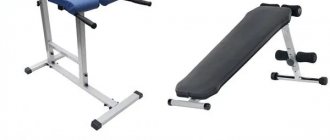
Seated calf raises
When our leg is bent at the knee joint, it is not the calf muscle that is trained, but the soleus muscle, which runs under the calf. Although this exercise does not train the largest mass, the calf, if you train the soleus muscle well, it will push the calf muscle upward and the lower leg will look more massive. An analogy can be given as the brachialis also pushes the biceps up.
The technique is the same as standing, only we are in a sitting position. Also, if you don’t have a special trainer, don’t worry. Place the platform under your feet, place the barbell on your quadriceps and perform lifts.
Calf Training Recommendations
1. From the articles that I wrote earlier about training white and red muscle fibers, you can learn that muscles do not have a counter, and they cannot count the number of repetitions; the time spent under load is important to them. Since when training calves each repetition is done very quickly, logically speaking they need to be trained in a multi-repetition mode
At least 10 repetitions. It is very important to achieve a strong burning sensation in the muscles.
2. Since the lower leg is a very durable muscle group, it needs to be trained with heavy weights.
3.If your shin is lagging behind in development, you can train it 2 times a week, because she recovers quickly. She is used to the daily stress of walking, so she is very resilient and recovers quickly.
4.Vary the load. In one workout, do 10 reps with a heavy weight, and in another, do 20 reps with less weight.
5.Stretch your calf between sets.
6.Train your calves only at the end of your workout, otherwise you won't be able to perform basic leg exercises with decent weight.
My Favorite Calf Training Methods
1.If you train with dumbbells, then pump each leg separately. Do the intended number of repetitions with the dumbbell, achieve a strong burning sensation, put the dumbbell down and immediately without weight, perform the maximum number of repetitions.
2. If you are training both legs at the same time, then perform the intended number of repetitions, also until the burning sensation is strong, then quickly walk away from the machine, standing on your toes as quickly as possible (like a ballerina) and walk around the gym on your toes for as long as you can tolerate the burning sensation.
I personally tried both of these methods on myself and I can say that they work great. In general, how can you tell if your lower leg is lagging behind or not? Measure your arms; ideally, the circumference of your shin should correspond to the circumference of your arm.
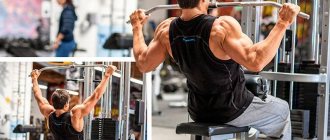
Standing calf raises
Standing raises are a more basic calf development movement than seated raises because... simultaneously with the calf muscle, the soleus muscle is also trained, and thanks to this, we can lift weights several times heavier in a standing position than in a sitting position.
There are different machines for training calves; of course, it is more convenient to train in them because... You don't have to worry about balance, but if you don't have special equipment, you can train with dumbbells or a barbell.
Execution technique
1.If there is no special simulator, you need to create similar conditions yourself
When training calves, it is very important to maintain a full range of motion. Calves love to be fully stretched and contracted as much as possible with a peak hold of half a second at the top position.
In order for us to stretch our muscles, it is important to stand on a hill, so place a block or step platform under your feet.
If you perform with a dumbbell, then find support for your free hand so that you do not sway. You can train your lower legs in a Smith machine by simply placing a platform under your feet.
2.Do not perform the exercise completely on straight legs, because Due to the heavy weight there will be stress on the knees. Keep your legs slightly bent at all times.
3.Different positions of the feet can shift the emphasis to the inner or outer part of the lower leg. See which area you are lagging behind, and train that one.
About the intricacies of the exercise
Technical features of raising your toes, despite the simplicity of the exercise, must be observed:
- in order to feel the load better, and also to prevent the knees from “drowning” in the bolsters, it is recommended to place flat pancakes under them;
- the angle at which the knee joint is bent must be straight;
- full range of motion must be used;
- raise socks as high as possible;
- You need to lower your heels slowly until you feel that your shins are fully stretched;
- squeezing your calves at the top, hold them in this position for a couple of seconds;
- Stretch the gastrocnemius and soleus muscles between approaches in a sitting position;
- adjust the rollers of the simulator in height so that, with your knees bent, your legs move in with little effort;
- The rollers should be located strictly under the knees. If the pillow is shifted towards the thigh, the amplitude is reduced;
- the body should not lean back;
- do not perform calf raises while sitting, using inertia and at high speed;
- weight should be moderate;
- number of recommended repetitions 6-10 times;
- The burning sensation after each of them will help determine whether the lifts are performed correctly;
- if you have to do heavy leg training, do not load your shins the day before;
- since the shins are endurance muscles, you can load them 2-3 times weekly;
- It is recommended to load the muscles at the end of classes, and not alone, but with other large muscles of the legs;
- in lower leg training, the soleus muscle is first worked on, and then the gastrocnemius;
- After loading your lower leg, you should not do cardio or run on a treadmill. This will “worn out” the muscles. It is more correct to use aerobic movements as a warm-up or to allocate a separate day for them.
Execution technique
There are two varieties of this exercise. In one case, the technique is performed in a simulator, and in the other, with a barbell. Of course, in each case the execution technique is different.
However, having mastered one of these varieties, the other will then be much easier to perform.
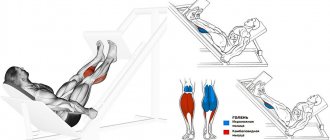
In the simulator
Here the exercise is done like this:
- They sit on the simulator and take a competent starting position.
- They get up and take a short break.
- Slowly lower and then repeat the exercise.
In the machine, take the following position: Sit down so that the feet are on the front inclined surfaces, and the knees rest against the surfaces specially designed for this. The latter have two vertical handles on top, which are grasped with your hands.
It is better to work at full amplitude. At the top it’s better to pause for one second
It is important to do more repetitions, because this will significantly increase the effectiveness of gymnastics. You shouldn’t strive for a lot of weight, the main thing is the number of repetitions
This is due to the fact that the calf muscle is relatively durable.
It is important to note that this version of this gymnastics is much more convenient than the version with a barbell. And this will be noticeable even to those who have long been accustomed to the second method, but have not worked out on the simulator at all.
Therefore, if it is important that doing gymnastics is extremely comfortable, you should use this method.
The simulator is universal and is perfect for both beginners and experienced trainees. That is why, perhaps, this option is superior in all respects to the option with a barbell.
Perhaps the only drawback of the simulator is that not everyone has access to it, unlike a barbell. But here the latter doesn’t look so advantageous compared to calf raises with dumbbells, which you can easily do at home.
With a barbell
It’s possible to do gymnastics without a machine. A regular barbell will do. It is advisable to have several small disks of different sizes, as well as one larger disk for a stand under socks.
In this case, do this:
- Take the starting position, placing the barbell on your hips.
- They rise on their toes, resting against the disc from the barbell.
- Slowly, without losing control, they lower themselves.
Sit on a bench raised so that your legs are bent at a ninety-degree angle. Socks are placed on the disc from the barbell. A disc height of five to seven centimeters is enough. The sports equipment is placed on the hips. It is advisable for it to lie closer to the knees. So the load will be greater.
Then they rise on their toes to the maximum level, and smoothly lower. This is done several dozen times. Of course, the load must be correctly calculated. Don't train with a barbell that is too heavy. Otherwise, you won’t be able to do a sufficient number of repetitions, and the technique will be much more traumatic.
If a beginner decides to use this method, it will probably be more difficult for him than with a simulator. Therefore, when sitting up on your toes, it is better for beginners to choose the first method.
Unlike the option with a barbell, you will not need to control the position of the bar of this sports equipment. This means that you will be able to concentrate more attention on other aspects of the exercise.
Which options are more effective?
Beginners often wonder which lifts are most effective. The exercise can be performed standing or sitting; the donkey version is popular. Both options are designed to work the calf muscles, but the execution technique determines which muscles receive the greatest load.
In a sitting position with legs bent at 90 C0, the soleus muscle is actively involved. It is located under the calf muscle and, with the proper degree of development, causes it to be pushed outward. The soleus muscles predominate in the lower leg, so by working them, you can significantly increase the size of this part of the legs. Standing calf raises allow you to work out your calf muscles well. It is she who visually stands out on the leg more strongly.
Due to this feature, it is recommended to include both exercise options in the training program. In terms of biomechanics, performing calf raises while sitting and standing are almost identical. It is worth considering that the calf muscles are stressed every day, so often the use of sufficient weights is required to obtain the effect of training.
Technique of how to do the exercise correctly
- For safety reasons, this exercise is best performed in a power rack. First, install the bar on the rack, having previously selected the required height and working weight. After this, stand under the barbell and place it on your shoulders (just below your neck).
- Hold the barbell with both hands on both sides and gently lift it from the rack, helping with the springing movement of your legs and at the same time straightening your back.
- Step away from the counter, place your feet shoulder-width apart and point your toes slightly outward. Always look ahead and keep your back straight, because if you lower your head, you risk losing your balance. Your knees should always be slightly bent, never extend them completely. This is the starting position. Tip: to increase the range of motion, you can place a board or disc under the balls of your feet. Be careful, however, as this variation requires the use of a stable object, as well as significantly greater coordination and balance.
- As you exhale, lift yourself up on your toes as much as possible, lifting your heels off the floor. Make sure that your knee joints remain motionless at this moment. Hold this point for a second, then slowly begin to lower.
- As you exhale, return to the starting position.
- Repeat as many times as necessary.
Caution: If you have lower back problems, you may want to perform bench calf presses (on a leg press machine) because barbell calf raises place significant stress on your lower back. Also, always ensure that your back is level and motionless.
because a rounded lower back can lead to injury.
Execution options:
There are several other ways to do standing calf raises.
- You can perform this exercise in a special simulator.
- In addition, calf raises can be performed on one leg alternately and with dumbbells in your hands. This exercise can also be performed in a Smith machine.
- To make the exercise more difficult, you can place something under the balls of your feet. Remember that this modification requires more coordination to maintain balance.
Training program for increasing muscle mass in the biceps of the arm.
Exercise "donkey"
Lifting weights in a vertical plane creates a high axial load on the spine and is fraught with injury. The “donkey” variation is designed to reduce negative factors without loss of effectiveness. To perform the exercise you will need: a barbell plate (another similar elevation), a high bench (frame, table), an assistant.
The exercise is performed from the following starting position:
- the toes and balls of the feet are located on an elevation;
- heels on the floor;
- feet shoulder width apart;
- body parallel to the floor;
- hands rest on the bench;
After the athlete takes the correct starting position, an assistant sits on top of him. Its function is to provide additional burden.
The exercise is then performed using the following technique:
- as you exhale, rise onto your toes, distributing the body weight evenly across the support points;
- while inhaling, lower to the starting position, stretching the muscles of the lower leg.
Recommendations
It is better to develop motor skills in an exercise without weights.
The assistant should not sit on the lower back. The correct location would be the pelvic area.
The exercise is only suitable for trained athletes with high strength levels. For beginners, it is better to focus on simpler variations or perform lifts in a special machine.
What muscles work
This technique perfectly strengthens the muscles of the legs. However, many other methods are also suitable for these purposes.
Therefore, it is important to understand what exactly such lifts are aimed at, and then it will become clear whether it is worth including them in your training.
Here are the muscles that work during such gymnastics:
- biceps surae muscle;
- soleus muscle;
- calf muscle;
- to a lesser extent - other leg muscles.
The lower leg is a fairly resilient muscle.
Therefore, it is important to do at least twenty repetitions. If it works out, sometimes it’s worth doing thirty
If you do less, the result will be so insignificant that there will hardly be any point in doing such exercises.
For other leg muscles, fewer repetitions might be sufficient. However, the point of such gymnastics is, first of all, to strengthen the lower leg.
That is why it is so important to provide it with sufficient load. But by load we mean first of all the number of repetitions, and only then the weight.
With such priorities, it will be possible to achieve the desired result.
Calf raises - how to do it correctly Effective technique for performing the exercise photo instructions
Surprisingly, the simplest movements, such as walking on toes, which entertained us in childhood, for example, are basic exercises in bodybuilding, and can miraculously transform a person’s figure.
Review Contents:
Muscle work
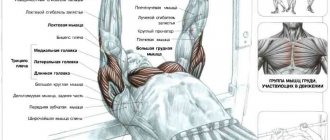
In fitness complexes, various variations of calf raises are used to strengthen and increase the volume of the calves and correct the silhouette of the lower leg; this exercise mainly trains the gastrocnemius and the soleus muscles that frame it.
The initial position of the feet from which the lift is performed can correct the impact on the muscles: if the toes are spread out to the sides, the load falls on the outer side of the muscles, if the toes are brought inward and are closer to each other than the heels, the inner side of the calf muscle is trained.
To ensure an even load in the starting position, the feet should be placed parallel. To train the soleus muscles of the lower leg, calf raises are performed from a sitting position.
To increase efficiency, the calf raise exercise is performed with dumbbells. It can also be complicated by increasing the range of motion of the foot when lifting using low steps and elevations.
Contraindications for calf raises
Raising on your toes with a transition to your heels and alternating walking in these two positions is one of the traditional exercises for strengthening the muscles of the foot, for the prevention of varicose veins, arthritis and other pathologies of the ankle joint.
But such exercises must be used with great caution in the strength training regime with many repetitions and weights. This exercise may aggravate Achilles tendon and ankle injuries.
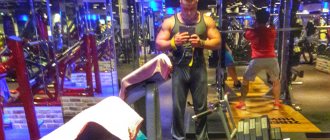
With caution and only after consultation with specialists, you can practice this movement in the presence of even weak signs of varicose veins. Methods for performing calf raises in the simulator are shown in the photo.
The degree of difficulty of this exercise can vary as the area of contact of the sole of the foot changes during the lift. So, to maintain the highest possible lift with a narrow area of contact between the toe and the support, special training is needed.
Lifting technique
To practice calf raise techniques, exercise equipment, barbells, and dumbbells are used.
Various exercise machines allow you to fix the body, removing the weight from the legs and increasing the effectiveness of muscle stretching. Special pedestals are also used to increase the range of motion.
At home, you can do lifts with the toes supported by a block, discs from a barbell, or adapt any other small stable elevation for this.
When performing calf raises using a pedestal, you need to comfortably fix your hands. The legs can be slightly bent at the knees, the back is straight and slightly tilted forward.
With dumbbells
When making the exercise heavier, lifting onto your toes from a standing position, dumbbells should be held in your arms down along your body.
You can vary the exercise by performing it for each leg separately, while you can take heavy weights, leaning your free hand on the back of a chair or wall. You can simply perform the exercise on one leg, placing the entire weight of your body on it.
Weightening calf raises in a seated position is done by placing dumbbells, a container of water or sand, or a barbell disc on the knees.
With a barbell
The barbell exercise is one of the most difficult and only experienced athletes can do it. Not only the lower leg works here, but also the muscles of the entire body.
The feet are positioned shoulder-width apart, the athlete grabs the bar and lifts the barbell by weight, beginning a movement called a “dead snatch.” Then you need to slowly rise on your toes and fix this position.
Weighting and smooth, measured exercises with fixation on the rise for several seconds helps to increase muscle volume. To increase strength and tone, faster and longer repetitions are needed.
Lifts performed for training purposes are done in 3-4 approaches, 20 or 10 multiple sets. They are usually part of strength training and are performed after warming up.
Advice when performing calf raises at home: If the goal is to increase the volume of your calves, you need to perform calf raises in equal proportions from a sitting and standing position.
Description of the exercise
Barbell calf raises are a basic exercise considered the most effective in bodybuilding for building mass and strength in the calves. The exercise loads the so-called triceps surae, the triceps muscle of the leg, which includes the gastrocnemius and soleus muscles.
Initial position.
We stand with our toes on a platform measuring 10x10 or 5x10 cm. You need to stand in such a way as to provide your heels with the maximum possible range of motion. The distance between the feet is 20 - 25 cm. Toes are pointed straight forward. We place the barbell on our shoulders, the body is fully straightened, the gaze is directed straight ahead. We lower our heels until we feel a stretch in the Achilles tendons, trying to go as low as possible.
Trajectory of movement
We start the exercise from the bottom position. Tighten your calves and, keeping them in constant tension, rise on your toes as high as you can. Try not to bend your knees when lifting, as this will transfer the load from the calf muscles to the soleus muscles. Having reached the top point, do not immediately lower yourself, stay in this position for a couple of seconds. Next, lowering your heels down, we return to the starting position. Throughout the entire execution, try to move slowly, without jerking.
Note
To get the best results, when performing the exercise, try to maximize the range of motion to fully contract your calves. The main rule is to rise as high as possible and fall as low as possible. If during a set, passing the bottom point of the trajectory, you linger there, relaxing your calves, the load will shift to the ankle joint. The method is quite suitable for training the Achilles tendon and preventing injuries. It may be difficult to maintain your balance, but if you rise onto your toes slowly, you should be able to achieve this.
In order to pump up muscles from different angles, you can change the position of your feet from approach to approach. In the first approach, the toes point straight ahead. For the second set, turn your toes outward at a 45-degree angle. In the third approach, turn them inward at the same angle. Each foot position loads the calf muscles slightly differently. With toes directed outward, the medial head of the gastrocnemius muscle (the outer part of the muscle) is worked in more isolation, while with socks directed inward, its lateral head (the inner part of the muscle) is worked in more isolation.