Medicine ball functionality
A medicine ball is a simple and at the same time unique sports device. It is made of durable material, does not bounce off the surface, and is compact. There are medicine balls of different weights and designs on sale - both for beginners and amateurs, as well as for professional athletes. The round shape of the projectile and its weight allow you to work out and strengthen all muscle groups, ensure full functioning of the joints and have a gentle effect on the ligamentous apparatus. Medical medicine ball is suitable for young, adults, old people. The functionality of a medicine ball makes it possible to realize a variety of purposes. Medicine balls are widely used in physical therapy, rehabilitation, and, of course, strength training.
Physical education activity with a ball for children of senior preschool age
Marina Dolmatova
Physical education activity with a ball for children of senior preschool age
Physical education classes using objects improve children's , develop dexterity, coordination of movements, eye control, enrich classes , making them interesting for children .
Program tasks
:
Educational:
- exercise children in walking and running with clear fixation of turns (guideline - cubes or skittles)
;
- strengthen running skills at a moderate pace;
-strengthen skills in handling a small ball ;
- consolidate the ability to perform ORU with the ball confidently , accurately, with good amplitude and at a given pace;
-improve motor skills and coordination of movements in space when changing into three columns.
Developmental (health)
:
- develop dexterity in exercises with the ball ;
-develop coordination of movements in a balance task on a gymnastic bench;
-develop physical qualities - agility, speed, endurance, strength, flexibility, eye.
Educational:
-instill a sense of responsibility;
- cultivate a strong interest in physical education and sports ;
- create the need to take care of your health;
- to cultivate honesty, organization, and a friendly attitude towards peers.
- cultivate interest in the activity .
Integration of educational areas: health, safety, communication, socialization.
Equipment: small balls (according to the number of children )
; gymnastic bench, four pins for reference.
Method of organization: Inline (must be divided into subgroups if the number of children exceeds twenty people).
Children's clothing : shorts, T-shirts, socks.
Introductory part:
Children enter the gym and line up in one line. The instructor welcomes the children . Be equal! Attention! Checks your posture.
Instructor: Today we have a difficult lesson , balls will help us do all the exercises, and we will find out how you are with them, whether the balls are obedient to you. (Children walk in a column near a basket of balls and take the one they like)
.
Warm-up with balls in the “Colored Beads”
- walking in a column one at a time with clear recording of turns:
- ball up, walking on toes;
- ball forward with outstretched arms, walking on heels;
- the ball is in outstretched arms, reach the ball with your knee;
Jumping with the ball . Side gallop: right side; left side. Run at a moderate pace. Reorganization in three columns.
Walking and restoring breathing: ball up - inhale, ball down - exhale. Reorganization in three columns.
Main part
1. Outdoor switchgear complex in place with balls. (with musical accompaniment)
.
1. I. p. - basic stance, ball in the right hand below. 1- raise your arms up through your sides, transfer the ball over your head to your left hand; 2- I. p. - ball in the left hand; 3-4 – also with the left hand (5-6 times)
.
2. I. p. - stand with your feet shoulder-width apart, the ball in your right hand. 1- hands with the ball forward ; 2- move your right hand with the ball to the side ; 3- right hand forward, transfer the ball to the left hand; 4- I. p. The same with the left hand. (4-5 times)
.
3. I. p. - stand with legs slightly apart, ball in right hand. 1-2 - sit down, arms forward, transfer the ball to the left hand; 3-4 - return to I. p. (5-6 times)
.
4. I. p. - kneeling, ball in right hand. 1-8 roll the ball to the right (left)
around the body.
Turning and moving the ball with your hands (3-4 times in each direction)
.
5. I. p. - lying on your back, the ball in both hands behind your head. 1-2 - raise your right straight leg, touch the toe of your foot with the ball . 3-4 - lower your leg. Same with the left foot. (6 times)
.
6. I. p. - basic stance, ball in right hand. Jumping on 2 legs in place (20 jumps)
. Repeat 3 times. There are short pauses between series of jumps.
Main types of movement:
Dividing children into two subgroups
1st subgroup:
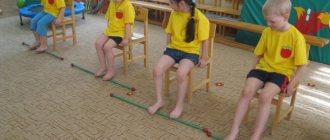
1. Tossing the ball with one hand and catching it with both hands while standing in a column (10-12 times in a row)
.
Repeat 2-3 times (under the guidance of an instructor)
.
2nd subgroup:
2. Crawling on a gymnastic bench on your stomach, pulling yourself up with both hands, gripping your hands from the sides (2-3 times)
.
(Under the guidance of the teacher.)
Subgroups change places and complete tasks.
3. Walking on a gymnastic bench. Performed in a continuous manner.
When walking, raise your straight leg - clap your hands under the knee, lowering your leg - spread your arms to the sides. (The teacher and instructor control the children’s , monitor posture, balance and correct completion of the task).
Outdoor game "Fishing Rod"
.
Children stand in a circle. In the center of the circle, the instructor holds in his hands a rope (a jump rope, at the end of which a bag of sand is tied. The instructor rotates the bag in a circle just above the floor, and the children jump, trying to prevent the bag from touching their feet. First, the teacher shows the children how to jump: energetically push off from the floor and tuck your legs under you.The instructor rotates the bag in both directions alternately.
At the end of the game, children from the circle line up in a column one at a time.
Part 3. Walking in a column, one at a time, around the hall. Formation in one line.
Instructor:
- That's it, our lesson is over . What did we do in class ? ( Children's )
.
- Thanks for the lesson . Goodbye. (Children leave the hall in a column one at a time)
.
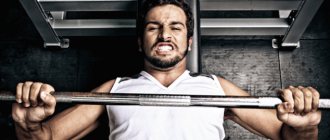
Medicine ball training
This set of exercises with a medicine ball is equally functional in the fitness center and at home. A medicine ball routine should always begin with a warm-up to prepare the muscles and ligaments for the training process. Each exercise is designed for 10-20 repetitions. To improve your mood and emotional tone, you can turn on your favorite music. So, let's get started with the exercises:
- Bend your legs under you and sit on your heels. Hold the medicine ball behind your back with both hands. Squeeze your shoulder blades together at a smooth pace, raising your arms high. Keep your back straight, do not lean forward.
- Same starting position. Stretch your arms forward with the medicine ball and bend your elbows. Place your hands behind your head and try to touch your back with springy movements. If the execution is correct, tension in the triceps is felt.
- In the same position, take the medicine ball in one hand and extend it forward, while the other hand is pulled back and parallel to the floor. Bring your hands together and pass the ball.
- Place one leg on your knee and move the other out to the side as far as possible. Hold the medicine ball overhead with your arms straight. Next, bend your body in the following sequence: to the leg laid to the side, and then to the other.
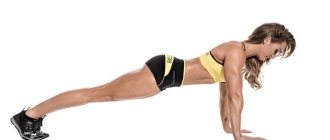
- Use a medicine ball as a support for push-ups by bending your elbows at a 45-degree angle and pulling your stomach in.
- Twisting the body with the ball. To perform this exercise, sit on the floor, hold a ball in front of your chest, lean your body back until you feel your abs tighten, and keep your feet together and slightly elevated. Alternate body turns to the right and left.
- Lie on your back with the ball between your ankles. Now lift your legs slightly off the floor and hold for a few seconds.
- Squats with a medicine ball. In a standing position, hold the ball above your head, in a squat - with your arms extended in front of you.
- Perform medicine ball jumps from a squat position. In the initial position the ball should be near the body, during the jump - above the head.
As you can see, the medicine ball complex is quite simple, but the benefits and effectiveness are high. By performing these exercises 2-3 times a week, you will pump up the muscles of your body and get rid of excess weight. Experience the full potential of a simple and affordable exercise machine - a medicine ball.
You can buy a medicine ball in Moscow in our online store Tanita-shop.
Medicine ball throw - standards in schools by grade
In order to develop in schoolchildren agility, speed, reaction speed, endurance, accuracy, and the ability to quickly adapt to various changes in the environment, it is achieved by performing exercises with a medicine ball. This exercise has quite a long history. To one degree or another, such actions are characteristic of almost every culture where various sports competitions were practiced.
Medicine ball throw standards for schoolchildren
| Medicine ball throw 1kg from a sitting position (cm) | ||||||
| Boys | Class | Girls | ||||
| 5 | 4 | 3 | 5 | 4 | 3 | |
| 295 | 235 | 195 | 1 class | 245 | 220 | 200 |
| 310 | 245 | 215 | 2nd grade | 280 | 215 | 175 |
| 360 | 270 | 220 | 3rd grade | 345 | 265 | 215 |
| 380 | 310 | 270 | 4th grade | 350 | 275 | 230 |
| 400 | 330 | 290 | 5th grade | 380 | 290 | 240 |
| 430 | 350 | 305 | 6th grade | 400 | 320 | 250 |
| 465 | 415 | 390 | 7th grade | 430 | 350 | 300 |
| 565 | 435 | 395 | 8th grade | 480 | 390 | 340 |
| 695 | 530 | 430 | 9th grade | 545 | 445 | 385 |
| 795 | 600 | 480 | Grade 10 | 580 | 470 | 405 |
| 11 cells 1 kg | 600 | 500 | 450 | |||
| 810 | 630 | 520 | 2 kg 11 cl | |||
Note : the standards and weight of the apparatus should be clarified by the teacher of your school’s physical education lesson. The weight of the ball can be from 1 to 8 kg, and there are several ways to throw such a ball.
Features of application in school programs
Initially, it is important to note that performing a medicine ball throwing exercise can have many interpretations. It all depends on the goal set by the teacher and the need to develop certain muscle groups. It should be noted that the weight of a medicine ball, with which school standards are passed, can range from 1 kg to 8 kg.
The exercise itself consists of the need to throw the ball as far as possible from the starting line, or move it from one hand to the other (from one student to another). It can be done individually, or maybe in pairs, when students pass the ball to each other at a certain speed (frequency) and at different distances (from a meter to 5 meters).
Here, unlike ordinary small balls, a variety of positions can be used to achieve the goal. In particular, the ball is usually thrown from a place. In this case, this can be done with two hands from behind the back, with one hand from the shoulder, by throwing yourself back, by performing a side throw, by throwing from one hand to the other hand, by throwing a projectile while sitting and from other positions.
It is not surprising that such exercises can be performed at any time of the year. At the same time, passing the standards can be carried out not only in open stadiums, but also in small indoor school stadiums. Standards, depending on the weight of the ball, as well as the complexity of the required actions, are established for students of all classes. At the same time, before starting the exercise, it is imperative to perform a general warm-up of the body so as not to accidentally pull the muscles while throwing the ball (in most exercises this is done with a sharp wave of the arms or one arm).
Additionally, do not forget about some personal safety standards. In this case, the throwing area must be cleared to outsiders. The range of free space directly depends on the exercise being performed and the weight of the ball to be thrown. Usually 5 to 20 meters is sufficient. The exercise should be performed under the supervision of a school teacher on his command. Rated on a five-point scale. Grades “satisfactory”, “good”, “excellent” are considered valid. The standards are drawn up separately for boys and girls and increase as students grow older.
About throwing techniques
Considering that the number of possible options for performing exercises with a medicine ball is very extensive, we will consider the most frequently practiced exercises in schools, with the help of which the maximum number of muscles is involved, and also maintains the real interest of students in performing the exercise.
In particular, we will focus on medicine ball throws from behind the back, from the chest, from the shoulder, while sitting.
Throw from behind
A very common exercise that allows you to develop speed, agility, accuracy, endurance, and technique. The entire execution process consists of the following actions:
- the student stands on the starting line with his back to his classmates, and facing the direction of throwing the ball;
- the ball is taken with both hands, raised above the head, pulled back, and then with a sharp movement of the hands it is moved forward and upward;
- During the initial phase of the throw, the body moves back a little, and then, simultaneously with the movement of the arms, it moves forward, accelerating the throw. It is prohibited to move beyond the boundary line;
- the required distance of the ball depends on its weight. Three attempts are given for standard completion.
Chest throw
Another popular exercise is when you need to throw a medicine ball as far (or more accurately) from your chest as possible. In this case, some variations can be practiced. In particular, the ball can be served to the maximum scoring distance, or you can practice accuracy and agility by passing the ball to a partner.
In the case of passing the ball forward, the exercise differs little from throwing from behind. True, here the ball is fed forward by a sharp throw of the arms from the chest forward and slightly upward. Basically, various groups of arm muscles are involved here.
When the ball is passed in pairs to each other, a slightly different algorithm operates:
- the students stand opposite each other, facing one another;
- throwing the ball is not carried out at full strength so that the other side has the opportunity to react to the approaching object and grab it in a timely manner;
- the distance between students should be from 3 to 5 meters (high school students can be a little more);
- The exercise can be performed with several students at once (here it all depends on the number of balls).
Shoulder throw
It is practiced when a heavy medicine ball (about 8 kg) is used as a throwing object. Darts from a place, or with a short run. The essence of the exercise is to throw the ball to the maximum length using the strength of your arms, torso, and legs. Usually, if you try to pass the standard without technical skills and only rely on the strength of your arm muscles, the result is not always the desired one.
Therefore, it is worth considering that throwing heavy objects from the shoulder is best done with the simultaneous use of the legs (done from a comfortable stand with half-bent legs), back muscles (help to push the ball during its start), as well as arms (the lion's share of the work falls on them , but without the previous two positions, efficiency decreases by 20 - 30%).
Develop strength, endurance, agility, accuracy. Typically, such exercises are performed in open stadiums under the close supervision of teachers for the safety of all students.
Sitting throws
Exercises that are practiced with primary school students. Here, medicine balls of light weight are used (usually 1 kg). As a rule, the whole essence of the exercises comes down to the need to throw the ball a short distance (1 - 3 meters), towards another student, or into the distance. Can be performed individually or in pairs. They practice in indoor gyms or specialized playing areas.
Effective exercises
Finally, it's time to look at the practical part of the training. Below are exercises with a small ball for children and adults that can be easily performed at home. To practice, you will need to find comfortable clothes and shoes, stock up on plenty of water, and remove all jewelry. It is better to conduct the training on a mat so that at the end there are no bruises or abrasions from the hard surface.
Exercises with a small ball can be aimed at working different muscle groups. Together they form a universal complex that involves the whole body. Just 6 fitness exercises will help you develop endurance, lose weight and strengthen muscles:
- Inner thighs and abs. Starting position - lying on your back with your legs raised, bent at a right angle. You need to place a ball between your knees. After exhaling, you should simultaneously tense your abdominal muscles, squeeze the projectile with your legs as hard as possible and hold in this position for 3 seconds, then relax and repeat 15 more times. At first it will be difficult, so beginners only need one approach, but over time their total number must be increased to three.
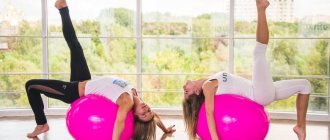
- Press. Here you will have to balance on the ball and use your abdominal muscles as much as possible. The starting position will be this: lying with the base of your shoulder blades on the apparatus, hands behind your head, and legs bent at an angle of 45 degrees and standing on the floor. The first thing you need to do is take a deep breath, and then exhale and at the same time do a twist, tensing your abs. A total of 25 such lifts should be performed in 2-3 approaches.
- Stretching the chest muscles. This will be a simple stretch for adults and children. It perfectly relaxes muscles and is especially important for those who spend all day in sedentary work. To perform this, you will need to take the starting position of the previous exercise, and then spread your knees as far apart as possible, bringing your feet together. Then you should arch your back so that your hands touch the surface of the floor. You need to hold this position for 5-8 seconds, then relax and repeat 3-4 more times.
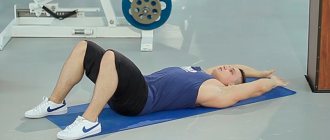
- Abs, inner thighs and buttocks. First you need to get into the position of a bridge for the buttocks: lie on your back, stretch your arms along your body and place your palms down, bend your legs and raise your pelvis so that your body forms a straight line. You should hold the ball between your knees. At a fast pace, the projectile must be compressed for 30 seconds. It is recommended to perform at least 3 repetitions in total.
- Buttocks. The starting position is similar to the previous one, but here the ball should be located under the feet. As you exhale, you need to rest your heels on the apparatus and lift your pelvis up without arching your back. After inhaling, you should lower yourself down, but do not touch the floor with your buttocks, but keep them at a distance of a couple of centimeters from its surface. This exercise must be performed in 3 sets of 10-15 repetitions.
- Waist and thigh muscles. This exercise will take longer than the previous ones, since here you will need to work on each side separately. The first thing you should do is lie on your side, straighten your legs, bend your lower arm and support your head with it, and place your upper arm in front of you and rest it on the floor. You need to grip the ball with your ankles. While simultaneously straining your abdominal muscles, you should raise your legs together as high as possible and squeeze the apparatus at an intense pace for 30 seconds. Afterwards, you should relax, rest for 5-10 seconds, roll over to the other side and repeat the same steps. For each side you will need to do 3 approaches.
These are the exercises you should do with a gymnastic ball every day to get a great figure and improve your overall health. This complex is the most effective, so there is no doubt that results will be achieved soon.