As part of rehabilitation therapy, exercises for the rotator cuff allow you to restore mobility to the joints without surgical intervention if there is a loss of rotation ability. Today we will look at the principles of creating a training program for such a problem, as well as the reasons for its occurrence and methods of prevention.
It is important to understand that it is not always possible to perform exercises with shoulder injuries. The first thing you should do is see a doctor.
External rotation
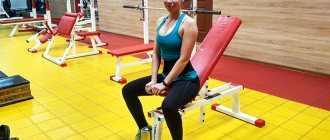
Stand with your extended arm away from the door. Attach the end of the expander to the door at waist level, and take the other end of the expander with your developing hand. Bend your elbow 90 degrees and place it on your stomach. Keeping your elbow tucked in, rotate your forearm away from the door—outward. Then slowly return your hand to the starting position. It is important to keep your forearm parallel to the floor. 2 sets of 15 reps.
When should you see a doctor?
You should contact a specialist if you have the first signs of a rotator cuff injury. These include:
- pain that occurs both during movement and at rest (intensifies at night);
- edema;
- weakness in the joint;
- limitation of hand mobility.
If you raise the alarm in a timely manner, the problem can be solved by taking non-steroidal anti-inflammatory drugs (Ibuprofen, etc.) and exercises on the rotator cuff. Ignoring pain can lead to worsening of the injury, including complete rupture of the muscles and tendons. In this case, treatment of the rotator cuff will be carried out through surgery.
Internal rotation
Stand with your developing hand facing the door. Attach the end of the expander to the door at waist level, take the other end of the expander with your working hand and bend it at the elbow 90 degrees. Keeping your elbow tucked in, rotate your forearm away from the door toward your body and then slowly return to the starting position. It is important to keep your forearm parallel to the floor. 2 sets of 8 to 12 reps.
Causes and consequences of rotator cuff injury
The rotator cuff is a tendon formation that wraps around the head of the shoulder joint. As an extension of the rotator cuff muscles, the cuff is used to rotate the arm inward and outward, and also allows you to lift it behind your head.
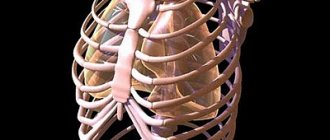
To understand the mechanism of a rotator cuff injury, it is necessary to refer to the diagram of the structure of the shoulder.
The cuff is located between the head of the shoulder joint and the acromion, the part of the shoulder blade that protrudes above the shoulder. When raising the arms and rotating movements, these two parts of the body inevitably collide with each other. The bursa located between them is designed to protect them from damage - a sac-like formation with synovial fluid, due to which friction is smoothed out.
If lubrication becomes insufficient, or under the influence of unfavorable factors the distance between the joint and the scapula is reduced (impingement syndrome), contact of the acromion with the rotator cuff leads to fiber disintegration, as well as to pain, swelling and limited mobility.
Causes of rotator cuff injuries can include:
- Age factor. Damage to the cuff is more common at the age of 40 years, which is explained by deterioration of the blood supply to the joint and weakening of the ligaments.
- Manual labor. At risk are lovers of country holidays, as well as representatives of certain professions (builders, loaders, etc.).
- Sport. The cuff is chronically injured in athletes who regularly perform rotational movements. These are tennis, swimming, basketball, bodybuilding, etc.
- Anatomical features of the structure of the shoulder, suggesting that the distance between the joint and the acromion is too narrow.
The main symptom of a rotator cuff injury is pain in the shoulder when trying to raise the arm above horizontal or behind the head. Once the diagnosis is confirmed, anti-inflammatory therapy and physical therapy exercises are prescribed. In severe cases, for example, with a complete rupture of the cuff, surgical intervention is required.
Shoulder rotation
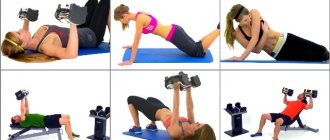
Lie on your stomach on a table or on the edge of the bed, with your arm hanging down. Slowly raise your straight arm out to the side and up until it is parallel to the floor. The thumb is pointed at the ceiling. Hold this position for 2 seconds, then return to the starting position. 2 sets of 15 reps. Take a small weight in your hand when the exercise is no longer difficult.
How can rotator cuff training benefit you?
Shoulder training begins immediately after a period of immobilization (immobilization), during which the patient should wear a fixing bandage. After surgery, the joint is provided with rest for 3-5 weeks; with drug treatment, 1-2 weeks are sufficient. During the rehabilitation period, exercises perform 2 important functions:
- Restore range of motion in the shoulder joint after fusion of the rotator cuff.
- Strengthens muscles that atrophy during immobilization.
The set of exercises should be selected by the doctor taking into account the characteristics of the injury. To prevent shoulder joint diseases, you can perform the following exercises.
Shoulder Mobility Testing
The Apley's Scratch Test can show how both shoulder girdles work in coordination with each other and can also determine the capabilities of each shoulder joint individually.
Here the right arm moves, performing functional internal rotation, and the left one, at the same time, performing functional external rotation. The goal is to bring your fingers together enough that they touch behind your back. Then the hands change and you check the other side. During the test, you can slightly change the position of the spine (bend, for example) or gradually raise your lower arm up.
Pay attention to the distance between the palms during simultaneous functional internal and external rotation. Also note whether you experience pain and whether there is a difference between the range of motion on both sides.
What you feel is the most important aspect of this test, while hand coordination takes a back seat.
Shoulder exercises
We work the deltoid muscle of the shoulder. It, one might say, “grabs” the shoulder joint and is responsible for flexion and extension of the shoulder, as well as abduction of the arm. The shoulder exercises below must be performed correctly, strictly following the technique. Otherwise, you risk not getting the effect of the workout or even getting injured.
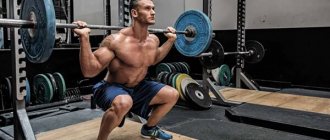
Dumbbell up press
Typically, this exercise is performed with a barbell or bodybar. But when using dumbbells, stabilizer muscles are additionally involved in the work (after all, you need to control the movement of two independent apparatuses at once).
Stand straight with your feet slightly wider than shoulder-width apart. Take the dumbbells with an overhand grip (palms facing down), bend your elbows (dumbbells should be at shoulder level), your hands slightly wider than your shoulders, and your elbows pointing straight down.
From this position, as you exhale, press the dumbbells up until your arms are fully straightened. Do not turn your head up - look ahead. Hands with dumbbells and body should be in a straight line. As you inhale, lower the dumbbells to their starting position at shoulder level.
This exercise well develops the anterior and middle bundle of the deltoid muscle of the shoulder.
Horizontal shoulder abduction
The second shoulder exercise in our complex. Stand straight, feet shoulder-width apart, arms with dumbbells at your sides, elbows slightly bent. The dumbbells in this position are at hip level.
This shoulder exercise targets the middle deltoid muscle.
As you exhale, spread your arms to the sides to shoulder level, also keep your elbows slightly bent. The palms in the spread position are directed towards the floor. You can turn them out a little, pointing your little fingers towards the ceiling. As you inhale, slowly lower your arms to the starting position.
This exercise works the middle fascicle of the deltoid muscle of the shoulder. If, when performing the exercise, you turn your hands with your little fingers up, the rear delta bundle is additionally turned on. Keep your body straight when performing the exercise, do not swing your arms by inertia - fully control the movement at each point.
Shoulder flexion (abduction)
The starting position is practically the same as in the previous exercise: we stand straight, feet shoulder-width apart, arms with dumbbells bent at the elbows, but palms pointing back. Those. the wrists almost touch the front of the thighs. We move our arms forward to shoulder level, dumbbells parallel to each other, palms facing the floor. Then slowly lower it down to the starting position. When performing the exercise, do not bend your back, keep your body straight.
The anterior bundle of the deltoid muscle of the shoulder works.
How to do the workout
The complex consists of the following movements:
- Hill push-ups - 4 sets of 10-15 times.
- Shoulder abduction using body weight - 4 sets of 10-15 reps.
- Rear delt rows - 3 sets of 10-15 reps.
- Straight arm fly - 3 sets of 10-15 reps.
You can do a rigorous shoulder workout and do all four exercises in one day, or break them into two parts and spread them out throughout the week. For example, do the first and third on Monday, the second and fourth on Thursday, and devote Tuesday and Friday to pumping your legs.
Hip supination exercises. Anatomy of the buttocks
The following muscles are responsible for the beauty of the buttocks:
- Gluteus maximus;
- Gluteus minimus;
- Gluteus medius.
There are also muscles such as the piriformis, obturator internus, gemelli, tensor fascia lata, which are responsible for abducting the hip to the side, but no one purposefully pumps them, since they are located in the deep layers and do not affect the aesthetic appearance in any way; in addition, they always, one way or another, are included in the work while performing exercises on the muscles of the buttocks.
- The gluteus maximus muscle originates from the sacrum, the posterior surface of the ilium and the sacrotuberous ligament and is attached to the gluteal tuberosity of the femur. Its main function is extension and supination (outward rotation) of the hip.
- The gluteus minimus muscle originates from the ilium and attaches to the greater trochanter of the femur. Located under the gluteus medius. The main function is hip abduction, as well as supination and pronation of the hip.
- The gluteus medius muscle originates from the outer surface of the ilium and attaches to the greater trochanter. It is located on top of the gluteus minimus and performs the same functions.
It is precisely this muscle group that needs to be affected in order to have a beautiful elastic butt. Now let's move on directly to the exercises.
At the request of readers: exercises for the shoulder
Figure 1. This is where the shoulder is.
We were talking about the shoulder. It turned out that not everyone knows where exactly the shoulder is located. The shoulder is not a ball of the shoulder joint. The shoulder is the longest part of the arm along the entire humerus. Up to the elbow. It's easier to show.
Look at the picture (Figure 1). Why is this important? Because when the shoulder joint hurts (and it hurts so much that you can’t turn your arm), it is important to determine some specific movements in it. For example, rotation. Rotation is rotation around an axis.
It is around the shoulder or humerus that there will be rotation.
Internal rotation
in the shoulder is when you try to feel your shoulder blade.
External rotation
in the shoulder is when you scratch the back of your head.
Why is it important
If you raise your arm sideways, people with impingement will experience pain in the shoulder joint.
If internal rotation is done simultaneously with raising the arm, the tendons in the shoulder joint will be pinched. It's harmful and painful.
To understand how internal rotation affects the shoulder joint, try raising your arm straight out to the side. Hold your sore thumb up (as if you are calling for mercy on the defeated gladiator). You will be able to raise your straight arm out to the side noticeably above shoulder level.
Now try raising your straight arm over your side, but keep your thumb down (as if you were voting for the defeated gladiator to be finished off).
This way you will be able to move your straight arm up to the side only to shoulder level. Then the bones rest against each other, and in order to raise your hand, you will have to turn your thumb up.
This is a normal limitation due to our anatomy.
Some people stubbornly try to overcome this limitation and twist their arm in a cunning way. The authors of various techniques and exercises are especially highlighted. They move their arms in and out. Very often, such rotations act on the shoulder joint like a meat grinder. The bones are pressed and crushed by the rotator cuff tendons.
Internal rotation in the shoulder is harmful to the shoulder joint
Internal rotation is performed by the pectoral muscles and latissimus muscles. Can you imagine? These are thick and very strong muscles. If they are even slightly strained, the shoulder is placed in a disadvantageous position.
Therefore, you cannot do any exercises that come to mind for a sore shoulder. Therefore, I do not believe most of the author’s methods with shoulder exercises.
Shoulder Exercise Option
To make the shoulder easier, we need to train the external rotators, which rotate the shoulder outward and allow us to scratch our heads. The external rotors are called the supraspinatus and infraspinatus muscles.
These are small muscles that lie on the shoulder blade and stabilize the shoulder joint. They are part of the rotator cuff. They are what are chewed in the shoulder joint during impingement.
Look how cute it turns out:
1. These muscles are external rotators. They move the shoulder into the desired position.
2. These muscles stabilize the shoulder joint. They hold the head of the humerus in the socket and do not allow it to move. This way the head won’t press where it shouldn’t.
3. These muscles are easily pinched and are the first to begin to hurt if something happens. Therefore, they are the ones who need to be trained first. You need to have time to make them strong and strong before the bones chew them.
Exercises
There are many exercises for the shoulder. There and to stabilize the scapula, and all that... Only for this you need an instructor. Without an instructor, people cannot do more than three exercises and make mistakes all the time. Personally, I prefer to give patients exercises that are guaranteed to do no harm and are guaranteed to help.
It turns out there are a couple of magical exercises that are very difficult to harm. Here they are in the pictures below:
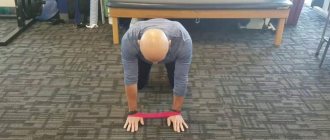
Figure 2. Exercise for the infraspinatus muscle
Feel your shoulder blades. There is a spine of the scapula - a kind of ridge. Above this spine lies the supraspinatus muscle, and below the spine lies the infraspinatus muscle. Poke them with your finger. It will most likely be unpleasant. These small working muscles work hard. And literally.
Figure 3. Supraspinatus exercise
For exercises take a small dumbbell. It is better to start with 500 g. Do 12 - 15 repetitions of the exercises. Every three days, increase the number of approaches. From one approach to three.
Then increase the weight of the dumbbells and start again with one approach. It's better to train twice a day. On the last repetitions it should be unpleasant or a little painful.
Maximum dumbbell weight no more than 6%
of body weight for a woman and
no more than 8%
for a man.
These exercises need to be done for a long time. A few months. The pain will decrease only after a month. If you have enough motivation, it will be beneficial.
I had shoulder pain for 5 years. Then I got tired of it and started doing exercises. After a month it didn't help me, but I stubbornly continued to do the exercises twice a day. It helped me after 1.5 months. The pain went away and never came back.
Now I do a bunch of different exercises, including some that are harmful to the shoulder, but the pain does not return. This is most likely because I was able to strengthen the supraspinatus and infraspinatus muscles before they started to tear.
If you liked the article, then like and subscribe to my channel. Read my articles on related topics:
There is no humeroscapular periarthritis
Brachial plexus strain
Elbow pain
Source: https://zen.yandex.ru/media/id/5ad190241aa80c39a7a6a66d/5dc0c3c8e6e8ef00aecab3b7
Scapulohumeral rhythm testing
Now that we have some understanding of the movements performed by the shoulders during functional internal rotation with one and two arms, it is time to evaluate rhythm and coordination.
In order for the shoulder to travel its full path without compensatory movements, the scapula and humerus must move synergistically and rhythmically. In sports medicine this is called the scapulohumeral rhythm.
Proper scapulohumeral rhythm means that for every 2 degrees of elevation movement of the humerus, the scapula should rotate upward 1 degree until the limit of motion is reached. However, the numbers won't tell you anything. The point at which the blade stops rotating is more important.
At approximately 120 degrees of arm elevation, the shoulder blade begins to rotate upward. If your shoulder blades become clearly visible on the sides of your body before reaching 120 degrees when you slowly raise your arms, this indicates that the posterior tissues of the shoulder are toned and tense.
In addition, the symmetry of movements on both sides should be assessed. Do your shoulder blades begin to rotate simultaneously or is their rhythm asymmetrical?
If the rhythm is disrupted, your best bet is to start working on soft tissue mobility in the back of the shoulder girdle.
This can be simple movements focusing primarily on the latissimus dorsi and other surrounding muscles using a foam roller or through self-myofascial release techniques. You can also use movements aimed at developing mobility, for example, adding stretching to your training program.
The choice is yours, and the only wrong decision is to do nothing at all.
Such a complex shoulder and its injuries
The 4 joints that make up the shoulder girdle are stressed all day long, and not only during training. This happens both when you hold down the computer mouse at work, and when in your free time you enthusiastically point your finger at the smartphone screen.
The shoulder girdle is an incredibly complex complex of soft tissues that comprises several joints that work together to produce smooth and powerful movements in coordination with the rest of the body.
Next, Dr. Raskin explains (and shows in the video below) how to self-assess your shoulder mobility and joint motion with a few simple tests. And this assessment can greatly influence your future training. All you need is your own body and a mirror.
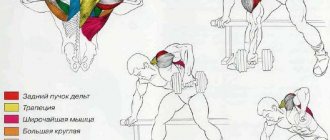
Muscles that externally rotate the shoulder
⇐ PreviousPage 4 of 8Next ⇒The muscles that externally rotate the shoulder are two small muscles, the subpectineus and teres minor. They are much weaker than the muscles that internally rotate the shoulder, which include the pectoral muscles and latissimus dorsi.
The subpectineal and teres minor muscles are part of a group of four muscles located in the upper back, which also includes the suprapectineal and subscapularis muscles. These four muscles serve as a kind of connecting link between the scapula and the shoulder joint. The relative weakness of these muscles and the excessive load placed on them are the cause of numerous injuries, so they need special training. There is only one way - L-dilution. They are difficult to describe in words, so you better see a trainer.
Aesthetics and selection of exercises
After you have laid a good foundation, you can begin the “finishing work,” and now it’s time to think about the aesthetic side of things. Here you have two roads: either try to correct the weak sides of the muscles or accentuate the strong ones. I myself prefer the second, but the final choice, of course, is yours.
If we are talking about correcting deficiencies, then you need to replace your usual exercise with the option that you need. For example, replace the bench press with an incline press or push-ups. The new exercise must be done with the same degree of dedication as the bench press.
When it comes to strengths, you need to choose the two exercises that you do best and put them at the center of your training program. Let's say you love deadlifts and leg presses. So focus on them, cutting off all other exercises to a minimum.
The ultimate goal of the effort is an extreme weight record. A sharp increase in strength indicators will precisely mean an even greater increase in mass in those areas that are already advantageous.
And finally, don’t forget about your posture and gait. The way you hold and walk greatly determines the appearance of your muscles.
Slouching, head down, always look comical. Well, they completely kill the athleticism of the muscles. It just so happens that in people's minds, large muscles are associated with a strong character. In short, strength should be visible in your entire appearance. An open look, a distinctly straight back, an energetic, athletic gait - this is what is expected from a bodybuilder.
How to do reps
Whatever technique you use, each set should become another way for you to overcome fatigue, laziness, and your own weakness. This is the only way you can achieve success. Extreme concentration, impeccable technique, high intensity - and so on in every set and in every repetition!
Most bodybuilders perform reps too quickly. For many people, it only takes a second to lift the weight and another second to return it to the starting position. Such a movement cannot in any way be called controlled. For such “hurries,” switching to a smoother rhythm would be a huge step forward in all respects. They would seriously increase both in mass and strength. Not to mention the fact that an ultra-fast pace overloads the ligaments and therefore threatens injury. Of course, injury can occur even with a smooth repetition rhythm if the movement is performed incorrectly. Safety doesn't come down to rhythm alone. However, the main condition for safety has always been and will be your concentration on the exercise. It is clear that the faster the repetition, the lower it is.
Technique and rhythm
Smooth movement is more important than speed itself. The smooth movement allows you to control the weight and at the same time put maximum stress on the muscles you are working. I note that smoothness and slow (or moderate) repetition rhythm are not always the same thing. Let's say you perform a bench press with a three-second positive phase, but with an explosive start. You cover the first centimeters in a split second, but the rest of the movement takes almost three seconds. Such an explosive start overstrains muscle and connective tissue and is fraught with injury. The same weight could be lifted in, say, two seconds, but smoothly. In this case, a two-second repeat would be clearly preferable to a three-second repeat. So, the main thing for you when performing a repetition is the smoothness of the movement. You don't need to count the seconds or strictly adhere to a certain rhythm in each exercise. In practice, a smooth rep that can pass the pause test you know takes about three seconds in the positive phase (or a little more if it's the last rep of the set) and at least three seconds in the negative phase.
Pauses between repetitions
The repetitions can be performed continuously or with a pause after each repetition. With continuous work, you use relatively light weights, but the set becomes shorter, and muscle pain increases. Short pauses between repetitions allow you to work with heavier weights. If such pauses reach 30-60 seconds, then the set actually turns into a series of one-repetition sets. When working with pauses like these, the barbell is usually lowered to the floor (or support) at the completion of each repetition.
The mode of performing repetitions largely depends on the exercise itself. For example, calf raises can be performed continuously, but the greatest effect is achieved by a short pause at the top of the movement. In squats and bent-legged deadlifts, you can hardly do without short pauses between repetitions, at least towards the end of the set. In general, repetitions that are performed with pauses are more effective than continuous repetitions. Continuous repetitions quickly cause a feeling of muscle fatigue, hence the feeling of a very large load on the muscles, but this feeling is deceptive - such a load does not stimulate the growth of muscle mass in the best way.
General recommendations
Allow about three seconds for the positive phase of the movement and at least the same amount for the negative phase; perform both phases of the repetition smoothly, without jerking. A faster pace will make it difficult for you to control your weight. The positive phase of the very last rep in a set, which you perform at the limit of your strength, can take you more than five seconds. For the first time, ask someone to count out loud the seconds you spend on each repetition to make it easier for you to maintain the desired rhythm. In the future, when you learn to perform the movement smoothly, there will be no need to count seconds. Some exercises, such as rows or bench presses, can be done more slowly than others (such as calf raises or bench presses) with the same degree of control over the barbell.
Do not try to count both seconds and repetitions at once - this is very difficult. If you need to count both, have someone else take the seconds while you count the reps, or vice versa. The 3/3 rhythm is just a rough guideline that you shouldn't get too hung up on. The main emphasis when performing a repetition should be on the correct movement technique. Think of each rep as a separate exercise, ending with a short pause before the next rep. The pause should take as long as you need to prepare for the next repetition. Towards the end of the set the pauses will become longer. But if you pause, the set will end prematurely. Over time, you will find the optimal pause length for each exercise. In exercises where the muscles gradually contract as you flex your limbs, such as calf raises, biceps curls, or lat pulldowns, try to hold the weight for a second or two in the position of full muscle contraction. This will allow the contraction force to reach its maximum.
This kind of “forced contraction” is typical for “single-joint” exercises, when the muscles do not relax when the joint is extended, such as when raising the toes. In “multi-joint” exercises, this number will not work for you. For example, in squats, when the knees straighten, the leg muscles, on the contrary, relax.
Repeats with double pause
When performing some exercises, such as biceps curls, you essentially take two pauses at once - at the bottom and top of the repetition. But there is still only one real pause - for rest. During the second pause, you tense your muscles, that is, you give them a greater load. So it would be more correct to consider such repetitions as “single-pause”.
For many exercises, such as the squat, bench press, and bench press, you won't be able to do two pauses—at the top and bottom—at least not if you perform them in a traditional manner. But these same exercises can be performed with a “double” pause - you just need to slightly modify them,
Place the pins on the racks at the level of the bottom point of this exercise and each time you complete a repetition, lower the barbell onto them. A second pause will be enough for each next repetition to start from the support position. This is sometimes called the bench press, squats, etc. “from the bottom.” This is a very effective and efficient way of training.
I highly recommend it to you - at least for some cycles. You can even perform one- and two-rest reps within the same workout, but in different sets. At the bottom of a press or bench press, you can rest for longer than a second or two, but with squats the situation is different. When performing squats “from the bottom support”, you should under no circumstances relax at the bottom point. If the pause is too long, your muscles will involuntarily relax and the set will be ruined. If you need a longer pause, lower the barbell to the pins at the end of the repetition (at the bottom point), and you yourself emerge from under it and straighten up without changing your stance or grip. Then squat down with a deep breath, hold your breath and quickly dive under the barbell, then immediately rise up with it and exhale. (If you exhale before lifting the barbell, your core will relax, which can lead to injury.) Hold in the top position, then slowly lower and place the barbell on the pins - the repetition is completed and you can prepare for the next one.
For people with long limbs and narrow chests, a long pause at the bottom of a bench or standing press may be unsafe due to the very large range of motion. It is better to reduce it (pause) to a minimum, or even slightly reduce the amplitude.
Deadlifts can also be performed with a double rest, but fatigue can quickly affect the movement's technique. For insurance, you can reduce the amplitude of the deadlift with a double pause, that is, lower the barbell onto pins installed at knee level or slightly below. While the bar is resting on the pins, give your arms a rest before your next rep. You will essentially be doing a partial range of motion deadlift with straight legs because your knees won't bend.
Criteria of truth - practice
You can only check whether this way of training suits you or not through practice. If you do not have health problems or physical disabilities, if you have not yet exhausted your muscle potential, then any of the load options presented on the pages of this book may be suitable for you. (But for either option to produce noticeable results, you must stick to it throughout the entire multi-month cycle or even longer).
No matter how great it may look in theory, no matter how great it may work for others, if you cannot get significant returns from the regime after 3-4 months, then it is not suitable for you. Look for something that will work for you, since you have a lot of choices.
Movement amplitude
In general, it is believed that the more difficult the exercise, the more effective it is, but there are many exceptions to this rule. For example, by increasing the amplitude of squats or deadlifts, you undoubtedly make these exercises more difficult, but for some this “difficulty” will be completely harmful. Maximum amplitude is only good if it does not lead to injury.
There are, however, also exercises where the amplitude is deliberately limited, although they could be performed with a greater amplitude. We are talking, in particular, about deadlifts with partial amplitude while lifting the weight (lockout) overhead. Using a rack design, you can easily break the exercise down into its component parts - the initial phase, the final phase (lockout) and everything in between. The initial phase continues from the start - say, from the chest in the bench press - and somewhere until the dead center. The lockout only takes up the last few centimeters of the replay, usually above dead center. But “what is between” can, depending on the exercise, occupy the second third of the amplitude, including the dead center; or the segment from dead center to lockout. Lockouts can be performed with significantly more weight than full reps. On the one hand, this beneficially increases the load on the muscles - but at the same time, lockouts pose a threat to the body as a whole, and primarily to joints and connective tissues. Yes, some can perform partial repetitions with colossal weights without visible damage to their health, but you and I are far from them - we are mere mortals, not genetic phenomena. And “phenomena” don’t always get away with such things, especially in the long term. So if you want to experiment with partial reps, consider choosing a part of the rep other than the lockout.
However, this does not mean that lockouts are basically contraindicated for you. In certain cycles, in some exercises, subject to all safety measures, they may well have a place, but not in those exercises that are difficult for you due to your physique. In any case, start with small weights and gradually increase them over a couple of months; until you reach the maximum. When performing a lockout, you must pay particular attention to your movement technique. The slightest error and enormous weight will simply crush you. Be extremely careful! To tell the truth, training with full (but not excessive) amplitude is much safer. But any other part of the repetition, except the lockout, is quite suitable for working with a limited amplitude, even on an ongoing basis. Examples of “partial” reps with regular weights include the bench press from a starting position 5 cm from the chest and the squat from a position 5 cm above hip level, parallel to the floor. Both of these options are both effective and safe.
One and a half repetitions
Full and partial repetitions can be combined within one set. This is a high-intensity technique, and you may find it very useful. But don’t try to do many exercises at the same time in this mode, otherwise you may overtrain. No more than two such exercises should be performed during training. This pair of exercises can be changed from time to time.
Work in “one and a half repetitions” comes in two varieties:
Take the bench press for example. Imagine that you have a barbell at your outstretched arms. In a controlled movement, “lower the barbell”, lightly touch it to your chest just below the pectoralis major muscles and again squeeze it out with straight arms.
Pause for one or two seconds, then lower the barbell to approximately the middle of the amplitude, stop and press it up with your arms straight. You can do it the other way around - first a “half repetition”, then a full repetition. In both cases, “one and a half” repetitions are done from top to bottom.
The barbell is again at outstretched arms. After a short pause, lower it to your chest. Then squeeze the barbell to the middle of the amplitude and return it back to the chest. Next, press the barbell straight with your arms. These “one and a half” repetitions are done from the bottom up. First you do a half rep, then a full rep.
Both options are equally effective. Perhaps one option is better for some exercises, and another for others. But you can use both options in the same exercise - alternate them from set to set or from workout to workout.
Full reps and “half reps” should be considered one “one and a half” reps. Naturally, in order to perform as many “one and a half” reps as you usually do full ones, you will need to reduce the weight of the barbell. As for the consistent increase in weights, everything remains the same. By returning to regular repetitions after a period of time and a half, you will likely be able to exceed your previous best results in this exercise. Although, you may have to spend some time getting used to your normal work routine again.
Overcoming
Whatever technique you use, each set should become another way for you to overcome fatigue, laziness, and your own weakness. This is the only way you can achieve success. Extreme concentration, impeccable technique, high intensity - and so on in every set and in every repetition!
If all the “weakly responsive” trained according to the programs presented in this book, humanity would become much more muscular. Moreover, the demand for steroids would drop sharply in the world - everyone would do just fine without them. And there would be much fewer “weakly responsive” people themselves, since very many would discover that they have good “responsiveness”.
Anyone who wants to gain as much strength and muscle mass as possible must organize their training, nutrition, rest and sleep in such a way as to ensure a steady increase in training weights. Everything you do should be aimed at creating the ideal conditions for consistent growth of your results with impeccable exercise technique!
⇐ Previous4Next ⇒