- January 16, 2019
- Workouts in the gym
- Irina Evtushenko
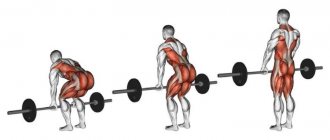
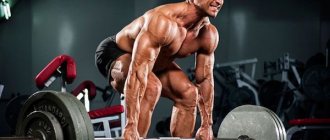
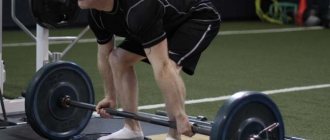
Every athlete has at his disposal sports accessories that allow him to train comfortably with weights. One of these is traction straps. With their help, you can shift the load from your hands and increase the weight on the apparatus. Wrist straps prevent injury, so they must be used when performing deadlifts. Let's look at the most common models of such products, and also talk about how to use them correctly.
Barbell straps: purpose
Wrist straps are used by athletes in cases where the task is to lift maximum weight on a barbell. The straps act as insurance, which will prevent the projectile from slipping out of your hands while performing the exercise. The main benefit of traction straps is grip strengthening. This device will bring the greatest benefit to powerlifters whose training complex consists exclusively of basic exercises.
If the forearms are weak, the deadlift will be difficult to perform, so the athlete needs to tie his hands to the apparatus. Knowing how to put on your traction straps can give you a stronger grip and prevent injury. The use of wrist straps can also be used during training with light weights during the recovery period after injury.
Deadlift Gaiters
Gaiters are a must-have item of clothing when performing deadlift exercises. The IPF rules state that it is prohibited to allow an athlete to perform exercises without wearing gaiters.
Deadlift Gaiters
They perform important functions:
- They protect the skin of the legs as the barbells slide along them.
- Prevents charging. If there is someone else's blood on the hyphae, it will not get on your skin.
Every experienced athlete knows that wearing long socks keeps his skin safe.
How to choose barbell straps
When choosing wrist straps for training, there are several key factors to consider. Devices must be comfortable and safe. Belts must be made of durable material. It is advisable to opt for belts made of polyester or polypropylene. The length and width of deadlift straps depends on your wrist size. It is important that they do not slip in your hands and do not cut into the skin.
Suit for deadlifts. What is it for?
The overalls are needed to support the athlete's back during deadlifts. It helps the athlete start moving from the bottom point. The right piece of equipment gives you a feeling of confidence. But, like other things, this one has features:
- correct direction of seams on the back. This allows you to achieve maximum rigidity of the product;
- attaching the legs to the body in two combinations. For classic and wide stances;
- the overalls should fit snugly to the body;
Deadlift suit
Since the material of the suit is hard, there is a possibility of skin injury when performing exercises. The consequences are minor - bruises on the body. It is not always easy for novice athletes to perform the necessary actions; they may experience pain. But with the arrival of experience everything goes away.
DIY wrist straps
If you want to make such an accessory yourself, first of all you need to decide what material will be used for this. It is important that it be durable, but not slip or stretch. For this purpose, you can use a tow rope, a waist strap, or a car seat belt. Next you need to choose the length for future straps. Too small ones will dig into your wrists. It is also not worth making them large, because their end will hang down and thereby interfere with the exercise. Standard length is 60–70 cm, width is 3–5 cm. The width is selected individually. To make them strong and durable, they need to be made double. For stitching you need to use strong threads. Both ends must be sewn together.
What muscles work during pull-ups?
Before you do this, you need to figure out which muscles work when doing pull-ups, since targeted work on strengthening and developing them will help you learn how to do pull-ups on the horizontal bar in the shortest possible time.
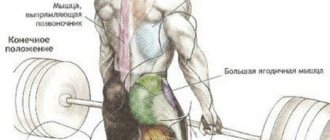
So, I’ll briefly answer the question, what muscles work when doing pull-ups? First of all, pull-ups work the back muscles (latissimus, trapezius and teres major) and arm flexors (biceps, brachialis), as well as the core muscles, which are responsible for stabilizing the spine, pelvis and hips.
You need to identify and eliminate your weak link. Strengthen the muscles that work during pull-ups and you will be able to do pull-ups without any problems, gradually increasing the number of pull-ups on the horizontal bar.
If you work out in the gym, you can use seated lat pulldowns as an auxiliary exercise. In this exercise you can adjust the weight of the weight. This way you will strengthen your back muscles and biceps. To strengthen your core muscles, you can even use regular push-ups that are accessible to everyone.
I'm sure you're already eager to learn ways to learn how to do pull-ups. Therefore, let’s not drag our feet, but get straight to the point.
How to use traction straps
Experienced weightlifters recommend wearing belts only in the last approaches, when the weight goes from working to maximum. If the weight is stable for 3-4 sets of deadlifts, straps should be used in the last set, when the strength is exhausted and lifting the barbell without straps will be more difficult. It is also advisable to alternate their use every two sessions: two weeks you need to train with belts, and the remaining two without them. This way your hands will get used to it and your grip will become much stronger.
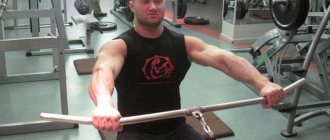
Instructions for using wrist straps:
- First, the strap must be placed on your wrist. Its end should be directed towards the fingers.
- Then you need to place your hand under the barbell, palm up, and wrap the “tail” around the bar. If the barbell is loaded to its maximum, the strap needs to be wrapped around the barbell twice.
- Next, you need to clench your fist over the belt and maintain a firm grip on the barbell.
- The same manipulations should be done with the other hand.
Sizing for straps
The sizes for the straps are completely individual. First of all, they depend on the circumference of your wrist, as well as on the diameter of the bar on which you plan to exercise.
Use the table below to determine what length of strap you need.
Make a mark on the material, but do not rush to cut it. First you need to make sure that this size suits you. To do this, secure the belt in the position in which you are going to sew it, using a clothespin or clamp. Go to the horizontal bar and try to put your hand through the strap.
If you are satisfied with everything, the strap does not dangle, does not press, then everything is fine. Come home and finally make your straps. By the way, you can try on the belts without leaving your home. To do this, you can use something similar in thickness to the bar of a horizontal bar, for example, a shovel handle.
Once you are sure that this is your size, cut the belt, but not at the mark, but a little further. Throw 5-6 cm over the top to create an overlap and sew the strap.
The benefits of exercising on the horizontal bar
There are dozens of varieties of exercises on the horizontal bar: pull-ups in various variations, push-ups, hanging leg raises, power-ups and many others. Finding the ones that suit your purposes won’t be difficult. With the help of the complexes described in the article, you will gain muscle mass, become stronger and improve your relief. However, methodicality and consistency are important in everything, and training on the horizontal bar with your own weight is no exception.
In this article we will analyze several of the best training programs on the horizontal bar, answer the question of how to create an individual program, and give useful tips and recommendations.
Sunshine in one strap
At this moment, most people have unnecessary questions and fear, because they are afraid of breaking down. Our site advises you to put aside all fears. If you have learned perfectly and are making the interception, then you have nothing to fear.
True, there is a big “BUT”. Until this point, you should be able to hit the sun/moon in one fell swoop without any problems. If you do this while swinging, you may not be able to resist.
Thanks to the third and fourth points, your grip will be sufficiently strengthened and the fear of swinging without belts should go away, and if the swing is unsuccessful, you will fall off.
Elements on the horizontal bar for beginners
There are many different elements, and you can find most of them in this article. I will try not to repeat myself, but still, some of the elements already described are suitable for beginning yard athletes.
The first thing beginners need to do is learn how to do pull-ups technically correctly. Pull-ups are performed not by the biceps and forearms, but by the latissimus dorsi muscles. This is the basis on which all other exercises are built. The easiest way to do this is to try to bring your shoulder blades together as you lift your body up. No need to swing.
The pulling movement itself should be performed not due to some kind of impulse, but due to compression of the latissimus dorsi muscles. It is quite difficult to feel this movement, and often it takes more than one month of training. But when you learn to do this, your back will begin to grow at an enviable speed. Another option is to use straps, they help to “turn off” your arms.
| Week 1 | |
| Number of approaches | Number of repetitions |
| Day 1 | |
| 5 | 1, 1, 1, 1, maximum |
| Day 2 | |
| 5 | 1, 1, 1, 1, maximum |
| Day 3 | |
| 5 | 1, 2, 1, 1, maximum |
| Week 2 | |
| Number of approaches | Number of repetitions |
| Day 1 | |
| 5 | 1, 2, 1, 1, maximum |
| Day 2 | |
| 5 | 2, 2, 2, 1, maximum |
| Day 3 | |
| 5 | 2, 2, 2, 2, maximum |
| Week 3 | |
| Number of approaches | Number of repetitions |
| Day 1 | |
| 5 | 2, 3, 2, 2, maximum |
| Day 2 | |
| 5 | 3, 4, 3, 3, maximum |
| Day 3 | |
| 5 | 3, 4, 3, 3, maximum |
| Week 4 | |
| Number of approaches | Number of repetitions |
| Day 1 | |
| 5 | 3, 4, 3, 3, maximum |
| Day 2 | |
| 5 | 4, 5, 4, 4, maximum |
| Day 3 | |
| 5 | 4, 5, 5, 5, maximum |
The horizontal bar training program for those who were able to perform more than 5 pull-ups is designed for 3 sessions per week. Other exercises have already been added here. Each workout is quite short, no more than 30 minutes.
Now that you know what exercises on the horizontal bar exist for beginners, you can move on to a set of exercises. The program will be designed for 2 lessons per week.
Monday:
- Classic grip pull-ups: 3 sets of 10 reps.
- Close-grip pull-ups: 3 sets of 10 reps.
- Hanging leg raises: 3 x 10 times.
- Crunches on the horizontal bar: 3 to 10.
Friday:
- Reverse grip pull-ups: 3 x 10 reps.
- Wide grip pull-ups: 3 to 10.
- Army corner: 3 to 10.
- Crunches on the horizontal bar: 3 to 10.
It is not advisable to exercise more than twice a week, because the same muscle groups work over and over again. If you train them often, they will get tired and you will not be able to complete the plan.
The program includes 3 sets of 10 repetitions of each exercise. At first, you will not be able to do all the repetitions in exactly three approaches. Your main task is to achieve all repetitions in one workout. If necessary, let's start with 10 sets of 3 times. But try to pull yourself up the indicated 30 times. And this applies to every exercise.
Exercises on the horizontal bar for girls will be more simple. For example, instead of the army corner, it is better to prefer hanging leg raises. Other exercises on the horizontal bar for girls are pull-ups using a rubber band, gravitron, or support from a partner.
For men, there are a number of other technically more difficult exercises. But these are not horizontal bar exercises for beginners. They are intended for more advanced athletes who have been training on the bars for a long time and regularly. We are talking about the work out direction.
Terms of use
When you understand how to make straps for a horizontal bar, the work is finished, you can start using them. If you need to grab the bar with an overhand grip, it is recommended to insert your hand into the straps from the front. If you plan to use an underhand grip, then do it from the back. When your product stretches from constant training, simply sew another layer to it. You need to know for sure that you can trust self-made straps. Your health and safety depends on it.
If you understand how to make straps for a horizontal bar and performed all the steps correctly, then your training will proceed as normal. The main thing is that your straps are safe and comfortable. After all, the slightest discomfort can ruin your classes. Good straps can support a significant amount of weight. So practice without fear.
Program on the horizontal bar for gaining weight
If you are a fairly experienced athlete and have a good command of the technique of all basic exercises, then this weight training program on the horizontal bar is for you. By doing it, you will add muscle mass in your arms, back and shoulders.
The bar training program for gaining mass is built around multi-joint movements that involve several large muscle groups at once. The work is carried out in the repetition range from 8 to 15. Only three workouts per week, but rest between approaches should be minimal - this way you will increase blood flow to the working muscles, without which muscle growth is impossible.