Why do deadlifts
This exercise has a lot of advantages. Here are some of them:
- This is a basic exercise for any bodybuilder. It develops several large muscle groups at once (back, legs, buttocks) as well as many small ones. The work of the muscles will be described in detail below.
- Deadlifts can significantly increase your strength. The increase in strength in this exercise will be accompanied by an increase in your muscle mass.
- In some cases, with a sore back, this is an excellent opportunity to forget about pain in the spine forever.
When performing a deadlift, about 70% of the muscles of the entire body are involved in the work. This is a powerful, energy-consuming exercise that also has a functional basis. After all, this is actually lifting a heavy object from the ground. And every person faces this task more than once in his life.
What muscles work
When performing a classic deadlift, the load on the muscles is distributed as follows:
Main working groups:
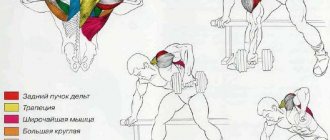
- Back muscles. The main load falls on the extensors of the spine, especially their lumbar part. Also, part of the work goes to the latissimus dorsi muscles.
- Legs and buttocks. The exercise makes the hamstrings, gluteus maximus and quadriceps muscles actively work. It’s worth saying here that the classic style of deadlifting puts less stress on the buttocks and the back of the thighs, so it is more suitable for men, but, for example, the Romanian deadlift and straight-legged deadlift are traditionally considered a more suitable option for women.
Additional load is received by:
- Forearms and hands. Holding a heavy barbell is not the easiest task for your hands.
- Trapezius muscles.
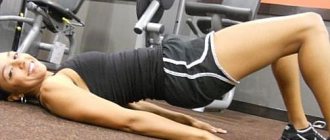
- Abdominal muscles (rectus and obliques). They stabilize your core, helping you maintain proper, safe posture.
- Calf muscles, inner thighs.
Muscle work during the exercise.
As you can see, almost the entire body is involved in this exercise.
Backdraft[edit | edit code]
PROBLEM:
Bent-over barbell rows are an excellent exercise for the latissimus dorsi. But bad luck! If you are a beginner and have not yet acquired a strong lower back, a heavy barbell will never conquer you.
SOLUTION:
Set the Smith machine bar at mid-thigh height. Take a lying position on the floor under the bar. Next, lift your body slightly and grab the bar with a wide, straight grip. Then you should statically tense your body and take a low hanging position above the floor, resting on your heels. From this starting position, do deadlifts, trying to pull yourself to the bar as high as possible. Thanks to the hang, your lower back is turned off from work and will no longer slow down your lat training.
Source Muscle and Fitness Magazine 2012 No. 1
Types of deadlifts
The classic way to perform deadlifts was mentioned above. But there are many variations of this exercise.
We list the main ones:
- Classic deadlift performed with a barbell.
- Deadlift of dumbbells on straight legs.
- Deadlift with a barbell.
- Sumo barbell row.
- Short deadlift.
In addition, variations of the barbell exercise can be performed both in Smith and with a free apparatus. The bar can be in a power rack, or simply stand on the floor.
We won't go into depth and tell you about exotic deadlift variations here, because there's no point in that. The exercises given in this article are ideal for all cases.
Execution technique
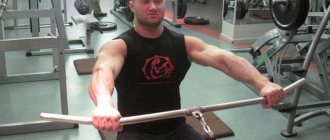
Previously, we already decided on the angle of inclination of the body when we talked about the difference in rods. Now you need to choose a grip. If we talk about safety, then a pronated (direct grip) will be more optimal in this regard. Thanks to this arrangement of the palms, we will remove the load from the biceps. Minimizing the risk of injury. A reverse grip will allow you to get the most out of the exercise. Due to the upward rotation of the hands, our shoulder blades will have to involuntarily move towards each other. At the same time, the chest will be slightly rounded. This position will allow you to stretch the working muscles as much as possible. But there is one condition. To perform reverse grip rows, it is very important to have a good feel for the contractions of the trapezius and lats. Otherwise, the biceps will begin to take on most of the load.
Initial position:
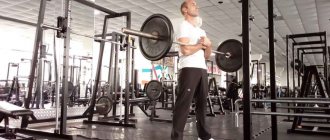
- We will look at the option of lifting the barbell from the racks. If you plan to lift it from the floor, then the lift will follow a DEADLIFT pattern.
- Place the barbell on the racks. Step up and grab the bar with your chosen grip. Palms are shoulder-width apart.
- The bar should be at such a height that when we grab it, our legs are bent.
- As you exhale, straighten your legs and remove the bar from the racks. Let's take a small step back.
- Lean forward 30°. The back is straight, the pelvis is laid back. Feet stand shoulder-width apart and slightly bent at the knee joints.
- Shoulders down, chest forward. Elbows point back and slightly to the sides.
- From this position, we will perform the exercise.
Performance:
- From the starting position, as you exhale, we begin to move our elbows back and at the same time bring our shoulder blades together. Pull the barbell until the bar touches your lower abdomen.
- Next, while inhaling, return the bar to its original position. Repeat for a specified number of times.
Deadlifting in different sports
Unlike powerlifting, the deadlift in bodybuilding is not a 100% mandatory exercise. But it allows you to develop your muscles well, making your body stronger and more respectable. Very famous athletes such as Arnold Schwarzenegger did it regularly. Among lifters, this is the basics.
Craving performed by Arnold Schwarzenegger.
- Deadlifts with a barbell are included in powerlifting triathlons.
- For the barbell push in weightlifting, the deadlift is the basic element of lifting the weight off the floor.
- For wrestlers, this is an important part of training to lift your opponent off the floor.
- This is one of the training elements in rowing.
Mainly, in all sports, this exercise is used to maximally strengthen the lower back.
Doing a classic deadlift
Before we tell you how to do a deadlift correctly, let's talk about how to hold a barbell. That is, let's talk about grip.
Grip nuances
The grip can be direct, reverse and mixed (mixed grip).
It is more correct to hold on to the bar so that your hands are turned with your palms facing your belt.
If the weight of the barbell is too heavy, athletes use a type of grip in which one hand is turned as described above, and the other with the palm facing away from you. The so-called mismatch. This really helps keep more weight off. But there are also unpleasant moments in this:
- The symmetry of the body is disrupted; over time, one side may become lower or higher than the other. The difference will be measured in mm, visually you may not notice it. However, this is a curvature of the spine.
- With such a grip (mixed), a torque occurs. The barbell seems to turn in one direction. This moment is transmitted to the spine, loading it.
- You are not training your grip strength because you are using a lighter version.
Correct deadlift technique means that your hands need to be positioned with your knuckles facing outward. If the weight does not allow you to do this, that is, your hands unclench, train your grip strength. There are special exercises for this. Choose a barbell weight that you can hold for 6-8 reps. Slowly increase the load over time.
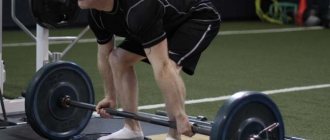
Exercise technique
The most common option is the classic bent-leg deadlift.
Storyboard of the exercise.
It can be done either in Smith, in a power rack or from the floor. The deadlift is a foundation, so it needs to be done at the beginning of your workout. Warm up well. Stretch your lower back and legs.
- Take an empty bar (usually its weight is 20 kg), stand in front of it, placing your feet slightly narrower than your shoulders. The feet should be parallel to each other.
- Straighten your back, push your pelvis back (natural arch in the lower back). The back cannot be round. The neck is an extension of the back; there is no need to raise or lower your head.
- From this position, we tilt the body forward, moving the pelvis back. With this tilt, the shoulders should extend slightly forward beyond the line of the shins. At the same time, the knees will begin to bend (by 10-15 degrees) - this is normal.
- The tilt of the body should be 40-45 degrees.
- Lower your arms down. If you are bending over correctly, your hands should be in line with the front of your shins.
- There should be very little left to the neck. Crouch down to pick it up. At the same time, do not lean your body forward or backward. Your main task is to ensure that your shoulders move along a strictly vertical axis.
- We take the bar with the correct grip (palms facing us).
- Smoothly straighten your legs, and only then straighten your back. When you hang weights on the bar, you won't have to go as low to grab the barbell. Therefore, you just need to approach it so that the bar rests on your shin. From this position it will need to be raised.
- When you are straight, squeeze your shoulder blades together.
- Then start lowering - first your back bends to about 45 degrees (make sure your shoulders are exactly above the bar), then your legs.
Do 10-15 warm-up reps, then hang up the plates and lift weights for 6-8 reps for 3-4 sets. If the working weight is heavy, approach it gradually. You should not immediately take, for example, 150 kg.
The bar should slide along your legs all the time - first along the shin, through the knee. Next, try not to move it far from the thigh, but also do not press it there with muscle force.
The position of the body, arms and legs during movement.
There is also such a thing as a classic short deadlift. This is when the barbell stands on plates, or is located in a power frame at a certain height from the floor. This option is used to practice This is deadlift training in the upper phase, when we do not lower the weight to the floor. This option is also suitable for people with limited mobility of the hip joints. It is performed in exactly the same way as the regular classic version, the weight is simply set to a higher place. Can be done in Smith.
Notes on technique
There are a number of technical points that should be observed no matter what type of deadlift you are doing. These are the moments:
- Heels should not be lifted off the floor. Do not wear shoes with soft or springy soles. Heavy weights will push them into the floor. It is best to wear shoes with thin, uniform soles (sneakers, for example).
- Despite the fact that when describing the classic deadlift technique, we suggested placing your feet slightly narrower than your shoulders, you need to find your own version. You can place your feet shoulder-width apart, or next to each other. Find the most convenient option for yourself. This will allow you to make the technique most correct for you and your body type.
- Don't load one part of your body more than another during a deadlift. Distribute the load evenly. This is achieved through the correct position of the pelvis. If your back or legs work more, pay attention to your pelvis.
- Take care that the barbell does not roll on the floor. When you lower it during the approach, it should not slide, roll away, etc. In this regard, doing deadlifts in a frame or machine is much more convenient.
- Toes should be on the same line, no leg should protrude beyond this line. Or not reach it. Asymmetry is unacceptable!
- The technique needs to be honed on light weights.
- In Smith, it is more convenient to stand on such a side that when removing the barbell, you can rotate the bar away from you (you are standing in the machine, not in front of it). But, again, do what is most convenient for you.
- To avoid chafing your knees, use bandages. Or do deadlifts in your pants. The wounds take a long time to heal and interfere with training.
- Wear an athletic belt.
Execution in Smith
Smith makes deadlift training a lot easier.
- Firstly, the weight can be taken from different levels.
- Secondly, you can fix it at any point if it suddenly becomes difficult or painful.
- Thirdly, it goes strictly up and down, so you cannot lift it any other way, to the side.
Agree - there are a number of advantages. Perfect for people with back pain.
How to deadlift in Smith - exactly the same as outside the machine. However, do not forget that you should not do deadlifts in Smith all the time. You should try to gradually switch to free weights.
In the Smith machine.
A healthy person does not have to start mastering deadlifts with Smith. If preparation allows, it is better to immediately take the barbell. It is better to use the simulator for those who have any problems with the spine. More on this a little further.
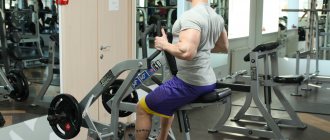
The best exercises for the back muscles (vertical rows)
Do you want to quickly increase volume and build a powerful, wide back? Then read the article “The best exercises for the back muscles (vertical rows)”...
Probably every athlete today dreams not only of big arms and beautiful abs, but also of a wide and powerful back, the main role in which is played not only by your latissimus dorsi muscles, although of course they are what make your back broad.
But don’t forget that in addition to the latissimus muscles, there are other smaller muscle groups that, like your latissimus, require a lot of work on them.
Only comprehensive back training and working out each of these muscles makes your back truly powerful and athletic.
There are TWO movements for general back development:
- The first movement is the vertical pull of the projectile, which responds and gives width to your back.
- The second movement is the horizontal row, which is responsible for the thickness of the back muscles.
Although, by and large, both rows are aimed at working your main latissimus muscles.
Although, of course, it is the horizontal rows that are more aimed at working out those small muscle groups that actually give the overall appearance that is responsible specifically for the thickness and massiveness of your back.
Whereas vertical rows help specifically work your latissimus muscles with a slight emphasis on other smaller muscle groups of the back.
Which exercises are most effective for each of the TWO movements?
Vertical rows and exercises: Many beginners who come to the gym in pursuit of a wide back begin to do pull-ups, but I want to disappoint you, in fact, pull-ups are not the best exercise for developing the back, at least for beginners and amateurs...
Because most athletes simply do not know how to perform this exercise not only correctly, but also as intensely as possible.
The fact is that with the same pull-ups, your arms, as a rule, give up earlier than the latissimus dorsi muscles, thereby you and your latissimus dorsi muscles simply do not work properly...
Therefore, most athletes simply cannot really work out their latissimus muscles very intensively and efficiently in pull-ups, which is why practically many athletes’ backs do not grow or develop in this exercise.
Therefore, I consider the best exercise for the latissimus muscles at the initial stage to be something other than pull-downs on the upper block, because... It is in this exercise that you can already control and change the weight with which you work in your workouts.
Therefore, I strongly recommend that many beginners and amateurs perform only this exercise for now. In the future, gradually move on to pull-ups and try to alternate them with rows on the upper block...
There is one cool combo that consists of two exercises that will absolutely explode your lats.
Super link 2 in 1 The first exercise is an overhead block pull (with a regular grip) with your palms facing away from you, while the grip itself should not be too wide, use a medium grip in this movement.
Attention: After completing all the repetitions you have planned, immediately proceed to the second exercise; there should be no rest between these two exercises.
The second exercise is also a pull-down, but with a reverse narrow grip, i.e. palms facing you.
These two exercises are quite simple and are performed on the same machine, but at the same time they complement each other perfectly and provide a tremendous load on your latissimus muscles...
You can perform this combination of two exercises as a superset, when two exercises are brought to muscle failure, while performing only one single approach.
Or you can work in a high-volume training mode for yourself, performing a certain number of repetitions from 10 to 20 repetitions and at the same time with a fairly large number of working approaches for yourself from 5 to 10 approaches, but with little rest between them.
Alternate these combinations of two exercises with your pull-ups and your back will really spread its wings.
What's the best way to do pull-ups?
The best option is to pull yourself up with THREE grips at once, using different muscle groups involved in lifting and pulling up.
The first grip is a pull-up with your palms facing away from you, i.e. you perform pull-ups using a standard-normal grip. With this grip, you mainly use the accompanying muscles of the triceps and biceps, which are responsible for the lift itself. It is worth noting that with this grip, it is quite difficult for many athletes to do pull-ups.
The second grip is pulling your palms towards you. In this position, you mainly activate the muscles - the biceps, which are also responsible for the lift itself, but the triceps already play a supporting role. It’s with this grip that it’s much easier to pull yourself up, unlike the previous one.
The third grip is a side (transverse) grip; with this grip, the entire load is already evenly distributed across the biceps and triceps. Using this grip it will be easiest to pull up. When performing “pull-ups” with any of these grips, your latissimus muscles work equally; only the accompanying muscles that are responsible for lifting in this exercise change. where you engage and work either the triceps, or the entire load falls on your biceps, with a side grip you already distribute the load equally on both the triceps and the biceps.
Take note: It doesn’t matter what grip you use when doing pull-ups, the latissimus muscles work the same in all THREE hand positions (grips).
So work with the grip that allows you to do the most pull-ups and also the one that allows you to add the most additional weight and work with it.
Or, alternatively, you can change your grip when your accompanying muscles are brought to exhaustion...
For example, you first do pull-ups with a regular grip, then you quickly change your grip with your palms facing you and continue the approach, then you change your grip again to a side grip and finish off your latissimus dorsi.
This method is quite good and gives a HUGE advantage in that you can eliminate weak muscle links and continue the exercise only by changing your grip to another.
For example, if an athlete does only 10 pull-ups with a normal standard grip (palms facing away), then in ONE such approach he will be able to do an average of 20 to 30 pull-ups.
Don't believe me? Try it yourself...
Thus, your intensity increases many times over, which will quickly affect the growth of your lats.
What are the best exercises and methods for developing the lats?
Just like when training other muscles, I often use and alternate high-volume training methods with high-intensity training methods.
High-volume training: High-volume training consists of only FIVE approaches with 30 - 60 seconds of rest between them, the less rest, the higher your intensity will be, while with each working approach the working weight of the projectile will be added.
- Set 1 – 20 reps (your starting weight)
- Set 2 – 15 repetitions (increasing the working apparatus)
- Set 3 – 10 repetitions (increasing the working apparatus)
- Set of 4 – 5 repetitions (increasing the working apparatus)
- Set 5 – Max number of repetitions (increasing working apparatus)
This method allows you to exhaust your muscles as effectively as possible and bring your muscles to complete muscle failure...
I also advise you to try another interesting method for developing your pectoral muscles called the 50/100 method.
High-Intensity Training: High-intensity training using the “50/100 method” gives you tremendous intensity in all your workouts and in all your exercises where it is used.
The 50/100 method involves fatiguing the muscles with two sets immediately after each other, thereby forming a “superset”.
This approach allows you to effectively work your muscles and bring them to muscle exhaustion every time.
The 50/100 method and the principle of its implementation:
The first approach is a light approach that will be equal to 50% of the weight of the upcoming working approach, consisting of 15 - 20 repetitions depending on your planned working weight. This approach allows you to maximally tire the muscle group you have chosen, while practically not tiring the weak muscle links.
When you have tired the working muscle group in your first approach, you proceed immediately to your second working approach with a pre-planned 100% working weight consisting of 6 - 10 repetitions, which will already finish off the tired muscles and give you a new impetus for their growth.
In the future, you can already try to perform all these methods and principles of training, which I described to you just above, no longer with the full range of motion, but only with a partial one.
You will be surprised, but from performing in a partial amplitude, your intensity will increase many times over, which will affect faster muscle growth...
Apply all these methods that I told you above and you will be surprised how quickly you will start growing!
Try all these methods in your pull-up workouts, as well as lat pull-downs, and your back will literally spread its wings, and you will be surprised at how quickly it will begin to grow.
I advise more experienced athletes to also perform a combination of several exercises (superset):
The main superset will consist of TWO exercises, the first of which is a pullover in a machine or a standing pullover in a bent-over machine for lat pulldowns for 20 reps, then you immediately perform the lat pulldown itself with a reverse close grip for 10 - 20 reps.
At the same time, you can replace your pull-downs with the same pull-ups, or alternatively, you can supplement them with a superset but with pull-ups, or even create a different combination of all these exercises for yourself.
For example, supplementing the “2 in 1 Super Lift” which I talked about above with preliminary fatigue consisting of an exercise such as a pullover in a simulator.
Don’t be afraid to experiment and choose only the most effective exercises for your arsenal...
Deadlift and sumo
Let's briefly go over the differences between these types of deadlifts and the classic ones. You can read in detail about the technique and features of each exercise in the relevant articles on our website.
Straight-legged row or deadlift
You can perform this exercise with dumbbells or a barbell. Here you will need a good stretch in the lower back and hamstrings. Take care of this in advance. Deadlifts on straight legs are better suited for girls, as they perfectly work the buttocks, back of the thigh and lower back without affecting the quadriceps.
On straight legs.
How to do deadlifts on straight legs - read a separate article on our website.
This is a lighter version of the deadlift, so you can do 10-12 repetitions in 3-4 sets.
If you take dumbbells, you need to hold them on the outside of your thigh. Their necks are parallel to your feet. And the feet are parallel to each other.
If your stretching is not enough to perform this exercise correctly, it is recommended to take a closer look at the Romanian deadlift. When performing it, the pelvis is also moved back, but the legs remain slightly bent at the knees. The bar of the bar drops to the middle of the shin.
Romanian version with slightly bent legs.
Sumo deadlift
This is a lifting type of exercise in which the legs are placed significantly wider than the shoulders and the arms are placed between them.
The wide leg deadlift is used in powerlifting.
In general, the technique is similar to the classic version, but there are a number of differences, which are also described in detail in the corresponding article.
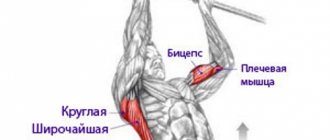
Bent-over barbell row with reverse grip
The reverse-grip bent-over row is a variation of the bent-over row. From a technical point of view, the movement is performed in exactly the same way, apart from changing the position of your hands on the bar. The muscles work are the same, except that the emphasis shifts to the lower lats and biceps, but the reverse grip has its own nuances.
What is the difference?
Bent-over barbell rows with a reverse grip, contrary to popular belief, place more stress on the lats. Remember when we talked about keeping your elbows as close to your body as possible when doing deadlifts with an overhand grip?
So, when performing deadlifts with a reverse grip, you, firstly, are deprived of the opportunity to place your elbows too wide, and secondly, you get the opportunity to bring your elbows closer to your body to such a distance that when performing a standard deadlift you cannot bring your elbows closer with anatomical points of view.
Therefore, if you learn to turn off your biceps when performing this exercise with a reverse grip, it is the reverse grip bent-over row that is the more preferable option for training your back.
In addition, the reverse grip row has another advantage, which is that no matter how hard you try to turn off the biceps, when using a reverse grip, they will in any case be activated with greater force.
This can be seen as a negative, but on the other hand, many professional bodybuilders consider it a positive. Dorian Yates, for example, considered the bent-over barbell row to be the main exercise for the biceps.
And if we take into account the fact that beginners only need to perform a few basic movements to train the entire pulling group, but still want to have big biceps, the reverse grip row can become a certain compromise between reasonableness in training and the desire to “pump up the biceps.”
If your back hurts
Whether to do deadlifts with a sore back is a controversial issue. Most often, the correct load on the lower back strengthens it, and a person forgets about pain and begins to live a full life. There are many such examples. But this is only with the correct technique and proper selection of scales.
When unqualified trainers get down to business, everything ends badly - a hernia, serious injury, surgery. And then you can’t force a person into the gym.
It is best to consult a sports physician about back pain. Because each case is individual!
You should always focus on your own well-being. There shouldn't be any pain. If your back hurts after every workout (do not confuse muscle and joint pain), try performing partial rows (short rows), or always wear an orthopedic belt with stiffeners. If this does not help, postpone classes until you consult a specialist.
If you have a sore back, the safest option is to use a Smith machine. Work in it for the first month to strengthen the ligaments and muscles of the back.
And remember, an ordinary doctor - neurologist or traumatologist will most often prohibit you from heavy exercise. A sports doctor is a sports doctor to help you continue playing sports. Therefore, if life without a gym is unbearable for you, try looking for such a specialist in your city.
Tips for maximum efficiency
- Before performing this deadlift, you must do a set of WARM-UP EXERCISES. Particular attention should be paid to the shoulder joints and lumbar region.
- Dorian Yates performed his signature exercise second, immediately after the VERTICAL BLOCK PULL. He did this in order to pre-tire the latissimus muscles. This way they won’t be able to engage as much as possible and take the load and trapezius.
- The Yats deadlift is a strength exercise. Therefore, it should not be performed in a multi-repetitive mode. 3 approaches are enough, 6-8 repetitions each.
- For variety, you can perform this exercise in a Smith machine. By working in it, we will be able to exclude smaller stabilizer muscles from working. And the entire load will fall on the main muscle groups.
- If you find it difficult to hold the barbell in your hands, then you should use wrist straps. Also, for a more comfortable performance, you can try performing Yats deadlifts with an EZ bar.
As you can see, the Yates Row is a really good exercise. It will not only work your trapezius, but will also help you gain muscle mass. But for this, you should perform the exercise with the correct technique. Therefore, you should take time to practice it, and only then increase the weight on the bar. With the right approach, you can get excellent results in muscle development.
Good luck to everyone in your training!
Main mistakes and difficulties
Stretching
Poor stretching is always a problem for a bodybuilder. Because of this, your deadlift technique can be severely affected. Moreover, this problem applies to any traction option.
Stretch the back of the thighs.
First you need to stretch your lower back, leg flexors, and calves. We use classic techniques for this:
- We reach the floor with our hands on straight legs. The lower you can go without rounding your back, the better. If you reach for floors with a round back, wean yourself off it. Firstly, this is harmful to the spine, and secondly, the technique of the exercise we are considering requires arching in the lower back.
- We stretch our hands to our feet while sitting on a fitness mat.
- We do stretches for the legs - splits, “reach the floor with your knees” and others.
It may take you a month to stretch enough for the lift.
Libra progress
You notice that the weight becomes light and add more. Progress seems to be going quickly. But for some reason the arch in the lower back disappears, and the back begins to round. You lift 150 kg, but in the upper phase you bring the barbell to the final point by straightening the thoracic spine. And the next day you have a strange pain in your chest. Congratulations - you have developed thoracic osteochondrosis.
More often than not, people do not feel pain and continue to gain weight. This is how serious injuries occur. What's the problem? In quickly hanging pancakes. You need to increase the weights slowly, carefully ensuring that the technique does not suffer.
If it’s easy for you, add 10 kg each workout. When it gets heavier, increase the weight by 2.5 kg. It's long, but effective. The most important thing is the right technique! When deadlifts are performed correctly, you will not get injured and you will gain strength and muscle mass.
Thrust frequency
The optimal training regimen for a bodybuilder is 1 deadlift per week. You can do 2 rows if one of them is with dumbbells, for example, on straight legs. And the second one is classic. If you work with heavy weights, it is better to leave the frequency at 1 time per week. This is because the load on the lower back is very large, both joints and ligaments are loaded. They need time to recover.
If you really want to pump up your back faster, do hyperextension 2 times a week.
Hyperextension for back training.