Execution technique
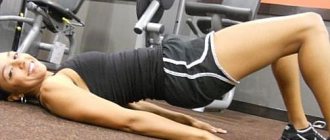
- Sit on the mat, lying on your back. Bend your legs at the knee joints and move your feet towards the pelvic area.
- Keeping your feet flat on the floor, raise your hips to the top position.
- Fix the shoulder joints on the mat (they should be directed upward towards the ceiling). Connect your fingers into a “lock” under the pelvis.
- Pressing your feet to the floor, tighten your thighs. The tailbone is directed towards the knee joints, and the chin is not pressed to the chest.
- Hold the position for five breathing cycles , then slowly lower your body to the mat. Repeat the asana twice.
Important! When doing the exercise, you do not need to turn your head, otherwise this can lead to injuries to the cervical spine.
You can prepare for this asana with the help of Urdhva Mukha Svanasana and Bhujangasana. After it, you can begin to perform Halasana, Sarvangasana, Karnapidasana.
When the exercise becomes easy to perform, you should move on to a more complex variation with the leg raised to the top position - Eka Pada Setu Bandha Sarvangasana .
The beginning of this pose is similar: the body rests on the floor surface using four points of support (shoulders and feet), the hips are raised up, the chin is not pressed against the body.
Remaining in this position, you need to raise your right foot and pull it towards the pelvis (the left foot and shoulders are pressed to the floor), straighten your leg up, perpendicular to the floor surface. Maintain balance for half a minute. As you exhale, return to the starting position (both feet and shoulders pressed to the floor, hips raised up). Repeat the cycle with the left leg.
Instructions for performing Setu Bandhasana
To prepare yourself for a full-fledged Bridge Pose exercise, start learning how to do the Setu Bandhasana asana. This is an easy position that develops the back, stretches the spine, and prepares the lower back for advanced training. Let's consider the technique of performing the practice.
- Take the starting position - lying on your back.
- Bend your legs at the knees and place them as close to the pelvis as possible.
- Place your arms parallel to your body.
- Raise your body as high as possible.
- Do the exercise while inhaling.
- Press your pelvic muscles forward.
- Reach your heels with your hands or clasp them behind your back. Stay in the top position for 20 – 30 seconds.
- Watch your breathing. It should be smooth, deep, conscious. Concentrate on your body, make sure that no pain occurs.
- As you exhale, lower your body to the floor. Repeat the exercise two to three times.
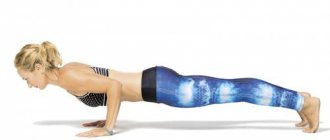
When you have mastered the simplified exercise, try moving on to a full bridge:
- Lie on your back, bend your legs, and press your feet toward your buttocks.
- Bend your elbows and place them next to your head at shoulder level. Your fingers should be on the floor parallel to your body.
- Take a deep breath, push off with your arms and legs at the same time, lift your body up.
- Stretch your back up, straighten your arms and legs.
- The chest and stomach should stretch.
- Lower your head back, you should look at the floor.
- The legs should be pressed together.
- Relax your neck, keep your lower back parallel to the floor. The legs, pelvis, and stomach should be tense. At the top point, calm your breathing.
- Take full breaths and exhales.
- Hold the asana for five breathing cycles, then lower yourself. Finish the position while exhaling. Lower yourself slowly and smoothly.
If you can, hold the position longer. The more you stand in the bridge pose, the better the work of the lower back, and the more visible the effect of the practice. During the training process, monitor your feelings.
Complex option
To prepare, use Cobra and Downward-Facing Dog poses. After Setu Bandha Sarvangasana, perform the following asanas: Plow, Sarvangasana and ear pose between the knees. If Setu Bandha Sarvangasana is easy to perform, then move on to a more difficult option - Eka Pada.
Lie on the floor with your back, lift your hips up, do not press your chin to your body. Lift your right foot and pull it towards the pelvic bone, straighten your leg so that it is perpendicular to the surface.
In this case, the shoulders and left foot should be pressed to the floor. Stay in this position for 30 seconds. As you exhale, take the starting position. Repeat with the other leg.
When standing on the bridge, follow the rules:
- straighten your chest and shoulders;
- do not spread your knees to the sides and do not touch them;
- stretch your shoulder blades and pelvis as high as possible;
- push your buttocks out using your tailbone;
- do not allow unpleasant sensations to arise
From a standing position
To master the Bridge pose well, you need to bend in the thoracic region; the position of the legs also significantly influences. At the very beginning, you can use the wall as a support:
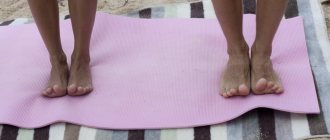
- Stand 30 cm from the wall, spread your feet hip-width apart. In this case, the hips should be turned slightly inward, and the knees should look forward.
- Place your palms together. Pull your hip bone up while relaxing your gluteal muscles.
- Move the front of your pelvis away from your hips. Repeat the same with the chest - pull it up towards the pelvic bone.
- Move your shoulders back and down in a circular motion, starting to push your collarbones up.
- The head is directed towards the wall, the palms are also lowered onto it. Reach your chin towards the ceiling.
- When pulling your torso back, press your hands on the support. Stay in this position for a few seconds.
When exiting the asana, push away from the wall with your palms. When this option seems easy, try going even lower. To do this, help move forward with your hands.
Tuning
When performing the bridge pose in yoga, it is important to follow the following rules:
- when lifting your pelvis, you need to stretch it and your shoulder blades as high as possible;
- straighten your shoulders and chest;
- do not strain the gluteal muscles, but strive upward by pushing out the tailbone;
- do not move your knee joints in different directions and do not touch them; they should be parallel to your hips;
- you need to stop at a comfortable height before painful sensations appear in the knee joints.
Video exercise No. 3: “Big Jump”
- Doing the exercise. Starting position: sitting on the mat, left leg straight, right leg bent, right foot pressed to the left thigh. Fold the belt in half and take the ends of the belt in your hands. Place the strap under the sole of your left foot and gradually lower your chest toward your thigh. Then slowly return to the starting position. After completing the exercise, do the same movement, changing the position of your legs.
- Breathing: When performing yoga exercises, you need to breathe exclusively through your nose. Remember to breathe smoothly and evenly during the exercise. Inhale as you stand still and exhale as you lower your chest and press into your hip to increase flexibility.
- Repetitions: 2-3 sets of 3-5 inhalations and exhalations, depending on your level of training.
Adviсe
The bridge asana is difficult to perform for people who have stiffness in the front part of the body, clogged neck muscles or weak back half of the body. Simplified variations of the asana are suitable for them.
- If you are unable to maintain the position of your knees parallel to your hips, it is recommended to do the asana with a brick. Place your feet on the mat at the width of your shoulder joints. Place the brick between your thighs at the narrowest point where they touch (knees should not touch). Thanks to this method, the knees will be fixed in the correct position and the lower back will not be tense.
- If your shoulders don't straighten, use a belt . When the pelvis is fixed in the upper position, you can not clasp your fingers together, but take the belt in your hands, placing your hands parallel to the shoulder joints. Raise your chest higher, expand your hips.
- If there are abnormalities in the cervical spine, you can place a cushion under it. Roll a blanket or towel into a cushion shape and place it under your neck. But it should not be very voluminous; it is better that the roller follows the natural curve of the spine in this section. This way, the chin will not be pressed against the chest, and the neck and back will be in a safer position.
How to Use a Yoga Strap
Any asana with a yoga strap helps you reach the right places with your hands or feet without suffering from insufficient flexibility. The belt will undoubtedly come in handy where there is not enough stretch. You can alternate practice with and without it.
You need to start with warming complexes. You should choose a comfortable yoga belt, do the exercises without Herculean efforts, resorting to simple variations:
Simplified Cow Pose
While sitting on your mat, fold your yoga strap in half. Take one end in your right hand and place your hand behind your back. Grab the other end of the strap with your left hand. Repeat the movement, changing the position of your hands.
Front lock
Sit on the mat, bend your knees. Place the strap under your feet and hold the ends with your hands. Straighten your legs and tighten the belt. Stay in this position for a few seconds.
Lying big toe grip
Lie on your back, moving your right arm and right leg to the right side. Place a loop of the belt over your foot and pull slightly towards you. Press both buttocks into the floor.
Do each exercise 3 to 5 times in 2-3 sets. Remember to breathe smoothly and evenly through your nose while performing asanas.
The desire to perform a certain asana beautifully is considered unacceptable. Focusing on social criteria and performing poses through pain leads to injuries. The human body has a certain resource, and everyone has their own. You should listen to yourself, observe the principle of non-violence, and avoid feelings of discomfort and excessive stretching of muscles. Yoga is not a struggle for primacy and there is no need to rush into mastering the practice.
Several asanas with a yoga belt - video
Benefit
Positive effects of asana:
- expands the chest;
- stretches the cervical region and the entire spine as a whole;
- normalizes the functioning of the lungs, thyroid gland and internal abdominal organs;
- reduces the feeling of heaviness in the legs, toning them;
- stabilizes the digestion process;
- reduces pain during menopause and menstruation (you can perform the asana instead of inverted backbends and poses);
- reduces headaches and back pain;
- brings the nervous system to a state of calm, reduces stress and has a positive effect on one’s mood in life;
- reduces anxiety and fatigue;
- has a beneficial effect on the body with high blood pressure, asthma, sinusitis and osteoporosis.
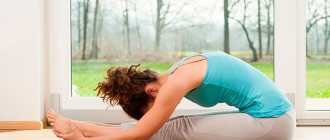
Video exercise No. 5: stretching for the back
- Doing the exercise. Starting position: the left leg in front is bent at a right angle, and the right leg is behind, knee on the floor. Lower your pelvis to stretch your right hip. Fold the yoga strap in half and hold one end of the strap in your right hand. Place your right arm behind your back, pulling the strap over your shoulder, and grab the other end of the strap with your left hand. Once in this position, tilt your back slightly to stretch and hold this position for 3-5 inhalations and exhalations. After completing the exercise, do the same, changing the position of your feet on the floor and the position of your hands on the belt.
- Breathing: When performing yoga exercises, you need to breathe exclusively through your nose. Remember to breathe smoothly and evenly during the exercise.
- Repetitions: 2-3 sets of 3-5 inhalations and exhalations, depending on your level of training.
Video Exercise #1: Front Lock
- Difficulty: level 1
- Muscles worked: abdominals, thighs
- Doing the exercise. Starting position: sitting on the mat, legs bent, stretch the belt under your feet and take the ends of the belt in your hands. Lift your feet off the floor and use the strap to straighten your legs. Hold this position for 3-5 breaths, then return to the starting position.
- Breathing: When performing yoga exercises, you need to breathe exclusively through your nose. Remember to breathe smoothly and evenly during the exercise.
- Repetitions: 2-3 sets of 3-5 inhalations and exhalations, depending on your level of training.
Video Exercise #2: Simplified Cow Pose
- Difficulty: level 1
- Muscles worked: shoulders, pectoral muscles
- Doing the exercise. Starting position: Sitting on your mat, fold the yoga strap in half and hold one end of the strap in your right hand. Place your right arm behind your back, pulling the strap over your shoulder, and grab the other end of the strap with your left hand. Hold this position for 3-5 breaths, then return to the starting position. After completing the exercise, do the same movement, changing the position of your hands.
- Breathing: When performing yoga exercises, you need to breathe exclusively through your nose. Remember to breathe smoothly and evenly during the exercise.
- Repetitions: 2-3 sets of 3-5 inhalations and exhalations, depending on your level of training.