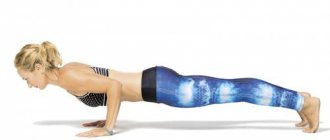
Execution technique
Step 1:
Stand in Tadasana with your hands on your hips. Exhale and begin to lean forward, starting from the hip joints, not from the waist. As you bend over, simultaneously actively stretch the front of your torso directly from the groin area. Do not strain your back when bending.
When bending, try to lengthen your torso rather than twisting.
Aim to expand the space between your pubic bone and sternum.
Step 2:
Try not to bend your legs, pull your knees up.
When you have bent over as much as possible, place your palms or fingertips on the floor slightly in front or along the edges of your feet (palms parallel to your feet) or, if stretching allows, place your palms behind your heels or wrap them around your ankle joints. If this is not possible, cross your forearms and hold your elbows with your hands - let your arms hang under their own weight.
Press your heels firmly into the floor and pull your sit bones toward the ceiling. Turn the front of your thighs slightly inward.
Step 3:
Relax your neck. Let your head be in a free position and pull down under its own weight.
Step 4:
As you inhale, carefully raise your head, trying to look as high as possible. Straighten your arms and at the same time straighten your shoulders, arch your back, stretching your chest forward. The fingers should be fixed in the same position (fingers/palms on the floor, palms on the ankle joints). This position is also called Ardha Uttanasana.
As you exhale, drawing in your stomach (to make the fold deeper), move your body a little lower towards your legs - return to the starting position of the asana, fold.
Step 5:
Stay in the asana for 30 seconds to 1 minute. Uttanasana can be used as a resting asana between standing poses.
Technique for performing Pada Hastasana Uttanasana
1. Stand in Tadasana.
2. As you exhale, bend forward and lower your toes, then place your palms on the sides of your feet, behind your heels. Try to keep your legs straight (the technique for beginners allows you to slightly bend your knees if you can’t do the exercise any other way). Stay in this position for 2 deep breaths .
3. Exhaling, try to stretch out as much as possible, straighten your legs to the end if they were bent and release your hands.
4. Inhaling, come out of the pose, rise up, relax your arms and restore your breathing. Return to Tadasana.
Benefit
- calms the brain and helps relieve stress and mild depression;
- reduces fatigue and anxiety;
- relieves headaches and insomnia;
- stimulates the liver and kidneys;
- stretches and strengthens thighs, calves, knees;
- improves digestion, relieves stomach pain;
- helps relieve menopausal symptoms;
- prescribed for the treatment of asthma, high blood pressure, infertility, osteoporosis and sinusitis.
Variations of Uttanasana
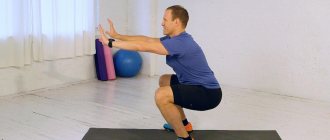
Simplified version of uttanasana
The simplicity of the pose is deceptive, so a simplified version is offered for beginners.
- Sit upright, stretch your legs and straighten your back.
- Then inhale and as you exhale you need to bend over.
- In this case, the legs are gently bent at the knee joints.
- You need to lie with your stomach on the front surface of your thigh
- Hands clasp the shins in the ankle area on the back surface.
- Inhale, then as you exhale you need to make a slight effort and carefully try to straighten your legs without lifting your stomach from the front of your thighs.
If you cannot straighten your knee joints to the end, then you should stop, according to your maximum capabilities. You need to try to breathe through the tension, and during the exhalation phase, direct your concentration to the place of maximum muscle tension.
If possible, you should try to straighten your lower limbs with each new breath. There is no need to make sudden movements; you can cause ruptures of tendons and muscle fibers. You need to patiently continue practicing, and then the asana will be mastered.
You will also be interested in the article about the cat pose - marjariasana.
Classic performance of uttanasana
- If you achieve success in the form of completely straight legs in performing the simplified version, you can move on to the main one.
- You need to stand with your back straight; to do this, you can diagrammatically imagine a line passing through your heels, tailbone and crown. Come into Mountain Pose asana. Then, with the next entrance, place your hands on your hips or waist. Lean back slightly, forming a slight arch in the lumbar spine.
- During the exhalation phase, move your torso forward, while maintaining a deflection in the spinal region. Remember that the tilt comes from the hip joints, there is no need to round your back. To do this, you need to concentrate on the deflection and maintain a straight posture.
- The lower limbs do not bend at the knees, the entire surface of the feet is on the floor. Palms go down. For advanced practitioners, place the palms on the lateral sides of the feet. It is allowed to place the hands on the ankles by clasping them from the back. We try to press the abs tightly against the front surface of the thighs.
- Extraction is carried out while inhaling, and the anterior abdominal wall leans more firmly as you exhale. It is very important to synchronize your breathing with your actions; it should be calm. At the exit, you should concentrate on the place of greatest tension, and attempts are made to relax.
- If it is impossible to keep the lower limbs unbent, the elbows are grabbed. It is enough to simply clasp your elbow joints with your hands. The body and cervical region should be as relaxed as possible, and the head hangs without tension.
We recommend that you familiarize yourself with the material: Yoga for two - asanas and technique.
It is advisable to stay in the asana from thirty seconds to two minutes. The exit is carried out slowly, without jerking movements. Place your palms on the front of your thighs. Raising the body is carried out during the inhalation phase, while attention is concentrated on the top of the head.
Ardha
- Take the initial pose in yoga - Tadasana.
- As you exhale, bend forward and lower your fingers to the floor.
- As you inhale, straighten your elbows and lift your body. At the same time, do not bend your back.
- Looking ahead, pull your chest forward. The neck should not be pinched.
- Stand in this position for 15-20 seconds.
Hasta
- Take the starting position of Tadasana.
- Raise your arms up, while clasping your palms.
- Place your arms straight behind your head and bend back.
- Don't strain your shoulders and lower back.
- Stay in this position for 20-60 seconds and breathe calmly. There should be no pain in the neck or back.
- Return to the original position as you exhale.
Variations
- Light version
To increase the stretch in the back of your legs, bend your knees slightly. As you stretch your torso down, try to tuck your tailbone toward your pubis. As you exhale, grab your ankles or big toes with your hands. As you inhale, gently push the front of your thighs back and try to straighten your knees.
- Complicated version
A . Padangusthasana - bending over while grasping the big toe. After bending forward, grab your big toes with the index and middle fingers of each hand.
Then pull your fingers up and secure them with your thumbs. As you inhale, straighten your arms and lift the front of your torso away from your hips, arching your back as much as possible.
Hold the pose for a few breaths, then as you exhale, stretch forward and down, spreading your elbows to the sides.
B. _ Padahastasana (also described in the article Padangusthasana) - bending over with hands placed under the feet. This asana implies greater flexibility in the back and legs.
When performing this pose, the position of the hands is replaced (step No. 2) - that is, follow all the steps described above. The palms should be placed under the feet so that the big toes press on the wrist bones, and the index and middle fingers cover the feet from below near the heels.
Technique for performing Baddha Hasta Uttanasana
1. Stand straight, arms and shoulders relaxed, legs straightened, hip-width apart, feet parallel.
2. Stretch out, raising your arms up, relax your back.
3. Grab your elbows with your palms, bend your arms at the elbows.
4. As you inhale, stretch as high as possible, relaxing the lateral muscles of your back and lumbar region.
5. Exhaling, bend forward and keep your back straight.
6. Extend your elbows with your body towards the floor, try to touch the floor with your elbows. in this position for 20-40 seconds, keep your breathing even. With each exhalation, try to relax your lower back.
7. Inhale and straighten your torso, unclasp your arms and pull them up.
8. After changing the cross, bend your arms and grab your elbows with your hands. Repeat steps 4-7.
9. Bring your raised arms back a little, exhaling, lower your arms, relax.
Adjusting the pose
- Check the position of the feet: the feet are active, the weight is evenly distributed over the entire area of the foot (that is, it does not go to the toe or heel).
- Straighten your back. Make sure you are not leaning too far. Make sure that there is no pain in the lower back muscles.
- Bend by bending the hip joints, and not by stretching the lower back. To do this, rotate your pelvis, moving your tailbone up. Point your hips inward, trying to increase the distance between your sit bones.
- Keeping your back straight, straighten your knees as much as possible. If you manage to fully straighten your knees, begin to pull your kneecap up using your quadriceps (quadriceps femoris muscle).
- Pull the top of your head down and look back (not down) - this will relieve tension from the cervical spine.
- Move your shoulder blades towards each other and move them further away from your ears. Pull your shoulders further away from your ears, lengthening your neck.
- Do not try to pull your chest towards your legs at any cost. If you feel that the thoracic region is rounding, either reduce the intensity of the tilt or slightly bend your knees. The main goal of this asana is to increase the space between the vertebrae while maintaining a straight back.
Preparatory exercises
In order to fully influence the cervical spine, we begin working out with a warm-up.
Bandhas and mudras will prepare the body for the intense part of the class.
Dakshina mudra
We sit down with a straight back in any comfortable sitting position: siddhasana, sukhasana (in Turkish), padmasana. The back is straight, the gaze is directed forward. Slowly turn your head to the right, making sure that your head does not move either up or down. We fix the position for 30 seconds and slowly return to the center.
Wamangi mudra
We repeat the same exercise on the left side.
Setu bandha
In some schools of yoga it is also called “Akashi mudra”.
Slowly lower your head back, looking upward. Hold the pose for 30 seconds. We return to the starting position.
Jalandhara bandha
We lower the chin down, pressing it tightly to the jugular cavity. We stay in the position for 30 seconds. Smoothly raise our head back.
Additional warm-up exercises for the cervical spine
- We perform 10 circular movements with the head to the left.
- We repeat the exercise in the opposite direction.
- Pull your ear towards your right shoulder. After 30 seconds of fixation, we return to the starting position.
- We perform the same tilt of the head to the left side.
- We make vertical circles with our chin: 10 times forward and backward.
- Horizontal circular movements with the chin 10 times in each direction.