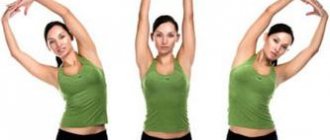
Relaxing your neck
The main principle of physical activity during a sedentary lifestyle is a comprehensive warm-up, working out the whole body. You need to move from top to bottom, so we start from the neck. Let me immediately emphasize that this is a very sensitive, delicate area. A special approach to it is required, the most careful and careful attitude. Perform the complex for the cervical spine carefully and easily.
With the first exercise, we will stretch the muscles and ligaments of the neck between the shoulder, which tends downwards, and the head, tilting to the side - away from the hand.
Article on the topic
Salads and warm-ups. How not to forget about a healthy lifestyle during self-isolation
Starting position: standing, arms hanging along the body. Next, pull one hand down and head in the opposite direction. We create tension primarily by lowering the shoulder; we try to tilt the head less.
As you perform, turn your head slightly and twist it slightly to engage different muscle fibers. Continuing to pull your hand down, slowly tilt your head and smoothly move to the other hand.
What muscle groups work together?
Some muscle groups are designed by nature to push, while others are designed to pull. The standard division is as follows:
- chest, shoulders, triceps = pushing;
- back, biceps = pulling.
And then there are the legs, which consist of the hamstrings, quadriceps and calf muscles. Each of the 6 major muscle groups is made up of individual muscles that work together to provide movement. In general the division looks like this:
- Pushing movements - chest, shoulders (front and middle deltoids), triceps.
- Pulling movements - back (latissimus dorsi and trapezius muscles), shoulders (rear and middle deltoids), biceps brachii.
- Legs - hamstrings, quadriceps, calves, glutes.
This is a very superficial overview, but it is more than enough to understand how to train muscles.
The only way to isolate one muscle group is to do isolation exercises.
However, there are many reasons to base your workout on compound exercises such as the bench press, deadlift, military press, and barbell squat. Performing basic exercises is effective for overall strength and muscle gain. Plus, it makes the task of creating a workout plan much easier because the compound exercises naturally load a significant amount of muscle.
Improving muscle mobility
Another good exercise for relieving tension, improving muscle mobility and freeing up blood vessels is “pinching.”
Grab your left shoulder girdle with the palm of your right hand and firmly remember it with pinch movements. Then with your left hand - the right shoulder, then - the entire neck.
The pinches should be moderately strong and palpable.
Problems are gone! Warm-up at the workplace Read more
Rotate your pelvis
Starting position: standing, hands on your waist. Perform circular movements of the pelvis with maximum amplitude in both directions.
Next, let's change the starting position a little and repeat the exercise: your legs are wide apart, your knees are slightly bent: you seem to sit down a little, your hands rest on your knees. When we do this, the spine is stretched, the arms serve as a kind of spacer. You then twist the lower part of the spine and thus promote stretching of the lumbar region.
"Raising the Sky"
The next mandatory element of our training is the “Raising the Sky” exercise. Starting position: standing, arms lowered, elbows straightened - with effort. Turn your palms at a 90 degree angle. They should be pointing down, parallel to the floor, with the fingers of both hands facing each other. Raise your arms up in front of you, keeping your elbows straight and your palms pulled towards you (as if you were supporting the ceiling), while taking a deep breath. Holding your breath, raise your head, look at your hands and stretch your hands up with all your might. You will feel tension in your lower back and back. Then lower your arms down to your sides, exhaling slowly. The head takes a vertical position.
Exercises for developing muscles, arms, legs and torso without objects. physical education article on the topic
Exercises for the muscles of the arms and shoulder girdle
The muscles of the arms and shoulder girdle play a major role in the formation of a beautiful physique, are very actively involved in all types of human activity, and are of paramount importance for playing many sports.
The arm consists of only three main links - the shoulder, forearm and hand, which have the ability to move relatively due to the elbow and wrist joints, but can perform the most complex movements due to the participation of many muscles. The simplest movement - bending the arm at the elbow joint - is performed by the flexor muscles of the forearm and the biceps brachii muscle - the biceps. The arm is extended by contracting the triceps muscle. Therefore, all exercises for the development of these muscles are built according to the same scheme - flexion and extension of the arm at the elbow joint. The number of repetitions of each exercise is 6 - 12, the pace can be varied - from slow to fast. You will choose the level of muscle tension yourself, taking into account how you feel - only taking into account the condition of the exercisers can you determine the optimal dosage without fear of negative consequences. This warning applies primarily to those who first began active physical education.
All exercises explain the essence of psychophysical training. They show the connection between volitional control, modeled in the higher part of the central nervous system - the brain, and the subsequent work of the “executive organ” - the muscular system. Moreover, the work of both the brain and muscles is based on bioenergetic support.
All exercises for the arms and shoulder girdle can be included in morning exercises and performed with a light load, repeating fewer times - no more than 6 - 8 in each series. If you exercise during the day and evening, choose the volume and intensity of your workout depending on your overall physical activity and level of fitness. Athletes who use athletic gymnastics without apparatus as an aid to the development of special speed-strength qualities can repeat the exercise 6 to 12 times in each series. In the last repetition, you need to tense your muscles as much as possible. If the number of series is increased to 2 - 3, then the total number of repetitions (that is, movements) will be from 12 - 18 to 18 - 36, respectively.
When using athletic gymnastics without apparatus as the main general developmental tool, you need to include as many exercises as possible in your classes and perform them at the highest possible level of muscle tension. Most of the exercises can be performed standing, sitting, or even lying down.
At the beginning of classes, you may notice some lack of coordination of muscle efforts; as your muscles develop, coordination will improve.
A set of exercises for the arm flexor muscles
1. Place your right hand on your wrist or clenched fist of your left hand. As you bend your left arm at the elbow, resist with your right arm. In this case, it is very important to maintain the value of the initial resistance, regardless of the angle between the bone levers - the shoulder and forearm. This mode of muscle work is called isotonic. This mode develops the flexor muscles more effectively than weight training.
2. Same as in exercise 1, but turn the palm of your left hand down.
3. Join your hands into a “lock” (grab the bent fingers of the other with four bent fingers of one hand), lift them forward to a horizontal position. Arch your back slightly. As you bend your right arm towards you, prevent it from moving with your left hand. In this exercise, the work of the flexor muscles of one arm is counteracted by the extensor muscles of the other arm - this type of muscle loading is called asynchronous.
The exercise is performed alternately for both hands, the initial movements are in a light warm-up mode, then gradually increasing the load on the muscles.
4. The same as in exercise 3, but clench your left hand into a fist and clasp it with your right hand. The left arm remains straight all the time - this will allow the pectoralis major muscles to be more actively involved in the work. In the initial phase of the movement, apply great effort.
5. Raise your hands, clasped together, in front of you to a level slightly above your forehead. Overcoming the resistance of your left hand, move your right hand to the side (to the right), bending it at the elbow as much as possible, then return it to its original position. Begin each subsequent movement of your right hand after lowering both hands down a little until they reach their lowest position at chest level. Perform arm movements continuously and in a zigzag manner, as shown by arrow F. To avoid pauses in movements, when returning your right arm to its original position, strain the flexor muscles of your left arm.
6. The same as in exercise 5, but moving the arms back and forth. In the starting position, raise your arms slightly above your head. Repeat, changing the position of the hands,
7. Join your hands and lift them up so that your right arm is fully straightened. Then lower your left arm down, bending it at the elbow and overcoming the resistance of your right arm.
This exercise allows you to simulate a pull-up on a horizontal bar; it is very important to bend your left arm as much as possible - this will load more muscle groups of the shoulder girdle. Change the position of your hands after 8-12 repetitions, and if you are developing strength endurance, increase the number of repetitions to 30-40.
The exercise can also be performed in a sitting position.
8. Lower your arms down. With your right hand, grab your left wrist, turning your shoulders slightly to the left. Relax your legs, bend your left knee. This position is reminiscent of one of the standard bodybuilding poses. Then bend your left arm at the elbow joint, overcoming the resistance provided by your right arm. In the final position, bend your left arm at the elbow as much as possible. Repeat with the other hand.
This exercise puts a powerful load on the muscles of the arms and shoulder girdle, including the latissimus dorsi.
9. Raise your left arm forward and upward to shoulder level and place your right hand on your left hand clenched into a fist. Overcoming the resistance of your right hand, bend your left hand towards you, while your left shoulder should maintain its original position.
The exercise actively involves the deltoid muscle bundles, as well as the chest and back muscles.
10. Take your hands behind your back, grab your right wrist with your left hand and lift it up to the limit, overcoming the resistance of your left hand.
The trapezius muscles are actively involved in this exercise.
11. Sitting on any support, clasp one leg with your hands just below the knee, using which to create resistance while bending your arms in the direction of arrow F.
Most of the muscles of the shoulder girdle are involved in the exercise.
12. Place your left leg on a raised platform, rest on your thigh with the elbow or forearm of your left hand, clasping its wrist with your right hand. Overcoming the resistance of your right hand, bend your left hand.
The exercise has variations: in a sitting position and using the table surface as a support for the elbow.
13. Place your left leg on a raised platform, clasp it with your hands and, creating resistance, bend your elbows.
A set of exercises for the arm extensor muscles
One of the main muscles of the arm, the triceps brachii muscle, which is also called the triceps, is very important for performing various movements of the arms. It is an antagonist to the flexor muscles of the arm. The harmonious development of the arm muscles, and indeed the entire muscular system, is impossible without strengthening the extensor muscles through regular training at the level of athletic gymnastics.
1. Bend your arms at the elbows, place your right hand clenched into a fist in the palm of your left hand. Overcoming the resistance of your left hand, straighten your right arm at the elbow joint, lowering your forearm down. Try to maintain the initial resistance force created by your left hand. Then change the position of your hands. The pace of the exercise is from slow to fast, impulsive.
2. The same as in exercise 1, but raise your arm in front of you to a horizontal position and then bend it as much as possible at the elbow joint. The deltoid and latissimus dorsi muscles are actively involved in this exercise.
3. Leaning your right hand on the palm of your left, straighten it forward, your left hand creates resistance.
4. Bend your left arm raised up at the elbow joint and place it behind your head. Grasp her wrist with your right hand. Then straighten your left arm straight up again. When extending your left arm, apply resistance with your right hand. This exercise is an imitation of the so-called French press.
5. Bend your right arm at the elbow towards your shoulder. With your left hand, clasp your right hand clenched into a fist, then, straightening your right hand, raise it up. This exercise is similar to a kettlebell press.
6. Raise your right arm, bent at the elbow, up and rest your hand on the palm of your left hand. When extending the right arm, the movement is directed downward. Use your left hand to resist. This movement is similar to a push-up on parallel bars.
7. Same as in exercise 6, but put your hands behind your back.
8. Bend your knees so that your hips take an almost horizontal position, and rest your hands on the upper surfaces of your thighs closer to your knee. Bend your elbows as much as possible, tilting your torso forward. From this position, do a push-up on your arms until they are completely straightened, overcoming the resistance provided by the muscles of the torso, mainly the abdominal muscles. In the final phase of the movement, round your back as much as possible, tensing your torso muscles.
The effectiveness of exercises depends on the “coherence” of tension in the muscles of the arms, shoulder girdle and torso. Replaces push-ups on hands while lying down and push-ups on uneven bars.
9. Place your right leg on a raised platform and rest your right hand on your thigh, bending it at the elbow joint. Straighten your right arm while offering resistance with your left.
10. The same as in exercise 9, but in a sitting position.
11. The same as in exercise 9, but leaning on the table surface.
12. The same as in exercise 9, but in a standing position on one knee.
Exercises 9 - 12 can be performed almost anywhere.
A set of exercises for the deltoid muscles
The deltoid muscles, which make the shoulders beautiful and wide, seem to cover the shoulder joint from the outside and are involved in all movements associated with raising the arms. The physiological state of the shoulder joint, consisting of the head of the humerus and the glenoid fossa of the scapula, depends on the functioning of these muscles. Well-developed deltoid muscles are necessary for many sports - for example, wrestling, boxing, throwing, acrobatics, rowing, tennis, swimming and even shooting, not to mention weightlifting.
The proposed exercises aimed at developing the deltoid muscles are not only very accessible, but also very effective. They are based on the natural range of motion of the bony levers.
The average number of repetitions of each of the given exercises is 6 - 12, the pace of execution can be varied.
1. Lower your arms down, clasp your left wrist with your right hand. Overcoming the resistance of your right hand, raise your left hand forward and up.
This exercise allows you to develop the anterior bundles of deltoid muscles and has a positive effect on the shoulder joint by expanding the load on its contact surfaces.
2. Raise your left arm up. As you lower it down, prevent this movement with your right hand. Adjust the amount of resistance created by the supporting (right) arm by the distance from the shoulder joint to the hand, that is, the length of the “lever” created.
3. Press your right arm, concave at the elbow, to the side surface of the body. With your left hand, grab the elbow of your right hand and resist it, raising your right hand up. The amplitude of movement of the right hand is as large as possible.
The exercise effectively develops the middle (lateral) bundles of the deltoid muscle.
4. The same as in exercise 3, but bring your left hand under the elbow of your right hand. The direction of movement of the right arm - downwards - is shown by arrow F. The pectoralis major muscles, latissimus dorsi muscles and antagonist muscles of the left arm are also actively involved in this exercise.
5. Bend your right arm at the elbow and lift it forward and up so that the shoulder is horizontal and the angle between the shoulder and forearm is 90 degrees. With your left (supporting) hand, clasp your right wrist, then lower the forearm of your right hand towards you (in the direction of arrow F), as far as the mobility of the joints allows.
6. Bend your arms in front of your chest. Place your right hand on your left hand. Overcoming the resistance of your right hand, lift your left up.
In exercises 5 and 6, the rotator cuff muscles are actively involved.
7. The same as in exercise 5, but in a sitting position, resting the elbow of your right hand on the surface of the table. Using additional support will increase the effectiveness of the exercise, which is reminiscent of arm wrestling.
8. The same as in exercise 6, but resting the elbow of your right hand on the table surface.
9. Bend your elbows and raise them almost to shoulder level. Grasp the wrist of your right hand with your left hand. After this, lower the elbow of your right hand down (in the direction of arrow F), overcoming the resistance created with the help of your left hand.
10. Bend your arms at the elbows and raise them to your chest. Hands in palm-to-palm position. Raise the elbow of your left hand as high as possible, then lower it down, overcoming the resistance of your right hand and at the same time moving your hands towards your right shoulder (arrow F). This exercise is characterized by a high degree of tension in the deltoid, trapezius and pectoralis major muscles. The distribution of tension on these muscles is carried out through concentration.
11. Move the elbow of your bent right arm back and up and rest it on the palm of your left hand. Overcome the resistance of your left hand, straighten your right hand forward.
12. Bring your hands together in front of you at shoulder level. Tightening the muscles of your arms and shoulder girdle, lower your elbows down.
This exercise also works the pectoralis major muscles.
A set of exercises for the trapezius muscles
In the work of the muscles of the shoulder girdle, a large role is played by the trapezius muscles, starting from the base of the back of the neck and covering, like a hood, the upper part of the body from the back. These muscles are involved in almost all movements of the arms, as they serve as a connecting even between the arms and the torso, as well as in movements of the head, bending and turning of the torso, movements of the collarbones and shoulder blades. The trapezius muscles are responsible for the formation of harmoniously developed muscle groups of the upper back, so they development needs to be given no less time than other muscles.
1. Grab the wrist of your straightened right hand with your left hand, lower your right shoulder as low as possible. Raising your right shoulder up (along the arrow F), resist the movement of your right hand, directing the force of your left hand along the arrow R. The exercise can be performed in any position - sitting, standing, lying down.
2. Raise your arms, bent at the elbows, to the sides, bend your back slightly - Bring your shoulder blades together while moving your arms in the direction of arrow F. When performing the exercise in a standing position, relax one leg, slightly bending it at the knee.
3. Sitting on a support, place your hands with the backs of your hands on your lower back. Bend well, bringing your shoulder blades and elbows together as in exercise 2. When performing the exercise in a standing position, relax one leg - this will allow you to relax the muscles not involved in the movement.
4. Place your arms straight behind your back, then lift them back and up until failure, tensing your muscles more at the end of the movement.
5. The same as in exercise 4, but first raise your arms back and up, bending them at the elbows, and then straighten them completely.
When performing exercises 4 and 5, do not be afraid of excessive stress on the shoulder joints - it is “more physiological” than training with fixed weights. The most subtle self-regulation mechanism of the central nervous system is triggered, instantly reacting to the appearance of pain due to excessive stress, which can lead to injury.
6. Join your hands into a “lock” and raise them slightly above the forehead line. In this position, tense the muscles of your arms and shoulder girdle, as if trying to break the “lock,” and then lower your arms down without reducing muscle tension.
7. Same as in exercise 6, but use your hands to perform circular movements indicated by the dotted line. Rotation alternately in both directions.
8. Sitting on a support, place your hands on your knees, spread your legs shoulder-width apart, raise your elbows as high as possible. In this position, tense the muscles of your arms, shoulder girdle and torso, and then lower your elbows down, pressing your hands on your legs, trying to connect them. At the same time, do not bring your legs together, providing static resistance with them.
This exercise can be performed while sitting on the floor or half-crouching.
9. Join your hands into a “lock” and raise them to shoulder level. Continuously perform alternating movements with your arms up and down with a small amplitude. It is better to perform the exercise while inhaling, although in principle, matching muscle tension with the rhythm of breathing does not matter.
10. Pull your head into your shoulders and tilt it back, raising your elbows slightly. In this position, tighten the muscles of the collar area, bring your shoulder blades together, then slowly turn your head left and right, as if rotating it around the longitudinal axis.
Those who have obvious symptoms of osteochondrosis of the cervical spine should exercise caution.
11. With your left hand, clasp your right hand clenched into a fist and raise your arms in front of you to shoulder level. As you bend your left arm towards you, offer resistance with your right.
12. Raise your arms in front of you to shoulder level. Place your right hand on top of your left. Raise your left forearm and create resistance with your right hand. As you lower your left hand, place your right hand underneath.
13. Cross your arms in front of your chest, pushing your elbows slightly forward and up. With the seemingly static nature of the load, the exercise is performed with a certain amplitude (the arms are lowered to the body) with maximum tension on the arms. shoulder girdle and torso. It is recommended to perform the exercise with a full inhalation, holding your breath while the muscles tense.
Exercises for the trunk muscles
The muscles of the trunk are connected to the muscles of the limbs, participate in their movement and perform the main plastic role - they “outline” the shape of the body. The supporting frame that holds the muscles of the body is the spinal column, consisting of sequentially and movably interconnected segments - vertebrae, providing mobility in any of the vertical planes.
With various inclinations, the spine bends, and this is possible only due to the contraction of certain muscle groups of the body.
The muscles of the trunk are involved in work both when the muscles of the shoulder girdle are tense and when the legs move. And without good development of the back muscles, neither correct posture, nor a beautiful gait, nor free breathing, nor the ability to stand upright are possible.
The main muscles of the anterior surface of the body are the pectoralis major and abdominal muscles (abdominals), which are involved in respiratory movements and restrain intra-abdominal pressure. The oblique abdominal muscles, connected in the upper part with the teeth of the latissimus dorsi muscle, form a kind of muscle corset with the rectus abdominis muscle.
If the pectoral muscles can be loaded by moving the arms, then the loading of the abdominal muscles and back muscles is similar to the movement of the bow string (the role of the arch is played by the spinal column).
Almost all exercises for the trunk muscles, associated with simultaneous muscle contraction and bending of the spine, have a beneficial effect on its condition and are a good preventive and therapeutic agent for osteochondrosis of the spine in any of its parts.
Exercises for the trunk muscles, which activate energy exchange in the muscles, have a healing effect on all elements of the spine.
The proposed exercises for developing abdominal muscles are unusual compared to the traditional method of “pumping up” using exercise machines, an inclined board or a wall bars. A very common exercise - raising the legs or torso in a lying position or hanging on a wall bar, horizontal bar, rings - gives a low training effect. Much better results in strengthening the abdominal muscles can be achieved using the following exercises.
Set of exercises
1. In a standing position, relax one leg to relieve tension in the back muscles (this tension can interfere with the exercise), bend slightly, raising your shoulders, bending your elbows. Place your fingers on the lower ribs, as if controlling the tension of the upper part of the rectus abdominis muscle. Inhale and deeply bend your torso forward and down. When bending over, tighten your abdominal muscles as much as possible and try to maintain the initial tension until the end of the movement. Do not bend your supporting leg. Perform the exercise at a slow pace, and after you master it well, speed up the pace. Do not forget that this exercise can be done no earlier than 2 hours after eating, otherwise compression of the abdominal cavity will adversely affect digestion and well-being.
2. The same as in exercise 1, but in a sitting position on any support, even in a soft chair.
3. While sitting on a support, keep your torso straight. Then, tightening your abdominal muscles, move your pelvis in the direction of arrow F - this will cause a corresponding bend in the spine. The position of the arms is arbitrary. The main mistake is excessive tension in the leg muscles. The exercise allows you to load the base of the abdominal muscles - the pyramidal muscle.
4. While standing, relax your right leg by slightly bending it at the knee and lifting it onto your toes. Bend your right arm and lift it up (this will make it possible to “unfold” the upper part of the latissimus dorsi muscle adjacent to the humerus). While tilting your torso to the right, make a counter-movement with your pelvis to the right (the shoulder and pelvis should move towards each other), tense the latissimus dorsi muscle, holding the bent arm in its original position. The direction of the torso tilt can be changed by involving other muscles of the torso.
5. Sitting on a support, at the same time as you tilt your torso to the left, move your pelvis towards your left shoulder. This movement is quite difficult to perform at first, but as the muscles involved in this movement develop, it will not be too difficult.
6. The same as in exercise 5, but in a supine position. Bend your legs and knees slightly, relax your arms. Simultaneously perform a counter movement with your shoulder and pelvis, completely relaxing the muscles not involved in the movement. The main task is to tense the muscles of the lateral surface of the body as much as possible,
This exercise can be performed even by those who are forced to remain in bed, but taking into account the permissible physical stress on the body.
7. While lying on your back, voluntarily tighten your abdominal muscles, but do not lift your torso. The torso will lean forward slightly and the shoulders will rise from the floor due to the tension of the abdominal muscles. Try to keep the angle between the floor and torso minimal.
8. The same as in exercise 7, but voluntarily contracting the muscles of the base of the abdominal press, which will cause a slight bend in the torso and the pelvis will noticeably rise.
Exercises 7 and 8 can be performed before bed.
9. Bend your knees, tense your back muscles, bend over, place your hands on your belt. Without relaxing your back muscles, straighten your legs and bend even more by increasing the tension of your back muscles. This exercise, aimed at training the flexor muscles of the spine, allows you to simultaneously develop its flexibility.
10. Sitting on the support, relax your arms and legs, then bend in the lumbar region and at the same time move your pelvis back, as if trying to move the support from its place.
Exercise is a good preventative against radiculitis.
11. In a standing position, move your left leg back a little, raise your arms to chest level. Voluntarily contracting the latissimus dorsi and oblique abdominal muscles, tilt your torso to the left. In the final phase of movement, muscle tension is maximum.
12. Place your hands behind your back, then lift them as high as possible, overcoming the resistance created by your joints.
13. Tilt your head back as far as possible, place your hands on your forehead, then slowly tilt your head forward, overcoming the resistance of your hands.
14. The same as in exercise 13, but put your hands on the back of your head, and in the starting position tilt your head forward.
15. Same as in exercise 14, but perform rotational movements with your head.
In exercises 13, 14 and 15, the range of movements of the head should be maximum, as far as the natural mobility of the cervical spine allows. The combination of a large range of motion with strong muscle tension requires caution during the initial period of training.
Exercises for leg muscles
The muscles of the foot and lower leg play an important role in the movement of the legs; when walking and running, they bear the main load.
The proposed exercises for developing and strengthening the leg muscles, which differ from the well-known traditional ones, will provide an additional training effect.
Set of exercises
1. While standing on your toes (you can hold onto some support with your hands), tighten your calf muscles as much as possible, as well as the muscles of the outer arch of the foot. Stretch up and, without reducing muscle tension, spread and bring your heels together at a moderate pace. The direction of movement is shown by arrows.
Sufficient muscle tension will be “signaled” by pain in the Achilles tendon,
2. With your leg slightly forward, place it on your heel, straightening it at the knee joint. Then, maximally straining the muscles of the outer arch of the foot and the tibial muscle located at the front surface of the shin, lift the foot up. After fixing the position, perform slow turns with the toe of your foot left and right, without lifting your heel from the support. The direction of power accents is shown by arrows F. The work of the muscles of the foot and lower leg in this exercise is similar to the work of the flexor muscles of the arm.
3. Place your foot on your toes and tense your calf and foot muscles as much as possible. Continuing to pull your toe as far as possible, perform oscillatory movements with your heel left and right in the direction of arrow F.
4. Place your foot with the toe pulled out as far as possible on the outer lateral surface, as far as mobility in the ankle joint allows, and roll it from heel to toe, extremely straining the muscles of the foot and calf muscle, while other muscles of the lower leg and foot are also strained.
5. The same as in exercise 3, but move the heel to the right, tensing the muscles of the foot and lower leg as much as possible. The amplitude of movement is the maximum possible.
6. Move your right leg to the side and up, join your hands and raise them slightly in front of you to make it easier to maintain balance. The foot of the left leg is completely adjacent to the support. Squat on your left leg, trying not to touch the floor with your right leg extended to the side. To ensure that the load on the leg muscles is powerful enough, change the pace of the exercise. At first, you can hold onto any support with your hands. If you cannot complete the exercise, you can touch the floor with your leg moved to the side.
7. The same as in exercise 5, but place your right leg behind you on a raised platform: a chair, stool, bench, etc. Vary the pace of the exercise.
8. Sitting on a support, grab your left leg bent at the knee by the ankle with your hands and, creating resistance with your hands, lift your shin up, trying to completely straighten your leg.
9. Place your left foot to the side on your toes. Extremely straining the muscles of the foot and lower leg, move the heel to the right and left.
10. Place your left leg back on your toes and, straightening it as much as possible at the instep and knee joint, tighten your calf muscle. In this position, move your heel left and right.
11. Walking in a semi-crouching position. This exercise, which is a good way to prevent disorders in the joints of the legs, can be included daily in a complex of morning exercises.
12. Walking, strongly straining the thigh muscles, is a very effective and energy-intensive form of healthy walking.
Regarding the question of the benefits of the daily mandatory ten thousand steps (and why exactly ten thousand?), we note that the point is not in the number of steps, but in their “quality”, that is, the power of the work performed, which characterizes not only the intensity of energy exchange, but also effectiveness of working out the internal structures of muscle tissue.
We offer an additional set of exercises for the development of leg muscles through complex biomechanical loading of muscles directly or indirectly involved in overcoming the friction force between the soles and the supporting surface.
The main advantage of these exercises is that they provide a high training effect, strengthen ligaments and joints, develop leg muscles, without exposing the spine to compressive loads that occur in weight training.
Unlike traditional exercises of a reflex-active nature, this method is of an active-compulsory nature, that is, a high level of coordination of muscle activity is achieved, and primarily the activity of the central nervous system.
The greater the coefficient of friction between the soles and the floor surface, the higher the effect of the proposed exercises. Therefore, it is advisable to conduct classes on a rubber mat with a corrugated surface.
Additional set of exercises
1. Squat down, tense your leg muscles, then make an effort to move your feet to the sides (in the direction of arrow F). If the friction between the soles of the feet and the support is large enough, then this will not be possible. While maintaining tension in your leg muscles, slowly stand up with your legs straight. The pace of the exercise can be varied from slow to fast. The position of the hands is arbitrary.
2. The same as in exercise 1, but in the starting position, place your left leg slightly in front of your right. In this case, you can change the power accents on the right or left leg to work certain muscle groups.
3. Stand with your feet hip-width apart. In this position, imitate walking in place, but direct the main effort to the soles of your feet, as if trying to move one of them forward and the other back. At the same time, bend your left leg slightly at the knee. Continuously alternate tension between the muscles of one leg and then the other. The position of the hands is arbitrary.
This exercise has a positive effect on the muscles, ligaments, tendons and joints of the legs (ankle, knee, hip). You can perform it at the beginning of classes as a warm-up or as an independent exercise at any convenient time.
4. Shift your body weight to your left leg, place your right leg to the side on your toe. Quickly squat down on your left leg with a sharp stop. This technique will increase the load on the leg muscles involved in the work due to inertial forces, the magnitude of which depends on the speed of the exercise in the phase of sharp squatting and sharp “braking”.
This exercise, aimed at developing the thigh muscles, has a training effect on the knee joint, which is prone to frequent injuries in running sports, as well as football, hockey, basketball, tennis, etc.
You can perform this small set of exercises in regular work clothes that do not restrict movement during rest breaks.
We stretch with all our might
I recommend performing the “Herringbone” exercise as a final exercise. It stretches the whole body well and equalizes muscle tension on the right and left.
Starting position: standing, feet shoulder-width apart. Raise your arms to the sides, fold your palms over your palms, as swimmers do before jumping into the water. Slowly stretch up, rising onto your toes. Stretch as hard as you can. Keeping your arms stretched upward, lower your heels to the floor. It is important to maintain tension in your arms and body. From the outside it may seem that a person is hanging on a hook. Lower your arms down to your sides. Breathing is voluntary.
Rest and recovery
Ideally, training should occur at the peak of supercompensation. It occurs 36-72 hours after the main strength work. It is advisable for a beginner to train the whole body every other day because he does not use high weights in his exercises, which can significantly affect the condition of the musculoskeletal system. In this training, each major muscle group is pumped with two, maximum three exercises. The volume does not exceed 6-12 working approaches per group.
More advanced clients may want to train a muscle group once a week as they perform a larger volume of work. They usually perform up to 5 exercises, some more.
If you don't have time to exercise
Sedentary work and a passive lifestyle are a one hundred percent guarantee of the formation of stagnation in the lower body and legs. Therefore, it is necessary to make certain movements every day to help fluid and blood circulate actively. Walking is ideal in this sense. Walk after sedentary work every day! Minimum 40 minutes. If you couldn't complete a set of exercises, at least take a walk. Walking is a very useful type of activity and a salvation when it is not possible to fully exercise.
Another useful habit for those who constantly sit is swimming. This is the most non-traumatic activity. Moreover, it is precisely this that provides a symmetrical load on both parts of the body. By working harder on your right or left side, you will simply swim in a circle. And if this is a pool, a swimming lane, you will have to strain the muscles of the right and left parts of the body equally. During swimming, all joints and muscles work, and under unloading conditions. In this sense, swimming is completely unique and irreplaceable!
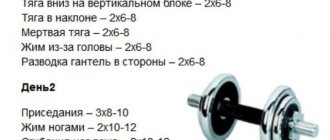
Workouts for beginners: description
1. We offer you 6 ready-made sets of exercises:
- Mon: Lower body workout (hips and buttocks)
- VT: Interval training for weight loss and body tone
- CP: Low-impact cardio without jumping
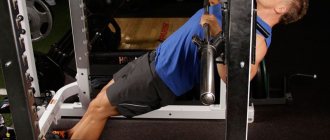
- CT: Upper Body Workout – Below
- PT: Circuit training for problem areas
- SB: Full body stretching
Repeat the program for 6-8 weeks, during which time you will be able to reduce volume, get rid of excess fat, develop endurance, tighten your arms, chest, stomach, thighs, buttocks. This affordable exercise routine will help you ease into your fitness regime.
2. Duration of training is 30 minutes, including warm-up for 5 minutes and stretching for 5 minutes. That is, the duration of the main lesson without warm-up and stretching is 20 minutes. This is an ideal time for beginners to work on target muscles without overdoing it.
3. The training is designed for beginners and beginners-intermediate levels of physical fitness. Some exercises are challenging enough that you can progress from week to week. The description also suggests a simplified version of the exercise, but gradually you should strive to complete the original version of the exercise without modification. You can always make a workout harder or easier by changing the number of reps or timing of the exercises.
See also:
- Top 30 exercises for slender legs
- Top 50 exercises for the buttocks
- Top 30 abdominal exercises
- Program without jumping for girls for 3 days
- Program for men without equipment for 3 days
- Program for men with dumbbells for 3 days
4. For training, you will need a mat and some free space in the room. No other additional equipment is needed. We recommend training in sneakers and comfortable sportswear made from natural materials.
How to choose sneakers for fitness
5. All workouts are low-impact, performed without jumping. The program is suitable for those who want to lose weight, burn fat and tighten their body.
6. The upper body workout suggested below consists of the following segments:
- Warm-up warm-up (5 minutes)
- First round: 7 exercises repeated in two rounds (~10 minutes)
- Second round: 7 exercises repeated in two rounds (~10 minutes)
- Muscle stretching (5 minutes)
7. An upper body workout includes functional exercises that will allow you to work several muscle groups at once. The emphasis in this program is on the upper body (arms, shoulders, chest, back, stomach), but the lower body is also included in the work, albeit to a lesser extent. There is no cardio exercise per se, but by quickly changing exercises, your heart rate will be high throughout the session, which will help you burn more calories.
8. This program can be performed for a time or number of repetitions of your choice. If you want to do this interval training for weight loss on a count, then the exact number of repetitions is indicated below in the description for each exercise. Please note that if you perform counting exercises without a timer, the total time of the program may differ from the stated one, since the pace of the workout will be individual. Do not take much rest between exercises if you are training on the count, this will reduce the effectiveness of the exercise.
9. If you want to train according to time, then the exercises in both rounds are performed according to the scheme 30 seconds work / 10 seconds rest. Those. You perform a given exercise for 30 seconds, then rest for 10 seconds and prepare for the next exercise, then perform the next exercise for 30 seconds, etc. You can take a longer break between laps, for example, 30 seconds - be guided by your capabilities. To perform using a timer, download a mobile phone application (for example, Tabata Timer) or turn on a ready-made video with a timer:
10. Gradually the body gets used to the load, so in the future it is necessary to move on to more complex and intense programs.
- Mon: Intense workout for legs and buttocks
- VT: Advanced Upper Body Workout
- CP: Intense cardio workout at 500 kcal
- CT: Low impact floor workout for problem areas
- PT: Interval training for weight loss and body tone