The name “Australian pull-ups” was given to this exercise by the Americans. It corresponds to the slang name for Australia - “down there”. It is not known for certain who invented this wonderful exercise. But it has been used in physical therapy, children's gymnastics, crossfit and fitness training for many years. The movement will help develop the latissimus dorsi muscles for those who do not yet know how to do hanging pull-ups, or do it technically incorrectly - with swinging.
In gyms, the exercise is performed by fixing the Smith machine bar at a level below the athlete’s waist, or in a power rack, using a regular bar as a crossbar for support. You can also do the exercise on parallel low bars with a reverse grip or a specialized horizontal bar. The movement is sometimes performed in training loops, on gymnastic rings, or while hanging on a thick rubber shock absorber. This allows you to activate your back muscles a little differently, engage stabilizers, and reduce the load on your lower back.
Execution technique
Initial position
- The crossbar is installed at waist level, or slightly higher if a beginner is pulling himself up, and it is difficult for him to perform the movement from a lower position;
- It is necessary to fix the projectile so as to prevent it from falling;
- The grip is straight, slightly wider than shoulder width or adequate shoulder width;
- The body is straightened, the pelvis is tucked, the hip joint is extended, the muscles are tightened;
- The fingers clasp the bar, the palm lies on the bar;
- The abdomen is tightened and neutralizes excess deflection in the lower back
Movement
- Squeeze your shoulder blades toward your spine and move your shoulders away from your ears;
- Pull your chest toward the bar, continuing to squeeze your shoulder blades and tense your lats;
- Touch the bar, then lower your body back down;
- Contract your muscles as you exhale, lower as you inhale;
- Do the required number of repetitions, maintaining a straight body position and toned buttocks.
Attention
- A pause at the peak of the contraction will help you strengthen the latissimus muscles better and eliminate unnecessary movements;
- The descent should be relatively slow, simply relaxing your muscles and lowering yourself under the weight of gravity is a bad strategy;
- Upward jerks and pelvic thrusts are not allowed;
- It is necessary to turn off the legs as much as possible, do not involve the pelvis, hip joint and do not push with the legs
Horizontal pull-ups are a simple exercise for a powerful back!
Pull-up technique
- Starting position: hang on the bar, place your hands slightly wider than your shoulders. The back should be completely straight, the chin slightly raised. Hold the bar with a closed grip. An open grip will not allow you to stay in a vertical hanging position for long without overloading your carpal ligaments.
- Start doing pull-ups from hanging on a high bar. We make an upward traction movement while exhaling at the same time. The movement should be carried out due to the movement of the shoulder blades. There is no need to try to pull yourself up with the strength of your biceps, since the latissimus dorsi is a much stronger muscle group. The same applies to various jerking movements of the pelvis and legs - such cheating is unacceptable here. To maximally load your back muscles, use wrist straps. This will take most of the stress off your biceps and forearms. Try to focus on the position of your elbows. You should “press” them down as you lift your body - this will maximize the load on the latissimus dorsi muscles.
- The movement should be performed in full amplitude. At the top point, the chin should be located above the level of the horizontal bar, and the elbows should be practically pressed against the body.
- Slowly lower yourself down while inhaling. At the bottom point, fully straighten your arms and relax your back muscles. pause for one second, then perform another repetition.
Recommendations
- Rest your toes against a barbell plate or plyometrics box, this will help remove inertia and prevent slipping;
- Pull your chest to the bar; in terms of biomechanics, the movement is most similar to an inverted bench press; the exercise will therefore be useful for beginner benchers, and simply for those who want to learn how to engage their back muscles and press more;
- Stay at the top statically, this will strengthen your core muscles faster. The back is naturally quite strong, it just needs to be included in the work, statics will help the athlete progress and quickly move on to more complex exercises;
- Rise smoothly, and try to lower in 4 counts, that is, twice as slow;
- If you have problems with your grip, try to place your palm completely on the bar, make your grip deeper, and do not work in a manner that involves “extra” muscles in the movement;
- Do not try to tighten your biceps; working them is not the main purpose of parallel or horizontal pull-ups;
- Eliminate kicking off the ground to progress faster
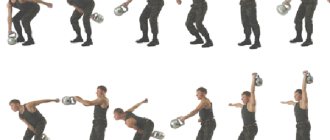
Two-handed force exit technique
There are two options for performing the exercise.
First option
With acrobatic elements, when all movements are performed very quickly. Movement occurs due to impulse.
- Starting position: hanging on the horizontal bar with your hands shoulder-width apart.
- The athlete arches his torso, bending like a bridge. Naturally, the deflection is not so strong. The shoulders are pulled back.
- It is from this position that, due to the impulse, one rises upward to the horizontal bar. At this moment, the athlete pulls himself up to the bar so that his torso is above the bar. Moreover, the pull due to the snatch is different from the pull in regular pull-ups.
- The hands are quickly and sharply pulled towards the stomach, and together with the push of the hips, the legs are pulled towards the bar.
- The next step is to exit. Even strong athletes who excel at parallel bar push-ups may not be able to do the push-up because they don't get over the bar. Here you need to consider the center of gravity and balance.
- The body weight should be located strictly under the crossbar. When the athlete is above the bar, his elbows should be at a right angle, and the bar should be at stomach level (below the solar plexus).
- A very important point is the position of the hands. They must be positioned horizontally. They remain in this position until the athlete begins to perform push-ups.
- At the moment of hovering over the crossbar, the hands should be turned vertically. The grip should be false, that is, without completely grasping the crossbar.
- In this position, positioned above the horizontal bar, you should move your legs forward to balance and maintain balance.
- The final movement is the vertical press. After the amplitude has been passed, the athlete returns to the starting position.
Second option
All movements are made using muscle strength: without jerking or swinging. The technique for performing this exercise is simple.
From the starting position (hanging on the horizontal bar), you should do a high pull-up, in which part of the torso (approximately to the middle of the chest) will be above the bar. From this position, use muscle power to lift your body up without pauses.
Pay attention to the hands, because they are the ones that allow you to perform all the movements from pull-ups to horizontal presses. Hands should not tightly grip the crossbar
Variations
- Pull-ups with a narrow reverse grip . This movement involves more of the biceps and forearms due to its biomechanical nature. The exercise allows you to strengthen your arms and forearms in equal measure with your back, but does not contribute to long-term progress in the development of back muscles;
- Pull-ups with a narrow straight grip . They engage the serratus muscles and force the shoulders to work, but at the same time they work better on the latissimus;
- Australian wide grip pull-up . The most common option, which is used only for developing the lats. This option can be performed with either a forward or reverse grip, and involves the back most actively. Working out the back muscles will be even more active with a reverse grip, since the athlete’s elbows will automatically be pulled towards the waist;
- Pull-ups in training loops . This option is convenient because those who wish can include the rear bundles of deltoid muscles, as well as the latissimus dorsi muscles, in the work. Pull-ups in loops are well suited for those who are just starting to exercise, because you can stand close enough to the place where the projectile is attached and reduce the load so that it is optimal for a beginner. It is enough to perform the movement, pressing your forearms to the body, and you will achieve maximum activation of the latissimus dorsi muscles.
Analysis of the exercise
What muscles work
In programs for beginners, the exercise is included as one of the stages of preparation for the classic pull-up. The movement creates an athletic V-shaped torso. The exercise helps to activate not only the back muscles, but also the muscles of the forearms and palms, strengthens the grip, and prepares for all traction movements.
Working muscles:
- Latissimus and rhomboid muscles of the back;
- Trapezius and round muscles;
- Biceps and forearm muscles;
- Abs, buttocks, and leg muscles as stabilizers
Advantages
- Suitable for beginners. They are often the first horizontal row in terms of strength training, and allow you to learn not only how to work with your own weight, but also how to properly engage your back muscles. The movement is better for a beginner than pulling a barbell to the belt due to the fact that it eliminates even a static load on the thoracic spine and cannot cause a back injury;
- Australian pull-ups are good for rehabilitation. After an injury, this movement will help restore muscle tone, strengthen your back, and improve muscle function in general. The exercise does not create a torsional or compressive load,
- Australian pull-ups allow you to create a beautiful silhouette, are suitable for bodybuilding purposes, and can be used by intermediate athletes to pump up their back muscles at the end of a workout. The higher the legs, the greater the load on the lats, so the variation with the legs raised on the support allows even the advanced to get the load;
- Pull-ups on a low bar are ideal for women's training; they strengthen the muscles that are “lagging behind” in most women and eliminate postural disorders;
- The movement can be performed by children and teenagers, and does not require a gym membership; in any yard there is a horizontal bar on which you can successfully do pull-ups, and parallel bars or a ladder for honing the skill of Australian pull-ups.
Smith machine pull-ups: 3 difficulty options
Types of pull-ups on the bar
There are several types of pull-ups on the bar. In many ways, the technique for performing them is similar, but still, there are some differences.
High bar pull-up
The most common is a full-range pull-up on a high bar. But not all people who have come to sports relatively recently find this exercise easy. Poor stretching of all ligaments and muscle fascia, low tone of the back muscles, weak grip and hypertonicity of the lower back muscles, accumulated over years of office work and a sedentary lifestyle, have an effect. Therefore, first you should master one simpler way to do pull-ups: hanging pull-ups while lying on a low bar.
Low bar pull-up
Low bar pull-ups are an easy way to master proper pull-up technique. To perform it, we will need a horizontal bar with height adjustment or any other similar equipment (for example, TRX loops or an Olympic bar and squat racks). Fix it at approximately chest level, bring your legs slightly forward, they should be slightly bent at the knees. The angle of inclination of the body should be approximately 45 degrees, we try to keep our back straight at all times, our gaze directed forward. The more you move your legs forward, the longer the range of motion will be and the more load you get on the latissimus dorsi muscles.
When performing pull-ups lying on a low bar, try to work at the fullest possible amplitude, touching the bar with your chest and statically straining the latissimus dorsi muscles at the top point of the amplitude. In the negative phase of the movement, try to go down as slowly as possible - this will load your back muscles even more, and your strength will increase.
When you have perfectly mastered the technique of hanging pull-ups while lying on a bar, start trying to perform pull-ups on a high bar. It's okay if you don't succeed the first few times. The main thing is to try to do a little more with each workout than you did in the next one, then progress will not be long in coming.
Pull-ups with different grip widths
We recommend starting with a grip approximately shoulder-width apart - this will help you feel the contraction and stretch of the latissimus dorsi muscles more easily, but then you can vary the grip width from very narrow to wider than shoulder width. This kind of complex exercise, done from different angles, allows you to work all the muscles in your torso. The narrower the grip, the more the biceps and lower part of the latissimus muscles are involved in the work; the wider, the more the rear deltoids and trapezius muscles work.
Preparing for the exercise
Unlike the classic hang, which is inaccessible if you have limited mobility in the shoulder joint, this version of the exercise is accessible to everyone. Before starting your workout, you need to warm up, do a general cardio warm-up, a joint warm-up, and 1-2 sets of pull-ups using a lightweight technique.
For this, beginners can use an almost vertical stance on the ground and a high support, continuing the usual technique, but without a pause at the top.
The exercise can be included not only as the first back movement, but also at the end of the workout, in which case it can be performed after the other movements have been done. Then joint warm-up is not necessary.
For beginners, it makes sense to do 1-2 sets of push-ups at the beginning of parallel grip pull-up training. The idea is that the inclusion of antagonist muscles contributes to better functioning of the back muscles.
Proper execution
- It is important to keep your spine and legs straight. The knees do not need to be “pushed” forward, they should remain in a neutral position so that the ligaments do not experience discomfort;
- The height of the bar cannot be the same for all people. The average starting position is at waist level, and most people should perform the movement from there. But for beginners, higher bars are also suitable, and for intermediates and those who are trying to correct their posture, pull-ups literally from a lying position on the floor;
- The one who performs it technically correctly is the one who feels the contraction of the shoulder blades to the spine, and consciously brings them together, and does not simply bring the body with the biceps to the bar;
- The starting point of the exercise is characterized by emphasis on the heels, but if the athlete’s hamstrings experience discomfort, standing on the foot with pointed toes, or using various types of supports is allowed;
- Exhale while pulling up, inhale while slowly lowering the body down;
- You need to strive to ensure that both halves of your back work equally, with your forearms parallel to each other. This will promote equal muscle involvement and help you move actively.
Errors
- Work in terms of amplitude, lack of involvement of the back muscles in the work due to pushing with the legs;
- Bend your knees and push your pelvis towards the bar;
- Uneven movement, that is, pulling with one arm and half of the back;
- Retracted shoulder blades at the moment of peak contraction;
- Lack of rigid fixation of the feet, “riding with feet”;
- Holding your breath during exercise;
- Haste and careless pace
Efficiency Tips
- Use a knurled grip and chalk if allowed in the gym. This will help avoid slipping while moving;
- The narrower your feet are, the more you have to involve the latissimus muscles in the work, and the harder you have to pull yourself up;
- Experienced athletes should aim for a parallel hang on the bar, and therefore keep their feet at a decent height
Important: Experienced athletes may lean on their calves rather than their feet. This emphasis reduces the efficiency of the legs and transfers the load to the back, which is what this exercise requires.
- Adjusting the load is quite simple. The closer the spine is to the plane of the floor, the more effective the work of the latissimus dorsi muscles. Therefore, in the gym, the pull-up bar or bar should be set as low as possible;
- In the gym, you can use not only footrests, but also straps to increase the range of motion by relieving the load on your forearms and palms. It makes sense to put on straps when the grip weakens
Note: this exercise can be performed in TRX loops, and then it will help not only strengthen the muscles of the back and arms, but also learn to stabilize the body. In this version, the movement also takes on additional meaning as an exercise for the ligaments.
How to improve personal results?
Below is a short series of tips and practical recommendations, taking into account which you will be able to identify your weak points in pull-ups, draw appropriate conclusions for yourself and conquer new sporting heights.
Strengthening the hands and forearms
Strengthen your hands and forearms with other exercises. A high number of repetitions in pull-ups on the bar is impossible without a strong grip and resilient forearms. Perform the following exercises to improve your results: hanging from a horizontal bar (with additional weights or with extenders), towel pull-ups, rope climbing without legs, squeezing a resistance band and various static-dynamic exercises that strengthen your ligaments and tendons. This point especially applies to those who have suffered injuries to the elbow or carpal ligaments. Without proper strengthening work, you risk causing the injury to recur because the ligaments may not be ready to handle serious strength work.
Additionally, strengthen the muscles of your back and arms. If you've already gained a decent amount of muscle mass through other free weight exercises, it won't be too difficult to work your way up to 20-25 pull-ups per set.
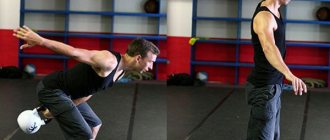
Clean technique
Minimize cheating in your movements. Don't deceive yourself: just because you completed the last few reps, engaging your lower back and legs, you won't become stronger, and the number of technically correct pull-ups in one approach won't move forward. In addition, you cannot be 100% sure that such a “dirty” way of doing the exercise will not lead to injuries and loss of results.
To learn how to do pull-ups “cleanly” and without jerking, a good option would be to perform pull-ups along a wall or other stationary vertical surface. You will need a smooth, low wall or door: hang on the top of it with your fingertips and lean your chest, stomach and front of your thighs as much as possible against it. The movement is further complicated by the frictional force that arises between your body and the wall. The work turns out to be more isolated, cheating is almost completely absent.
Variety of execution techniques
Variety is the key to continuous progress in training. Perform pull-ups in as many variations as possible: wide or narrow grip, forward or reverse, with or without additional weights. Due to such complex work, you will strengthen the entire array of back muscles, and also increase your strength endurance.
Perform hanging pull-ups on a bar in different styles. From time to time it is worth adding variety to the training process and doing pull-ups not only in the classic style, but also in a more “pump” version, due to the isolated work of the latissimus dorsi muscles. The athlete does not need to try to reach as high as possible and fully straighten at the bottom point; working in such a limited amplitude, you do not allow the back muscles to relax for a second, which significantly increases their strength potential and ability to work in a large range of repetitions.