What muscles are used by vertical push-ups?
Vertical push-ups use almost all the muscles of the body. Most of the load falls on:
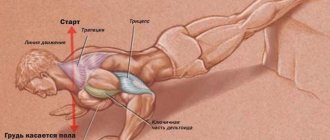
- Deltoid muscles. Especially on the front and middle heads. It is due to their contraction that extension occurs in the shoulder.
- Triceps. This muscle is responsible for extending the arm at the elbow.
- Pectoral muscles. Most of the load falls on its upper part.
All these muscles work dynamically; movement occurs due to their contraction. The rest are responsible for stabilizing our body. They work statically (they do not contract or stretch). These include:
- Gluteal muscles. Stabilizes the pelvis, preventing it from falling forward.
- Back muscles. Latissimus, trapezius and extension muscles of the spine. Responsible for stabilizing the spine.
- Abdominal muscles. These are the rectus and oblique abdominal muscles. Also, they are responsible for stabilizing the press.
- Biceps.
This muscle stabilizes the humerus. And besides all the others, it actively works in the negative phase (during flexion of the arm).
Narrow push-ups[edit | edit code]
This variant of the placement of the hands allows you to work primarily the triceps and, to a lesser extent, the muscles of the chest and shoulder girdle.
Initial position
: Take a straight arms position, but place your hands directly under your chest, a few centimeters from each other. The feet can be slightly spread to the sides to make it easier to maintain balance.
- As you inhale, lower your body until the angle of your elbows is approximately 90 degrees and your chest is 3-5 cm from the floor. Keep your elbows close to your torso.
- As you exhale, press your body up, straightening your arms. Imagine yourself rising up, trying to push the floor away from you. The pushing force should come primarily from the triceps, shoulder muscles and chest.
Advantages and disadvantages of vertical push-ups
Along with most exercises, vertical push-ups have an impressive number of benefits. These include:
Advantages
- A large load falls on the muscles of the shoulder girdle. Of course, if your goal is to develop more deltoids, then vertical push-ups will not be enough. But for training at home, it’s quite enough.
- There is no compression load on the spine. Unlike the more common barbell or dumbbell presses, to develop deltoids. In vertical push-ups, there is no pressure on the spine. Which makes the exercise less dangerous.
- Arm muscles work. As mentioned earlier, the triceps and biceps are actively involved in the movement. Consequently, vertical push-ups allow you to increase these muscles in volume.
- Abdominal muscles are strengthened. Vertical push-ups cannot affect the appearance of those treasured abs. But thanks to their implementation, the abdominal muscles become stronger.
- No special equipment is required to perform. Thanks to this, this type of push-up can be performed anywhere. At home, on the street or on vacation.
- Develops a sense of balance and coordination. This is especially useful for people involved in gymnastics.
- Blood supply to the blood vessels of the brain. Due to this, its performance improves. The load on the heart is reduced. Blood is redistributed in the body. As a result, blood stagnation in the pelvis is eliminated.
Flaws
- The exercise can be dangerous for unprepared athletes. Due to weak muscles and joints, a novice athlete may fall, injuring his neck. Or fall to either side and injure your lower back.
- Staying with your head down for a long time is harmful. If we build on our hands for 5-10 minutes, nothing bad will happen. But staying upside down for a longer period of time can affect our well-being. Up to the formation of serious diseases. Therefore, you should not perform a large number of approaches.
- Vertical push-ups are not suitable for beginner athletes . For beginners, it will be difficult to perform vertical push-ups. And professionals mostly choose other exercises to develop these muscles. Therefore, it can be seen extremely rarely in gyms.
We can conclude: vertical push-ups are an effective exercise for developing pressing muscles. And most of all it is popular among athletes who train in the gym.
Example workout
Below is a sample of exercises at home and in the gym.
At home
It is possible to exercise at home, since training does not require special equipment.
Here is a set of exercises:
- Warm up. To avoid injury, perform warm-up exercises: swing your arms in a circle 10-20 times, raise your arms to the sides 10-20 times, move in a circle with your hands on your shoulders 10-20 times, and at the end, gently stretch your arms and shoulders.
- Shoulder push-ups – 4 to 15 – 30.
- Pushups. Hands shoulder-width apart, elbows close to the body: 4 sets of 6 – 15 push-ups.
- Corner push-ups - 4 sets of 6 - 15 times. Don't forget to adjust the height of the stand.
- Single leg push-ups – 3 x 6 – 12 reps.
- Hitch. At the end, swing your arms: in front of you, to the sides - 3 x 15 - 30 repetitions.
In the gym
When training in the gym, use additional equipment. For example, place your feet on a weight, bench, or ball. This will increase the load on your shoulders.
Also, do barbell squats before working your shoulders. The squat works more muscle groups than any other exercise. By doing it, you will trigger a surge in testosterone, which will have a positive effect on shoulder growth. Perform 3-4 sets of 10 repetitions with medium weight.
Here is a set of exercises:
- Warm up. To warm up, you will need a block trainer or elastic band. Bend your elbow at a right angle. Hold an elastic band or the handle of a block in your palm so that the axis of the load runs parallel to your forearm. Perform hand abduction and abduction - 4 sets of 15-20 repetitions for each arm.
- Shoulder push-ups - 4 sets of 6 - 15.
- Corner push-ups - 4 sets of 6 - 15 times.
- Vertical push-ups or t-push-ups – 4 x 6 – 15 reps.
- On one leg - 3 x 4 - 12 times.
- Hitch. Stretch your arms and deltoids in a butterfly machine or on a bench with dumbbells - 3 x 10-15. Use light weight.
Execution technique
Basically, rack push-ups are performed near a wall against which your heels rest. This technique reduces the risk of falling due to loss of balance. And a full handstand, without special training, is unlikely to be possible for most people working out in the gym.
Initial position:
- Stand facing the wall, at a distance of 1-1.5 meters.
- Lean forward and place your palms on the floor. We place our hands wide so that when bending the elbow, an angle of 90° is formed.
- We push off from the floor. By inertia, we throw our legs up and rest our heels against the wall. If you can't do it yourself, get help from a partner.
- Tighten your glutes and core muscles. There is a natural arch in the lower back.
- Before you start doing push-ups, make sure your body is in a stable position.
Performance:
- As you inhale, bend your arms at the elbow and shoulder joints.
- Next, as you exhale, we push ourselves up by contracting the deltoids, triceps and pectoralis major muscles.
- During movement, your legs should move freely along the wall. There is no need to touch them while helping yourself to do push-ups.
Shoulder push-ups - types
Let's start with a difficult one, wall push-ups (or, as they are also called in handstands, they are also vertical push-ups), an extremely favorite in CrossFit. The first difficulty that beginners face is getting into the starting position. To do this, take the usual starting position for all push-ups in front of the wall, so that your hands are at a distance of 12-20 centimeters from it, then slightly tighten your pelvis and push strongly with your legs up. Yes it takes a little practice. When you manage to take the starting position, do not immediately start doing push-ups, try to hold it for a while until you begin to feel confident. Perform the push-ups themselves slowly, concentrating on the work of the muscles.
Execution example
An easier option, suitable for beginners, is shoulder push-ups. A separate material on the site is dedicated to them. Here I would like to remind you once again about the importance of following execution technique and tempo. If, when performing, you do not concentrate on the target muscle groups, in our case the deltoids, then the entire load will go to the more developed muscle groups - the pectoral and triceps. And performing exercises at an excessively fast pace is a direct road to injury.
The shoulder girdle is an extremely important muscle group, as it is involved in almost all movements performed in the upper body. Plus, impressive shoulders are just beautiful. Unfortunately, for many this part of the body is the least developed.
Push-ups are a great way to combat this problem. They are not only effective, but also affordable: they can be practiced without special equipment and at home. You will learn how to pump up your shoulders with push-ups using different types of this exercise.
In order to better understand the exercise technique, it is necessary to have an idea of how this muscle group is structured and functions.
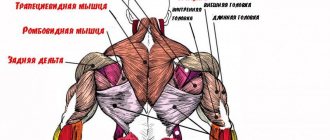
The muscles that form the shoulder girdle are divided into:
- the anterior delta (deltoid muscle), which is responsible for raising the arms forward;
- the middle delta, responsible for raising the arms to the side;
- rear delta, responsible for raising the arms to the sides and back;
- trapezius muscle, which elevates and retracts the shoulder blades.
Recommendations for implementation
- Your movements should be smooth and controlled. The main task is not to fall down due to inertia.
- When lowering down, do not touch your head to the floor, giving yourself the opportunity to rest between repetitions. Doing this can lead to injury to the cervical vertebrae. An exception may be performing an exercise with the so-called kipping technique. When an athlete stands on his head and helps himself to squeeze out his own body weight by moving his legs. It is mainly used by professionals to increase the number of times.
- Excessive bending in the lumbar region is not allowed. This can lead to spinal injury.
- The distance from the wall should not be large or small. Sitting far away, we will turn the exercise into push-ups with high legs. Which is designed to develop the upper pectoral muscles. If you stand very close, it will be difficult to control your balance.
- During the movement, the elbows should be spread apart, and not brought together.
- To make your stand more stable, you need to increase the support area. To do this, spread your fingers.
- You can also perform these push-ups facing the wall. The main thing is that when you extend your arms, you don’t run your feet up against the wall.
- To increase the amplitude of the exercise, you can use special push-up stands. Thanks to them, the distance from head to floor will become greater. And you can go lower.
No special equipment
It’s possible to pump up your shoulders without dumbbells. There are not very many exercises like this. Some of them require special physical skills from the athlete. In addition, if you are wondering what to do to lose weight in your shoulders, then exercises with your own weight will help with this; for this, it is enough to increase the number of repetitions and approaches.
Pushups
This popular exercise will help broaden your shoulders. The deltoid muscles are actively involved in the work. You can also work your chest and triceps. It is best to perform the movements with medium arms. Push-ups are great for beginner athletes. A simple exercise will help strengthen the torso, as well as prepare the athlete’s body for future stress. After several lessons, you will understand how to pump up your pectoral muscles and shoulders at home without additional equipment.
Handstand push-ups
This exercise is considered technically difficult. It is great for experienced athletes. It is very important to perform handstand push-ups correctly. To do this, you must follow the exact movement algorithm:
- Touch your back to the wall and then bend down.
- Place both hands on the floor. They should be located approximately shoulder width apart.
- Raise your legs up one at a time. Lean them against the wall.
- Stand firmly on your hands and begin push-ups.
With this exercise you can pump up your shoulders at home. It is best to practice in pairs with a partner who can back you up. Experienced athletes can perform handstand push-ups even without support. The movement is not recommended for those athletes who have problems with blood pressure. Similar push-ups can also work the latissimus dorsi muscles.
How can a beginner learn to do vertical push-ups?
For beginner athletes, it will be difficult to immediately begin performing vertical push-ups. Therefore, they need two things. Work on the strength of your muscles and joints. Basic exercises can help with this. For the shoulders, these would be: OVERHEAD BARREL PRESSES or DUMBBELL PRESSES. The chest will work great: WIDE ARM PUSH-UPS (once you learn how to do this exercise correctly, switching to the vertical version will be much easier). And for triceps, the following are perfect: DIPS and NARROW GRIP BAR PRESS. After you have mastered these exercises perfectly, you can proceed to the second point. Work on your resilience. To do this, there are lead-in exercises that, when completed, will allow you to freely get into a full stance even without leaning against the wall.
Spartan push-ups
They are performed with the arms being on the ground, but they should be offset, one in front of the shoulder on the ground and the other down on the sides of the body.
You need to start with your arms outstretched, you need to bend your elbows in this position until your chest touches the floor, and from there, when your arms are almost outstretched, you can change hands, moving the one that was forward, back.
The exercise helps to work the triceps and also stabilize the muscles.
Lead-up exercises
Push-ups with a delay at the bottom point
This exercise is reminiscent of classic push-ups. Only at the bottom point, we should take a short pause for 3-5 seconds, allowing our muscles to work statically. This technique will help strengthen your elbow and shoulder joints. Making them stronger and more resilient.
Push-ups with legs supported
This exercise is reminiscent of the “downward dog” pose from yoga. We take a small support. A box or sofa would be great. We kneel on him. We rest our hands on the floor. From this position, we move the body forward a little and do push-ups. Once you can complete 15 reps. Let's modify the exercise a little and instead of knees, we rest against the box with our toes. The legs remain straight. We perform such push-ups until 15 repetitions are easy for us. Then we move on to the third level. Now we lift one of our legs up and do push-ups.
Closed Horizon Handstand
Now is the time to work on our resilience. To do this, we need to take the correct stance. Place your hands slightly wider than your shoulders. Bring your shoulders forward. We statically strain the pectorals, deltoids and triceps. We bend our legs at the knees and move our body forward, lifting our feet off the floor. At the end point, we should be in a straight arm stand, legs bent and pressed to the stomach. In this position, you need to stand for 30 seconds. It's okay if you can't do this exercise right away. At the initial stage, it is best to use the help of a partner. He will support you a little until you understand the principle. Once you feel that you can stand freely for 30 seconds in this position, then you can move on to the final exercise.
Power output in handstand
It's time to unite the entire movement into one. The force output is performed from a sitting position. Place your palms on the floor, placing your hands slightly wider than your shoulders. Tighten your pecs, deltoids and triceps. Move your shoulders forward. Now we lean forward, bending our arms at the elbow joints and lifting our feet off the floor. Then, we tense our gluteal muscles and lift our legs up into a standing position. As you exhale, extend your arms. All these elements of the exercise must be done synchronously. At first, it is best to practice power output near a wall or with a partner. This will reduce the risk of falling if you lose your balance. We carry out 6-10 such exits. If you do not plan to perform this press in a rack without support. Then, you can choose the option of standing against the wall.
The main thing is not to forget that bodybuilding pursues the goal of harmonious muscle development, and not the study of gymnastic elements. Therefore, before you start mastering vertical push-ups in a full stance, you need to decide for yourself whether you need it. Or it is enough to perform them with emphasis on the wall.
Push-ups with legs elevated: what does it do?
The classic variation of push-ups involves positioning the body parallel to the floor. As for the hill, you can put both hands and feet on it. Let's take a closer look at push-ups with legs raised on a support.
Raising your legs to a height, the body forms a certain angle of inclination. Due to this, the load on the arms and body is shifted.
This variation is more complicated than the classic one. Therefore, it is recommended to include it in the training program in cases where push-ups have been mastered to perfection.
The benefit of the downward bend is to better work out the arms and torso. In particular, the load falls on the upper part of the pectoral muscles.
As a rule, the upper beam is less developed and the classic variation involves the central part to a greater extent. At the same time, the upward movement remains without proper load. However, a well-designed top adds volume and attractiveness to the bust. The variation benefits both men and women.
Push-ups with legs raised are performed at a body angle of 30-45 degrees. Those. to achieve this angle it will be enough to place your feet on:
If you use the latter, the body will be actively involved in the work.
It is also worth noting that the higher the legs are raised, the more deltas are involved in the work. When you raise your leg to the maximum, it will actually be a delt push-up.
What muscles work?
Let's take a closer look at which muscle groups are involved when pushing the leg above the head. In fact, the exercise is essentially an inverted version of the incline bench press.
In this case, the main emphasis falls on the upper part of the pectoral muscles and the front deltoids. The approximate load distribution looks the same as in classic push-ups:
- Pectoral muscles, in particular with an emphasis on the upper part;
- Anterior bundle of deltoid muscles;
- Triceps muscle - triceps;
- Latissimus dorsi and abdominal muscles.
It is worth noting that using the width of your arms, as in classic push-ups, you can shift the emphasis of the load. For example:
- with a wide stance, the chest will actively work;
- if you make it narrow, the load will shift to the triceps and inner chest.
Therefore, to achieve maximum results, it is necessary to alternate different variations, then you can get a good effect.
Push-up technique: legs above head
In general, the technique of performing push-ups from the floor “feet on a hill” is very similar to the classic variation. A distinctive feature is that the legs are located on a hill:
- Starting position: take a classic lying position, place your hands shoulder-width apart as in the classic variation. However, as mentioned above, the distance between the palms can be changed, depending on the desire to load one or another muscle group. The elevation can be anything - a chair, stool, bench, fitball, and even trx loops. The body should be absolutely straight from head to heels without arching in the back. The abs and back are in a tense static state.
- While inhaling: slowly lower the body down by bending the arm at the elbow until a few centimeters remain between the chest and the floor, while keeping the body in a level position without arching the back. It is very important not to touch the floor with your chest, otherwise the muscles will lose tone and you may fall. At the lowest point, you can linger for 1-2 seconds for better muscle stretching. In this case, the back should not bend.
- As you exhale: due to the effort of the target muscles, we push ourselves up, and the movement should not be sudden.
Perform the required number of repetitions and sets with your feet on a bench or any other elevated position. The exact quantity is determined on an individual basis. Everything depends directly on the goals and objectives of the trainee, so everyone selects this figure independently.
What variations can there be?
As mentioned above, different objects have different angles of inclination and dynamics. For example, if you do step push-ups, the angle will be smaller if you perform the same movement with your feet on a chair. In the first option, the main load will go to the upper part of the pectorals, but in the second option, due to an increase in the angle, it will be placed on the deltoids.
Do you want to improve your figure and health, without harming your spine and joints? Get my free resources on smart fitness at the gym or at home and learn how to exercise the right way!
They are suitable for both beginners and advanced fitness fans.
You can also try push-ups on a fitball (feet, hips) and TRX loops. Due to mobility, stabilizing muscles will be included in the work, so performing the exercise will become much harder. This will allow you to perfectly develop flexibility and coordination.
Basic errors during execution
Work to failure
Under no circumstances should you perform vertical push-ups to failure. Even if you are training with a partner. This technique can lead to falls due to muscle fatigue. At best, you will simply fall, and at worst, you will injure your head or neck. Therefore, if you feel that you no longer have the strength to do one more repetition, you should stop doing it.
Body swaying during execution
This exercise requires the athlete to fully stabilize the core. The body should be as straight as a pencil throughout the entire approach. If you engage your legs to perform a few more reps, your body will begin to sway. And eventually you will fall.
Head touching the floor
I already spoke about this earlier. Putting your head on the floor will create additional stress on the cervical vertebrae. This can lead to their displacement. The same applies to lightly touching the head while moving. Maybe the first 3-5 repetitions you can control this process. But towards the end of the exercise, your muscles will get tired. And you won’t even notice how you start to rest your head on the floor.
Sets and repetitions of push-ups
If doing push-ups is difficult, do as many push-ups as possible until failure until the muscles stop working. If it has become very easy to do push-ups in all variations, add weights (pancakes, dumbbells) or master complex variations. Perform 3-4 approaches. You shouldn’t do push-ups every day; two workouts a week are enough to give your muscles time to recover.
Tips for maximum efficiency
- Before performing the exercise, you should perform a GENERAL WARM-UP of the whole body. Particular attention should be paid to the elbow and joints.
- Also, it would be a good idea to do 1-2 sets of DUMBBELL PRESSES with a light weight.
- The exercise must be performed under your control. Especially when lowering down. This way, you can avoid a sharp fall and hitting your head on the floor.
- Place a small rug on the floor. Yes, it will slightly reduce the range of motion, but at the same time, it will soften the impact of the head when falling.
- When bending your arms, your elbows should move to the sides and slightly forward. This movement will be more natural for them.
- To maintain an even body position, you need to forcefully tense the stabilizer muscles. You should feel them working statically.
- More professional athletes can perform vertical dips.
- If you find it difficult to do full range of push-ups, you can start with a partial one.
As you can see, vertical push-ups are a very effective exercise. But his technique is quite complex. Therefore, many athletes bypass it, preferring iron. But if you are working out at home, or your goal is to learn all the intricacies of training with your own weight. Then this type of push-up should be in your arsenal.
Good luck to everyone in your training!
Is it possible to build up your shoulders by doing a lot of push-ups?
First of all, we need to understand the anatomy and structure of this exercise. You should know that the triceps and pectoral muscles receive the main load during push-ups. If you do the exercise incorrectly (extremely spread your elbows, bend in the lower back, don’t go low enough), then only chest exercises.
To build up a uniform and high-quality relief, you need to pump up the front, middle and rear delta bundles. There will be no problems with the first two. But push-ups for the rear deltoids spoil the whole picture, since they affect them only slightly, which is not enough for an effective load. Why is this happening?
Speaking in the language of trainers, the middle delta “steals” the load from the back one, since they both have the same task - to pull the muscle in the right direction. Physically, a person cannot “turn off” the work of the middle delta in order to fully use the rear one. So it turns out that push-ups for pumping up the shoulders do not allow you to work all the muscles of the upper shoulder girdle.
The back bundles are effectively pumped only with the help of a barbell and dumbbells. Therefore, the answer to the question “is it possible to pump up your shoulders by doing push-ups” will be negative. Yes, you will increase your endurance, improve your relief, strengthen your muscles. But, unfortunately, you will not work through them fully. Accept that you can’t do without a complex of weights (only weight provides the necessary load for muscle growth).
However, shoulder push-ups without equipment can be practiced in addition to basic strength training for all muscle groups. We will tell you how to pump up your shoulders with push-ups, giving the most effective variations for this purpose.

