According to statistics, every 10 people in the world suffer from neck pain. Stress, curvatures in the spine, and constant tension contribute to the development of stiffness of the cervical spine. People facing this type of pain most often resort to heating pads and warming ointments. And if you can’t stand it, many people drink painkillers, not wanting to get to the bottom of it.
However, there is a whole range of yoga poses that have a therapeutic effect on the neck. So the next time you have an attack of pain in the neck, instead of rubbing with painkillers, try to listen to your body and do a couple of neck asanas.
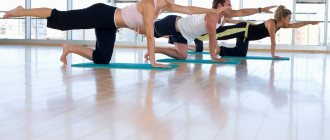
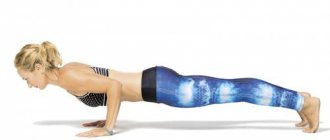
Cow-Cat Pose
This therapeutic asana helps the vertebrae begin to play, breathe and move. The pose gives flexibility to the spine, lengthens the front of the body, removes the double chin, and salt deposits in the neck. Creates new breathing space.
Start in a knee-elbow position with your back straight, palms under your shoulders and knees under your hips. With an inhalation, we raise our head up, a slight deflection. With an exhalation, lower your head down, your back arched. Remember to keep your shoulders back and down as you bend.
Repeat 7 to 10 times, gently combining it with your breathing.
Neck warm-up. Performed standing or sitting in Virasana.
Any activity should begin with gentle warm-up movements, especially if you are exercising in a cold room or have come from cold air. Dynamic work with the neck (vyayama) begins with longitudinal traction of the cervical spine, which must be maintained during movement. That's why the first exercise is called "Baron Munchausen pulls himself out of the swamp with a horse sandwiched between his legs." While maintaining a vertical position of the neck, gently but persistently pull the head up by the hair on the top of the head and lower the shoulders down.
Next, maintaining the achieved feeling of extension, we proceed to the cycle of exercises “A sleepy horse raises and lowers its head, shaking off the duckweed stuck to its muzzle, turns its head in different directions in bewilderment and, in a state of extreme amazement, performs completely strange movements with its head.” We start by tilting forward and backward, then turning the head left and right (the chin should move in the same horizontal plane), then bending to the side, and ending with head rotations.
While performing all these movements, it is very important to maintain the feeling of neck extension (you can “remind” yourself of this feeling by repeating the first exercise a couple of times between the “horse” exercises). For example, when tilting your head back, we do not press the back of your head to your back, but stretch your face up; when performing turns, we pull the top of your head up, tilting your head to the side - we try not to touch your shoulder with your ear, but stretch your neck with your upper ear up, while simultaneously lowering your shoulders down.
Two types of rotations are used: the first - we “draw” circles with the top of the head, gradually increasing their radius according to sensations. The second is to “draw” circles with the chin, that is, we make movements with the head in the vertical plane (the chin stretches “up-forward-down-toward” and vice versa). When performing rotations, an unlimited amplitude of movement is first selected, which gradually increases if there are no unpleasant sensations.
For therapeutic purposes, these exercises are always done 1-2 times a day, very slowly and consciously, with a painless amplitude and with a gradual increase in the number of repetitions (you can start with ten and add, say, one per day or 10 per week, until get bored, or rather, until you feel like this is the optimal amount for your neck).
We finish the warm-up with a short strength fixation.
The head is vertical, we place the palms intertwined in the fingers on the forehead, inhale smoothly and deeply, as we exhale we begin to press the head on the palms, and with the palms on the head, maintaining a vertical position of the cervical region. At the end of exhalation, maximum effort is applied - but this is only for healthy people(!). For those who already have problems with the neck - old injuries, osteochondrosis, spondylosis, etc., a softer version is recommended, but with a large number of repetitions and 2 times a day.
The exercise is performed in a similar way with palms on the back of the head, and then with the right and left sides - in this case, one palm is placed on the ear, the neck remains vertical. To reduce the load, in the therapeutic version, applying pressure on the head with two or three fingers is enough. The time of isometric load on the neck muscles is determined individually. To begin with, 5-10 seconds with moderate effort are enough, you can gradually increase the pressure and time of the exercise - up to 15-20 seconds, this is quite enough to obtain a characteristic strengthening effect.
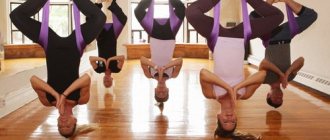
Balasana (Child's Pose)
Child's pose is a restorative pose. It helps to relax your back and neck. Reduces anxiety and psychosomatic stress. To do Child's Pose, from cat pose, lower your hips toward your heels until you feel comfortable. Extend your arms forward and lower your head to the floor. Alternatively, you can place your fists under your head. Relax completely. Child's pose, semi-inverted pose. It places your head lower than your heart, so avoid this pose if you have high blood pressure or eye problems.
If there are no problems, stay in it for 30 seconds or longer.
Ardha Matsyendrasana (Seated Twist)
The seated twist is an excellent pose that provides flexibility to the spinal column. It gently massages the abdominal organs and increases neck mobility.
Sitting on the floor, extend both legs forward and place your arms at your sides. Bend your right knee and bring your foot toward the outside of your left thigh. Exhale and extend your left arm behind the knee of your right leg. And place your right hand at the tailbone with the palm on the floor pointing towards you. Turn your head to the right so that your chin points to your right shoulder. Make sure your back is straight and the top of your head reaches toward the ceiling. Breathe in this pose for 5-7 deep breaths. Repeat on the other side to maintain your body balance.
General rules of classes
When treating neck diseases with yoga, a positive result can be achieved by following the rules:
- all movements are performed without haste and smoothly;
- The training begins with simple asanas and gradually increases the load;
- for problems with the cervical spine, intense twisting and deep deflections are avoided;
- Before practice, the neck is warmed up so as not to provoke sharp pain;
- Classes are held no more than 3 times a week.
To improve your health with osteochondrosis, you need to be patient and conduct regular sessions.
Tilt of head to shoulders
This easy pose can be done anywhere. It helps stretch the lateral and trapezius muscles. It can be performed either standing or sitting, provided that the back is straight.
To begin, inhale, raise your arms up, and exhale, lower your arms down and tilt your head with your right ear to your right shoulder.
At the same time, we do not raise the shoulder; it remains level. Inhale and return your head to the center. Exhale and lower your head to your left shoulder. If you want to deepen the stretch, place your right hand on your left ear as you lower your head to the right. Don't pull your head down, just let the weight of your arm take care of stretching the muscles. Do this exercise five to seven times.
Recommendations for Beginners
Before you begin yoga therapy for the neck, it is important to learn the necessary rules for beginners, which will help you prevent common mistakes and get positive treatment results after just a few sessions. They are as follows:
- All movements are performed smoothly and slowly. Haste, lack of concentration and yoga are incompatible concepts. Separately, it should be noted that movements made daily should also be smooth.
- It is important to monitor your breathing. Activation of regenerative processes can only be achieved if the rules of breathing practices are followed. You should alternate between deep breaths, exhalations and shallow breathing. Instructions from a competent trainer will help you learn more about the basic principles of yoga breathing practices, which will also help strengthen your neck.
- It is necessary to make adjustments to the diet. A balanced diet, saturating the body with important microelements and vitamins will help increase the effectiveness of the exercises performed.
Before starting a yoga session, it is recommended to do a light warm-up for the neck, which will prevent excessive stress on muscle tissue and activate metabolic processes. The warm-up complex includes neck turns, head tilts, raising arms and shoulders.
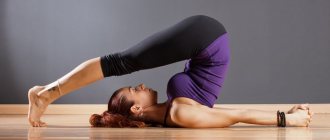
Viparita Karani (Feet on the Wall)
This pose helps the body relax, calms the nervous system, mind, improves blood circulation and aligns the spine. For this pose, you can sit facing a wall and place your feet on the wall while completely relaxed. Place your arms at your sides, palms up, with your back and head on the floor. Experiment with the distance between your butt and the wall. Try all the options until you find one that suits you. If it is difficult for you to lie with a straight back, place a folded blanket or terry towel under your sacrum. Stay in the pose for 5 to 10 minutes, inhaling gently and relaxed. To exit the pose, bend your knees and turn onto your side.
Shavasana (complete relaxation pose)
Savasana is usually practiced at the end. This finishing pose is useful for relieving tension, stress, and anxiety. In it, everyone experiences a dive deep into themselves, and our body and mind adapt to the transformations caused by the practice of asanas.
Lie down in a comfortable position on the floor. Extend your arms with your palms facing up at your sides. Stretch your legs and spread them slightly apart. Close your eyes and breathe calmly, effortlessly. Relax your face, jaw, and release any remaining tension in your neck or spine.
Stay still for 5 to 15 minutes.
Stretching the muscles of the collar zone.
The following exercise stretches the sides of the neck well and relieves tension at the base of the neck. It gives the most complete effect if performed after the short static fixation mentioned above. In a sitting position: the left hand “grabs” the right ear over the head, the right hand grabs the ankle (thus fixing the body), as you inhale, the neck stretches upward, as you exhale, the body tilts to the side, so that the feeling of extension moves to the base of the neck. Fix 3-4 breaths, then repeat on the other side.
Typical mistakes:
- Hand pressure on the head.
- Tilt the head forward or throw it back - when performed correctly in the first phase of the exercise, the neck should be strictly vertical, the movement occurs in one plane.
- Stretching the neck to the side rather than up (diagonally) - this can occur if the body is not tilted to the side, while the opposite shoulder is raised. As a result, the spinal discs become more compressed instead of stretched; in addition, the muscles of the collar zone are less stretched in this case. It is important to create a preliminary upward stretch, and then, holding the ankle with your lower hand, pull your shoulder down from your neck, moving your head up and then to the side.
- A sharp stretch, which leads to muscle contraction, exacerbating the so-called “posture reflex,” which is expressed in the fact that the muscles contract when trying to sharply stretch them. Therefore, it is necessary to “flow” into the asana gradually, gradually increasing the force of traction. The fixation is performed for at least 20 seconds, because only after 10–15 seconds the tense muscles “give up” and begin to truly relax and stretch.
A similar extension is performed on the back of the neck, with the fingers intertwined behind the head and the thumbs placed at the base of the skull behind the ears.
After which it would be optimal to move on to working on the thoracic spine, since for most people it is magically connected to the cervical spine.
Tips for daily prevention
In addition to the above poses, be more mindful of how you hold your neck on a daily basis. It is quite difficult to constantly be aware of your position in space. But it's much easier to keep track than to suffer from neck pain. My mom is a massage therapist and she coined the term “blogger pose.” This is when the spine is strongly rounded forward, the shoulders are dropped, and the head is very far in front of the neck. Agree, now there are a lot of similar people, and even a small hump on the back is no longer surprising. This indicates incorrect posture, and leads to a large number of problems with the neck muscles, headaches, and impedes the flow of energy from the head to the neck.
There is another problematic position, the “reading pose,” when, when reading, a person bends his head very far forward and holds a book or phone very low, almost on his knees. Prolonged reading in this position leads to chronic problems with vision, neck, and back.
Spend your time tracking such postures and eliminating them. Read from your phone only at arm's length and at head level. It's the same with books. Keep your posture, don't let your shoulders roll down, and you'll feel great. Stretch your neck every day. If you work on a computer most of the time, take a stretch break every hour. Simple movements - forward, backward, left, right and neck are fine. Your health will improve, and your body will thank you!
I hope that these recommendations and the poses described above will help you get rid of pain and achieve a healthy, beautiful neck for many years to come.
How yoga treats the neck
Yoga is an ancient Indian teaching that helps you achieve spiritual and physical unity. Many positions help develop flexibility, balance and strength. Asanas have a positive effect on the cervical and collar areas, work deep muscle tissue and strengthen the corset of the spinal column, which is useful for cervical osteochondrosis. A static position will not cause harm if the exercises are performed correctly. To avoid mistakes, it is necessary to conduct classes under the supervision of an experienced yoga instructor.
Yoga therapy is used to treat osteochondrosis. You can perform the technique yourself by studying videos from professionals and poses in pictures. Training has a positive effect on the emotional state of the beginner and his musculoskeletal system. For problems with the cervical spine, yoga is used in combination with medication and massage sessions. Therapeutic yoga for the neck at home is a good preventive measure for osteochondrosis. The practice has the following beneficial effects:
Yoga classes correct posture.
- stretches the spine;
- improves blood circulation;
- corrects posture;
- improves psycho-emotional state;
- increases the elasticity of ligaments;
- is physical therapy.
By performing a set of exercises, you can strengthen the muscles of the thoracic, lumbar and cervical spine. With daily exercise, weight loss and improvement in physical condition are observed. The advantage of practicing for the cervical spine is that there are no age restrictions. Each person will be able to choose asanas for themselves and perform them at a time convenient for them.