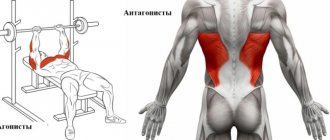
V. How exercise therapy works
The spinal extensor muscle bundles are located in several layers. On the outside are the longest bundles, extending over one and a half dozen vertebrae. The longissimus dorsi muscle has bundles that connect the lumbar and cervical spine. It is these bundles that create the cervical-tonic effect - an increase in back strength with an extended neck. In the middle layers there are bundles of muscle fibers connecting the vertebrae of one or two sections of the spine. Closer to the spine lie fibers connecting several vertebrae. Directly at the spine are the shortest fibers that connect two adjacent vertebrae. It is the fibers closest to the spine that are most responsible for its health. It is their strength and elasticity that can prevent displacement and hernias.
When performing rows and bends, the main work is done by long and medium beams. And when performing hyperextensions, the shortest fibers do not work enough. In terms of their effect on the spine, hyperextensions are classified as therapeutic and preventive exercises. But hyperextension and exercise therapy do not replace each other, they complement each other, as they affect different layers of the back muscles.
The task of the exercises proposed to you is to force the shortest fibers of the back muscles, which are little loaded in other exercises, to work, and at the same time to stretch them. This can be achieved by forcing the spine to bend in certain areas with the maximum possible amplitude. To achieve a goal, you need to exert yourself with efforts close to the limit. Maximum effort, lasting several seconds, should be alternated with relaxation. Stretching and relaxation are designed to combat pockets of chronic tension arising from static load.
Exercise therapy will not replace traditional stretching methods, the effects of which are aimed at the large muscles of the body. Traditional stretching and exercise therapy complement each other.
The benefits of exercises for the pelvic organs
Training any muscle always has a positive effect on the body as a whole. The same applies to training the pelvic muscles.
Positive effects
Performing specially selected exercises allows you to achieve the following effects:
- Accelerate blood circulation in the pelvic organs, thereby increasing the rate of delivery of nutrients, oxygen and removal of metabolic products. This leads to the activation of the processes of hormone synthesis in the prostate gland, which causes an increase in potency, the process of formation of new sperm and seminal fluid proceeds more quickly and fruitfully, which significantly improves the functional characteristics of sperm.
- Improve the outflow of venous blood from the vessels of the pelvic cavity, which is the most effective prevention of the formation of hemorrhoids and the development of inflammatory processes in the prostate gland, seminal vesicles and bladder: stagnant blood leads to an increase in local temperature and the creation of a favorable environment for the proliferation of various microorganisms that cause inflammatory diseases.
- Strengthen the peristalsis of the lower intestines, thereby having a beneficial effect on its work.
- Involve the lower parts of the spinal tract in movements, thereby activating nutrition and metabolic processes in their intervertebral discs and eliminating existing muscle spasms, which is a prevention and measure to combat degenerative processes in the intervertebral joints, including osteochondrosis.
- Strengthen the muscles of the buttocks and lower abdominals, that is, improve your figure.
Strengthening the muscles of the pelvic floor
The anatomical area associated with the small pelvis, such as the pelvic floor, deserves special attention. At its core, it is a complex of muscles that bear the weight of all the abdominal organs and, in particular, the pelvic organs. It is they who do not allow these organs to fall down and be pinched by the bones that form the pelvis - this is a kind of hammock that can sag somewhat under the weight of the organ complex, but must have sufficient elasticity so as not to stretch and sag completely.
Particularly important is the fact that the pelvic floor muscles are not smooth, but striated muscle tissue, which means that it can be trained. It is known that the pelvic floor muscles work actively during lifting weights, during bowel movements, urination and sex. The weakness of one of the muscles located in the pelvic floor is associated with such an unpleasant condition in men as the release of a few drops of urine after urination.
Observations show that the muscles on the pelvic floor are quite amenable to conscious control, that is, they can be tensed and relaxed at will.
In addition, performing exercises for the purpose of prevention is much simpler, without pain, which often occurs if the same exercises are performed when some pathological process is already taking place in the pelvic organs.
Execution technique
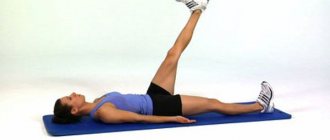
To perform the pelvic lift exercise while lying down, take the following position:
- lie on the floor, stretch your arms along your body and press them to the floor with your palms down;
- bend your legs at the knees and pull them as close to the buttocks as possible;
- make sure your fingers are pointing towards your heels;
- Keep your feet and knees hip-width apart;
- press your shoulders and body tightly to the floor surface;
- raise your toes slightly, focusing on your heels.
After this, start the exercise:
Lift your pelvis up so that your body forms a straight line with your hips. Make sure the emphasis is on your heels
This is an important condition that guarantees the correct lifting technique and gives maximum load on the gluteal muscles. You should not feel any tension in your back. Having reached the top point of the movement, tighten your buttock muscles as much as possible.
Maintain this position for 2-5 seconds. Make sure that during the entire exercise the load falls on the buttocks, and not on the quadriceps. In the latter case, you are clearly doing something wrong. Lower yourself down slowly over 1-2 breaths, avoid jerking and sudden movements. Try not to touch the floor with your buttocks. This will allow you to keep your muscles toned throughout the entire exercise. Ideally, at the bottom of the exercise, there should be 3-5 centimeters between your body and the floor.
Do not turn your head from side to side while performing the movement. This can cause injuries to the cervical spine. And just pulling a muscle will be unpleasant. The gaze should be directed strictly upward.
Adhering to the indicated amplitude, do 15–20 repetitions. Take a break for 1 minute and repeat the entire exercise 1-2 more times.
Tips for beginners
The glute bridge exercise will serve as a good addition to the standard set of physical exercises for beginners. It can and should be performed at home, because it does not require any special training or special devices.
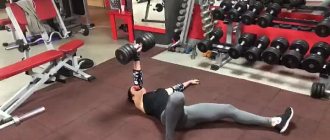
We invite you to familiarize yourself with the Kettlebell lying on the floor technique.
Beginners should take into account some features of the technique:
- The glute bridge gives the best results when done between regular squats and ab pumps. At this moment, the buttock muscles are maximally warmed up and ready to work.
- Make sure you support your legs, your feet should be on the floor, your legs shouldn’t be too wide apart, your pelvis shouldn’t hang loose. In order to bring the movement to automaticity, perform it slowly at first, monitoring your breathing and muscle tension.
- Do not make sudden movements, do not increase the load if you are not ready for it. Otherwise, you can injure your neck and spine.
1. There are a large number of variations of this exercise, we will talk about this a little below. With the help of different options, you will be able to complicate the exercise, add something new, and add variety to your workout.
2. In some options, additional weight can be used. As an additional weights, you can use a bar, a dumbbell, or a barbell plate. As stated earlier in the mistakes, you cannot chase more weight. It is necessary to select the correct weight so that the athlete can do at least 10 repetitions in one approach.
3. At the top point, be sure to stop and contract the target muscles as much as possible to enhance the effect of the exercise.
4. As mentioned earlier, this exercise is not basic, but isolating, therefore, it should be performed at the beginning of the workout to warm up or at the very end, to more clearly work out the buttocks (recommended).
5. At the bottom point, do not place your buttocks completely on the floor. The distance should be at least 4 centimeters. This will allow you to constantly keep your muscles tense throughout the entire set and increase the effect of the exercise.
6. If you want to perform an exercise with additional weights and are doing it at home, as an additional exercise. weight, you can use various bottles filled with water, a bag with heavy objects and so on. If you have the necessary equipment at home, then, of course, it is better to use it.
IMPORTANT!!! If you use additional weights, be sure to support the weight with your hands so that it does not roll down. Also, many people make the mistake of placing the weight not on the pelvic area, but on the stomach. This cannot be done!
Correct pelvic lift technique
Many athletes, including those who have been visiting gyms for many years, can make annoying mistakes that make the exercise simply useless.
Here is what technique you need to adhere to in order for your classes to be effective:
- We lie on our backs, arms lie along the body;
- We bend our legs at the knees and press them towards the butt;
- Feet and knees are hip-width apart (that is, they are not standing together);
- We place our feet on the heels;
- We press our head and shoulders tightly to the floor - they should not move during work.
Now you can start the exercise. The pelvis is raised so that the hips and torso form a straight line.
Having risen, we are not in a hurry to lower ourselves, we fix the position for 2-3 seconds so that the muscles tense as much as possible. We make sure that the load falls on the buttocks.
Now we lower ourselves slowly, controlling the tension in the muscles. No need to fall or put your butt on the floor. When lowering, approximately 2-4 cm should remain between the floor and buttocks - this will allow the muscles to remain in working condition throughout the entire exercise.
For beginners, you can do 15-20 repetitions with breaks between sets of 1-2 minutes.
It is very important to maintain the starting position with your palms, shoulders and head pressed to the floor. No need to look to the sides or turn while performing the workout
This can lead to sprains or injuries.
Many people ignore warming up before training - this is a mistake. Before putting stress on the muscles, they need to be warmed up.
This is done in order, firstly, to increase their work limit, and secondly, to ensure that they receive sufficient oxygen and nutrients during training.
Don't be lazy to warm up before class. This won't take much time and will only improve your training results.
The pelvic lift is a great exercise for those who are just starting to work on their figure - it is a basic exercise that can be easily done at home.
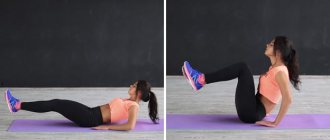
How to properly perform pelvic lifts while lying on your back
- Lie on your back with your knees bent. Place your feet as close to your buttocks as possible and press firmly into the floor, avoiding slipping. The feet should be spread the width of the hip joints and kept parallel to each other. The distance between the heels and buttocks is 30-40 cm.
- Place your arms along your body, palms down, with your head and shoulders firmly pressed to the floor. As you inhale, begin to slowly lift your torso without lifting your head, shoulders and heels from the floor. Raise your hips as high as possible while keeping your back straight. In this case, at the top point of the lift, the shin forms a perpendicular to the floor. At the top of the exercise, pause for 2-3 seconds. Tip: Perform the exercise by tensing your gluteal muscles. Try not to use the strength of your hips, try to relax them.
- After a static pause, slowly return back to the starting position.
Technique for performing the Shoulder Bridge exercise:
Another option: the exercise is performed with a small amplitude, without lowering the pelvis low to the floor and trying to achieve a feeling of muscle fatigue.
Benefits of the Glute Bridge
Raising the pelvis from a lying position is one of the variants of such a well-known exercise as the bridge. However, compared to the classic bridge, this movement does not place excessive stress on the spine.
The beneficial properties of the exercise include:
- The glute bridge is excellent for targeting the gluteus maximus while also targeting the hamstrings.
- The exercise can be performed at home without any complex equipment, just a fitness mat (or a large towel) is enough. To complete the exercise you will only need 10-15 minutes of free time.
- The supine glute raise is an effective buttock development exercise that can be performed comfortably by both beginners and more experienced athletes. At the same time, in general the movement is quite safe; however, if you experience any discomfort in the lumbar region or knee joints while performing it, you should pause your current workout and consult a therapist.
- Everyone knows the bridge exercise from high school or college classes. As a rule, lifting the pelvis while lying on your back does not cause any serious difficulties. It is performed by both children and adults. Therefore, you can safely include this movement in your training program and perform it regularly.
Technique for performing the gluteal bridge exercise:
- Lie on the floor on your back, arms at your side, knees bent. Your feet should be shoulder-width apart. This is your starting position.
- Using the heels of your feet to press into the floor, lift your hips off the floor while keeping your back straight. Perform this part of the movement as you exhale and hold the position at the top of the range of motion for a second.
- As you inhale, slowly return to the starting position.
Execution options:
- You can perform this exercise by lifting one leg at a time.
- If a regular glute bridge is very easy for you and you want to add intensity to the load in the exercise. You can use a barbell plate or dumbbell as additional weight.
- There is also a variant of the exercise, lifting the pelvis from a lying position with a barbell. This exercise is suitable for more experienced practitioners.
- In addition, there is a variant of the exercise in which, for additional load, the legs are placed on a bench or platform, which also increases the intensity of pelvic lifts from a lying position.
By the nature of the load, the gluteal bridge belongs to the type of isolated exercise. This circumstance makes it reasonable to combine it with other compound exercises aimed at working the lower body, such as stiff-legged deadlifts or squats with dumbbells.
Before you begin direct pelvic lifts, you need to do a general warm-up and warm up your muscles well. Aerobic exercises, such as slow running or jumping rope, are good for this purpose. A 10-minute warm-up will be sufficient and your body will be ready for exercise.
Technique for performing the gluteal bridge exercise with a barbell:
- Begin the exercise sitting on the floor with a loaded barbell above your feet. Using bar extensions or a bar pad can greatly reduce the discomfort caused by barbell pressure in this exercise. Place the bar so that it is directly above your hips and lie flat on the floor.
- Begin an upward movement by pressing your heels into your feet, extending your hips with the bar resting on them. The weight of the barbell should be supported by the support of the upper back and the heels of the feet.
- Once you reach the top position as far as possible, slowly reverse the movement to return to the starting position.
Thus, lifting the pelvis while lying down is a simple, but overall extremely effective movement. Regular exercise will allow you to achieve good results, namely, your buttocks will become toned, their shape will improve, problem areas will be worked out, and overall tone will appear. Combine glute bridges with cardio training, and you can noticeably improve the condition of your figure, which will please you and those around you.
Once your muscles are stronger, you can progress the load level of the exercise by using additional weights, such as a barbell or dumbbells.
Video: Glute bridge exercise:
Owner by car number - how to find out the owner of a car by number bibikatut.ru.
Features and benefits of exercises
The gluteus maximus muscle, which plays a major role in this exercise, takes on the function of maintaining the body in an upright position. During the training process, the biceps femoris muscle and other muscles of the femoral surface on the back side are also connected to it, which is very effective for coxarthrosis. This exercise is not particularly difficult, and therefore almost anyone can perform it without special training.
Important! To begin with, it is recommended to practice the initial exercise well to strengthen the muscles. After they get used to the volume of training, auxiliary weights can be used.
The main advantage of the classes is the fact that lying pelvic lifts do not require the use of additional equipment or exercise machines. To conduct classes, you only need a fitness mat and free time. Thus, if you are unable to go to the gym, you can simply choose a set of similar exercises to practice at home.
Today, there are many different traumatic techniques that often cause serious harm to health. However, proper technique and comfortable, non-slip shoes will guarantee no injuries. It is believed that raising the pelvis while lying on the floor is one of the simplest and safest types of training for coxarthrosis.
VI. Description of exercises
To perform exercise therapy, you need a coating that will provide sufficient adhesion to your clothing or body. The covering must be secured in a stretched state.
1. Lumbar twisting. 2 options
IP (starting position) Lying on your back, hands behind your head, legs bent at the knees. In the 1st option - the heels are together, in the 2nd - the distance between the heels is equal to the length of your shin.
We tilt our knees to the sides one by one, trying to place our closed knees on the floor (in case 2, our knees lie separately in different places). We monitor the position of the elbows; they should remain pressed to the floor. If you lack flexibility, you will need the help of assistants who will press your elbows and knees to the floor, avoiding excessive traumatic forces. If you have good flexibility and can easily perform the exercise on your own, place a pillow under your pelvis. This will increase your range of motion and better stretch your lower back.
2. Thoracic twists
IP: lying on your back, arms up, fingers intertwined.
Keeping the pelvis pressed to the floor, we raise the shoulder blade and bend the spine forward in the thoracic region, while simultaneously twisting it to the side. We try to do the exercise with the maximum possible amplitude in both directions.
3. Caterpillar in 2 directions
Forward. IP: Lying on your back, knees bent, arms up.
Having removed the arch in your lower back, raise your shoulders and place them as far away from your legs as possible. Bend your lower back as much as possible. At the same time, your pelvis should move towards your head. After several repetitions, move your heels closer to your pelvis, this will return you to IP. Back. IP: Lying on your back, knees bent, arms to the sides - lie relaxed.
Leaning on your heels and shoulder blades, lift your pelvis, while keeping your thoracic region on the floor. Place your pelvis as close to your heels as possible. Lift your heels off the floor. Bend your lower back as much as possible. At the same time, your shoulder blades should move towards your legs.
4. Lizard in 2 directions
Forward. IP: Lying on your back, legs down, arms up.
“Stepping over” with the shoulder blades, we move towards the head.
Back. IP: Lying on your back, arms resting freely in the direction of your head, legs raised above the floor.
“Stepping over” with the pelvis, we move towards the legs.
5. Raising the pelvis with the lower back pressed and moving it to the sides
IP: Lying on your back, legs bent, arms folded on your chest.
Press your lower back to the floor. Raise your pelvis without lifting your lower back from the floor. Use the rectus abdominis muscles to lift the pelvis, exclude assistance from the legs. Alternate maximum tension of the rectus muscle with relaxation in the position of the legs and arms lying on the floor. Return to IP. Raise your pelvis and, without lifting your lower back from the floor, shift it alternately to the sides, as far as possible.
6. Wave in 2 directions
IP: Lying on your stomach, palms under your forehead.
We send a wave along the spine towards the head, after 5-6 waves of relaxation, 5-6 waves along the spine towards the legs, relaxation... and so on.
7. Stretching on the stomach, legs secured
This exercise does not train muscles, it helps to completely relax after exercise.
Lying on your stomach, tie your legs to the furniture or to the exercise machine with a rubber band.
You can bend over with your hands. Rolling over your stomach, move forward, while the tension of the rubber should increase. Relax your lower back after each movement. Repeat several times. With the rubber band stretched and the lower back relaxed, move the pelvis to the sides.
- Lower back injuries from strength training
- How to exercise if your back hurts: step-by-step instructions
- How to choose exercises for pain/diseases of the spine
- I tore my back during training, what should I do?
- Schmorl's hernia: causes, symptoms, treatment
Page added to favorites Page removed from favorites
LiveInternetLiveInternet
Quote from Irzeis' message
Read in full In your quotation book or community!
An effective exercise for the buttocks - Shoulder Bridge
The exercise “Lifting the pelvis while lying on your back” (Shoulder Bridge) does an excellent job of strengthening the gluteal muscles, in addition, it is less traumatic compared to other exercises for the buttocks.
To perform the exercises, you only need a fitness mat and comfortable shoes to avoid your feet sliding on the floor. You can perform the exercise with your own weight, with a rubber band, or use weights in the form of a dumbbell or barbell.
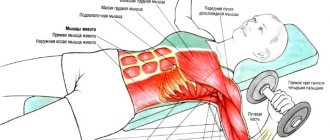
Muscles involved when lifting the pelvis while lying on your back:
This exercise primarily works the ischiopopliteal and gluteus maximus muscles.
Perform it repeatedly, feeling the muscle tension at the top of the pelvic lift with each repetition.
How to properly perform pelvic lifts while lying on your back:
- Lie on your back with your knees bent. Place your feet as close to your buttocks as possible and press firmly into the floor, avoiding slipping. The feet should be spread the width of the hip joints and kept parallel to each other. The distance between the heels and buttocks is 30-40 cm.
- Place your arms along your body, palms down, with your head and shoulders firmly pressed to the floor. As you inhale, begin to slowly lift your torso without lifting your head, shoulders and heels from the floor. Raise your hips as high as possible while keeping your back straight. In this case, at the top point of the lift, the shin forms a perpendicular to the floor. At the top of the exercise, pause for 2-3 seconds. Tip: Perform the exercise by tensing your gluteal muscles. Try not to use the strength of your hips, try to relax them.
- After a static pause, slowly return back to the starting position.
Technique for performing the Shoulder Bridge exercise:
Another option: the exercise is performed with a small amplitude, without lowering the pelvis low to the floor and trying to achieve a feeling of muscle fatigue.
Note:
It is very important to understand that pelvic lift is actually nothing more than hip extension.
The exercises are performed at a good pace. You should do 5-6 approaches and 25-30 repetitions in each approach. Rest between approaches should not exceed 1 - 1.5 minutes. Compliance with the exercise technique and rest time between approaches is one of the key points of successful training.
Make sure your movements are calm and measured. Breathing should be even, without stopping.
Avoid arching your lower back. Do not bend your knees under any circumstances: point them directly at the ceiling. To do this, you can imagine that there are glasses of water on your kneecaps.
Options for pelvic lifts while lying on your back:
1. Execution option - bridge legs together
2. Weighted pelvic lift . This makes the exercise more difficult, but increases efficiency and improves the impact on the buttocks. If you are using a barbell or dumbbell as additional weight, place it directly on your hips and hold it with both hands.
Video tip:
3. Shoulder bridge with straight leg
You can perform this exercise with one leg fully straightened, which will make the exercise more challenging. Starting position: lying on your back, legs bent, heels firmly on the floor, arms along the body. Using your shoulder blades and heels, lift your buttocks so that your body forms a straight line from your knees to your shoulders. As you exhale, begin to lift your right leg towards your head (straightening it). The left leg stands firmly on the floor. Do not roll onto your left side: the balance of the body should not be disturbed. Then slowly lower your leg. Repeat the movements 3-5 times with your right leg, and then change legs and do the same with your left leg.
You can complicate this exercise by moving your straight leg up perpendicular to the floor. Then try to pull your leg towards your chest
Don't forget to change legs and do the same movements.
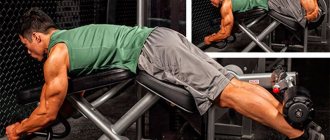
4. Shoulder bridge with a bench You can also perform a pelvic lift by placing your feet on a bench or any other low surface.
Lying on the floor, hands pressed with palms to the floor. The arms are extended along the body. Place your feet on the bench. Hips in vertical position:
- take a breath and lift your buttocks off the floor
- hold this position for two seconds, and then lower yourself without touching the floor with your buttocks;
- At the end of the movement, exhale.
This exercise develops the gluteus maximus muscles and mainly the ischial-popliteal muscles, which are used to a much greater extent when lifting the pelvis from the floor.
The exercise is performed slowly, since the most important thing is to feel obvious muscle tension. Good results can be achieved by performing this exercise in several approaches with 10-15 repetitions.
Another option is to place your calves on the bench while lifting your pelvis. In this position, the ischial-popliteal muscles and the tense calf muscles are more intensively involved.
5. Pelvic lift on a fitball The shoulder bridge can also be performed on a fitball.
1. Lie down on the floor next to the fitball. Place your shins on top of the ball and place your arms at your sides, palms down. This will be your starting position. 2. Squeeze your glutes and lift your hips up. Bend your knees and roll the ball towards you until your feet are on the ball. 3. After a short pause, straighten your legs and roll the ball back, then lower your hips to the floor to the starting position. 4. Do the required number of repetitions of the exercise
6. Lifting into a shoulder bridge on one leg
And a more “advanced” version of the exercise:
Lie on your back on the floor. Bend the knee of your right leg and place your foot on the floor. Leave your left leg straight. Stretch your arms to the sides at an angle of 45 degrees. Open palms lie with their backs on the floor. Raise your left leg up so that the knees of both legs are at the same level and both thighs are parallel to each other.
Pull your abdominal muscles towards your chest, squeeze your buttocks as much as possible and lift them off the floor. Your shoulders - pelvis - knees - left foot - should create a single straight line.
Hold this position for 5-7 seconds without holding your breath. Gently lower your buttocks to the floor. Tighten your abs again, squeeze your buttocks, and lift them off the floor again. Repeat the exercise with raising your left leg 5-10 times.
Change the position of your legs. Do the same exercise on your right leg the same number of times as you just did on your left.
PS. Wondering what workout Christina Aguilera uses to tone her butt muscles? Despite the fact that she has always been petite, periods of cravings for unhealthy food force her to seriously start working on problem areas. These exercises were developed by Aguilera's personal trainer, who worked with her on her body for a long time.
Shoulder bridge Starting position: lying on the floor, legs bent at the knees, feet on the floor, arms along the body. Inhale, as you exhale, squeeze your buttocks and press your lower back to the floor. Keeping your gluteal muscles tight, squeeze and tuck your pelvis, pointing your tailbone toward your stomach and up. Slowly lift off the floor vertebra by vertebra, resting on your heels and shoulder blades. When you rise completely, take a deep breath, and as you exhale, begin to lower yourself slowly to the floor. The gluteal and abdominal muscles are tense.
Tricks Aguilera's trainer advises: Determine the number of repetitions of the exercise you are going to do (for example, 10) and start counting down. This way you will deceive the body and add endurance to yourself to complete the exercise completely.
See also:
Lunges are the best exercise for tightening your buttocks.
How to quickly tighten your buttocks
A set of exercises for the buttocks
Exercises for the buttocks
Transverse abdominal muscle training. Tupler technique
It consists of repeated retraction of the abdominal wall while sitting, lying and standing. The palms of your hands or a long piece of cloth are used to control muscle contraction. The basic Tupler exercise is to move the navel toward the spine without holding your breath. It is most convenient to perform it while sitting on the floor with reliable support behind your back, legs crossed. Place one palm on the solar plexus, the other under the ribs and, as you exhale, try to move the navel towards the spine and slightly hold it. Do this for 100 movements, counting them out loud (time interval is approximately 2.5 minutes). Perform up to 5 such approaches per day, ending with Kegel exercises. With a strong degree of diastasis, the abdomen is wrapped in a long piece of cloth (towel), holding its ends in the hands. As you exhale, the towel is pulled over your stomach, helping the muscles contract, and held at the point of maximum compression for a second. The number of repetitions in this case is reduced to ten. Regular exercise tightens the abdominal wall within a few weeks.
Execution options
The technique is no different from that described above.
The simplest and most affordable weighting option. We wrote about performing this variation of the gluteal bridge in the article It’s realistic to pump up your buttocks at home: what exercises and equipment are available to you at home?
This complication of actions will allow you to load your buttocks even more.
How to do it correctly: after you strain your buttocks at the highest point of lifting the pelvis, you need to bring your knees together and spread them as many times as possible, as in the abduction-extension simulator. Believe me, your buttocks will simply burn from the pump!
The single-leg glute bridge allows you to better work each leg separately.
First option. Starting position: lying on your back, one leg bent, the second shin lying on the first knee. As you exhale, raise your pelvis, not forgetting about your straight, tense back, hold for 2-3 counts and, inhaling, return to the starting position.
Second option. Again, the starting position is lying on your back, one leg bent on the floor, the other straight extended upward. The technique is the same:
A fitball (like other unstable support) is a good complication for the gluteal bridge. This way you will have to additionally concentrate on balance and the stabilizing muscles will come into play.
First way. The shoulders and shoulder blades are on the fitball, the legs are shoulder-width apart, and the feet are pressed to the floor. Exhale with effort and raise the pelvis, pausing for a couple of seconds at the highest point. Slowly return to the starting position.
In this version, the ball acts as a bench. Believe me, it is difficult to stay on such a support, but thanks to this, the stabilizing muscles are included in the work.
Second way. We place our feet on a fitball and raise our pelvis until a straight line with our torso is formed. Keep your balance! Slowly, rolling the ball back, we return to the starting position.
The most obvious and fairly convenient weighting option. What we like about this option is that you can throw the weight on yourself without much difficulty. For example, lifting a barbell on your own is much more difficult!
The technique is not original: we lie down on the mat, bend our knees. We take a dumbbell in our hands and place it on our hips, holding it with our hands.
Raise the pelvis and remain in this position for 2-4 counts, with maximum tension. After this, we lower ourselves without touching the floor with our buttocks! Hold the weight with your hands the entire time you perform it so that the axis of the load does not shift from the buttocks.
You can also perform kettlebell lifts on your butt!
The technique for performing a pelvic lift with a weight plate is the same as with dumbbells. You can make it more difficult by doing it from a bench - this allows you to achieve greater amplitude!
Useful training video:
There are 2 ways to sit on a bench: you lie down with either your upper or lower body on an elevation - the main thing is to make it comfortable and safe:
What is important to consider:
It is also important to consider: this option of lifting the pelvis with emphasis on a bench is possible without injury only for flexible people - if you have problems with this, it is better to abstain!
The emphasis on the bench should be on the lower edge of the shoulder blades - so that when you lift, you can easily rest your shoulders on it.
While lifting the barbell, you should not help yourself with your elbows or rest your neck against the support: this can lead to pinching of the muscles and blood vessels.
If you have one bench in your room, but it doesn’t suit you, you can place a rug folded several times under your butt. If, on the contrary, you are already high, then take a banal step platform.
If you want to further complicate the technique of performing an exercise on a bench, use two elevations of the same height. This will increase the range of motion of your hips to perform a bridge, look at the photo:
You can also add a knee tuck at the peak point or lift one leg up for more work on each of the buttocks. You can also bend one leg at the knee and perform a pelvic lift, first on one leg, then on the other. Of course, these options are for experienced trainees!
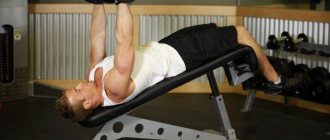
Lying pelvic lifts are a more advanced version of the gluteal bridge, which is performed on a lying leg curl machine. Don’t be afraid, this option has a big advantage: you can easily change the working weight and not be afraid of injury, because it is fixed.
You will also have a given trajectory of movement, so it will be easier to perform the exercise.
Lie with your shoulder blades on the edge of the machine bench. Place your legs shoulder-width apart and press your feet to the floor. The roller is located on the line of the hip bone. Hands are on the bolster, and the pelvis is in the canopy.
Using the force of your buttocks as you exhale, lift your pelvis until it is parallel to your body. Hold for 2 seconds at the top and squeeze your buttocks tightly. Feel the tension in your muscles.
Lower your pelvis slowly and under control, making sure that the tension does not go away from the muscles! Don’t fall like a fallen willow and don’t sit on the floor at the bottom of the exercise! Repeat as many times as necessary.
Lifting the legs and pelvis with a barbell while lying down is the most inconvenient option, in our opinion. Because you have to independently support the weight of the barbell in the absence of a given amplitude - the possibility of injury is high.
What to pay attention to:
The correct position of the bar is one: on the bend of the legs and body.
As you perform the movement, make sure that the bar does not roll forward or backward across your body.
It is strictly forbidden to place the barbell on your stomach.
The technique for performing with a barbell is the same as without a barbell.
There are 2 types of bars: Olympic long bar weighing 20 kg and curved short bar from 10 kg. We recommend that you use the second type. But no matter which one you choose, remember that if you feel uncomfortable, painful or uncomfortable, you can put a cushion or towel under it.
People often ask how to lift a barbell? Ideally, the safest and most convenient option is to have someone put it on you, but if a faithful friend is not nearby:
place a barbell with a small weight on your hips while sitting on a bench and step down from the bench,
place a barbell or step platform on both sides - this will create additional space between the bar and the floor,
overcome your shyness and ask the most handsome guy in the room to help you!
It is most convenient to perform a gluteal bridge with a barbell on a bench:
We place a bench next to the machine and lie down on it so that the fulcrum is on the shoulder blades, and the bar is on the line of the hip bone. We recommend that you hold onto the bench with your hands - this will make it easier to make effort when lifting the weight.
Starting position: legs bent and standing shoulder-width apart, toes turned out, pelvis tilted. By tensing the gluteal muscles, we raise the hips to a straight line with the body. At the final point, we linger for a few seconds, squeezing the muscles, then slowly lower ourselves without relaxing.
The Smith pelvic lift is ideal for those just starting to exercise and those who have poor balance.
Which glute bridge option is best? In fact, each of them is good and effective in its own way: the selection criteria are your comfort, personal preferences and the availability of equipment.
Exercises indicated for abdominal muscle diastasis
These exercises should be performed in the second stage of training, after about a month of breathing and preparatory exercises described above.
I.P. Standing on all fours, rest on your knees and palms. As you exhale, you need to lower your head down, round your back and pull in your stomach. As you inhale, do the opposite—raise your head, arch your back and relax your abdominal muscles. This exercise should be done at a leisurely pace. We start with 10 times and then gradually increase the load.
I.P. Lying on your back. Place your feet on the floor with your knees bent. Slowly lift your buttocks up and stay in this position for a few seconds. The movement is smooth, literally “vertebra by vertebra.” At the same time, pull your tailbone up and the top of your head forward. Don't forget to breathe only through your chest. Stop when your pelvis, knee and shoulder are in line, inhale, and begin to lower your spine to the floor. This exercise perfectly stretches the spine, strengthens the abs and thigh muscles. Try not to strain your abdominal muscles too much and breathe evenly.
I.P. Lying on your back. Press your lower back to the floor as much as possible. Raise the right shin (knee bent) up to a right angle. As you exhale, straighten your entire leg, while pulling in your stomach as much as possible. We pull the top of the head up, the pelvis is level. While inhaling, we return to the starting position. We change the leg. Repeat 10 times for each leg. This exercise strengthens the deep transverse abdominal muscle. To make it more difficult, you can lift both legs at once. As you exhale, straighten one leg and bring the other knee towards you to balance the pelvis.
Raising the leg from the “on all fours” position
I.P. on all fours, palms directly under the shoulders. The stomach is tucked, the body is kept straight. Straighten your left leg as you exit until it becomes parallel to the floor. As you inhale, return to the starting position. Don't arch your lower back! The top of the head is pulled forward, the toe of the raised leg is in the opposite direction. Do 10 repetitions for each leg. To complicate the exercise, simultaneously with raising your leg, raise your arm on the opposite side.
I.P. lying on his side, legs together, resting his forearm on the floor. The other arm is bent, resting on the side or shoulder of the supporting arm. Raise your pelvis so that your shoulders, core and legs form a straight line. Fix yourself in this position, tensing your abs and buttocks. Hold at the top of the movement for 20-30 seconds. Repeat on the other side.
Variants of pelvic lifts while lying on your back
1. Execution option - bridge legs together
2. Weighted pelvic lift . This makes the exercise more difficult, but increases efficiency and improves the impact on the buttocks.
If you are using a barbell or dumbbell as additional weight, place it directly on your hips and hold it with both hands.
Video tip:
3. Shoulder bridge with straight leg
You can perform this exercise with one leg fully straightened, which will make the exercise more challenging. Starting position: lying on your back, legs bent, heels firmly on the floor, arms along the body. Using your shoulder blades and heels, lift your buttocks so that your body forms a straight line from your knees to your shoulders. As you exhale, begin to lift your right leg towards your head (straightening it). The left leg stands firmly on the floor. Do not roll onto your left side: the balance of the body should not be disturbed. Then slowly lower your leg. Repeat the movements 3-5 times with your right leg, and then change legs and do the same with your left leg.
You can complicate this exercise by moving your straight leg up perpendicular to the floor.
Then try to pull your leg towards your chest [/td]
Don't forget to change legs and do the same movements.
4. Shoulder bridge with a bench You can also perform a pelvic lift by placing your feet on a bench or any other low surface.
Lying on the floor, hands pressed with palms to the floor. The arms are extended along the body. Place your feet on the bench. Hips in vertical position:
- take a breath and lift your buttocks off the floor
- hold this position for two seconds, and then lower yourself without touching the floor with your buttocks;
- At the end of the movement, exhale.
This exercise develops the gluteus maximus muscles and mainly the ischial-popliteal muscles, which are used to a much greater extent when lifting the pelvis from the floor.
The exercise is performed slowly, since the most important thing is to feel obvious muscle tension. Good results can be achieved by performing this exercise in several approaches with 10-15 repetitions.
Another option is to place your calves on the bench while lifting your pelvis. In this position, the ischial-popliteal muscles and the tense calf muscles are more intensively involved.
5. Pelvic lift on a fitball The shoulder bridge can also be performed on a fitball.
1. Lie down on the floor next to the fitball. Place your shins on top of the ball and place your arms at your sides, palms down. This will be your starting position. 2. Squeeze your glutes and lift your hips up. Bend your knees and roll the ball towards you until your feet are on the ball. 3. After a short pause, straighten your legs and roll the ball back, then lower your hips to the floor to the starting position. 4. Do the required number of repetitions of the exercise
6. Lifting into a shoulder bridge on one leg
And a more “advanced” version of the exercise:
Lie on your back on the floor. Bend the knee of your right leg and place your foot on the floor. Leave your left leg straight. Stretch your arms to the sides at an angle of 45 degrees. Open palms lie with their backs on the floor. Raise your left leg up so that the knees of both legs are at the same level and both thighs are parallel to each other.
Pull your abdominal muscles towards your chest, squeeze your buttocks as much as possible and lift them off the floor. Your shoulders - pelvis - knees - left foot - should create a single straight line.
Hold this position for 5-7 seconds without holding your breath. Gently lower your buttocks to the floor. Tighten your abs again, squeeze your buttocks, and lift them off the floor again. Repeat the exercise with raising your left leg 5-10 times.
Change the position of your legs. Do the same exercise on your right leg the same number of times as you just did on your left.
PS. Wondering what workout Christina Aguilera uses to tone her butt muscles? Despite the fact that she has always been petite, periods of cravings for unhealthy food force her to seriously start working on problem areas. These exercises were developed by Aguilera's personal trainer, who worked with her on her body for a long time.
Shoulder bridge Starting position: lying on the floor, legs bent at the knees, feet on the floor, arms along the body. Inhale, as you exhale, squeeze your buttocks and press your lower back to the floor. Keeping your gluteal muscles tight, squeeze and tuck your pelvis, pointing your tailbone toward your stomach and up. Slowly lift off the floor vertebra by vertebra, resting on your heels and shoulder blades. When you rise completely, take a deep breath, and as you exhale, begin to lower yourself slowly to the floor. The gluteal and abdominal muscles are tense.
Tricks Aguilera's trainer advises: Determine the number of repetitions of the exercise you are going to do (for example, 10) and start counting down. This way you will deceive the body and add endurance to yourself to complete the exercise completely.
See also:
Lunges are the best exercise for tightening your buttocks.
How to quickly tighten your buttocks
A set of exercises for the buttocks
Breathing exercises for abdominal muscle divergence
1. Breathing with the stomach. When the muscles diverge, it will be very useful to learn to breathe with the stomach, as children do. With this type of breathing, the stomach inflates during inhalation, and deflates during exhalation. This type of breathing provides a gentle and effective workout for the abdominal muscles.2. Gargling breath. Take a deep breath and fill your belly with air. Then perform short exhalations while lightly tensing your abdominal muscles. Do this until the air leaves your lungs. After this, hold your breath for a short time and begin a new cycle of rinsing breathing.3. Vacuum retraction of the abdomen with breath holding. Inhale through your nose and immediately exhale sharply through your mouth, accompanying the exhalation with sound. After this, pull your stomach as far as possible under your ribs and hold your breath for a while.4. Burning breath. Take a deep breath in through your nose and short exhales through your mouth. At the same time, help yourself push out the air with your abdominal muscles. Outwardly, it looks like vibration in the stomach. As you push out the air, contract and relax your abdominal muscles until the air is completely exhaled from your lungs.
Pelvic floor muscle training
It is important to train the muscles of the pelvic diaphragm separately; this is the only way to restore the connective tissue in the area of diastasis. This is easy to do: make sure that the perineum is tense when performing any exercises, squeeze it forcefully. One of the most important functions of the pelvic diaphragm is to support the pelvic organs from below and prevent their displacement as a result of increased intra-abdominal pressure.
To train the pelvic diaphragm, Kegel exercises and similar yoga asanas are recommended. Execution example: tense the muscles of the perineum for 10 seconds, and then slowly relax them. First repeat 5 times and then gradually increase the number of repetitions to 25.
Variations of the exercise
If your fitness level is high enough, you can make the exercise more difficult by increasing the number of repetitions or adding an extra set. You can also try an advanced version of this movement, namely the barbell pelvic lift. Additional weights will give the buttock muscles increased stress.
If you are not used to working with a barbell or are doing bridges at home, use a regular dumbbell, kettlebell or other weighting material. Grasp the selected projectile with your hands and place it on your lower abdomen. Perform the exercise according to the scheme described above.
In order to relieve tension in the lower back and avoid injury, it is better to perform a glute bridge with dumbbells, a barbell or other weights with your back resting on a bench.
Execution with a barbell.
There is also an option - to put your feet on a small stand. This will allow you to lower your pelvis lower, and therefore increase the effectiveness of the exercise.
Using a bench.
As you can see, pelvic lifts are a simple, but very effective exercise. The first results from its regular and correct implementation will become noticeable after 1.5–2 months. The shape of the buttocks will improve significantly, the muscles will become strong and will not lose their elasticity. By combining this exercise with aerobics, you will also enjoy a reduction in the volume of your problem area.
If your goal is to strengthen and develop the gluteal muscles, use additional weights - a barbell or dumbbell.
II. What to do
It is impossible to completely avoid static postures in everyday life. This means we need to minimize the harmful consequences. You need to take breaks and warm up more often.
If there are pockets of chronic tension in the back muscles, massage will help. You need a hard massage. They don't do this in salons. We need a good massage therapist, preferably a sports one. The price will be above average; only strokes are sold cheaply. It’s good if you get 3 courses a year for 2 weeks.
Between massage courses (and if there is no time or money for massage), regular exercise therapy (therapeutic physical education) classes will help you. Exercise therapy will not help if there is already a huge hernia on one of your discs, which has compressed a bundle of nerves or broken a neighboring vertebra. Exercise therapy will prevent these terrible problems. Exercise therapy will help a small young hernia heal. You should not do exercise therapy for acute pain. Exercise therapy copes well with discomfort and aching pain; it is a surefire way to maintain the spine in good condition. You should resort to it at the first feeling of discomfort in your back.
The benefits and harms of the gluteal bridge
Positive aspects of pelvic lift
The obvious advantages and real benefits of the exercise are expressed in the following facts:
- the buttocks are worked out without overloading the lower back, which cannot be said about squats;
- the ease of the exercise lies in the fact that in the basic version without weights, exercise equipment is not required, you can work at home;
- exercise promotes better blood circulation in the pelvic area, which means it improves the quality of sexual life;
- you can tighten your buttocks without doing squats;
- during the execution of the bridge, a colossal amount of calories is expended, thereby helping to control body weight;
- lifting the buttocks in different variations helps strengthen the abs;
- the exercise is performed with your own or any additional weight;
- The benefit of the pelvic lift also lies in increasing strength and developing muscles that are used in jumping and running.
Glute Bridge Sets and Reps
How many times a day to perform the exercise depends on its complexity. For the classic version, it will be enough to perform three standard sets of thirty repetitions. The number of approaches decreases as the load increases and weights are used.
The glute bridge exercise is effective in itself. So it’s better to concentrate not on quantity, but on technique and quality of execution, then you will feel the result very soon.
Recommended entries:
You need to be logged in to leave a comment.