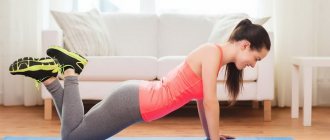
Fitball technology (“fit” – health improvement, “ball” – ball) initially originated as one of the directions in rehabilitation, which already indicates the undeniable benefits of this method. Switzerland can rightfully be considered the birthplace of fitball, where physiotherapists at the rehabilitation center in Basel first used fitball for therapeutic purposes. Subsequently, their American physiotherapist colleagues also used this technology to restore the consequences of musculoskeletal injuries. Almost immediately after achieving positive results, the balls confidently entered the arsenal of equipment for recreational gymnastics throughout America. The technology developed so rapidly that issues of the development of this area quickly flowed from local seminars to international conferences, where representatives from more than 30 countries of the world took part.
The fitness industry, whose main mission is to improve public health, has embraced fitball technology. The goal of training using a fitball is to develop motor abilities such as strength, coordination, flexibility and balance. With the help of a fitball, you can perfectly load almost all muscle groups, and also learn how to correctly perform some basic exercises. Today we have prepared for you a selection of the most effective exercises that can be performed with a fitball anywhere. Let's get started.
Squats
The fitball will teach you how to squat better than anyone else in the world! With its help, you will consolidate the ideal technique of this movement in the shortest possible time. To do this, in addition to the ball, you will need a wall.
- Stand with your back to the wall and place the exercise ball behind your back so that it completely covers your lower back.
- Place your feet slightly wider than shoulder width.
- As you inhale, perform a squat.
- As you exhale, rise to the starting position.
Perform 4 sets of 20 repetitions.
During the negative phase, try to keep the fitball from coming off your lower back - to do this, when you squat, try to place your hip joint lower under the fitball.
When performing squats, make sure that your knee joints do not go beyond the projection of your toes. This will be eliminated if you follow the advice given above.
What is a fitball for?
Fitness cynics say that all such equipment and group classes are needed for only one thing - to attract a not very strong-willed person to workout, get him to pay money and entertain him for an hour so that he does not lose focus and move at least somehow.
In fact, a fitball is useful for:
- rehabilitation of knee and hip joints using exercise therapy;
- removing the load from the spine when performing abdominal exercises;
- increased mobility in joints after surgery or injury;
- reducing the axial load on the musculoskeletal system (musculoskeletal system) during jumps.
Only they are broadcasting something completely different to us. The fitness ball supposedly helps to engage the deep layers of muscles and thereby improves metabolism, helping to burn fat. Is it so? It really depends on what you do with this ball. If the whole training comes down to sitting jumps and rolling a projectile under your own heel, you don’t need to expect any special results. Most likely, you will not achieve “fat burning” at all, especially if you do not follow a proper diet.
But if the fitball is used as a piece of equipment to complement a balanced fitness program, and its owner also eats normally, everything will be fine with fat. He will leave. So it all depends not on the choice of fitness classes and equipment, but on how rich the training session is with the right things, for example, squats, deadlifts and presses. Yes, at the end of the lesson it is quite possible to twist on a ball and do reverse hyperextension.
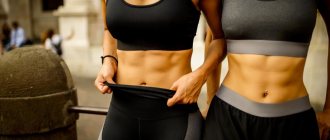
Press crunch
This exercise on a fitball is perfect for those who experience back discomfort when performing abdominal crunches on the floor or bench. Also, with the help of a fitball, you can ideally feel the abdominal muscles, understand and consolidate the correct movement technique, which you will use in the future in other abdominal movements.
- Sit down on the exercise ball, and then a few steps forward, place it behind your back, closer to your lower back.
- Then, in reverse steps, roll the exercise ball so that you are completely lying on your back on it.
- Place your elbows bent near your ears.
- As you exhale, twist, lifting your body up.
- As you inhale, return to the starting position, fully stretched.
Perform 4 sets of 15 reps.
As you lift your torso up, focus on bringing the bottom edge of your ribs toward your pelvis—this is exactly how your abs work, as they attach just above the bottom edge of your ribs on one side and near your iliacus bones on the other.
At the top point of the positive phase, try to squeeze your abdominal muscles as much as possible, making an additional forced exhalation.
During the negative phase, always straighten your body completely, moving it as far back as possible, while trying to move the lower edge of the ribs as far as possible from the iliac region, thereby completely relaxing the abdominal muscles.
Benefits of exercises with a ball
Performing regular workouts using a fitball, whether in the gym or at home, brings enormous benefits to the human body. With the help of various exercises you can achieve:
- intensive work of all muscle groups;
- improving coordination and dexterity;
- improved posture;
- prevention of diseases of the joints and spine;
- burning extra calories;
- figure tightening.
The rounded shape of the fitness ball makes it possible to perform exercises with a large amplitude, and its instability ensures constant tone of all muscles.
This gymnastic equipment can easily replace expensive and large-sized sports equipment, treadmills and other equipment, while not being inferior to them in efficiency.
With the help of exercises on a fitball, you can bring comprehensive benefits to your body: remove excess belly fat, get rid of excess fat on the hips, the hated cellulite on the buttocks, tone and strengthen every muscle in your body.
Hyperextension on a fitball
The exercise is also suitable for those who, for whatever reason, experience discomfort when performing this movement with classic equipment or on the floor. For greater efficiency, you can use a wall as a footrest.
- Walk with your back to the wall, placing the ball in front of you.
- Lie on your stomach on the ball, with your knees on the floor and your feet against the wall.
- Bring your arms bent at the elbows to the ear area.
- As you exhale, lift your body as high as possible.
- As you inhale, return to the starting position.
Perform 4 sets of 15 reps.
At the end of the negative phase, try to stretch and relax your lower back as much as possible.
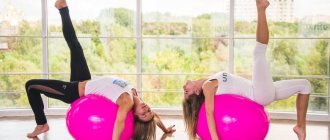
Plank
Doing planks on a fitball will give you a lot of excitement, believe me. Unstable ball support will stress your abs and stabilizer muscles so much that it will not seem like much. Everyone who does a plank on a fitball for the first time remembers this day for a long time. Therefore, if you have been practicing the classic version on the floor for a long time, you should switch to a fitball, thereby increasing your level.
This exercise can be performed in several variations, which include different positions of the hands as support. Let's consider the most classic option on the elbows.
- Place your arms bent at the elbows on the ball.
- Stepping back, bring yourself into a plank position.
- Don't shake (just kidding).
Perform 4 sets of 60 seconds.
In any version of the plank, do not allow excessive bending in the lumbar area!
Try to keep your lower back level relative to your entire body.
When leaning on a fitball, your arms should be strictly perpendicular to the floor.
The closer your elbows are to each other, the more difficult it will be to maintain balance. Therefore, if you are just getting acquainted with this variation of this exercise, place your elbows as far as possible from the center of the fitball. In the future, gradually reduce the distance between your elbows, thereby increasing the load on the stabilizer muscles.
Experiment.
Varieties
The fitball ball comes in several variations. This gymnastic apparatus can be of different diameters and colors. Depending on its shape, the following varieties can be distinguished:
Ball with horns. They act as a holding device; this model is most suitable for children and users without experience. Before purchasing, look at a photo of a fitball on the Internet or in a sporting goods catalog to make sure whether this shape will prevent you from performing certain types of exercises.
A fitball with spikes is perfect for losing weight. The spiked surface additionally serves as a massager that effectively copes with the hated cellulite.
A smooth fitball is a classic option that is suitable for any activity with it; it can be used both for intense training and for relaxation and relaxation.
You can find these oval-shaped gymnastics equipment that resembles a donut. This type is intended for performing special exercises; a more limited range of actions can be performed with it than with round models.
As for the average cost, depending on the diameter, shape, manufacturer’s brand, design, it will vary from 500 to 3000 rubles.
Gluteal bridge
The exercise is ideal for the fair sex. This is an interesting alternative to the classic buttock bridge, in which the body support is fixedly fixed on the shoulder blades. When performing a glute lift with your back on the ball, your buttocks will be forced to contract more intensely in order to at least bring the hip joint to the level of the body line, and the unstable surface of the fitball will force the gluteal muscles not only to work in their usual form of contraction, but also to include the function of stabilizing the lumbar areas relative to the horizontal axis.
- Lie with your back on the ball.
- A few steps forward, bring your body to a semi-vertical position, lowering your pelvis almost to the floor.
- Bring your arms bent at the elbows to your chest, crossing them.
- As you exhale, push yourself off the floor with your legs, lifting the iliac region as high as possible, directing it towards the ceiling.
- As you inhale, return to the starting position.
Perform 4 sets of 20 repetitions.
At the peak of the positive phase, try to squeeze your buttocks as much as possible with an additional contraction - this way you will get more benefit from the exercise.
Experiment with foot placement. The width of your foot stance will affect not only your balance, but also the segments you work on your gluteal area.
The ideal option is four sets with four different foot positions, starting with the widest possible and ending with the narrowest (right down to the touching of the medial ankles).
If you are in good physical shape or the bridge on two legs loads you less than before, then it is worth improving it with a stand on one leg. In this case, use the starting position with your legs as narrow as possible, and then lift one of your legs off the support.
Also, a good alternative to the classic bridge is the option of resting your back on the floor, where your feet are on the ball. In this case, the fitball can be placed near the wall.
- Place the fitball near the wall.
- Lie on your back near the ball and place your feet on it.
- As you exhale, resting your feet on the ball, lift your pelvis as high as possible, directing your iliac region toward the ceiling.
- As you inhale, return to the starting position.
Perform 4 sets of 20 repetitions.
Press "Berezka"
Despite the fact that the name of the exercise contains only the word “press”, this type of movement loads much more muscles, and when using a fitball, which we fix between the legs, the adductor muscles of the thigh will also be perfectly loaded. Let's begin!
- Lie down on the floor.
- Place the exercise ball between your legs so that your feet are on the center line of the ball.
- Raise your legs together with the fitball vertically up.
- Place your hands along your body with your palms facing the floor - they will serve as additional support.
- As you exhale, try to lift the ball as high as possible towards the ceiling, lifting your pelvis and lumbar region off the floor.
- As you inhale, return to the starting position.
Perform 4 sets of 15 reps.
Try to involve your abdominal muscles as much as possible, minimizing the rocking effect. Use your hands for more rigid support.
The birch tree press can also be performed in a slightly different variation, which is suitable for slightly more advanced fitness enthusiasts. The modernization involves rotating the pelvis during the positive phase of the movement. Every time you lift the fitball up, rotate it around its axis in one direction or another. In this case, the oblique abdominal muscles will additionally come into play.
What beginners who want to know what a fitball is and how to train correctly need to know
The minimum set of equipment is a gymnastic ball. Some exercises may require a pair of dumbbells or a bench, but you can still limit yourself to just a ball.
As with any fitness activity, when exercising with a fitball, you first need to do a warm-up to warm up your muscles. During exercise, it is important to maintain correct posture: keep your back straight and do not bend your knees where they should be kept straight.
Remember to focus on your breathing. Proper breathing is the cornerstone of any physical activity. There is an important thing that not everyone takes into account: choosing the right clothes. Sweat can cause slipping, so it's best to wear comfortable clothing that covers the top.
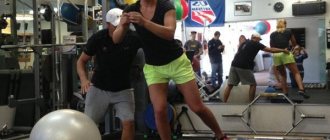
Rodeo
This exercise is the highlight of this article. It will leave absolutely no one indifferent. First of all, it trains balance and perfectly lifts your mood. Of the muscle groups, the abs and stabilizers are perfectly loaded. The essence of the exercise is simple - you need to sit astride the ball and remain a fitball rider for as long as possible.
There are several options for implementation. We will offer two of them. The simplest is the one that involves squatting on a fitball as on a regular chair.
- Sit on the ball.
- Lift your legs off the floor, straightening them at the knee joints.
- When balancing in this position, maintain your balance as much as possible.
Actively engage your abdominal muscles. Spread your arms out to the sides. As soon as you relax your abs, you will immediately lose your balance.
A slightly more difficult option is to sit astride your knees.
- Go to the fitball.
- Leaning towards the ball, rest your hands on it and alternately place your knee joints on it.
- Straighten your body and remove your hands from the ball.
- Maintain your balance as much as you can.
Try to place your feet as close to the edges of the fitball as possible - this is the most optimal support position for this exercise.
Conclusion
Training with a fitball has a beneficial effect on the vestibular system, develops coordination and gives many positive emotions. All this also has a positive effect on metabolism. With the help of a fitball, you can warm up and also get quite a serious load. Today, such balls can be purchased at almost any sports equipment store. Make the most of the opportunities for your own development and expand your fitness horizons. The more varied your training, the more results you will achieve later.
Editor and proofreader: Farida Seidova
Are you training at home? Then you might also be interested in these articles:
how to inflate a fitball without a pump
FITBALL FOR ACTIVITIES WITH A BABY Use the ball from birth! Rocking on a ball develops the vestibular apparatus (one of the most important components of activities with a child of the first year of life). The baby can perform “passive” swimming, as he is used to doing in his mother’s tummy. Thus, the baby receives the necessary vestibular, visual and kinesthetic impulses. Relaxing effect - in children from birth, as a rule, the tone of the flexors prevails. Exercises on the ball relax the abdominal muscles, which improves digestion and reduces infant colic. If the abdominal muscles are relaxed, breathing improves significantly. Vibration is a kind of physiotherapy that has an analgesic effect, stimulating the function of the adrenal cortex, liver and other vital organs. From birth you can do simple gymnastics on a ball, making it more difficult with age. At the same time, all muscle groups are strengthened and developed. Strengthening the back muscles, especially around the spine, makes it strong and flexible. This is the key to the normal functioning of the nervous system and the free distribution of nerve impulses throughout the body. Gymnastics on a ball is an interesting and fun activity. By practicing from an early age, very soon you will see the contented and happy face of your baby as soon as you put him on the ball. Almost all children love to play with a ball, which is very important for their emotional and psychological development. His Majesty the Movement The birth of a baby is always a miracle. And we all want it. so that our children are strong, healthy, strong, smart and happy. However, unfortunately, many parents, and especially grandmothers (and many health workers) are sure that the newborn is very weak and can get sick at any time. Consequently, he needs to create comfortable conditions - warmer, more nourishing; God forbid, if you pull the baby’s arm or leg, something might come off or break. Of course, all children are different, everything is purely individual. Now we will talk about a situation where pregnancy and childbirth proceeded without pathology, and the child was born healthy. Here it is necessary to understand and comprehend that parents must do everything so that the baby does not lose the unique ability of newborns to adapt to environmental conditions, because the foundations of all life are laid in the first year, starting from the neonatal period, that is, from the 1st month. The lifestyle of the parents themselves is very important, their attitude towards clothing, temperature, nutrition, sleep, walking and, of course, physical activity. This is what we will talk about today. Russian physiologist I.M. Sechenov wrote that “the work of muscles is the work of the brain,” that is, where the motor system is in low activity, the general development of higher nervous activity is delayed. This is especially true for children in the first year of life. Massage and “his majesty” movement directly affects brain growth in young children. A gymnastic ball has been used for practicing with children for quite a long time, but simple rocking is generally recommended, which is undoubtedly also very useful. In our work with babies, we use a large gymnastic ball (fitball), and from a very early age. Now you need to select the ball. The most optimal size is 75 cm in diameter. This size of the ball allows it to be used by all family members. It’s comfortable to just sit and jump on, even for adults. As a result, the load on the spine is reduced and the back muscles relax. And gymnastics on such a ball has a healing effect on the entire body. Mothers will find it useful for restoring their figure after childbirth. Well, for kids it can be used from birth to 4~5 years, and for play and beyond. The gymnastic ball should be stable and elastic enough so that both you and your baby feel confident and calm. The stability of the ball depends on the quality of the rubber from which it is made, and the quality of the rubber is determined by the weight that the ball can support. On good balls, the manufacturer always indicates this weight. The ball is stable if it can withstand 200-300 kg. Latex gives the ball its elasticity. Balls are usually brightly colored - choose the color to suit your taste. The ball should be smooth, without “horns” or pimples. You should not skimp on a training device for your baby. I want to repeat again - the ball must be stable. And you must be sure that your activities are safe. So you bought the ball. Inflate it with any pump (a manual bicycle pump or an electric car pump will do). If you don’t have a pump, you can inflate with your mouth - you’ll just have to work a little longer (from my own experience, no more than 40 minutes). There is no need to inflate too much. Inflate so that the ball is sufficiently elastic, soft and stable. The first lessons can begin at 2 weeks of age (you and the baby have already adapted at home, your feeding, sleep and wakefulness patterns have gradually improved, and your umbilical wound has healed). Classes should be carried out no earlier than 40-60 minutes after feeding. The first lesson is short. First you have to get used to the ball yourself. Sit on a chair or sofa, place the ball in front of you. Cover it with a diaper and carefully place the baby on his tummy exactly in the middle. It is not necessary to undress the baby first. If you feel unsure, let someone close to you at first insure you and hold the ball with your hands. Exercise 1 Place your baby's right hand on his back and lightly press him against the ball. With your left hand, hold your left leg in the area of the knee joint, while pressing your hand against the ball. This way you will be in complete control of the situation. Start slowly rocking the child forward, backward, in a circle, vibrate a little. Carefully watch the baby, talk to him, sing a song, praise him. This will give him confidence. After 1~2 minutes, holding the ball with your feet, carefully turn the baby onto his back. Again, place your right hand on his tummy, hold his leg with your left, and repeat all the movements. If the child gets worried during the first lesson, do not stop, repeat everything the next day, and then put the baby on the ball several times during the day. Gradually, you and your baby will get used to such activities. On the ball, the baby calms down, relaxes, and receives a light massage of the abdomen and back. The gas flows out better, the tummy stops hurting, the stool normalizes, and the tone of the flexors decreases. Gradually increase the amplitude of rocking and rotation. Before classes, you can do a light stroking massage; it is useful to undress the baby during classes - here you can get air baths and hardening. The time for practicing on the ball is not strictly established. If you and your child enjoy it, do as much as you want throughout the day. Until the 1st month, by swaying and spinning on the ball, you both adapt to training on such a simulator. From the 1st month, classes can be made more difficult. Now perform all exercises while standing in front of the ball. Exercise 2 First try to remove your hand from your back and tummy. At the same time, hold the baby with both hands by the legs in the area of the knee joints. Learn to feel confident with such support by rocking, rotating and vibrating your baby. Exercise 3 Then gradually learn to lift your hands off the ball, slightly lifting the child's legs. The most important thing is to do everything smoothly and carefully. Gradually, lifting the baby's legs, rock him with emphasis on the upper torso in a position on his stomach. After this, place the baby on his back and repeat the exercise. Exercise 4 Increasing the amplitude of rocking and holding the baby by the knees, and then only by the ankle joints, try to lower his head down more and more. Don't be afraid of upside down positions. Having gotten used to the position on the tummy, the child will train the muscles of the cervical spine, hold his head longer, better and more confidently. The back muscles and spine are also activated and strengthened. In the supine position, the head down position ensures a decrease in the tone of the flexors; they straighten, the tone of the hand decreases, and the fingers open. Having gotten used to the head-down position, stay in the hanging position for a short time, shake the baby a little, vibrate the ball, and relax. Exercise 5 When you become comfortable with hanging upside down, you can try holding the child only by the arms. Since this is somewhat more complicated, ask your relatives to back you up at first. The baby lies on his back. Take him by the handles in the area of the wrist joints or place your thumb in his palm. The innate grasping reflex will allow you to firmly hold the baby by the hand. As before, first master simple rocking movements (start very carefully, gradually increase the range of motion). If the child's arms extend quite well, achieve full lifting of the arms up in motion. The legs hang down freely. Stay in this position for a while. Relax your baby by shaking and vibrating. Gradually achieve full straightening of your legs along the ball and full extension of your spine. Over time, in a supine position, you will be able to perform any movements with your arms: up, down, “mill”, crossing on your chest. Exercise 6 Having mastered these simple exercises, by 2 months you can move on to more complex gymnastics. The child lies on his back. You hold it by the legs in the area of the knee joints, and if you feel confident, only in the area of the ankles. Try to do the following slowly and carefully: bringing the baby closer to you, bend his legs at the knee joints and press him to his tummy, and straighten his legs when moving the ball away from you. Repeat the exercise several times; Gradually increase the amplitude and speed of the swings. Now try to perform the same movement, first only with your right leg, then only with your left leg. You will get a kind of “bicycle” on the ball. Exercise 7 The child lies on his tummy. Hold him in the lumbar region with your right hand, and with your left try to put him in the “frog” position. In this position, swing forward, backward, vibrate on the ball. It is relaxing and good for hip development. Exercise 8 The baby lies on his tummy. Hold it by the handles (as in exercise 5). Rock forward, backward, gradually lift your shoulder girdle and chest by the handles. You will get a “fish” on the ball. Gradually spread your arms to the sides, while lifting the baby. You will get a “swallow” on the ball. In the 3rd month, the exercises should be further complicated and diversified, but a specialist should teach you this. In the position on the stomach, it is useful to bend and unbend the legs, hold the child first by one leg, then by the other, holding the arms, lower it down, make jumping movements, thereby training the support on the entire foot. When the baby learns to grab objects, you can scatter several small toys on the floor, and you will see how he begins to tear off first one, then both hands from the ball, trying to grab the toy. Your activity will turn into fun. In the position on the back, you can sit the baby down, bend and unbend the straightened legs, make turns left and right; after a while, start teaching the child to roll over from his back to his tummy and back, and a little later to sit down. I am deeply convinced that a baby must be taught to roll over, sit up, sit down, crawl, and when he gets up on his own, walk correctly. You should not wait for the little one to start doing this on his own. The more we push our children, the more successful their development is. However, I want to repeat once again: under no circumstances should you experiment on your own; a specialist should teach you all this. You need to exercise for 10-15 minutes daily. After such an activity, it is very useful to swim in the bath. If you consider that the lesson begins with a light massage (10-15 minutes), plus swimming for 10-15 minutes, everything will take you from 20 to 40 minutes a day (just that!). But what benefit will the child receive! The little person’s body responds very quickly to such activities. The results will be noticeable almost immediately. The baby will become more active, stronger, will no longer be afraid of changes in the position of his body, his sleep and appetite will improve, and he will receive a positive emotional charge. The ball is also very good for practicing with children who have any neurological (hyper-, hypotonicity, etc.) or orthopedic pathology (torticollis, hip dysplasia, etc.). In these cases, classes should only be conducted by a specialist. Good luck to you and health to your children! Tatyana Yuryevna ANDROSOVA, valeologist Russian family magazine “Aistenok”, June 2005, pp. 17-19