The importance of yoga for arms and shoulders
When you stand and look in the mirror, it is not always possible to realize that the relief of your arms is far from perfect. But when the handle rises to the side, it will be noticeable that there is a need to level the relief by pumping up the triceps. When summer comes, women want to wear elegant dresses, blouses where their shoulders and arms will be exposed.
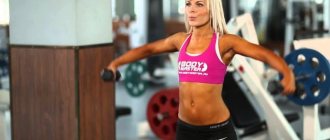
Many women have a misconception about physical exercises for their arms and shoulders. They think that because of this, femininity is lost. By doing yoga, you will never be a bodybuilder, but weak muscles will tighten up.
Yogic asanas can remove excess fat from full arms and add muscle mass to thin limbs.
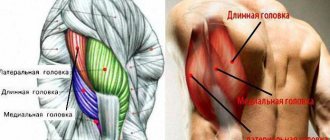
The formation of a beautiful relief is achieved thanks to the two main muscles of the shoulder - biceps (biceps) and triceps. The biceps helps to flex the limb at the elbow and shoulder, and with the help of the triceps (triceps muscle), the limb extends.
Bodybuilders and bodybuilders use weights to bend and extend their arms at the elbow joints, shaping the relief of their shoulders and forearms. This is typical for men. Yoga exercises work the shoulder muscles in a balanced manner without over-stressing the biceps or triceps muscles. As a result, the relief of the upper extremities improves and the arms do not gain muscle mass.
Below are simple poses that activate the muscles of the shoulder and forearm.
If you perform asanas correctly, after class you will feel pain in your upper limbs when you lift them up - this is normal.
Contraindications for training the arms and muscles of the shoulder girdle
The shoulder joint is the most mobile joint in the human body. Almost 60% of all dislocations are traumatic shoulder dislocations, and the complex of the above asanas is not suitable for everyone.
Yoga for arms and shoulders is contraindicated for:
- injuries of the elbow joint, wrists, spine;
- in the last months of pregnancy;
- high and low pressure;
- migraines and headaches;
- weakened condition in which physical activity is contraindicated.
Any asanas will become easier and less difficult when you become less fussy and start listening to yourself. The soul and body are in the same harness, and it is yoga that teaches you to hear the body and respond to its requests. Another advantage of the practice is that it involves giving up bad habits, which has a beneficial effect on health.
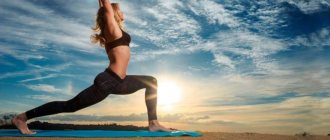
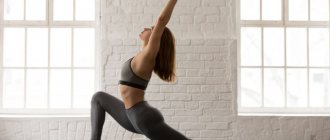
Uttihata Trikonasana (Extended Triangle)
In this position, the upper limbs act as the steering wheel. If you stop tensing the muscles of your upper limbs, you will fall. One palm rests firmly on the surface, and the other is directed directly upward. Therefore, strong muscle work is required to maintain the position. The shoulder joints open perfectly.
Execution method:
- Spread the lower limbs wider, the upper limbs to the sides and tilt to the left.
- While inhaling, bend your left leg slightly and place the fingers of your left hand on the surface or prepared block.
- Lift the left foot off the surface, transferring the weight of the body to the right leg. Breathe calmly, maintaining balance.
- With your right foot, press well to the floor and, as you inhale, straighten your right leg. Smoothly raise your left leg upward and fix it in a position parallel to the surface or slightly higher and extend it.
- Turn the top of the body to the left so that the chest becomes parallel in relation to the wall.
- Maintain balance. When a feeling of stability appears, extend your left arm, forming a straight line with your right.
- Look towards the limb extended upward. Stay in the pose for at least 30 seconds.
- To exit the Triangle, you need to exhale and gradually lower your left leg to the surface and straighten up.
- Repeat similar movements to the right side.
You cannot perform the asana when:
- neck injuries. If you have neck problems, it is not recommended to look up
- headaches;
- low blood pressure;
- insomnia.
Asanas for strengthening arms
Beautiful relief of the arms is formed by the biceps and triceps. Yogic practices allow you to work on them and the shoulder muscles in a balanced way: the shape of the arms is improved gradually, without gaining muscle mass. This is a definite plus for the fair sex, who are afraid of losing their natural femininity, but dream of strong, toned muscles.
Description of popular “power” asanas for arms and shoulders:
- Kneel down and place your palms or forearms on the floor (hands shoulder-width apart). As you exhale, lift your pelvis up, focusing on your feet. Don't bend your knees. The head should hang freely between the hands.
- Place your hands and knees on the floor shoulder-width apart. Lift your knees up and press your toes and palms into the floor (wrists under your shoulders). The entire body should resemble one straight line. Don't let your lower back arch and don't tilt your head down.
- Remaining in the previous pose, lower yourself onto your forearms and lift one straight leg up.
- While in pose number 2, bend your elbows and lower yourself down until your body is parallel to the floor.
- Lying on your right side, straighten your legs and rest your right hand on the floor. Place your palm strictly under your right shoulder. The left leg should rest on the right leg. Pull your left hand up. Don't lower your pelvis down. Do not raise or lower your head - the neck and spine should be in one line. The same emphasis can be placed not on the palm, but on the forearm.
- Sitting on the floor with your legs straight, place your palms behind your back. Point your fingers towards you and, as you inhale, lift your pelvis up, focusing on your feet and palms. Look up and extend your entire body into one line.
- From a standing position, lean to your right side and place your right palm on the floor. Focus on your right arm and right leg. Stretch your left arm up and your left leg parallel to the floor.
Stretching asanas for the arms and shoulder girdle
- While sitting or standing with your back straight, place one palm behind your head. Place your other hand behind your back from below and fold your palms one on top of the other between your shoulder blades. Do not move your elbows to the sides, but straighten your shoulder joints back. If you can't reach with your palms, grab a yoga strap or any other strap.
- Sitting on the floor, bend your legs and place your feet on the floor. Place your hands behind your back and place your palms on the floor (hands shoulder-width apart, fingers pointing away from you). Slide your straight arms further until tension appears in the muscles and tilt your head back.
- Lying on your stomach, move your right arm to the side, pressing your palm firmly to the floor. The arm should be perpendicular to the body. Slowly turn your face towards the ceiling and try to lie on your right side. Press the palm of your left hand into the floor to support your body and create optimal resistance.
- Strengthen the previous pose by turning completely onto your side and bending your legs. Place your feet on the floor as close to your body as possible. Raise your straight left arm up and slowly lower it towards your right hand. Clasp your hands or bring your right foot towards your left hand and grab your toes.
- Lie on your stomach. Place your left hand along your body, and place your right hand under your neck so that your elbow and palm are on the floor. The closer your left shoulder is to the floor, the greater the tension. Place your left palm on the floor and adjust this distance.
- Stand on the floor (feet shoulder-width apart) and place your arms straight behind your back, clasping your palms. Exhaling, bend down as much as possible. Try to lower your head as close to your feet as possible. Pull your palms up and then away from you until your arms are parallel to the floor.
- Get on all fours and place your left palm under your right shoulder. Stretch your right arm to the side and slowly lift it up. Turn your torso after your hand, without lifting your knees and left palm from the floor (a). Then lower your right arm and place it under your left (perpendicular to your body). Place your right shoulder on the floor, bending your left arm at the elbow (b).
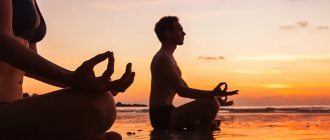
To achieve deep relaxation, you don’t have to get up at dawn - you can practice yoga at any time of the day, alone or in pairs. You can start with a simple hatha yoga lesson. To practice at home, use training videos from real gurus.
For beginners, it is enough to do 5 breathing cycles in each exercise (one cycle consists of inhalation and exhalation). The next day after classes your hands may hurt, but this should not be a reason for a break. You can feel the benefits only by regularly practicing yoga.
All kinds of stances are classified as traumatic asanas. Before you begin to master them, you need to really assess your capabilities, learn to step away from thoughts and find inner balance. The pose of the Staff on four supports (power asana No. 4) will help you prepare for them. It is better to start practicing the inverted position against a wall or other stable support.
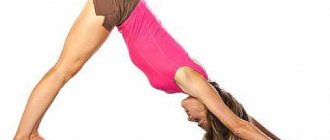
Adho Mukha Svanasana (Downward Facing Dog)
The Downward Facing Dog exercise is found in almost all complexes for beginners or as daily practice.
It activates almost all muscle groups, including the muscles of the shoulders and arms.
Execution method:
- Get on all fours, spread your knees hip-width apart. Place your palms on the surface, spread your fingers wider.
- When performing the asana, the emphasis should be on the palm.
- Inhaling, straighten your knees and spinal axis, palms and feet pressed to the surface. At the initial stage, you can leave your knees slightly bent and place folded material under your heels.
- Try to stretch the spinal axis, raising the tailbone to its maximum height.
- Feel the tension in your arms.
- Stay in the pose for five breathing cycles. Breathing is free.
- To exit the pose, take a deep breath and hold your breath (for several seconds), while exhaling, bend your knees, touching the surface with them. Lower your pelvis onto your heels, place your head on the floor, stretching your arms forward.
Do not do Adho Mukha Svanasana if:
- last stages of pregnancy;
- hypertension;
- diarrhea.
Therapeutic yoga exercises for the shoulder girdle at home
Do you have tense, cramped, or simply sore shoulder and back muscles that make you urgently want to see a massage therapist?
There's nothing worse than trying to exercise when you have tight or strained muscles that cause headaches or back and shoulder pain.
Most of us cannot afford a daily massage. But you can do yoga, stretching exercises to relieve tension and pain in the shoulder girdle.
Before we begin, let's look at the root cause of muscle tension.
You've probably already guessed it: it's all about poor posture, especially rounded shoulders, as well as stress.
If you're stuck at work and sitting in front of a computer all day, then chances are you've noticed that your back is getting into the wrong position and you need to work on not rounding your shoulders. If this is problematic for you, then read the article on how to get rid of slouching at home.
But if you already have knots or need an extra boost to finally get rid of them, try these 13 exercises for a strong, healthy back and shoulders.
13 best yoga exercises to stretch the shoulder girdle
To get the maximum benefit and relieve pain in the problem area, try to keep your body relaxed, as this will allow it to stretch better. And once you get into the position, hold for 20-30 seconds .
Neck stretch
If you realize that you have problems in the upper part of the shoulders, close to the neck, then this exercise will provide some relief.
Technique:
- Sit on the floor and cross your legs. Pull your shoulders down and back.
- Tilt your head towards your right shoulder. Don't lift your right shoulder up to reach your head. Instead, focus on stretching your neck and keeping your shoulder in place.
- You can stop here and then repeat on the other side, or you can increase the stretch by slightly pulling your head toward your shoulder with your right hand.
- Repeat with the other shoulder.
Reverse plank
The reverse plank stretches the triceps and the front of the pecs, and also targets slouching, which can cause tension and pain in the shoulders.
Another benefit is strengthening your back muscles, which will ultimately work to return your shoulders to their proper position.
Technique:
- Sit on the floor with your knees bent in front of you.
- Place your hands 40cm behind and wider than your hips; Point your fingers forward.
- Bend your elbows slightly, inhale, and lift your hips up. Straighten your arms and keep your chest open and lifted.
- You can stop here or go further by throwing your head back (but without letting it sag) and straightening your legs.
- Engage your hips so that your legs are straight and avoid sagging your hips.
Chest opening with tape
This yoga exercise is better known as a shoulder opener and is great for lengthening the pectoral muscles while relieving muscle tension in the shoulders.
Technique:
- Stand up and hold the yoga band behind you.
- Fasten the tape with your palms facing forward. Your hands should be far enough apart that you have enough tension, as you should feel the muscle stretch.
- Increase the stretch by moving your arms closer together and slowly lifting them behind you.
- Be sure to keep your shoulders still throughout this exercise.
Pose in the saddle
The saddle position pulls on the front of the chest and hip flexors, all of which will cause rounding and tension in the upper back if the muscles are not stretched. This exercise also applies gentle pressure to the upper back and shoulders, working to relieve spasm.
Technique:
- Sit on your legs, place your knees at a comfortable distance from each other.
- Now gently lower your back to the floor, resting on your elbows.
- At this point, you may feel enough tension in your quads and pecs to stop. However, you can complete the exercise until your shoulders drop completely to the floor to make the position truly complete.
Eagle pose
Eagle pose deeply stretches the entire shoulder girdle and upper back. It can also stretch the back lower, but this requires a lot of balance, so we'll just focus on the upper body for now.
Technique:
- Stand up with your shoulders back and down.
- Stretch your arms out in front of you. Place your right hand under your left.
- Bend your elbows and wrap your right arm around your left, like a snake. Touch your palms.
- Hold this position or increase the stretch by beginning to gently lift your elbows, still keeping your palms together.
- If your palms don't quite touch each other yet, try touching with the back of your hand.
Gomukhasana (Cow Head Pose)
Gomukhasana works the entire shoulder girdle area, stretches the pectoral muscles and eliminates muscle tension. (If you can't clasp your hands behind your back, you can use a strap.)
Technique:
- Sit on the floor.
- Raise your right hand up and behind your back (as if you were patting yourself on the back).
- Now touch your lower back. Try touching your fingertips together.
- You can end here, or try wrapping both hands around your wrists to gently open your hands.
- Hold this position for a few breaths and switch hands.
Eye of the Needle Pose
Eye of the needle pose is designed to stretch the shoulders and upper back. It is ideal for relieving tension and spasms around the shoulder blades.
Technique:
- Start in a table position (arms directly under your shoulders, knees under your hips).
- Inhale and lift your right arm up, stretching your pectoral muscles.
- Now lower your hand and place it under your left arm and pectoral muscle.
- Let your right shoulder touch the floor, then reach your left hand in front. Pay close attention to your technique.
- Repeat the same exercise with the opposite shoulder.
Cat and cow pose
Cow-Cat pose works to release tension in the back and shoulders and is a great complement to many of the exercises listed in this article.
Technique:
- Start in Table Pose with your arms and legs directly under your shoulders and hips.
- With a neutral spine, begin to exhale and round your back upward. Hold for a few seconds.
- Inhale and arch your back, lifting your head, looking up.
- Continue alternating between cat and cow poses for about 15 repetitions.
Uttanasana
This pose provides a deep stretch to the shoulders as well as the neck.
Technique:
- Stand in a wide stance, with your feet approximately 1 - 1.3 m apart.
- Clasp your hands behind your back, pressing your palms together.
- Lean forward, resting on your hips. Lower your arms overhead toward the floor, making sure your shoulders don't touch your neck.
- To return to the rack, engage your glutes and hamstrings to help you return to your starting position.
Shoulder stretch with yoga band
This exercise is one of the simplest yoga shoulder exercises that you can do anywhere you have a yoga band.
Technique:
- Stand with your feet shoulder-width apart.
- Hold the band in both hands, lift it above your head, then pull it back slightly.
- Make sure there is enough tension so that you feel tension in your arms and upper back.
- Do the amount of exercise that is acceptable to you.
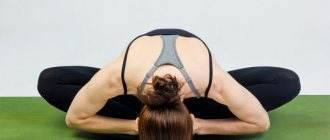
Child's Pose
Child's pose provides a good stretch for the shoulders and chest and reduces tension.
Technique:
- Sit on your tiptoes. Bend forward onto your hips, keeping your arms in front of you and your forehead touching the floor.
- Extend your arms as far as necessary until you feel a stretch in your upper and side back.
Snake pose
Snake pose opens the chest and stretches the front of the shoulders. This helps return your shoulders to the correct position, which helps prevent muscle pain.
Technique:
- Lie face down on the mat.
- Place your hands behind your back and press your feet to the mat.
- Lift your chest off the floor by squeezing your hands. Look down at the mat to avoid straining your neck.
- Hold for 5 to 10 breaths, then release your arms and press your cheek to the mat.
Bridge with clasped hands
This pose simultaneously strengthens and stretches the entire back while placing gentle pressure on the shoulders, eliminating any tension.
Technique:
- The pelvis lies on the floor, knees bent.
- Keeping your knees pointing straight forward, lift your hips up.
- With your hips lifted, place your hands on the floor and clasp them under your thighs.
- Hold this position for a few seconds and lower back to the ground. Do a reasonable number of repetitions.
Relaxing Yoga - Shoulder Stretch
Don't be afraid to do several exercises in a row, because this way you will really loosen up.
You will also begin to feel more relaxed and less stressed in no time. And if you have time to do the exercises every day, then the result will not only not be long in coming, but will also be long-lasting and of high quality.
Source: https://yurielkaim.com/yoga-shoulder-stretches/
Source: https://FitZdrav.com/fitnes/uprazhneniya-jogi-dlya-rastyazhki-plechevogo-poyasa.html
Purvottanasana (East)
The asana is practiced in combination with the Downward Facing Dog pose. If you perform these exercises consistently, all the muscles in your arms and shoulders are activated. The load is distributed evenly, which helps create a beautiful relief.
Execution order:
- Sit on the surface with your lower limbs extended. The back is straight.
- Place your palms on the surface near the pelvis, fingers should be in the direction of the feet.
- Bend your lower limbs at the knees, spread your feet shoulder-width apart.
- While inhaling, raise your pelvis and straighten your upper and lower limbs.
- The body, as it were, draws a straight line, so the chin should not be directed towards the chest.
- Breathing is even, calm, keep the knee and elbow joints tense.
- Stay in the asana for 5–10 breathing cycles.
- To exit the pose, you need to exhale, bend your knees and sit on the surface.
It is forbidden to perform the East pose if the cervical spine or wrists are damaged.
How to protect your shoulders while practicing yoga?
How to avoid injuries when doing yoga? Tips for working with shoulder joints.
Shoulder opening asanas
Especially regulate the amplitude of shoulder opening in asanas with a lever.
When performing yoga exercises for the shoulders, dose the intensity of the impact. Do not overdo it if you feel sharp pain while performing the asana. In this case, it is better to reduce the amplitude of movement or exit the pose. This recommendation especially applies to asanas where there is leverage.
Examples of asanas for opening the shoulder joint:
From left to right: Gomukhasana, Garudasana, Namaste behind the back, Lock behind the back
Asanas with emphasis on hands
In asanas with emphasis on the hands, it is necessary to correctly adjust the position of the shoulders. It is unacceptable to raise your shoulders upward, squeezing your neck with your shoulders. On the contrary, you should move your shoulders and shoulder blades further away from your ears.
It is unacceptable to raise your shoulders up. On the contrary, you should move your shoulders and shoulder blades further away from your ears
It is also important to keep your arm muscles active. You should not sag on your arms; your arm muscles should remain strong. Otherwise, all the load goes on the joints, which can lead to injury or disease. How to perform asanas correctly? You should imagine that you are pushing off the floor with your hands. Active hand work is the key to the safety of the shoulder, elbow and wrist joints.
You should not sag on your joints. Active hand work is the key to the safety of the shoulder, elbow and wrist joints
Examples of asanas supported by hands:
From left to right: Purvottanasana, Marjariasana, Vasisthasana
. It may be useful to read:
- Dasha's husband Dashi's real name. Swami Dashi biography wife photo Wikipedia personal life. Teachings of Swami Dasha. Education and religion;
- Journalists revealed facts about the most mysterious participant in the “battle of psychics”;
- Drawings for the theme of winter fun comics;
- Physical exercises for effective recovery A set of physical exercises that promote health;
- Exercises for armpit elasticity - what to do if your armpits are flabby? ;
- How to remove “ears” on the hips at home Remove ears from the arms;
- “Winter Fun” Scenario for winter sports integrated entertainment in the middle group;
- Exercises for hand joints with arthrosis;
Vasikhstasana (sage)
The asana is performed from the Downward Facing Dog position. Having studied the complex in full, you will be able to make smooth transitions from asana to asana, maintaining the load on the upper limbs.
Vashstasana develops the shoulders and forearms.
Execution order:
- After doing Adho mukha svanasana, place most of the body weight on the right side of the body.
- Press your left leg towards your right, pressing your right foot well to the surface.
- Smoothly turn your body to the left, lifting your left hand from the surface. Having found the balance point, lift it vertically upward, forming a single line.
- Fix the position for about 30 minutes. Every day try to increase your stay in the pose.
- To exit the asana, the left hand is lowered along the body, smoothly placing the palm on the floor, turning the face towards the floor. You can lie down on a surface to rest, or you can move into the Downward-Facing Dog pose to perform the Sage exercise in the opposite direction.
You should not perform this asana if you have problems in the elbow joints or wrists.
Neck and shoulder exercises for beginners
Entry-level poses are aimed at relaxing and stretching the muscles. Simple yoga asanas for the neck and shoulders can be performed every day in order or combining exercises as desired. The presented exercises are suitable for absolute beginners, but if you have problems performing them, then see the simplified version.
Leg and butt workout for beginners
Shoulder stretch against the wall
Why: For maximum stretching and opening of the shoulder joints, as well as improving posture. This yoga exercise for the shoulder region stretches the shoulder muscles well, improves joint mobility, eliminates fatigue and pain.
How to do it: Stand facing a wall about a meter away. Raise your arms up and bend toward the floor with your back straight until your back is parallel to the floor. Place your hands on the wall, you can deepen the tilt a little. Don't slouch, keep your back straight. Feel how your neck relaxes, your shoulder joints and chest open, and your spine stretches.
How to simplify: It is not necessary to bend over until parallel to the floor. Take a comfortable position. The main thing is not to round your back.
Triangle pose
Why: This yoga exercise relieves back and neck pain, opens the shoulder joints and chest, stretches the spine, tones the leg muscles, and stretches the hamstrings.
How to do it: Spread your legs, feet about a meter apart. The left foot looks straight, the right foot is turned to the right. Bend to the right with a straight back, place your right hand at the edge of your foot, and reach up with your left hand. Open your shoulders and chest, lengthen your spine and stretch your neck.