The next one that will lift your butt and turn your life around! Are you the head? Then let's go - these are the 10 best exercises you can do at home to strengthen your gluteal muscles and visually lift your butt!
Eat right, lead an active lifestyle and!
So, give your joints a good stretch, prepare a mat and a bottle of water. Go!
An effective exercise for the buttocks “Lunch”
Extend one leg as far as possible to the side, and place the other in a half-bent position, pull your shoulders back, and keep your heels off the floor.
Start performing jumps, alternately changing the position of your legs: either the left leg is in a half-bent position, and the right leg is extended, or vice versa. At the same time, while jumping, perform bends with your hands alternately touching the floor. 30 times at a dynamic pace in each direction.
Exercise “Boat” - strengthening the back of the thighs
Lie on your stomach on a gymnastic mat, bend your legs, heels together. Raise your legs up in this position, your stomach does not come off the horizontal surface, only your legs work. The higher you hold your legs above the floor, the better the gluteal muscles are pumped up and the more effective the result will be.
Exercise "Star"
The initial position is as in the previous task: lying on your stomach, arms forward, legs straightened. Spread your arms and legs to the sides simultaneously. Make sure you are breathing correctly.
Swing your legs back
Lying on your stomach, bend your legs at the knees and strain your buttock muscles. Then straighten your legs. Alternately bending and straightening your legs (preferably reaching your heel to the gluteal muscle) will help pump up not only your buttocks, but also get rid of fat deposits on your legs.
Exercise “Crab” for strong and elastic buttocks
We sit on the floor, bend our legs at the knees. Place your hands behind your back and lean on them. Then we lift our butt up. While in this position, straighten one leg and lift it up as much as possible. Then take her aside. Hold this position for 10-15 seconds. After this, return to the original position. Do the exercise 10 times in each direction.
Exercise Bridge
Lie with your back on the floor, extend your arms along your body, tuck your legs as close as possible to your buttocks. Raising your torso up, squeeze. As an additional load, this task can be performed as follows: in a position where the buttocks are raised and squeezed at the top, bring your knees together. In this case, the internal group of leg muscles also works. “Spring” in this position 20 times.
Exercise “Brazilian butt”
Take a lying position. In a lying position, lean on your legs. Bend one leg at the knee and begin to spring upward. After doing this home exercise for the buttocks, you will feel how amazingly your gluteal muscles work after it.
Exercise Lunges
Place one leg as far forward as possible and bend it. Take your other leg back and then lower yourself to your knees. Perform jumps, alternately changing the positions of your legs. The back is straight.
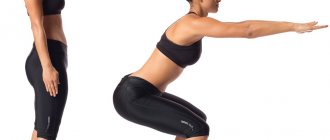
Squats and Lunges
Place your feet shoulder-width apart. Bend your torso forward so that your body forms a 90-degree angle, then squat down with your butt. Pull your hands to your chest. The back is straight. Perform squats at maximum speed. Do three sets of 20 reps.
Standing in an upright position, reach the floor with your hands and focus on your hands. From this position, lift your leg with your heel up, straining your gluteal muscle.
Get on all fours, placing your palms and elbows on the floor. Raise your leg to the level of your back. Lower your toe down, that is, make your leg in the shape of the letter “L,” then lift it up as high as possible. In the extremely raised position, squeeze and remain in this tense stance for 8-10 seconds. Then return to the original position. Do this exercise at least 3-4 times with each leg.
In order for exercises for the buttocks of girls to give a good result, you need to work hard and systematically on yourself: perform the proposed complex every day.
A variety of finger games provide a chance for parents and educators to have fun with their kids and act out funny scenes. Finger games, organized by adults, develop language, memory, attentiveness, and the ability to concentrate.
Preparation
- Ventilate the room.
- Do exercises with the children, walking in a circle - 15 seconds, windmill like rotating with your hands - 10 seconds, walking again - 10 seconds, then everyone takes their places at the tables.
Before starting the finger game “Crab”, children should be familiarized with the following concepts:
- a palm tree is like a tree;
- crab, its structure, how it moves;
- a seagull is a bird that flies and flaps its wings, catching fish in the sea;
- how fish swim;
- crocodile, how dangerous he is.
Having learned the peculiarities of the nature of warm countries, the child will be more willing to play the role of funny characters.
Movements
The teacher plays the song Crab for finger gymnastics.
The words of verse 1 are accompanied by hand movements imitating the swinging of a palm tree. Hands are placed on the table, elbows rest on the tabletop. Children bend their arms, trying to keep their elbows off the tables.
During the chorus, children place their palms on the table and separate their bent fingers. By moving these fingers, they move their hands left and right, showing the crawling of a crab.
The second verse is accompanied by an imitation of the movements of a seagull. The thumbs are clasped together, the remaining fingers are clenched. Children, raising their hands clasped in this way above the table, try to move them like wings. Then they put their palms together and make gestures directed from top to bottom, showing how a seagull dives.
During the chorus, the exercises imitating a crab are repeated again.
During the performance of the third verse, the kids show a toothy crocodile. Bend your fingers and close the bases of your palms. Placing the back of the hand on the table, the other is raised and lowered without straightening the fingers, imitating the mouth of a crocodile. Change the position of the hands while repeating the words.
They finish the finger play with crab, repeating the gestures of the chorus.
Gluteal bridge
How it works. This is one of the best core exercises for the abs, lower back, thighs, glutes, quads, hamstrings and one of the easiest to incorporate into a warm-up or workout.
The glute bridge is a great way to activate your lower body muscles and warm up your back.
Execution method.
Starting position - lying on your back, knees bent, arms along the body, feet shoulder-width apart and the entire area should rest against the floor (they cannot be torn off), toes pointing forward. As you exhale, slowly lift your pelvis, contracting your gluteal muscles as much as possible. At the same time, the legs and knees should remain in the same place. At the highest point (at the peak of the tension in the buttocks), fix the position for 2 seconds. As you exhale, slowly lower your pelvis to the starting position. Note: To make the exercise more challenging, lift up onto your toes at the top of the movement; place your feet on a step or any other elevation; do a bridge on one leg; place the barbell across your thighs.
Do 3 sets of 10-12 repetitions.
Exercises to improve coordination of movements
Breathing exercises
- Inhale, hold your breath, exhale, hold your breath again. Gradually increase the duration of air retention. Repeat the exercise 5-6 times.
- Sitting on your knees, play “ball”. First, the “ball” is inflated - raise your arms to the sides, take a deep breath, then the “ball” deflates - lower your hands in front of you and exhale, pronouncing the sounds “S”, “SH” or “I”.
Trituration
- Rub your palms together until a feeling of warmth appears.
- Using warm palms, first rub your ears until they become red, then your earlobes.
- Exercise “Baby Elephant” Press your thumbs to your earlobes and make circular movements with your hands.
- Exercise “The monkey itches” | With crossed arms, massage the head in the direction from the crown to the ears, and then to the neck. A small child may not cross his arms.
- Exercise “Mosquitoes” | Tap your forearm and shoulder twice with your opposite hand.
- Exercise “Fists” | Tap your fists on different sides against each other.
Finger gymnastics
- Make circular movements with your thumbs.
- Massage each finger, reminiscent of pulling off a glove.
- Put your palms together and work only with your fingers, which should “say hello” to each other.
- Join your hands in a “Lock”.
- Exercise “Ladder” | Alternately place your fingers on top of each other. And in the same way, alternately move them apart.
Lying on the floor
- Exercise “Log” | Lie on your back, stretch your arms above your head. Using only your shoulders, roll to the edge of the mat and return back.
- Exercise “Soldier” | Lying on your back, press your arms to your sides. Rolling using only your shoulders, crawl to the edge of the mat and return back.
- Exercise “Sphinx” | Lie on your stomach, keep your hands in front with support on your forearms. Use your hands to crawl to the edge of the mat and back.
- Exercise “Frog” | Lie on your stomach, keep your hands behind your back, clasped in a “lock”. Use your legs to crawl to the edge of the mat and back.
- Exercise “Boat” | Lie on your stomach, stretch your arms forward. Bend, raise your arms and head. Then do a “Boat” on your back: hold your head and legs in weight. It is advisable to gradually increase the stretching time to 1 minute.
- Lying on the floor, take a ball or a bright toy and spread your arms to the sides. Move your hand with the ball from left to right, then down and up. Without moving your head, use your eyes to follow the toy. Then the “work” of the tongue is added to the “work” of the eyes: the eyes and the protruding tongue move in the same direction and follow the toy. After the child does this on his own 20-25 times, you can complicate the exercise: follow the ball with your eyes, and move your tongue in a different direction.
Exercises on all fours
Hand work is important in this set of exercises. Ask your child to walk on all fours, alternately moving his hands forward. Gradually complicate the exercise: when walking on all fours, your hands overlap: right - to the left, left - to the right. The essence of this exercise is to synchronize your step and learn to alternate hands correctly.
Wall exercises
- Perform an extension step with your feet, while alternating your hands.
- Perform an extension step with your feet, while your hands “step” alternately “overlapping.”
Galina Stukanog
Tags: gymnastics, dyskinesia, breathing, massage, stretching, synkinesia
Diving push-ups
How it works. This type of push-up moves the entire body. Thanks to the dynamics, flexibility improves and the muscles of the chest, shoulders, back, hips are strengthened, and triceps are also developed. Plus, you get a good stretch for your hamstrings and lower back.
Execution method.
Starting position - place your feet slightly wider than your shoulders and lower yourself onto your hands (the position of your hands should be slightly wider than your feet). Bend at the lower back, your pelvis should be raised up (the position should resemble the shape of a triangle). Focus on your heels, making sure your legs don't bend, this will provide a good stretch for the tendons. Then slowly bend your elbows, lowering your head to the floor, and make a movement similar to diving under the bar; get into the same position as a classic push-up. Hold the position for 2-3 seconds. Do the same, only in reverse order, returning to the starting position.
Contraction and extension of the feet of both legs with head turns.
Starting position: legs in 6th position, hands on the belt, head in the face position.
The musical time signature is 4/4, the character is moderate and clear.
At “1” - the feet contract, the head turns to the right shoulder.
At “2” - the feet are extended, the head returns to the face position.
At “3” - the feet contract again, the head turns to the left shoulder.
At “4” - the feet and head are returned to their original position.
Monitor the maximum extension and contraction of the feet, a taut, straight body, retracted abdominal muscles, the correct position of the hands on the belt (4 fingers together), and a straight back.
Turkish Rise
How it works. It will be difficult for you to navigate the movements at first, but it is worth the time. When performing this exercise, all the muscles of the body are used. It is difficult and not the most pleasant to do, but if you want to increase strength and power throughout the body, you need to do it. Also, the “Turkish get up” develops the muscles in the shoulder area well and eliminates any imbalances. Plus, it's a great metabolic exercise because it forces all the muscles in your body to work together.
Execution method.
This exercise can be performed using a kettlebell or dumbbell. Starting position: lying on your back. Take the weight in your left hand, lift it up and lock it. Bend your left leg and lean on it, keep your right leg straight. Roll slightly onto your right hip, place your right hand on the floor and extend your arm further up. Using your left leg and right arm, carefully lift yourself off the floor. The right leg is straightened. The kettlebell is also held overhead in the straight left arm. Bend your left leg under you and kneel. The result is the following position - the left knee rests on the floor, the right foot rests on the floor, the weight in the right hand is extended above the head. Take a breath and stand up straight. Perform all movements in reverse order to return to the starting position.
Do 3 sets of 6-10 repetitions on each arm.
“This is a full-body exercise. It develops the shoulders especially well, but this does not mean that later you will only feel tired in your arms,” says Langowski.
Exercises for training stable sitting and sitting down independently
For stable sitting, good head control, straightening reactions of the torso, supporting function of the arms, and balance are required. Head control training begins in the first months of life, holding the child in a sitting position with his back to himself, supporting him under the arms and chest with one hand. After the child begins to sit down from a sitting position on his back with the help of an adult with support on one hand, it is advisable to form a stable seat. They train a stable sitting posture in different positions - sitting with legs apart, sitting with legs dangling, sitting cross-legged. The latter pose is especially beneficial as it prevents adduction and internal rotation of the legs. First, they engage in the balance reaction with light jerk-like movements with a gradual increase in the force of the push, and then they stimulate support on the hands and the ability to sit without support
Particular attention is paid to the ability to maintain posture stability in different head positions, causing back extension by point paravertebral stimulation
| No. | Initial position | Procedure for performing the exercise | Note |
| 1. | Sitting cross-legged with the support of a methodologist | Running your fingers along the spine stimulates straightening of the back | |
| 2. | Sitting cross-legged, supported by the shoulders | By moving your shoulders and arms back with external rotation, cause the torso to straighten and the head to rise |
Table continuation
| No. | Initial position | Procedure for performing the exercise | Note |
| 3. | Sitting cross-legged with the support of a methodologist under the chest or shoulders | Stimulation of lifting, bending, turning the head with a toy | Gradually reduce the intensity of support |
| 4. | Sitting cross-legged or with legs outstretched, facing the trainer, supported by arms outstretched | Rock back, forward, sideways, diagonally, to create stability in the sitting position | Gradually the amplitude of movements increases |
| 5. | Sitting on the hands of the methodologist facing the table with support on his hands | By lowering the child down at the table and maintaining support on his hands, stimulate the straightening of the back and head (“looking out from behind the table”) | |
| 6. | Sitting facing the methodologist with hands supported | Slightly swinging to the right or left, releasing the hand of the same name, cause support on the released hand | The amplitude gradually increases |
| 7. | Sitting facing the ball, legs apart or in a Turkish position | Rocking the ball back and forth and moving your fingers paravertebrally to stabilize the position with a straight back |
Table continuation
| No. | Initial position | Procedure for performing the exercise | Note |
| 8. | Sitting with your legs dangling over the edge of the table | Stimulation of grasping a toy on the left or right with rotation of the body | The toy is in different positions on the table, at different distances |
| 9. | Sitting cross-legged, with your back to the methodologist | Grasping a toy by weight on the right, left, front, top | Turns gradually increase, support decreases |
| 10. | Sitting cross-legged or with legs apart | Stimulate the grasping of a toy from different positions by tilting the body and returning to the starting position | |
| 11. | Sitting astride a bolster | While supporting the child's torso, give proper support to the feet by running your finger from the big toe to the little toe to extend the toes and further to the heel, causing abduction of the foot (with varus position) | |
| 12. | Sitting astride a bolster with proper support on your feet | Turns, bends, lifts the head behind the toy while holding the pose | |
| 13. | Sitting astride a bolster with emphasis on the feet | Passive forward bend and active straightening to the starting position | Tilt can be active behind the toy |
End of the table
| No. | Initial position | Procedure for performing the exercise | Note |
| 14. | Lying on your back | Bring your hands to your feet and, grabbing your arms and legs, lift your body and head, swing in this position | Stimulate straightening of the back and head |
| 15. | Lying on your back | Bring your hand to the leg of the same name and stimulate the rise to a sitting position with support on your free hand |
Lateral walking in a semi-squat (“crab”)
How it works. This exercise tones the inner thighs, quadriceps, and glutes. But at the same time, a person looks quite ridiculous in a half-squat position with his legs spread wide and his arms extended to his sides. By keeping your knees bent and your legs locked in a wide stance, you create an isometric action. This type of muscle contraction occurs when you are in a static position and activates more muscle fibers than concentric and eccentric contractions.
Execution method
. Starting position - take a half-squat position. Keep your arms down or stretch them out in front of you at chest level, keep your shoulders and head straight, look forward. While holding this position, take a step (a distance of about 25 centimeters) to the left. Place your right foot next to your left to return to the starting position. This will keep your leg muscles engaged throughout the exercise. To make it more challenging, use an elastic band for resistance, placing it on your knees.
Do 3 sets of 10 reps for each leg (10 to the right and 10 to the left).
“Make sure you stay in a half-squat position at all times and maintain that position the entire time,” Langowski advises.
Complex training – what can you get as a result?
Photos in sports magazines and some videos often show beautiful, ripped bodies, advertising one or another way to achieve them.
However, “experienced” athletes and professional trainers can accurately point out problem areas of the body and select the most effective set of exercises. The main thing is to decide what you would like to get as a result of training at home. Eg:
- For those who want to tighten, pump up the gluteal muscles, tone them and thereby achieve an increase in butt to Brazilian “standards”, training should be carried out three to four times a week (10-20 minutes each) subject to specially selected exercises. . When performing such a complex, you can use a medium load. For beginners, you can use minimal weighting, gradually increasing it to average levels.
- For those who want to achieve an increase in only the “fifth point”, it is recommended to use medium weights. Weights are also allowed when performing exercises to increase the gluteal muscles - “” and similar actions. As in the previous case, training can take from 10 to 20 minutes, provided that the exercises are performed regularly (3-4 times a week). In this case, to get more effective results, you can supplement your home workout with protein-based shakes. They will help you achieve the desired result faster, even if you perform the simplest exercises. This is due to the fact that protein shakes help build muscle tissue and also allow you to increase their size.
It is worth noting that it is impossible to pump up the muscles of the buttocks without taking any action. The fact is that even when walking, these parts of the body are practically not involved. Considering this point, you need to focus your attention when performing exercises on tensing those muscles that you would like to achieve at home.
Single leg burpee
How it works. Burpees are considered one of the best exercises for the entire body, developing both strength and aerobic capacity. With each repetition, you develop muscles in your chest, arms, thighs, hamstrings and abs, and burn an insane amount of calories. Single leg burpees are much more difficult because you have to work harder to maintain your balance. This load engages the ankles and leg muscles, causing the muscle fibers to contract. You may look a little weird doing this exercise, but the results are worth it. Note: You can initially place your elevated ankle in the TRX loop for extra support.
Execution method. Assume a push-up position, lift your left leg from the floor 25 centimeters. Do a push-up, then immediately jump to pull your right leg toward your chest and place it on the floor. Using your right leg, stand straight, then jump up to land on your right leg. Bend over and do the same movements in reverse (with both hands on the floor, jump back with your right leg, keeping your left leg above the floor).
Do 3 sets of 5-8 repetitions on each leg.
Victoria Pervushina
Exercise:
raising legs on all fours
Muscle group:
working out the back of the thigh
Initial position:
standing on all fours, back straight, hands shoulder-width apart, knee angle 90 degrees. As you exhale, lift your bent leg up, squeezing your gluteal muscles. Hold this position and return to the starting position. Important: at the top point, the thigh should be parallel to the floor, and the shin should be perpendicular to the thigh. We perform it on each leg 50–100 times, depending on the level of training.
Advice:
at the top point, the thigh should be parallel to the floor, and the shin should be perpendicular to the thigh. As you exhale, return to the starting position. We perform 60 times on each leg.
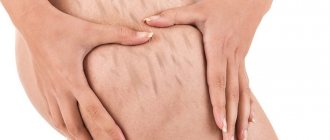
Do not be prematurely upset if you do not have chic and elastic buttocks by nature, because the situation can be corrected on your own by performing special exercises. And you don’t have to exhaust yourself with long, intense workouts in the gym. It is enough to choose a set of activities that will include the best physical activities. They can be performed even at home, which is very important for many busy girls and men. And today we will tell you what exercises you can do for your buttocks at home in order to become the happy owner of a beautiful butt.
Today, the World Wide Web offers a lot of information (video, photo instructions) for improving your body. But in order to pump up the muscles of female or male thighs and achieve enlargement of the buttocks, you should use special exercises aimed specifically at this area of the body.
The main component of successful training is regularity. Ideally, to bring your buttocks closer to Brazilian shape, you need to exercise for 10-20 minutes three times a week. Moreover, the results will be more effective if you adhere to an integrated approach. In other words, to quickly pump up and tighten the muscles of the whole body, you should:
- perform exercises to enlarge the buttocks;
- adhere to a proper diet;
- do a set of exercises to lose weight;
- lead a fairly active lifestyle.
In addition to everything described above, it is necessary to correctly approach the implementation of exercises aimed at increasing the “fifth point”. To get the perfect butt without pumping up other parts of the body, you must strictly follow the technique of performing physical actions. The fact is that pumping of the gluteal muscles occurs when the muscles are activated:
- backs;
- press.
To ensure that the load is distributed correctly between the limbs involved in training, and also to eliminate the possibility of injury, it is worth carefully approaching the issue of studying the technique. So, for example, in order not to pump up your legs, but at the same time achieve enlargement of the buttocks and thigh muscles, it is worth reducing the physical activity that puts stress on the quadriceps, which is responsible for the volume of the legs.
It is advisable to perform a set of exercises from which actions involving the anterior thighs will be practically excluded. In particular, this applies to girls who tend to be overweight in the area below the waist.
Lateral movement on a treadmill
How it works. It may look weird to you and the person running on the treadmill next to you, but remember, this is for the love of fitness! Moving sideways on a treadmill is a good workout for your thighs, inner and outer thighs, calves, abs, and obliques. This exercise will strengthen your muscles and improve coordination. Just be careful, you might fall while doing it!
Execution method.
Start by walking normally, facing forward. Holding the treadmill support with your left hand, turn to the right and immediately begin moving sideways. The movement in this way should continue for a minute. Return to a forward-facing position and walk at a normal pace for about 15 seconds. Then do the same for the left side (hold the treadmill with your right hand). Note: You can gradually increase the speed and incline to make the exercise more challenging.
Do 3 sets of 3-minute reps on each side.
Inverted press
How it works. The inverted press is considered a safe alternative to the typical barbell press. The difference is that you use only your body weight and do not push the barbell, but pull yourself towards it. In this case, all the muscles of the back and core are involved.
Execution method. Place the barbell on the Smith machine at waist level. Squat down on the floor with your arms as if you were about to do a bench press (palms facing the ceiling). Now straighten your body so that you are suspended on the barbell, with your feet shoulder-width apart and your heels touching the floor. Pull up until your chest touches the bar, then slowly lower back down, keeping your body straight and tight.
Do 3 sets of 6-10 repetitions.
A selection of effective exercises
You need to take the starting position (hereinafter - i.p.) lying on the floor on your back with your arms extended along the body and legs bent at the knees, pulled up as close as possible to the buttocks. The palms of the hands should touch the surface of the floor, the feet should be shoulder-width apart with the toes pointing straight. Begin to lift your pelvis as high as possible, as shown in the photo, using only the efforts of the gluteal and lumbar muscles.
Having reached the maximum peak, return the pelvis to its place, but do not touch the floor with it. Try to stay in this position for a few seconds (later increasing to 1-2 minutes). Then lift your pelvis again. While doing this, you should constantly keep your gluteal muscles tense in order to get a visible effect after 20-30 days of regular training at home.
Reverse plank
To perform this exercise to pump up the gluteal muscle, you should take IP. - sitting on the floor with straight legs extended forward and arms behind your back, palms resting on the floor. Please note that in order for the exercise to provide the most effective results, you need to point your fingers towards the buttocks, as shown in the photo below.
You need to start the exercise by smoothly lifting and straightening your body. In this case, the body is supported only at two points - the heels and the palms of the hands. Straightening your back, throw your head back so that your back line is straight. Stay in this position for a couple of minutes (you can start with 10-20 seconds, increasing to several minutes), then return to IP. It is recommended to perform 20 repetitions over 10 minutes.
When performing this complex to tighten your butt, pay attention to ensuring that the muscles of the area of the body you are interested in are constantly tense and maximally involved in the training.
Exercise "Crab"
For this exercise it is worth taking an i.p. - sitting on the floor on your butt with your knees bent and your hands behind your back. Place your palms on the floor behind you so that your fingers are facing in different directions. Then raise your body so that there are 2 points of contact with the floor - palms and feet (see photo below). From this position, lift your legs one by one, straightening them and lifting them up as high as possible.
For this type of physical activity, 10 repetitions are recommended for each leg. Completing them can take from 2 to 5 minutes.
"Lunges" forward
Accept i.p. – standing straight with your arms down along your body and your feet together. Inhaling, step forward as far as possible. Exhaling, return to the first position. While performing the action, do not forget to keep your back straight (see photo) and breathe correctly. The use of weights is allowed for those who have reached an average level of training.
To pump up the gluteal muscles in this way, you need to do it for 10-20 minutes. For those who have recently started performing this complex, you can first do 10-15 approaches, increasing the number to 20-30 repetitions.
So easily and simply, following the video and photo instructions, you can make the most of your home exercises and pump up the muscles of your thighs and buttocks within 30-50 days of regular training, provided you only work 10-20 minutes daily.
Working muscles
READ MORE: How to pump up pectoral muscles at home for a man
Main working muscles
- Muscles that flex and stabilize the spine: rectus abdominis, external oblique, internal oblique, transverse abdominis.
Accessory muscles
- Muscles that flex the leg at the hip joint: iliopsoas muscle, rectus femoris muscle.
- Muscles that extend the leg at the hip joint: gluteus maximus, hamstrings.
- Muscles that externally rotate the leg at the hip joint: gluteus maximus, deep rotator cuff group.
- Muscles that extend the leg at the knee joint: quadriceps femoris.
- Muscles that extend the arm in the shoulder joint: latissimus dorsi, teres major, pectoralis major (sternocostal band).
- Muscles that flex the arm at the elbow joint: biceps, brachialis.
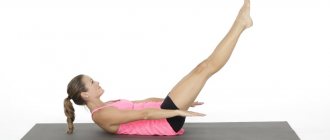
Starting position for the crab exercise. Sit on the mat, bend your knees and cross your ankles. Bend your spine into a "C" shape. Grab your opposite feet with your hands (with your left hand - the right foot, and with your right hand - the left). Bend your elbows slightly and spread your elbows out to the sides. The thumbs lie on the outer surfaces of the feet, and the rest cover the plantar part. Lift your feet off the mat and draw your knees toward your shoulders, balancing on your butt.
Inhale. Roll backwards on your back.
In the 1st phase of the crab exercise, use your abdominal muscles to tilt your pelvis back and evenly bend your spine in the shape of the letter “C” along its entire length - from the head to the tailbone. At the same time, draw in your stomach, pulling the front wall of the abdominal cavity towards the spine. Use your hip flexors to lift your feet off the mat and bring your legs closer to your chest. At the same time, the hips rotate slightly outward so that the knees are in the shoulder area.
At the beginning of the 2nd phase, draw in your stomach even more and tilt your pelvis back so that your body gently rolls with your back on the mat. At the same time, try not to change the curvature of the spine and the angle of flexion of the legs at the hip and knee joints.
To facilitate the transition to the return movement in phase 3, use the hip extensor muscles to move the hips a little further from the chest. The muscles that extend the arm at the shoulder joint pull the feet toward the buttocks. As already mentioned in the analysis of back rolls, the simultaneous coordinated contraction of the muscles that extend the leg at the knee joint and flex the arm at the elbow joint minimizes changes in the position of the limb and facilitates the movement of the body as a whole. Use your abdominal muscles to further flex your lumbar spine and push your torso forward (mid-phase 3).
In the 3rd phase of the crab exercise, when the head touches the mat, carefully balance the strength and speed of movements so as not to damage the small vertebrae of the cervical spine.
Returning to the starting position, use eccentric contraction of the muscles that extend the leg at the knee and hip joints. This is important for controlling pelvic movements and protecting the knees.
Mental image. The most difficult part of the exercise is crossing the knees and touching the mat with the head. Imagine that your partner is pulling on the waistband of your jeans to lift your pelvis. The same image can be used when returning to the starting position. This will help you perform the movements easily and smoothly.
Notes
Perhaps the crab exercise got its name because of the specific position of the limbs, when the elbows and knees are spread apart, and the feet and hands are brought together - a complex exercise that is recommended to be performed only by those who have already gained extensive experience and have fully mastered the technique of such exercises , like back rolls and “Seal”.
However, in the “Crab” there is an additional difficulty - continuing to move forward while relying on the knees, which find themselves in a very vulnerable position, since the knee joints are strongly bent and support the entire weight of the body. In addition, the knees are slightly spread out to the sides, which puts them at even greater risk if the technique is poor.
Options
When performing the crab exercise, you can, while on your back, spread and cross your legs again. At the same time, they either remain bent at the knees, or they can be straightened and then bent again. This option adds some variety to the crab exercise. Rapidly changing the positions of the arms and legs requires coordination of the actions of many muscles so as not to disrupt the stability of the power center and the smoothness of the overall movement.
Here, too, the placement of the hands changes slightly to maintain a neutral position of the feet. Since it takes time to introduce new elements, it is recommended to slightly change your breathing pattern. During the roll back phase, exhale, then inhale when changing the position of the legs, exhale during the return movement, and inhale again when the head touches the mat and a gentle stretch of the neck muscles occurs.
READ MORE: How to remove belly fat 10 rules and tips 20 exercises
“...Until recently, my morning makeup routine almost every day began with tea bags on my eyes. Even creams from respected French companies did not help. Morning swelling under the eyes appeared on its own, regardless of the evening meal.
One day I came to work with bags. My partner, seeing me, immediately made me do simple exercises and very simple lymphatic drainage. I did everything with little faith in success. However, literally after a few minutes the swelling went away. Now, regardless of the condition of my eyes, I carry out this procedure daily. I’ve already forgotten when the eyes are like slits and the ankles are like barrels. These are the exercises.
Go to a table or cabinet, grab it with your hands, stand on your tiptoes and squat down, while leaving your feet in such a position that your heels do not touch the floor, i.e. you are on tiptoe, but sitting. Stay in this position for 30 seconds.
Exercise 2 Now you need to do lymphatic drainage around the eyes. To do this, take 2 metal teaspoons. Draw them simultaneously along the contours of the eyes: from the bridge of the nose up to the temples and in a circle again to the bridge of the nose. Movements should be with light pressure so as not to injure the skin. Do this for 1 minute.
Single leg raises from a bench
How it works. This multi-joint movement improves balance and strengthens the musculature of the lower body and strengthens the core. The only drawback is that you resemble Frankenstein while doing it. But you will be pleased with the result.
Execution method.
Sit on a bench with one leg bent at a 90-degree angle and the other raised parallel to the floor and kept straight. Extend your arms forward so that they are also parallel to the floor. Make sure your abs remain tense. Leaning forward slightly, rise up, leaning on the leg that stands on the bench. Rest for about 1 second and continue.
Perform 3 sets of 6-10 repetitions on each leg.
“Keep your balance at the top of the movement and slowly lower back down onto the bench,” Langowski recommends.
Hanging pull-ups
How it works. This exercise is simple and strange at the same time - mainly because it feels as if you decided to take a nap while doing pull-ups.
Execution method.
Grab the bar and do half your maximum number of pull-ups. Lock in at the top of your last pull-up and just hang there. While still holding your body, slowly pull your knees toward your chest. Hold this position for 30 seconds. Then slowly lower yourself to the ground.
Do 3 sets, each with half your maximum number of pull-ups, hanging for 30 seconds.
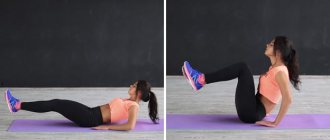
Exercise CLIMBER
The exercise is very simple. In the article from the previous workout there is a video on how to do it. And in words - you stand up in a prone position and begin to bring your knees to your chest one by one. Slow or medium pace.
That's all for today! Sincerely, Ruslan Dudnik!
PS And in general, cats that do pull-ups on the horizontal bar are already a thing of the past. Now the panda shows better results, which makes the exit by force