Squats with weights on the chest, called front squats, are rarely done by modern athletes. Many people have heard about this method of performing a well-known basic movement, but due to ignorance of the technique, it is rarely included in the training program. Meanwhile, the front squat gained popularity even before the era of bodybuilding: it was practiced by athletes while preparing for a power push of a barbell.
- What muscles are used during front squats?
- Benefits of Front Squats
- Technique for performing front squats with a barbell on the shoulders
- Features of the front grip during a front squat
- Step-by-step front squat technique
- Video: how to properly squat with a barbell on the front
- Smith machine front squat
- Video: Smith machine front squat technique
- Front squats with dumbbells and kettlebells
- Video: chest squat technique
- Recommendations for performing front squats
Rules for performing the exercise
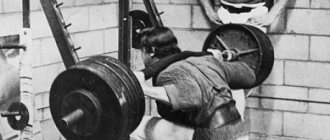
- Place the barbell on the racks slightly below shoulder level. Walk up to the bar and sit slightly under it, bending your knees. Grip the bar slightly wider than shoulder-width apart. Bring your elbows forward (your palms will turn upward), placing the barbell on your front delts.
Important . Before picking up the barbell, fix the bend in your lower back and maintain it until you finish the approach.
- After making sure the bar is stable, straighten your knees and stand in the starting position. Step away from the racks, place your feet shoulder-width apart, feet slightly apart. Keep your head and elbows raised at all times.
- As you inhale, begin to lower to the lowest point. Don't move your pelvis back or lower your head. Continue lowering until your thighs touch your calf muscles. Keep your knees in line with your feet; those knees look toward your toes when lowering. Continuously use the abductors to push the knee outward during the squat.
Important . A serious mistake is to bring your knees together when lifting. Such an error could result in injury. If you can’t keep your knees strictly in the plane of your toes, reduce the weight.
- At the lowest point, do not pause or hold your breath. The knee joints have the ability to spring slightly when sitting deeply and instantly lift the body up. At the moment when your hips touch your shins, smoothly spring your knee joints and rise upward as you exhale.
- Build your upward movement using the strength of your legs and pressing your heels into the floor. Because the torso in front squats should be as close to the vertical as possible and maintain the balance of the whole body. It would be a mistake to stand up using your back, as the barbell will tip forward.
- Don't lockout at the top. Firstly, by holding the weight with your muscles, you protect your joints, and secondly, and no less important, your muscles are under load and tension throughout the entire set, and not just during the repetitions.
Note : To maintain balance at all times, try to keep your elbows high (parallel to the floor) and slightly out to the sides.
Do not round your back or put your weight on your toes, otherwise the bar will tip forward.
Correct technique
The mechanics of this exercise are such that many technical flaws inherent in conventional squats are simply impossible here. If an athlete begins to twist his back, he will simply lose his balance and fall.
You cannot perform this exercise with a crooked back, you simply will not stand up with the barbell in this position, while regular squats allow such hackwork.
Therefore, on the one hand, front squats are simpler: the correct technique here will have to be followed in any case. But on the other hand, they are complex: the athlete will not be able to simplify his task by slacking in technical details.
The algorithm for performing the exercise is as follows:
- Place the barbell on the racks, the height of which should be equal to the level of your shoulders.
- Sit under it and grab it with your hands shoulder-width apart. The legs should also be approximately this width. The feet are parallel to each other or diverge very slightly to the sides.
- The starting position should be such that your arms are parallel to the floor; to do this, you need to bend your hands and wrists.
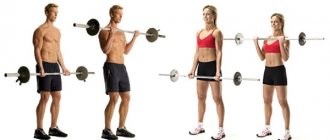
- If you are using dumbbells, rest your right hand on your left shoulder, and your left hand on your right, placing the dumbbells on your shoulders accordingly (the same grip can be used when performing an exercise with a barbell).
- Get up from this position so that the bar lies between the bottom of your neck and the top of your chest and is supported in this position by your hands.
- Take a couple steps back.
- Squat down to a position where your legs are parallel to the floor. Stand back up. Repeat 5-10 times. You need to sit down while inhaling, stand up while exhaling.
Analysis of errors and recommendations
Despite the fact that it is difficult to make mistakes here, typical of a classic squat, some violations of the technique are still possible.
First of all, these include incorrect head position. The gaze should be directed only in the forward direction. Otherwise, there will be unwanted stress on the cervical vertebrae. In addition, if you look down, your back will bend in that direction along with your head.
The perpendicular from the bar to the floor should be in the middle of the foot. Otherwise, the load will be distributed incorrectly. Many beginners move their body too far forward, causing the bar to be positioned far ahead of the floor rather than above their feet.
Of course, you don’t need to make any geometric calculations, but when determining your body position “by eye”, you should not allow such a location for the projectile.
You shouldn't over-extend your wrists if you don't have good stretching (which, by the way, plays a much bigger role in front squats than in regular squats). If you can't keep your arms parallel to the floor without pain in your elbows or wrists, then it's better to stretch them and don't force your joints with premature loads.
The pelvis and abdomen should be pulled forward throughout the entire exercise; you should not pull them back, trying to maintain balance - this will only upset it.
A general rule for all squats, and front squats are no exception: at the top point you do not need to straighten your knees completely. Firstly, it overloads the joints, and secondly, it relieves stress from the muscles. And the muscles should not be allowed to rest between repetitions; this is possible only after completing the approach.
It is a mistake to hold the barbell suspended using just your arms. The bar should lie on the chest, and the hands should only secure and stabilize its position.
Incorrect tempo of execution is a consequence of the greater complexity of measured and gradual movement. At a fast pace, you can try to lift more weight, but this does not benefit the body, and it is very easy to violate the correct technique.
You should not bring your legs together at the knees, this dramatically increases the risk of injury. If you cannot keep them in the correct position, then the weight on the bar is too much for you, reduce it.
It is easier to control the position of your back and head if you squat in front of a mirror.
Description of the exercise
The main feature of front squats is the position of the body. Due to the fact that the bar rests at the top of your chest on the front delts, you will have to maintain a body position as close to vertical as possible at any point in the squat amplitude.
The center of gravity should pass through the middle of the foot, the middle of the thigh and the plane of the barbell. The key point of correct execution is that you do not push your pelvis back, but try, on the contrary, to keep your back as straight as possible.
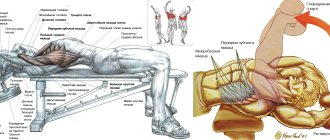
The main load when performing this movement falls on the quadriceps. In addition, the muscles of the buttocks, calves and hamstrings are involved in the work. The muscles of the back of the thigh and calf act as dynamic stabilizers.
Let's note the main advantages of front squats:
- Excellent for working out the lower back, hips and abdomen.
- The load on the spinal column and knee joints is reduced.
- Since there is no possibility of bending forward, the exercise is safe for the back.
- A relatively small torque is created in the lumbar region.
- It is easier to master the technique, since if you make mistakes, the projectile will simply fall.
- Develops balance.
- Excellent for overcoming plateaus in the development of leg muscles.
- Accelerates fat burning.
The working weight in front squats will a priori be lower than in classic barbell squats. This is due to the fact that to maintain balance you have to use more stabilizer muscles.
The features of the exercise discussed above lead to the following statement: front squats are safer for the lower back, due to the absence of negative loads in different directions on the spine, as well as the use of lighter weight than squats with a barbell on the shoulders. In order to determine how to position the barbell on your chest, you need to find out the mobility of your shoulder and wrist joints.
Try the classic version, when your arms are parallel to each other, your hands are tucked under the bar, your palms are facing up, and your elbows are parallel to the floor. This option is safe only if you feel comfortable in the shoulder joint and hands.
A detailed overview of the front squat technique is presented in the following video.
An alternative to the classic hand position is to place your hands crosswise on your chest. This position is suitable for most people with insufficient flexibility in the above-mentioned joints. More information about this option can be found on the page of the exercise Deep squats with a barbell on the chest (cross position of the arms).
Deep squats with a barbell on the chest
For beginners, we recommend trying this exercise in the Smith Machine. Due to the work of the body in a given trajectory, the load on maintaining balance is reduced. This is what it will look like
The trick of this simulator is that the bar (barbell) is fixed and moves only along a given path. You won’t be able to fall, somehow move it in the other direction, and you won’t make the technical mistakes that you could make in a regular frame.
What muscles work during front squats with a barbell?
Front squats, like classic ones, are aimed at working the leg muscles:
- Quadriceps (medial, lateral, rectus and intermedius muscles);
- Biceps femoris;
- Gluteus maximus muscle.
When performing a front squat with a barbell, the load falls more on the upper part of the quadriceps , whereas with classic squats, the quadriceps is loaded more evenly.
This is due to a shift in the center of gravity due to the movement of the barbell from the back to the chest.
General recommendations for squats
The exercise may seem simple, but it is not at all. Even experienced athletes make mistakes in it. The most common mistakes:
- Too fast movements, jerks on squats and lifts. This does not allow you to fully work out the muscles.
- Full straightening of the knees on the rise, which removes the load from the quads and adds it to the knee joints.
- Tilt of the back or head, which causes the body to lean forward and the barbell to fall.
- Smaller range of motion, which does not allow you to work all the muscles.
- Excessive load that does not allow you to hone your technique.
- Holding the barbell with the strength of your arms and especially your wrists.
In addition, it is worth paying attention to the clothes and shoes in which you train. First of all, the right shoes play a role, which can help perform the exercise.
Shoes with low heels are best; flat soles are not suitable for squats.
Placing pancakes or small blocks under your heels will also help maintain stability and improve balance. This especially helps those who have flat feet.
Outerwear matters too. T-shirts and tank tops that absorb moisture well can allow the barbell to slip, putting the athlete at risk of injury. Some people use talc or chalk to better hold the barbell.
Beginners should start with the classic, rather than crossed, position of the arms on the bar. This will make the job easier and prevent the bar from rolling off your chest. This hand position is also well suited for those who lift heavy weights.
Training scheme
If you use the exercise as your main one, we recommend doing at least 5 approaches.
- When working on strength and mass – 8-12 repetitions.
- When working on endurance/drying – 15-20 repetitions.
Each athlete selects weight individually, taking into account individual preferences, health and physical fitness.
It is very important to note that all advice regarding the training program is purely advisory!
The training scheme should be developed by a qualified coach, taking into account the physical fitness and characteristics of each athlete. This is the only way to minimize the risks of harming yourself and achieve the desired results.
Training programs
Please note that in the description of the schemes, the notation is used, where the number of approaches is first indicated, and then the number of repetitions in these approaches. For example, writing “2 x 5” means 2 sets of 5 reps, not 5 sets of 2 reps. With this system, the athlete will be able to take more and more weight with each successful “wave”, as the nervous system will gradually adapt to the loads
This method is designed for the most advanced athletes who want to develop maximum muscle strength. For example, an athlete can squat 2 times with 150 kg on the first wave, 2 times with 160 kg on the second wave and 2 times with 170 kg on the third wave
With this system, the athlete will be able to take more and more weight with each successful “wave”, as the nervous system will gradually adapt to the load. This method is designed for the most advanced athletes who want to develop maximum muscle strength. For example, an athlete can squat 2 times with 150 kg on the first wave, 2 times with 160 kg on the second wave, and 2 times with 170 kg on the third wave.
- 1 x 5, 1 x 3, 1 x 2
- 1 x 5, 1 x 3, 1 x 2
- 1 x 5, 1 x 3, 1 x 2
Another variation of this system is 12 approaches in 4 waves. It also does fewer reps per set than the previous version of this method:
- 1 x 3, 1 x 2, 1 x 1
- 1 x 3, 1 x 2, 1 x 1
- 1 x 3, 1 x 2, 1 x 1
- 1 x 3, 1 x 2, 1 x 1
In this system, you start with a weight that you can easily do 6 sets of only 2 reps. And, depending on the individual characteristics of the body, this weight will be about 80 - 87% of your maximum. Since the goal of these workouts is to increase muscle strength, after a while you will be able to do 6 such approaches for 4 repetitions.
This method is effective because the load increases gradually. The athlete increases the number of repetitions only when he is able to fully perform the exercise with the previous weight. This system works on the principle of repeated repetitions, which means that over time the nervous system gets used to new loads, which gradually become the norm.
After the 5 x 2 workout, the load is reduced by 7 percent, and the next stage is 5 sets of 3 repetitions.
In this method, you need to perform 8 single approaches, and then 5 x 3-5. In the Hepburn method, the first 8 sets are performed in a normal stance, and the next 5 x 3-5 in a rack with heels raised to a height of 2-2.5 cm.