The plank is one of the most effective and simplest ways to strengthen your abdominal muscles. When done correctly, it helps strengthen the muscles in your arms, back, and core. Below we will look at options for performing this exercise. Running and general physical training coach Alisa Matyash shows you how to perform the exercises correctly.
The “Health” section is your detailed guide to healthy lifestyle issues. Training, nutrition, amateur sports - we have only the most important and useful information that will help you become better every day. Subscribe to our telegram channel to be the first to receive the latest articles.
Classic plank technique
Despite the ease of implementation, due to the static nature of the plank, it has a beneficial effect on the back, arms, abs, and buttocks. But to obtain the result, the technical execution of the plank is of great importance. Watch how to do the plank exercise correctly in the video. Shown here is a classic straight arm exercise.
Let's look at everything step by step.
- Lie on the floor on your stomach.
- Place your toes on the floor and pull your arms closer to your chest.
- Continuing to press your toes, lift your body with straight arms. The palms should be clearly under the shoulders. You need to lean on your entire palm. Body weight should be evenly distributed on the arms and legs. If at first it is difficult to distribute the weight evenly, try transferring it first to your arms, then to your legs. Once you learn to feel your weight, this will not be difficult to do.
- The whole body should stretch into one straight line. Heels point back, head forward, gaze forward. The head does not go into the shoulders, but extends out from them. Watch your pelvis: it should not go up or sag; to do this, tighten your buttocks. The belly does not sag. The whole body must work and be tense.
- Feet can be shoulder-width apart or narrower. The plank is also possible with legs spread wide apart. The wider the legs, the easier it is to do the plank due to the larger support area. Accordingly, the narrower the legs, the more difficult it is to perform the exercise.
You need to stand in the plank for as long as your body allows. As soon as the execution technique is violated, the exercise must be stopped and repeated after a short rest 1-2 more times. A slight trembling of the hands should not alarm you; this is a normal reaction of the body.
Often the plank on straight arms is replaced with a plank on the forearms. This is a more complex option. The main points are similar, the only difference is in the hands. Watch the video below on how to properly do a forearm plank. The shoulder and forearm should form a 90 degree angle.
You can add complexity to a regular plank by moving your arms as far forward as possible, while maintaining the same plank technique.
Variations on the plank theme
Now let’s look at how to correctly perform other variations of this exercise:
- Straight arm side plank. You need to lie on the floor and rest your right hand on the floor. The hand should be directly under the shoulder. The legs are located either next to each other, or one lies on top of the other. The left hand rests on the waist or is extended upward. As you exhale, you should lift your body and fix it in a static position for at least 30 seconds. It is necessary to ensure that the body is a single line. The exercise is repeated 3-4 times for each side.
- Side plank on the elbow. The starting position is similar to the previous exercise, the only difference is that the fulcrum is the elbow, not the hand. The forearm should be perpendicular to the shoulder. As you exhale, you should “squeeze out” on your elbow and hold this position for at least half a minute. The plank is repeated 3-4 times on each side.
- Plank with twist. Starting position - emphasis on outstretched arms; as you exhale, you need to rotate the lower part of the body through one of the sides in the upward direction. In this case, the legs are located one in front of the other. The final position is fixed for 60 seconds, then the body is turned in the opposite direction. This version of the exercise allows you to work out the oblique abdominal muscles as efficiently as possible.
- Plank with crossed arms. Legs and crossed straight arms rest on the floor. The brushes are next to each other. The execution technique is similar to the options already described.
- Reverse plank. Starting position – lying on your back, emphasis on your arms (located at the back, shoulder-width apart, hands and forearms should form a right angle with each other). The gaze is directed to the ceiling. Having “squeezed” the body up, you need to fix it in this position for at least 30 seconds, after which you can relax the muscles. The exercise is repeated 3-4 times.
- Table. The starting position is similar to the previous version, only the legs should be bent at the knees (the shins are positioned perpendicular to the hips, and they, in turn, are in the same plane as the torso).
Video: Plank exercise: how to do it correctly? Types of planks.
How to complicate the task? For example, you can fix your upper body on a fitball, move one leg to the side or lift it up (this will reduce the area of support, and, therefore, increase the load).
“Professionals” also perform the plank with weights - they place a weight plate, dumbbells or even a kettlebell on the buttocks.
An excellent student from Moscow has invented a fat burner! 12 cm in the waist goes away in a week if mixed with kefir...
More details
Revolutionary technology for losing weight at home. Lose excess weight without dieting or training! In just 23 minutes a day.
Buy
Age-related fat does not come from food! You will lose 22 kg of fat in a week if you drink 150 ml of hot water on an empty stomach...
More details
One arm plank
This variation will strengthen the upper body well and also activate the stabilizer muscles that are responsible for balance. For a better understanding, watch the video on how to properly do the plank exercise with arm raises.
The technique is quite simple.
- We stand in a classic plank position on straight arms or forearms, not forgetting about technique. We shift the weight to one hand.
- Raise your other hand forward and hold it as long as possible.
- We change hands.
Plank with raised leg
In this case, the load goes more on the lower part (hips and buttocks), and the stabilizer muscles are also activated.
A video of how to do the plank exercise on one leg is presented below.
The algorithm looks like this.
- Get into a classic plank position.
- Raise one straight leg without jerking upward. There is no need to lift it up too much. To make it easier, you can place one foot on top of the other.
- Take a short rest and switch legs.
Arms, legs, abs and head
Hands can be placed in different positions, on the hands or on the forearms. The starting position depends on this. Either your elbows or your hands should be directly under your shoulders.
The position of the legs may be different. From feet together to large distances between them. The narrower the legs, the more difficult it is to stand, because the area of support is smaller. You can continue to complicate things and stand in a plank position on one leg.
Of course, the abs should be tense. Often the problem is that people, on the contrary, forget to strain it. But the abs should be tense for almost the entire workout!
Here you need to be very careful in performing certain exercises, including planks. Because with a strong deflection in the lower back, if performed incorrectly, the situation can be aggravated. In this case, you should always consult individually.
As described in the starting position, it is necessary to maintain natural deflections in the spine. Imagine that you are standing. Where is your head pointing? Now just flip yourself into a plank position and you will get the correct position. Look slightly forward and at the floor. For self-control, you can put some object close to you and look at it without looking away.
Plank on two points
For a more advanced level, you can combine the previous two exercises. This option has a good effect on coordination and requires concentration, since the support area is small.
The technique is as follows.
- Get into a regular plank pose. Maintaining technique, lift your arm and opposite leg. Stand in this position as long as your body allows.
- Switch arms and legs.
Watch the video below on how to properly perform punk on two points.
Kneeling plank (beginner plank)
A lighter version of the exercise. The body has two points of support: the palms of the hands and the knees. The arms are held in a straight position, but are not fully extended at the elbows. This prevents pinched nerves and inflammation in the elbow joints. The legs are crossed at the knees, the legs and feet are raised up. The body forms an acute angle with the floor line.
It is very important to ensure that the body is held in the desired position not through the efforts of the arms or legs, but through strong tension in the muscles of the back and abs. When performed correctly, it creates the feeling that the abs and back form a tight corset, and the arms and legs practically do not notice the load.
Kneeling plank (step 1)
Kneeling plank (video):
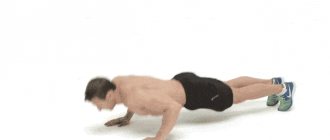
From this position it is convenient to begin practicing push-ups in a lying position. We simply bend our elbows, lower our body so that it is parallel to the floor, and return to the starting position, tensing the arm muscles. Mostly the upper half of the body works.
Kneeling plank (step 2)
Plank with emphasis on the knees (execution technique)
Side plank
In this plank, the emphasis is on the oblique abdominal muscles. To follow the full technique, it is better to watch a video of the plank exercise.
The correct technique is as follows.
- Get into a regular plank position.
- Raise your straight arm up. You can put your legs crossed, this is a simple option. Or place the lower leg on the outer part of the foot, and the upper leg on the lower leg; this option is more difficult. Maintain a straight line throughout your body. Push off the floor with your hand, do not let your pelvis and sides sag.
- Do the same on the other side.
To make the side plank more difficult, you can raise your top leg up.
How to make a jack plank
Step 1: Get on your knees and place your hands on the floor. Bend your elbows so that your forearms are on the floor. Your elbows should be directly under your shoulders. Step 2: Stretch your legs behind you and tuck your tailbone slightly so that your pelvis is perpendicular to the floor. Squeeze your glutes and strengthen your core. Your body should lie in a straight line, your back flat. Focus your gaze on the floor. Step 3: Keeping your body in a straight line, bend your knees slightly and jump with both feet to the sides as if you were doing a jumping jack. Step 4: Sit on your toes with your knees slightly bent, then return your legs to the starting position.
The movement should look like a jumping jack done from a plank position. Make sure you keep your belly button depressed (core engaged) to prevent your hips from dropping and you from feeling a bounce in your lower back. Also, don't spread your legs too wide with each jump, otherwise you'll end up doing fewer reps. Extend each leg just 10 cm from the starting position.
Reverse plank
Sit on the floor. Place your hands on the floor. With your legs extended forward, lift your pelvis up. The body should resemble a string. The gaze is directed upward, the neck is extended, the head is not thrown back. The back is straight. Be sure to watch the video on how to do the plank exercise.
If this exercise is difficult to perform, try doing a plank with your legs bent at 90 degrees. To make it more difficult, you can lift one leg up.
Types of planks
Straight arm plank (classic)
- Take a position similar to a push-up position. - Feet together, toes to the floor. - Arms straight. The hands are at an angle of 90⁰ to the wrist, resting on the floor under the shoulders (isometric exercise - the joints are located under the joints to avoid injury). - Flat back without arching or rounding of the lumbar region (tighten your stomach). - Straight legs. Bent knees put extra stress on the lower back, making the exercise difficult. — The pelvis is twisted (the butt does not stick out or sag), parallel to the floor. The buttocks are tensed to strengthen and comprehensively work the core muscles. - Head, neck, shoulders in one line, without tension. The gaze is directed to the floor. - Do not squeeze your shoulder blades, strain the area between them, as your hands will move apart. - Start with 30 seconds in one approach, gradually increasing to three minutes. - Smooth breathing without delays.
Dynamic planks
If you get tired of the constant static, you can try doing the plank in dynamics. Plus, fast-paced options burn more calories.
- From the classic plank position on straight arms, move to a plank on your forearms. At the same time, maintaining a straight body position, bend your arms alternately. Then, straightening your arms one at a time, return to the plank position with straight arms. For clarity, watch the video on how to do the plank exercise correctly.
- Get into a plank position on your hands or forearms. Step one foot to the side, then the other. Then return your legs one by one to the starting position. For intensity and dynamism, you can spread your legs not by steps, but by jumping.
- From a plank position, alternately pull your knees toward your shoulders.
Types of plank exercises
There are more than 100 types of planks of varying difficulty, and each coach comes up with some of his own. We will show 4 types of classic planks. This is enough for most amateur athletes to strengthen their torso muscles. For more complex types of planks, watch the video at the end of the article.
Elbow plank
The most common plank is resting on your elbows. Keep your hands parallel to each other or lock them together. It is better to perform the first workouts in front of a mirror or film yourself on your phone to control the arch of your back. Shoulders, pelvis and heels should be in a straight line.
Source: asanarebel.com
Plank in prone position
Plank in push-up position, the principle is the same. You can make the plank on your elbows more difficult by lowering yourself onto your elbows and then rising again while lying down.
Source: besthealthmag.ca
Side plank
You can diversify by focusing on a straight arm, but this is much more difficult. This plank better loads the lateral muscles of the torso.
Source: hearstapps.com
Plank with arms and legs raised
A more advanced version of the classic elbow plank. Do this type of plank when you can stand in a regular plank for more than a minute. There are many options for execution: raise your right arm and left leg (and vice versa), raise only an arm or leg, make movements with a raised arm or leg.
There is an error in the photo - the pelvis should be lower, in line with the heels and shoulders. Source: asanarebel.com
Reasons to do a plank every day
There are several reasons to include planks in your workout plan.
- Strengthening the muscle corset. The plank affects the muscles of the back, buttocks, legs, shoulder girdle, and abs.
- The exercise is static, which means it develops strength, but without equipment.
- Promotes weight loss.
- The plank is useful for people with joint problems.
- Improved flexibility. Stretching improves by stretching the posterior muscle groups and hamstrings.
- Improved posture. Since doing the plank strengthens your back, your posture gradually becomes correct.
- The plank does not require special training or equipment. You can do it wherever you want. Anyone can do it.
- With the correct technique it is not at all dangerous.
You will find information on how to do the plank exercise correctly and types of planks in this article.
Elbow plank (beginner plank)
Another simplified option, accompanied by less load on the muscles of the forearm, elbow and wrist joints. Ideal for those who have problems with hand joints. Due to the low position of the back, the body forms a parallel line with the floor, slightly rising only in the area of the shoulder blades and neck. All the muscles of the body are well worked out, especially the front surface. Increases resistance to static loads and overall endurance of the body.
Elbow plank
When performing the plank on your elbows, your abs are worked out perfectly, so we recommend it for daily practice. You can start with 10-20 seconds and work up to a minute.
Myths about the plank
The popularity of the exercise has created several myths around it:
- By doing the plank every day, you can lose significant weight. Yes, the plank, like any exercise, burns calories. But by doing it alone, you cannot achieve results. To lose weight, you need to include cardio exercises in your workout regimen. For people with a lot of weight, the bar is even contraindicated. Since it will be simply impossible to maintain body weight.
- If you do the plank, abs will definitely appear. The muscles are strengthened, but subcutaneous fat will not go away without cardio and other strength exercises, which means the abs will not appear. In addition, in the fight for abs, we must not forget about proper nutrition.
- Plank is easy. If you find it easy to do the plank without any physical training, then most likely you are doing something wrong. At first glance, a simple exercise is difficult to perform in static conditions.
How is the plank useful?
The body in the position receives muscle strengthening under strong tension:
- press;
- in the back area;
- gluteal area;
- upper and lower extremities.
The exercise improves posture and overall muscle tone of the body, and is considered a good basis for sports training.
The plank will not pump up the abs and gluteal area and will not get rid of extra centimeters in the abdomen and waist. The exercise will tighten, providing tone to the necessary muscles, give them strength, giving strength to the tendons and ligaments.
Muscles in the plank position consume less energy with less recovery costs. This means that training can be done much more often, compared to strength exercises.
The plank plays a significant role in the form of a therapeutic effect, strengthening the back and improving posture. The exercise is considered the best for spinal problems, giving gradual development and strengthening of the natural muscle belt of the lower and middle part of the body. But the listed factors are achieved only with the correct sequence of execution of each type.