How to measure shoulders for sewing or choosing clothes?
If you are going to place an order in an online clothing store, you will not be able to try on the model you have chosen, since it is located at a great distance from you. Therefore, you need to know absolutely all your parameters in order to always be able to choose exactly the size that best suits you. When you know all your indicators, it will not be a problem to order clothes from other cities and even countries, because you will be able to choose the right size based on the data you have. In addition, this skill will definitely come in handy for those who love to sew. After all, in order to sew any item of clothing, you need to know how to take measurements from yourself or from the person for whom you plan to sew these clothes. Therefore, it is imperative to know how to measure your shoulders and other parts of the body.
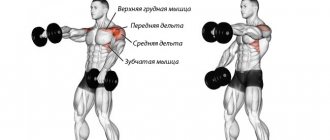
Shoulder Width Measurement
The main measurement concerning this part of the body is width. If you don't know how to measure your shoulders and where to start, then you should first of all find out the width of your shoulders. This is the easiest part of measuring as you just need to place one end of the measuring tape to the edge of one shoulder and then measure to the edge of the other shoulder. This is called shoulder width. At the same time, you need to make sure that the person is not hunched over, slouched or does not spread his shoulders too wide - they must be in a natural state for the measurement to be as accurate as possible. By the way, knowing your shoulder width can help you not only in choosing clothes in an online store or when sewing your own, but also in sports, since the “feet shoulder-width apart” position is very often used there. And if you know how to measure your shoulders and what their width is, then it will be much easier for you to take this position.
Shoulder coverage
Another important parameter that you need to be able to measure is shoulder circumference. It is necessary to ensure that the sleeves are the right size and not too narrow or too wide. Therefore, everyone should pay special attention to this aspect when learning how to measure shoulders. The main point in this case is the correct choice of measurement location. In fact, upper arm reach is a misnomer because it measures the reach of the forearm, but the name doesn't really matter. But the only important thing is that this parameter must be measured in the widest part, that is, on the biceps. It is worth noting that the hand should be in a relaxed state, freely extended along the body. There is no need to strain your muscles during the measurement process, since in this situation the sleeve will be much wider.
It is also very important not to tighten the measuring tape on your bicep too much so that the skin underneath it contracts, otherwise the reading will be inaccurate and the sleeve will end up smaller than needed this time. To measure, place the end of the measuring tape at the selected point and wrap the tape around your forearm until you feel that you are starting to pull - then take the final measurement. For accuracy, this measurement can be performed several times.
Shoulder length measurement
Another parameter that may be useful to you is the length of the shoulder. Given the fact that there is also a neck between one shoulder and the other, you will not be able to divide the width of the shoulders in half to get each indicator separately. Therefore, a separate measure was introduced - shoulder length. It is measured from the base of the neck to the end of the shoulder, and again it is best to take several measurements to ensure that you get a more accurate figure and do not make mistakes. In clothing, the shoulder length may differ from your anatomical parameters - it depends on how exactly you want to sew the item of clothing.
Separate parameter
These are the three main parameters that are the keys to how to measure your shoulders correctly. But there is an additional aspect that does not require a measuring tape, because it must be measured visually. This is the tilt of the shoulders. This parameter has only three values, but it can greatly affect the process of sewing clothes. In this case, it doesn't take a genius to figure out how to measure your shoulders and their slope. It is enough just to know that the standard degree at which they are located is somewhere between 20 and 25. Such numbers are considered normal, while a larger angle means sloping shoulders, and a smaller angle means square. This parameter should also be taken into account when choosing clothes remotely or when sewing them yourself.
fb.ru
How to correctly take measurements of a woman’s figure: general recommendations
These measurements will be needed if you want to sew a dress, blouse, jacket, or coat.
Measurements 1–10 are recorded and used in half size, the rest - in full.
- Half neck circumference - measured at the base of the neck. The tape needs to be closed in the jugular cavity.
- Half-circumference of the chest is the first - the tape passes horizontally from the back along the protruding points of the shoulder blades, from the front - above the chest.
- The half-circumference of the chest is the second - the measuring tape goes from the back as in the previous version, from the front it passes along the most protruding points of the chest. It is better to remove the first and second half-circumferences of the chest one after another, without changing the position of the tape on the back. Maintain a natural posture, lower your arms down, but do not pinch the tape in your armpits.
- The half-circumference of the chest is the third - the tape runs around the body strictly horizontally, in front - along the most protruding points of the chest, in the back - maintaining a horizontal line. This measurement is the mass production size that suits you.
- Half waist circumference - measured using an auxiliary tape or elastic band located in the narrowest part of the figure. Do not try to create a waist yourself by tightening the cord. You are beautiful, regardless of size, and the correct number will help the product fit well.
- Semi-circumference of the hips - the tape goes horizontally around the figure, at the back - along the most protruding points of the buttocks, at the front - taking into account the protrusion of the abdomen.
- Chest width first - measured horizontally between the front corners of the armpits, above the chest.
- Second chest width - the measuring tape is applied horizontally between the front corners of the armpits through the most protruding points of the mammary glands.
- Center of the chest - measured between the most protruding points of the chest. This size, like the half-bust circumference, varies depending on the shape and tightness of the bra you are wearing.
- Back width - measured across the shoulder blades between the back corners of the armpits.
- Front waist length - measured from the highest point of the estimated shoulder seam at the base of the neck to the front waistline. The tape is placed vertically along the figure. To find the highest point of the shoulder seam, wear a thin jersey tank top. Where the shoulder seam meets the neckline is the right point. You can find it before starting measurements, mark it with chalk, and remove the T-shirt.
- Bust height is the distance from the highest point of the shoulder seam to the most protruding point of the chest.
- Back waist length is the first - measured from the seventh cervical vertebra to the waist line. If you feel the base of the neck at the back, you will find a protruding vertebra. That's what you need.
- The second back waist length is measured from the highest point of the estimated shoulder seam at the base of the neck to the back waist line. The tape is positioned vertically, following the curves of the figure.
- Back armhole height is the distance from the highest point of the shoulder seam to an imaginary horizontal line drawn from the back corner of the armpit.
- Oblique shoulder height - measured from the end point of the shoulder to the point where the spine intersects with the waist line. The end point of the shoulder can be found using a thin knitted tank top with a sleeve. The place where the shoulder seam enters the sleeve seam is the point we need. Since you marked the waist with an elastic band or tape, finding the intersection of the waist line and the spine should be easy.
- Shoulder width is the distance from the highest point of the shoulder seam at the base of the neck to the end shoulder point.
- Sleeve length - measured from the end point of the shoulder to the desired length. The arm should be in a natural position, slightly bent at the elbow.
- Shoulder circumference - the tape runs strictly horizontally at the widest point of the shoulder.
- Wrist circumference - measured above the hand along the protruding bones.
- Product length - measured from the seventh cervical vertebra to the desired length.
Skirt measurements
The number of measurements needed for a skirt depends on its silhouette. For a circle skirt, you only need the length of the product and the half-waist circumference. To sew a pencil skirt, you also need to measure the half-circumference of your hips. The length of the skirt is measured from the waist line along the side seam to the desired level.
Measurements for trousers
In addition to the half-girth of the waist and hips, you will need a few more measurements to build the trousers.
- Seat height - measured on a sitting figure from the waist line along the side seam to the chair. For accurate measurements, the seating surface must be hard.
- Knee height - measured standing from the waist line along the side seam to the middle of the kneecap.
- Knee width is especially important for skinny trousers. The tape is placed around the bent knee.
- The width of the trousers at the bottom is selected according to the model. If you are going to sew tight trousers, then the width of the trousers at the bottom will be equal to the circumference of the foot through the heel.
- Pants length - measured standing from the waist line along the side seam to the desired length. In narrow trousers, the length is taken to the bone. In medium or wide ones - up to the middle of the heel with which you will wear these trousers.
When creating a pattern, you need to remember that the measurements taken from the figure are not equal to the dimensions of the parts. When constructing drawings, an allowance for freedom of fit is added to the measurements. This is not a constant value. It depends on the size of the figure, the properties of the fabric, the purpose and silhouette of the product, as well as fashion.
In addition to all the above measurements, it is necessary to periodically and regularly measure the fat layer (subcutaneous). Because volumes can increase due to subcutaneous fat, and you will think that it is your muscles growing.
There are a huge variety of methods for determining subcutaneous fat. Therefore, to learn in detail about each of them and choose the most suitable one for yourself, read the article: How to measure subcutaneous fat. Although I recommend a better method - Kalipometry, since it is one of the most accurate and simple.
Also, a recording of measurements missed due to lack of time or plain laziness can greatly spoil the picture of intensive training. Can you remember exactly all the numbers you received, say, a couple of weeks ago? It’s unlikely... But without this, it will be unclear how far you have progressed in losing weight or building muscle.
Below we bring to your attention a standard table that will help you sew the right size item without any problems.
Table No. 1
How to measure shoulder width correctly?
To protect his body from the negative effects of the external environment, insect bites, harmful substances and other factors, ancient man invented clothing. Over time, it underwent various changes, becoming more convenient and functional. Certain elements of clothing became an expression of national characteristics and acquired cultural and social significance.
The design and tailoring of clothing has grown into an art form, separated into a separate direction called fashion. Fashion designers are engaged in the development of various forms of clothing. The better a master is able to embody new fashion trends, while creating his own unique style, the higher public appreciation he receives. Creating high-quality models requires from a fashion designer, in addition to the obligatory talent, great hard work, obsession and patience.
The concept of “tailoring” comes from the French word tailler, which translates as “to make to measure.” In essence, cutting is a certain order of necessary actions that allow you to create patterns for various clothing models.
In order to correctly construct a drawing of the future product, the necessary measurements should be made. When mass producing models, template data for typical figures is used. In custom tailoring, it is very important to take correct measurements. A professional cutter should know well how to measure shoulder width, chest volume, product length and other parameters. The procedure for taking measurements should be treated with great responsibility, since the final result depends on the correctness of the actions and the accuracy of the measurements. The process seems quite simple, but to know, for example, how to correctly measure shoulder width or sleeve length, you need basic knowledge of the anatomical structure of the body, ideas about body types, and human constitution.
Peculiarities
The human physique is a combination of several parameters: the size of the torso, the shape of the torso, the proportions of individual parts of the body and the physiological characteristics of the structure of the tissues of the human body. The concept of “physique” is rather a medical term. In everyday life, fitness, physical education, modeling and tailoring, the most common term is “figure”. Within the framework of the constitution, each person has his own individual figure, which is determined long before his birth. It depends only on the parental genes what the future child’s height, shoulder width, and foot size will be. Due to the huge variety of hereditary factors, no one can predict what body features a person will inherit. The figure is also influenced by gender, profession, and sports activities.
The process itself
When starting to take parameters, you should know exactly what measurements are required. In order to sew a men's shirt, you need to know how to measure shoulder width, sleeve length, neck circumference and product length. Tailor's measuring tools can help with this.
The measuring tape was invented by a French tailor back in the early nineteenth century. It is a narrow strip of durable material one and a half meters long with metal clips at the ends. A graduation scale is applied on both sides of the tape. To avoid inaccuracies in taking measurements, it is advisable to use the same tool when sewing a product.
Abbreviation
The obtained data must be entered into the measurement table using special notations. Capital letters indicate the names of the measurements, and small letters indicate the measurement point. O - girth, H - height, W - width, D - length, t - waist, b - hips and so on. So, shoulder width. This measure is designated as follows: Shp.
When taking measurements, the customer must be wearing the shoes in which he will wear the clothes being made. The height of the heel affects not only the length of the product, but also the curves of the figure. The person should stand straight, without moving, in a relaxed and calm state. It is better if he wears only underwear or thin, tight clothing.
Advice
When taking basic measurements, it may be difficult to figure out how to measure shoulder width. The accuracy and correctness of sizing affects the fit of the product.
The width is measured horizontally by connecting the extreme points protruding above the shoulder joints. The tape should fit snugly to the body, but not be tight.
We take measurements ourselves
If a tailor sews clothes for himself, then he can take most of the measurements himself. But the question inevitably arises: how to measure shoulder width without outside help? To do this, you can take your own shirt or T-shirt that fits perfectly on your shoulders, then straighten it on the table and use a tape to measure the distance between the points where the sleeve joins the shoulder line. This way you can take the correct measurement.
fb.ru
Abbreviation
The obtained data must be entered into the measurement table using special notations. Capital letters indicate the names of the measurements, and small letters indicate the measurement point. O - girth, H - height, W - width, D - length, t - waist, b - hips and so on. So, shoulder width. This measure is designated as follows: Shp.
When taking measurements, the customer must be wearing the shoes in which he will wear the clothes being made. The height of the heel affects not only the length of the product, but also the curves of the figure. The person should stand straight, without moving, in a relaxed and calm state. It is better if he wears only underwear or thin, tight clothing.
How to determine your clothing size?
Size is perhaps the most important thing when buying clothes online. To choose it correctly, you need: 3 free minutes and a measuring tape. Using our experience, we have prepared simple and understandable instructions for you.
So, we are interested in 3 parameters: chest circumference, shoulder width and sleeve length.
How to measure bust circumference?
| Bust circumference can be measured either by yourself or with the help of a friend, girlfriend, grandmother, etc. Hold your breath and measure the circumference of your chest (as in the photo on the left). The tape should be approximately at the level of the nipples, and your arms should be lowered. It is important that the tape fits snugly to the body (does not hang!) and, at the same time, is not too tight. |
How to measure shoulder width?
It's even easier with shoulder width  You need to take a shirt that fits you “perfectly” at the shoulders. If there is no such shirt, then the “perfect” T-shirt will do. Lay it flat on a flat surface (like a table) and measure the width from shoulder to shoulder (as in the photo on the left). Important: the tape should be applied to the points where the shoulder line connects to the sleeve. The figure should be around 38-48 cm. Write it down! |
How to measure sleeve length?
| And the last parameter. Straighten the sleeve on a flat surface (for example, on a table) and measure the distance from the shoulder seam to the edge of the cuff - along the outside of the sleeve (as in the photo). The figure should be around 60-70 cm. |
How to choose the right shirt and jacket?
On the page of each model its sizes are indicated - XS, S, M, L, etc. BELOW each size you can see what shoulder width and chest circumference it will fit.
Sizing chart for men's clothing
| Russian size | European size | Bust |
| 44-46 | XS-S | 85-95 cm. |
| 48-50 | M | 96-102 cm. |
| 52-54 | L | 103-110 cm. |
| 56-58 | XL | 110-116 cm. |
Is everything somehow complicated?
Measure your parameters and call us at +7 (499) 64-10-64-7. We will choose the right size ourselves!
www.dressero.ru
Separate parameter
These are the three main parameters that are the keys to how to measure your shoulders correctly. But there is an additional aspect that does not require a measuring tape, because it must be measured visually. This is the tilt of the shoulders. This parameter has only three values, but it can greatly affect the process of sewing clothes. In this case, it doesn't take a genius to figure out how to measure your shoulders and their slope. It is enough just to know that the standard degree at which they are located is somewhere between 20 and 25. Such numbers are considered normal, while a larger angle means sloping shoulders, and a smaller angle means square. This parameter should also be taken into account when choosing clothes remotely or when sewing them yourself.
How to take measurements / Blog
You should not rely on your usual size when choosing such a serious product as a wedding or evening dress, even if you buy T-shirts, sweaters and knitted dresses in this size without any problems. Carefully study the size correspondence tables presented on the website where you are going to order. From personal experience, they vary. Different brands may have different size ranges, they sew using different patterns, and they may have different measurements for certain sizes. That's why it's important to know not so much your size as your measurements.
Carefully read the description of the product, what features of the cut it has, what fasteners it has, what material it is made of. A stretch wedding dress is a rarity. Wedding dresses usually have waistbands that are reinforced against stretching. If the dress has a zipper and your waist circumference exceeds the waist circumference of the selected size by more than 1.5 - 2 centimeters, you will no longer be able to fasten the dress. Often, in photographs, dresses on models “hang a little”; there is an option that this is intended by the design, but more often than not, the models turn out to be too thin even for small sizes, or there was simply no other size for the shoot. A responsible seller will always indicate the parameters of the model and what size dress she is wearing, so that you can evaluate the actual fit of the dress on your figure.
Imagine how you put on a dress and how you take it off so you can understand which measurements to take into account and which not. And, of course, start from the style:
— If the dress is completely tight-fitting, you need to take everything into account - chest, waist and hips (if it also has sleeves, then shoulder/biceps girth is also taken into account).
— If it is a tight-fitting top and a loose-fitting skirt, then the hips are not important here, you should focus on the chest and waist.
— If the dress is loose from the chest, then the only important measurement is the chest circumference.
To take measurements you will need a measuring tape and an elastic band. Having some experience, you will be able to take some measurements yourself, but for the most part, you cannot do without an assistant. Ask a relative to help you or invite a friend. By following the instructions, they will easily cope with the task.
You need to measure the volumes in the underwear with which you will wear the dress. Please note that even nylon tights with a “stretch” can remove several centimeters from the hips, let alone shapewear. If the dress you choose, for example, has an open back, and requires wearing without a bra, then you need to take measurements without one. Remember that a bra always adds volume, even if it has a soft cup.
In order to correctly determine the line against which measurements will be taken, tie a regular elastic band around your waist. We recommend using an elastic band, and not a lace or ribbon (an elastic band, unlike a non-stretch lace, will roll down to the narrowest place itself, this is exactly what we need).
1.Waist circumference
Wrap a measuring tape around your waist. Don't pull it too tight, don't pull your belly in! A finger should fit freely between the tape and the body. Don't forget that at the event you will move, eat and drink, sit, stand, dance, raise and lower your arms, you should feel comfortable in the dress!
2. Circumference above the chest The centimeter tape along the back should run horizontally along the line of the shoulder blades, touching the rear corners of the armpits with the upper edge, then along the armpits, in front - above the base of the mammary glands.
3. Chest circumference Measurements are taken at the most protruding points of the chest
4. Torso circumference under the bust Measured horizontally just below the bust line
5. Center front length Measured vertically from the jugular fossa to the waist line
6. Chest height Measured from the shoulder seam line at the base of the neck to the most protruding point of the chest gland. At the same time, take measurement 8 - the length of the front to the waist (see below).
7. Front length to waist Without changing the position of the measuring tape at the base of the neck, measure the height from the shoulder to the waist through the most protruding point of the chest.
8. Back length to waist
Measured from the highest point of the designed shoulder seam at the base of the neck to the waist, parallel to the spine.
9. Shoulders Measure horizontally along the shoulder slopes from one shoulder point to the other (the extreme point of the shoulder slope is the protruding bone)
10.Back width
Measure horizontally along the shoulder blades between the back corners of the armpits.
11. Chest width Measured horizontally above the base of the mammary glands between the verticals of the anterior corners of the armpits.
12. Center of the chest Measure horizontally between the protruding points of the mammary glands.
13. Neck circumference A centimeter tape with the lower edge passes from behind over the seventh cervical vertebra. Further along the base of the neck and closes above the jugular cavity.
14. Shoulder circumference Measure horizontally at the widest point of the shoulder with the arm hanging freely.
15. Armhole circumference
Raise your arm parallel to the floor and wrap the measuring tape around the armpit through the extreme point of the shoulder slope. Lower your hand and make sure that the tape is strictly vertical and take the measurement.
16. Wrist circumference
Measure along the protruding points of the wrist joint and the head of the ulna.
17. Sleeve length
The long sleeve is removed from the extreme point of the shoulder to the wrist along the arm slightly bent at the elbow. Similarly, remove 3/4 length, elbow length or short sleeve: from the extreme point of the shoulder to the point where the sleeve ends.
18. Hip circumference Measured horizontally along the widest line of the hips in front and along the most protruding points of the buttocks in the back.
19. Skirt length It is recommended to take measurements in the shoes that are intended to be worn with the dress. If the shoes have not yet been selected, wear another pair, the height of the heels of which will correspond to the ones you are looking for. Measure vertically along the side seam from the waist to the floor.
20. Saddle length
The measurement is taken in the center from the waist line in front through the ischial seam to the waist along the back.
21. Hips height
Measured vertically from the seventh cervical vertebra to the line of the most protruding points of the buttocks and thighs.
www.mywony.com
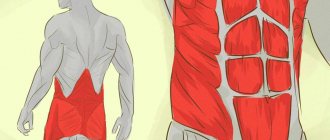
Basics of taking measurements before sewing
Before you begin cutting the material and sewing the product, it is necessary to accurately measure the body circumferences required to complete this work.
By the way, taking measurements for a product is a very important process. After all, everyone knows that if mistakes are made at this stage, the product will be sewn to inaccurate measurements. And therefore, it will never fit well on the figure.
When taking measurements, it is very important to pay attention to the body structure of the person for whom the product will be sewn, since various deviations from the accepted norm are possible. Therefore, for figures with deviations from the generally accepted norm, more measurements are taken than for a typical figure. It is necessary to take into account the characteristics of the body when choosing the future style of the product, as well as its optimal shape.
The quality of the final result directly depends on the more accurate the measurements you take...
So, all measurements of a person’s figure can be divided into four groups by default:
- girths (neck, shoulder, wrist, chest, waist, hips);
- length (to the waist, arms);
- width (back, chest, shoulder);
- projection measurements (body position, shoulder height).
The first three groups are measured with a measuring tape, the fourth group is measured using a system of rulers.
The figure is measured using underwear or a light dress without large layers of fabric. Be sure to ensure that when taking measurements the person stands without tension, without changing his posture.
To correctly take measurements, as well as other related measurements, it is necessary to determine the horizontal - the reference line. It is recommended to place it at the waist line, as it is easily fixed on the figure and connected to any point on it.
To do this, tie an elastic band at the waist so that it is positioned strictly horizontally. The correct location of the elastic is checked by measuring the distance from its upper edge to the floor (from the back and front).
When designing a dress for a specific figure, the position of the tops of the front and back neckline is determined by measuring without calculating calculation formulas. In this case, the middle of the shoulder is taken as the starting line. All measurements are made with a tight fit of the measuring tape without taking into account allowances, because they will be provided for when creating a drawing of the future design in direct dependence on the fabric, silhouette, size and purpose of the product.
The number of basic measurements recommended by this method gives the necessary idea for cutting and sewing about a figure that does not have any special deviations from the standard one, both in general and in individual areas of the body.
The measurements taken are written in the following capital letters:
- O - girth,
- C - half-circumference,
- B - height,
- D - length,
- W - width,
- C - centers or protruding points,
- P - position of a point or line,
- P - height (length).
Indices, that is, small letters with capital letters, indicate measurement areas. The values of girths, lengths, heights and widths of the shoulder are recorded in full, and half girths and widths - half of this value...
So, the size number corresponds to the measurement number on the figure.
1) Half neck circumference (POsh)
A centimeter tape is applied above the seventh cervical vertebra, from the side and in front it passes along the base of the neck and closes in front above the jugular cavity.
2) Half chest circumference first (POg1)
The tape is applied horizontally to the shoulder blades, it touches the upper edge of the posterior corners of the armpits, runs along the armpits, passes above the mammary glands in front and closes on the right side of the chest.
3) Half chest circumference second (POg2)
This measurement determines the size of the product when constructing the drawing. After the previous measurement, the tape on the back is not moved, in front it passes through the protruding points of the mammary glands and closes on the right side of the chest.
3a) Half chest girth third (POg3)
In the retail chain, this measure determines the size of the product. The tape is applied horizontally around the body through the protruding points of the mammary glands and closes on the right side of the chest.
4) Half waist circumference (W)
The tape is applied horizontally around the body along the waist line. When sewing some products, you may need to measure the full waist circumference (from).
5) Half hip circumference (HH)
The tape is applied to the buttock points, it runs horizontally around the torso, in front along the protrusion of the abdomen and closes on the right side of the torso. Sometimes you also need to measure the full circumference of your hips (Ob).
6) Shoulder length (Dpl)
Measured along the middle of the shoulder slope from the base of the neck to the shoulder point.
7) Sleeve length (Dr)
The tape is applied from the end of the shoulder seam through the protruding point of the elbow in the direction of the little finger to the hand. The arm is slightly bent at the elbow. At the same time, record (record) the length of the sleeve to the elbow.
 Arm circumference (Op)
Measured with the arm freely lowered. The tape is applied strictly horizontally. Its upper edge touches the posterior corner of the armpit, the tape closes on the outer surface of the arm. For a narrow sleeve, additionally remove the girth of the arm at the level of the elbow and at the level of the wrist, or the girth of the hand (OK).
9) Half back width (PShs)
The tape is applied horizontally over the convexities of the shoulder blades to the posterior corners of the armpits.
10) Half shoulder width (HW)
Measured between the shoulder points on the back side. The ribbon goes through the sprout. This measure is a control measure.
11) Back length to waist (Lst)
The tape is applied from the back from the waist line to the base of the neck at the shoulder; it runs parallel to the spine through the convexity of the shoulder blades.
12) Armhole depth (Gpr)
Measure from the base of the neck at the shoulder seam to the top edge of a strip of thick paper placed under the armpit. The tape runs parallel to the spine along the convexity of the shoulder blades. The end of the paper strip is taken to the shoulder blades, positioning it strictly horizontally.
13) Side length (db)
Measured on the back from the top edge of the paper strip to the waist line vertically.
14) Back shoulder height (Vps)
Determine the position of the shoulder point in relation to the waist line. Measurements are taken in two directions: along the shortest distance from the intersection of the waist line with the spine through the shoulder blade to the shoulder point (oblique shoulder height) and from the waist line to the shoulder point parallel to the spine (straight shoulder height). The measurement is written as a fraction: the numerator is the value of the oblique measurement, and the denominator is the direct measurement.
15) Half of the chest width first (ПШг1)
The tape is applied above the base of the mammary glands between the verticals, mentally drawn from the anterior corners of the armpits upward. This measure is a control measure.
16) Half the width of the chest second (SHPg2)
The tape goes along the protruding points of the bust to the verticals, mentally drawn from the front corners of the armpits down.
16a) Half the bust width (ПШб)
The tape is applied between the front corners of the armpits through the protruding points of the bust. The last two measurements are recorded together: the first number is PShg2, the second is PShb.
17) Bust Center (CB)
Measured between the centers of the mammary glands.
18) Chest height (Вг)
The tape is applied from the base of the neck at the shoulder to the protruding point of the mammary gland.
19) Front length to waist (Dpt)
This measurement is taken directly after the Bg measurement. The tape, applied to the base of the neck at the shoulder, passes through the protruding point of the chest gland parallel to the middle of the front to the tape at the waist line.
20) Length of the middle front (chipboard)
Measured from the jugular cavity to the band at the waist line. With a large bust, a thin ruler is applied to its protruding points - the tape passes through it. To control, measure the depth of the neck from the base of the neck at the shoulder to the upper edge of a ruler placed horizontally at the jugular cavity.
This measurement, added to the depth of the neck, should make up the length of the front to the waist, and it is written down in two numbers: the first is the depth of the neck, the second is the chipboard itself.
21) Front shoulder height (VPP)
Measurements are taken in two positions: from the shoulder point to the center of the bust and from the same point (the tape is not moved from it after the first measurement) parallel to the middle of the front to the braid at the waist line. Record both values.
22) Product length (Di)
The tape is applied from the 7th cervical vertebra, it goes down through the waist line to the desired point.
23) Skirt length (Du)
Measured from the waistline to the side.
24) Length in the middle of the front from the waist to the floor (Dpp)
25) Side length from waist to floor (Dbp)
26) Length from waist to floor at back (chipboard)
Measured along a line that continues the line of the spine.
Length of the skirt in the middle of the front (L). Its value is the difference between the DPP measurement and the length from the bottom of the skirt to the floor.
Back skirt length (Ds). The difference between the chipboard measurement and the length from the bottom of the skirt to the floor.
27) Length of trousers, length of trousers to the knee (Dbr, Dbrk)
Measured from the waist line along the side to the desired point.
28) Thigh circumference (About)
The tape wraps strictly horizontally around the thigh, touching the upper edge of the subgluteal fold, and closes on its outer side.
29) Seat height (Sun)
The person whose figure is being measured must sit on a chair with a flat, hard seat. Measure along the side from the waist line to the seat of the chair.
30) Seat length (Ds)
The tape runs from the front waistline through the groin to the back waistline.
31) Step length (Lw)
Measured along the inner surface of the thigh from the groin to the floor with the legs slightly apart.
32) Knee circumference (Approx)
Measured with the leg bent at an angle of 90° at the level of the knee point.
33) Height of the subgluteal fold (Vpya)
Measured from the middle of the subgluteal fold to the floor vertically.
ATTENTION!!!
- Before making a pattern drawing, you need to check whether the measurements were taken correctly.
- The half-circumference of the chest should be equal to the sum of the measurements of half the width of the back, the width of the armhole and half the width of the front (POg2 = PShs + + Shpr + PShn)
- Half the width of the back is taken according to the measurements taken; the width of the armhole is calculated by measuring the circumference of the arm (Shpr = = Or: 3 + 0.5 cm);
- Half the width of the front is equal to half the width of the second chest (ПШп = ПШг2) or half the width of the bust minus approximately 2 cm (ПШп = = ПШб-2 cm);
- If there is an inaccuracy of more than 1 cm, the measurements must be checked again;
- The length of the back to the waist should be equal to the sum of the armhole depth and side length measurements (Dst = Gpr + Db);
- When sewing hats, you need a measurement of head circumference (Og).
Girth measurement - SportWiki encyclopedia
Girth measurement[edit]
Body girth dimensions are the simplest anthropometric indicator. By taking measurements every few weeks, changes (increase or decrease) in muscle volume can be effectively monitored[1]. In the USA, this method is considered as an addition to the control of strength, speed-strength abilities and power[1].
Measurement technique:
The subject takes a natural position: heels together, toes apart, legs straight, arms down. The researcher places a measuring tape so that the zero division of the tape is in the field of view, and marks the division opposite the zero mark. The tape should fit snugly to the part of the body being measured, but without pressing into the skin.
Neck circumference - measured under the thyroid cartilage.
Chest girth - the tape runs from behind under the lower corners of the shoulder blades, from the front for men and children - at the level of the nipples, for women - along the upper edge of the mammary gland. Chest circumference is measured in three states: deep inhalation, deep exhalation and in an intermediate state.
Abdominal girth - measured at the level of the umbilical point during the pause between inhalation and exhalation.
Waist circumference - a measuring tape is placed 5-6 cm above the iliac crests.
Girth through the buttocks - the tape passes through the most protruding areas of the buttocks.
Thigh circumference - the starting position of the person being measured: feet shoulder-width apart, body weight evenly distributed on both legs. The tape is applied to the thigh under the gluteal fold.
Calf circumference - measured at the point of greatest development of the calf muscle. The position of the subject is the same as when measuring hip circumference.
Shoulder girth at rest - measured at the point of greatest development of the shoulder muscles. The arm hangs freely, the muscles are relaxed.
Girth of a tense shoulder - the subject raises his arm to a horizontal position, bends it at the elbow joint and strains the shoulder muscles as much as possible. The measurement is taken at the widest part of the shoulder.
Forearm girth - measured at the point of greatest muscle development on a freely hanging arm, the muscles are relaxed[2].
- Measuring chest circumference with a deep breath and in an intermediate state
- Abdominal girth measurement
- Measuring the circumference of the buttocks
- Thigh measurement
- Calf circumference measurement
- Measuring shoulder circumference at rest
- Measuring the circumference of a tense shoulder
- Forearm circumference measurement
A large-scale study of the girth of hockey players was carried out by Martirosov E.G. and his colleagues[2]. The results are presented in the table:
Results of measuring the girth of hockey players[2]
| Index | Quantity subjects | Average value | Standard deviation |
| Chest circumference, cm | 64 | 100 | 3,6 |
| Body surface area, m2 | 64 | 1,97 | 0,11 |
| Transverse midsternal diameter of the chest, cm | 64 | 30,2 | 3,1 |
| Sagittal midsternal diameter of the chest, cm | 64 | 21,2 | 1,0 |
| Pelviscrest diameter, cm | 64 | 31,3 | 1,8 |
| Calm shoulder circumference, cm | 64 | 32,3 | 2,1 |
| Circumference of the tense shoulder, cm | 64 | 35,1 | 2,2 |
| Forearm circumference, cm | 64 | 29,3 | 1,4 |
| Thigh circumference, cm | 64 | 61,1 | 2,8 |
| Shin girth, cm | 64 | 39 | 2,1 |
- ↑ 1.01.1 Strength training. National Strength and Conditioning Association / Editor L. E. Brown. - IL: Human Kinetics, 2006. - 368 p.
- ↑ 2,02,12,2 Martirosov, E.G. Technologies and methods for determining the composition of the human body / E.G. Martirosov, D.V. Nikolaev, S.G. Rudnev. - M.: Nauka, 2006. - 248 p.
sportswiki.to
How to measure shoulder width - PontCost
Measure your shoulder width at the back (standard)
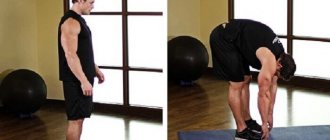
- Ask for help. Since the standard method of measuring width requires taking measurements along the top of your back, you will need another person to take these measurements for you. If you cannot find anyone to help you with measurements, use the "Shoulder Width Measuring Method with shirt" instead of this method. This method can be done independently and usually gives accurate results.
- Wear a shirt that fits you well. Although not required, a shirt that fits well is ideal for measurements, as you can use the seams of the shirt to measure with a tape measure. If you don't have a perfect shirt, any shirt that fits well on the shoulders will do. You don't need to measure your shirt when using this method, but a good shirt can provide useful starting points.
- Stand with your shoulders relaxed. Your back should be straight, but your shoulders should be in a naturally relaxed position.
- Determine the shoulder points. These points will be labeled by your lateral end of the scapula bone, which can be found at the top tips of your shoulders. These two points should also be the points where the shoulder meets the arm, or the points where the shoulder begins to curve down toward the arm. If you are wearing shirt that fits your upper body well, you can use that as a guide. The shoulder seams on the back of the shirt are usually the same as your actual shoulder measurements. If your shirt doesn't fit well, use your knowledge of how to widen or narrow it at the shoulders and adjust the two end points to make the changes you need.
- Measure the space between your shoulder points. Ask your assistant to place one end of the tape measure on your back at the first shoulder point. Your assistant should then measure up, along the curve of your shoulders, across your entire back, then back to the outer edge of the other shoulder point. Keep in mind that you should measure across the widest part of your shoulders. This usually means 2.5-5 cm below the neckline. The centimeter will not be horizontally straight during this measurement. It should bend in a gentle curve with your shoulders.
- Record the data. This is a measurement of the width of your shoulders. Write it down and keep it with you. The standard shoulder width measurement can be used for both men's and women's clothing, but is most often used for men's shirts and jackets. Shoulder width essentially measures the width of the yoke of your ideal size shirt. You will also need these measurements when determining the best sleeve length for your shirt or jacket.
Shoulder Width Measurement
The main measurement concerning this part of the body is width. If you don't know how to measure your shoulders and where to start, then you should first of all find out the width of your shoulders. This is the easiest part of measuring as you just need to place one end of the measuring tape to the edge of one shoulder and then measure to the edge of the other shoulder. This is called shoulder width. At the same time, you need to make sure that the person is not hunched over, slouched or does not spread his shoulders too wide - they must be in a natural state for the measurement to be as accurate as possible. By the way, knowing your shoulder width can help you not only in choosing clothes in an online store or when sewing your own, but also in sports, since the “feet shoulder-width apart” position is very often used there. And if you know how to measure your shoulders and what their width is, then it will be much easier for you to take this position.