Share:
CrossFit is a discipline aimed at developing functional strength and endurance. Consequently, only here you can find a huge number of specific exercises from gymnastics and acrobatics. One of these exercises was the elbow stand.
General information
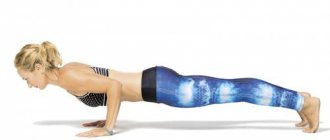
Note: the elbow stand is sometimes mistakenly confused with the elbow and toe stand exercise, that is, the classic plank. But that's not true.
Elbowstand is a static exercise designed to develop the ligaments and joints of the upper shoulder girdle. In addition, the exercise perfectly engages the core and abdominal muscles, which makes it universal for maintaining good shape at home.
Detailed description of the Sarvangasana technique
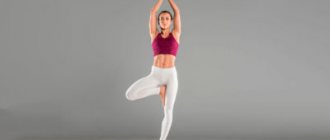
Salamba Sarvangasana ( Shoulder Stand with Support ) is one of the canonical asanas that has a powerful therapeutic effect. It will help get rid of allergies and bronchial asthma, improve the functioning of the thyroid gland, strengthen the nervous system - you can’t count it all. Aligning your body in Shoulderstand is quite complex and there are many nuances involved. You need to build a pose from the bottom up: if you do not pay due attention to the position of your neck and shoulders, you risk damaging your cervical spine or losing your balance.
Sarvangasana is a real salvation from fatigue, overexcitement or bad mood at the end of a hard day. After a few minutes in the pose, you will feel your peace of mind returning.
You must become a pedant when preparing to perform Sarvangasana , because incorrect body position can lead to compression of the fragile cervical spine. But the risk associated with performing the Shoulder Stand is not a reason to abandon it altogether.
Sarvangasana and the Spine
The cervical spine consists of seven vertebrae. All of them, except the first two, are separated from each other by movable discs that create space for the spinal nerves that begin in the spinal cord and exit between the vertebrae. The discs also allow the neck to bend and rotate. Normally, the vertebrae and discs are positioned in such a way that they form the curve of the neck at the back of it. It allows you to optimally distribute the pressure of the head on the neck. The curve is supported by the nuchal ligament, located along the back of the neck. This ligament is attached to the bony (spinous) processes protruding from the back of the vertebrae. The nuchal ligament is quite elastic, so it contracts to its normal state after traction. Thus, if you flex your neck, tilting your head forward, and then return it to a neutral position, the ligament allows you to restore the cervical curve.
The degree of cervical bend in Shoulderstand depends on how you perform the pose. If you don't use support, but shift your body weight back so that the pressure is on the backs of your shoulders and your upper spine and ribcage are tilted diagonally away from your head, you won't put much pressure on your neck. This is a standard and completely safe way to perform Sarvangasana for some schools of yoga. But if you, placing your head and shoulders in the same plane, try to stretch the spine and chest strictly vertically, pushing the sternum towards the chin, the cervical bend under the pressure of the weight of the whole body becomes too strong. Few people are able to perform the pose in this way without causing harm to themselves, while most people simply cannot bend their neck so much without the risk of getting a hidden or obvious injury.
Iyengar says that a vertical Shoulder Stand is stronger and more effective than a non-vertical one. More and more people are trying to imitate the inherent evenness of posture in Iyengar's style, but are not using the aids he recommends. As a result, they inevitably exceed the limited mobility of the neck. This is not to say that an absolutely vertical Shoulder Stand without additional support is a “bad” pose. On the contrary, perhaps this is the ideal option, but it is so traumatic that only advanced yogis are able to do it without causing harm to themselves. But even they usually perform Sarvangasana better if they use support under their shoulders.
So what happens when a student bends their neck too much in a Shoulder Stand? At best, he risks getting a muscle strain. A more serious consequence is the stretching of the nuchal ligament, exceeding its elastic limit. It can be stretched gradually, over many sessions, until it loses the ability to recover to its normal state after traction. In this case, the neck loses its normal curve and remains flat not only after performing Sarvangasana, but throughout the day, always. With such a deformation, too much weight is transferred to the front side of the vertebrae and improper distribution of the load can provoke the growth of additional, compensating bone formations - painful “spurs”.
An even more serious consequence of excessive pressure on the neck is injury to the intervertebral discs. As the pose compresses the frontal part of the disc, one or more discs may slip backward or rupture, causing herniation and pinching of nearby spinal nerves, causing numbness, tingling, pain and weakness in the arms. Finally, a student with osteochondrosis who does the Shoulder Stand too hard may even cause cracks in the cervical spine.
Additional support under the shoulders in Sarvangasana allows you to position your head below shoulder level, thereby reducing the degree of neck bending in the pose. Auxiliary materials increase the angle between the neck and torso, allowing you to achieve a vertical or almost vertical position in Shoulder Stand, while avoiding these problems. Despite all of the above, auxiliary materials cannot be called a panacea. The full version of Sarvangasana, even with support under the shoulders, may be unsafe for students with too stiff necks or shoulders, for those who have suffered a neck injury in the past, for students suffering from osteochondrosis, overweight people, etc. In these cases, it is better to perform various variations of the Shoulder Stand or replace it with simpler inverted poses, such as Viparita Karani (Bent Candle Pose).
One of the most effective modifications of Sarvangasana is the chair variation: in this case, the sacrum rests on the front edge of the seat, and the hips are located on the back of the chair. This option avoids unnecessary pressure on the neck area. (Yoga Journal)
Strengthening the neck
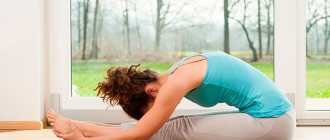
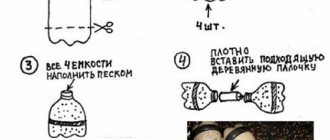
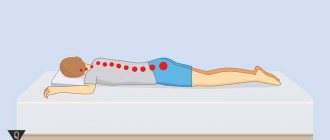
There is an elementary way to strengthen the neck muscles, which is also the only possible one in case of high instability of the position of the cervical vertebrae. This pathology is quite common in children, less often in adults, it is very painful and does not respond to exercise therapy methods. Traumatologists usually advise strengthening the neck muscles. The recommendation is sincere and is given, apparently, from the heart, but in this case it is contradicted by one small problem: in order to obtain the necessary muscle load, you need a movement that creates it. But with this pathology, any active movements of the head lead to further self-traumatization and a vicious circle results. But if we cannot move our head, then we have the opportunity to passively use its weight. In this case, the goal can be achieved only with the help of a static load, and this is done in the simplest way.
Lie on your stomach face down, resting your head on your hands. Lift your forehead from the support so that your head hangs in the air and move your arms slightly to the sides, with the tip of your nose almost touching the floor. And maintain this position until the moment when fatigue is felt in the neck muscles. Then you need to put your hands up and carefully lower your head on them. This is the first exercise. Second: lie on your back and slightly lift the back of your head from the floor, while your face looks straight up, and maintain this position until fatigue occurs in the front of your neck and throat muscles. The third position is to lie on your right side, raise your head parallel to the floor and remain there so that the muscles on the left side of your neck work. Then the fourth stage: lying on your left side, perform an action similar to the previous one. Repeat each position one to five times as the neck muscles adapt. Thus, with simple techniques it is possible to strengthen the neck muscles without any active movement of the head.
In many cases, with their help, it is possible to achieve complete stabilization of the vertebrae in children under thirteen years of age in two to three months. The same method is suitable for bringing the neck into a state that makes it possible to master inverted poses. (V. Boyko, YIK)
What muscles work?
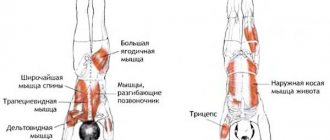
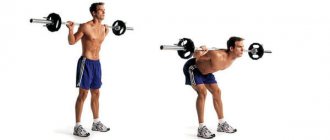
The elbow stand is a complex exercise that, although it has a static function, simultaneously affects the shoulder girdle and focuses the load on the deltoids, abdominal muscles and legs. Let's take a closer look at which muscles are involved in this exercise:
| Muscle group | Load type | What is he responsible for? |
| Upper deltas | Static | Takes on the main burden of holding the body. |
| Front delts | Static | Takes part of the load when the body tilts forward. |
| Rear delts | Static | Takes part of the load when the body tilts back. |
| Core muscles | Statodynamic | Responsible for the straight position of the body. |
| Rectus transversus muscle | Depending on the variation | Responsible for keeping the body in an extended position. |
| Obliques | Stabilizing | Helps level out the process of tilting the body to the sides. |
| Biceps hamstrings | Stabilizing | Responsible for the position of the legs during hold. |
| Quadriceps | Static | It is a muscle antagonist of the “biceps femoris”. |
| Gastrocnemius | Stabilizing | Responsible for the position of the legs. A well-stretched leg is an additional static coordination load. |
| Gluteus muscle | Statodynamic | Responsible for the position of the body in the hip joint. The load is similar to the abdominal muscles. |
As you can see, the abdominal muscles and upper deltoids take the main load. However, you can create additional dynamic load by changing the position of your legs or body. However, this is only allowed if you have perfectly mastered the technique of the classic elbow stand.
Handstands in yoga: names and techniques
Once you have mastered simple hand balances, you can move on to complex variations. An experienced practitioner, as a rule, feels good about his body, is confident in himself and his abilities. However, you need to master complex asanas under the guidance of a teacher, since their implementation involves observing many nuances, on which both the correct execution and injury safety depend. In addition, the teacher can objectively assess the capabilities of each student and his readiness to master new asanas.
- Ashtavakrasana
is named after the sage Ashtavakra, who was born twisted in eight places (“ashta” - eight, “vakra” - crooked).
Technique for performing from a sitting position on the right side:
- From a sitting position with straight legs, place your right leg on your right shoulder. The right hand should be on the inside of the thigh.
- Bend your left leg and cross your right and left ankles.
- Raise yourself on your hands, tilt your body forward and extend both legs to the right side.
- Bend your elbows and tilt your body deeper.
- When completing the asana, lower your feet to the floor.
- Repeat on the other side.
- In an advanced version, you can, while remaining supported on your hands, move your legs from one side to the other.
- one-legged crane pose (eka - one, pada - leg, baka - crane) strengthens the arms and wrists, stretches the muscles of the upper back, strengthens the abdominal muscles and opens the pelvic area.
Technique for left leg:
- Place your feet hip-width apart and squat with your legs bent.
- Lean your body forward and bend your elbows.
- Raise your right leg, rest your right knee on your right forearm. You should not feel any discomfort in this position.
- Bend your body forward and lift your left leg off the mat.
- Find your balance and extend your leg up. Stay in this position for several breathing cycles.
- Lower your leg and repeat the asana on the other side.
(“adho mukha” - face down, “vriksha” - tree) is one of the most famous asanas on the hands, which can be found not only in yoga, but also in sports disciplines.
Technique:
- From tadasana, lean forward and lower your hands to the floor shoulder-width apart.
- Raise your legs simultaneously or alternately, straight or bent at the knees. Options for entering the asana depend on your individual characteristics. Stretch up, trying to avoid arching in the lower back. Keep your feet together.
- Watch your breathing and stay in the asana for several breathing cycles.
- If you are just mastering the asana, perform the exercise near the wall.
- firefly pose (titibha - firefly). This asana engages almost all muscles: shoulder girdle, back, triceps, abs and quadriceps thigh muscles.
Technique:
- Place your feet wider than your shoulders.
- Bend over and place your hands back under your hips so that your hips are on your shoulders. Fingers point forward.
- Shift your body weight into your hands and lift your feet off the mat.
- Straighten your legs as far as the stretch allows and lift them up.
- Straighten your arms.
reminds us of the legend about the sage Kaundinya, who built a large kingdom and married a half-woman, half-snake.
Technique for performing on the left side:
- Get on your right knee and step down onto your right foot.
- Cross your left leg behind your right so that your left foot is on the outside of your right thigh.
- Next, you need to twist to the left: place your right elbow behind your left thigh, lower your palms to the floor. Palms are shoulder-width apart, parallel to each other.
- Raise your pelvis and shift your weight to your arms. The body should be between the palms.
- Lift your left foot off the floor, then your right foot.
- Straighten both legs. Keep your shoulders level.
- Perform the asana on the other side.
Hand balances are an integral part of the practice. By regularly performing these exercises, you will notice how your body's condition has improved, your character traits have changed, and your ability to concentrate has increased. It is worth remembering that the main thing in yoga classes is regularity. It is important to find your own version of regular classes to get results and high-quality mastery of asanas.
As with any other asanas, balances must be approached consciously, since if done incorrectly, it is difficult to make progress. In extreme cases, injuries to the wrists and shoulders are possible. If, in addition to hatha yoga, you practice reading spiritual literature and meditation, any complex asanas will become accessible to you over time and will firmly become part of your daily arsenal for working with the body and mind.
How to do an elbow stand correctly?
The technique of performing an elbow stand seems to be quite simple, but the exercise requires extreme concentration from you and strict adherence to instructions.
So, how to do an elbow stand correctly step by step:
- First, you need to take the “lying support” position, changing the position of your arms so that the main emphasis is not on your palms, but on your elbows.
- Next, leaning your body against the wall, begin to slowly lift your body so that you stand on a headstand. It is important to understand that the body must be lifted impulsely in 2 stages: first, you need to lift the body with bent legs; straighten your legs.
When performing the exercise, you need to pay attention to the following aspects:
- The position of the body is that it should be perfectly extended. It is not allowed to rest the housing on the wall, because this significantly reduces the load on the target muscle groups.
- If you cannot keep your body in a perfectly straight state, try first holding it in the “bent legs” position, this will reduce the load on the abs and reduce coordination perception.
If you need to shift the emphasis, try a variation of the elbow stand for the press:
- First you need to stand on any variation of the bridge (the ideal solution would be a bridge on the elbows).
- Then slowly raise your body, keeping your legs bent.
- Next, taking the starting position for a stand on your elbows, rotate your body and legs in different directions.
This variation is called “Mexican”, and is more complex, but also highly effective for the abdominal muscles. It is actively used in gymnastics and related sports disciplines.
To make it easier to get to the rack itself, you can use the following tricks:
- Rock the body. For example, from the “basket” position, when your body has an initial impulse, thanks to which you can easily bring the body to the desired position.
- Move into a stance from a bridge position. It is important to maintain concentration here, as you can easily fall.
- Take the starting position with the help of a partner. This reduces the coordination load and allows you to last longer. Recommended for people who have never tried this exercise before. Already a week after training with a partner, you can start trying to stand on your elbows on your own.
If, even with all the tricks, you cannot get into a full handstand, it is recommended to improve the condition of the abdominal muscles and upper deltoids. The press will help keep the body in the correct position, while the deltoids are responsible for the very possibility of taking the correct position.
Balance asanas on hands in yoga
Asanas on the hands help strengthen the body:
- correct posture and relieve tension from the spine;
- strengthens the abs and buttocks;
- strengthens the muscles of the arms and back.
Hand balances redistribute energy flows in the human body, which contributes to the development of spiritual potential. With regular practice of these asanas, you will get rid of negativity and be able to draw energy from the reserves of your body and the surrounding space.
When performing handstands, you need to take into account your current state of health, psycho-emotional background and follow the recommendations:
- You should not practice hand balances if you have injuries to the wrist and shoulder joints. Use with caution in case of diseases of the spine.
- Asanas are performed after warming up the shoulder girdle (chaturanga dandasana, urdhva chaturanga dandasana, push-ups).
- Avoid mastering the entrance to the asana through jumping and asymmetrical swings: enter and exit through slow, controlled movements.
- If severe discomfort occurs, immediately exit the asana.
- Hand balances suggest a special emotional state. Irritation and bad mood will not allow you to perform the asana properly and achieve balance.
Important nuances when performing the exercise
The technique of performing Sarvangasana involves an inverted body position. The back of the head acts as a support. To perform this, you need to lie on your back. Knees should be bent and gently pressed to the chest. Your arms and pelvis should be on the floor.
Palms should be pressed to the floor. In this case, you need to take several deep breaths. As you exhale, lift your hips up from the floor and gently press the back of your head to the floor. Your elbows should be bent and your palms should be placed on your pelvis for support.
As you exhale, lift your body up. The chin should touch the chest. Move your hands to your middle back. Make sure there is no free space between your neck and the floor. The back of the head and the back of the shoulders should also remain on the floor.
As you exhale, straighten your legs. Point your fingers towards the ceiling. It is advisable to remain in this position for 5 minutes. In this case, you need to breathe evenly. As you exhale, slowly lower yourself down. For beginners, you can use a bench when performing the exercise. This will be additional support.
When performing the exercise, it is important not to make sudden jerks. All movements must be gradual and consistent.
How to Breathe While Standing on Shoulders
You need to breathe deeply and evenly in the final pose. There should be no tension. When exiting the pose, you should hold your breath for a short time.
How long does the approach last?
You need to start doing the “birch” exercise for at least 30 seconds. The duration of the approach should be gradually increased. The main thing is not to feel tired. There should also be no pain or severe discomfort. Only in this case will the exercise be beneficial and not harmful to health.