Why stand on your hands?
In addition to the fact that the handstand itself looks very impressive and allows you to demonstrate the athlete’s physical fitness, it is a very useful exercise in terms of training.
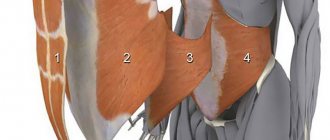
Muscles working during the exercise.
An argument for learning how to perform this exercise can be any of the following points:
- A handstand gives a powerful workout to the muscles. The main emphasis is on the shoulder girdle, arm muscles and core.
- Coordination of movements and a sense of balance are trained, and the overall level of control over your own body increases. The benefits of such training are obvious not only in the gym, but also in everyday life.
- The inverted pose helps improve blood circulation. Blood rushes to the brain, increasing the supply of oxygen to its cells.
Bar counters for restaurants, cafes
In bars, cafes and restaurants, the bar counter photo design is an integral part of the interior, a typical center, the main starting point of all actions. The bar counter and bar furniture in general are subject to special requirements in terms of wear resistance. She experiences enormous loads once a day and therefore must be made of comfortable, durable material. But with all this, it should be unique, elegant, and quite spacious. Bar counter ideas photo:
The design implies that a bar counter for a restaurant or cafe is usually made in a moderate, least pretentious style, so as to highlight the overall peaceful atmosphere. But at the same time, it should emphasize the overall style of the room, have a unique design and functionality.
- Roller shutters in St. Petersburg
- Boston virus - symptoms and diseases caused by the Coxsackie virus
- Properties and applications of MDF
Bar counters for a bar should combine several advantages: in addition to beauty and attractiveness, ergonomics and convenience for the bartender are of great importance. The more thoughtful the design, the more effective its operation and the furor of the entire establishment will be.
Bar counters for a restaurant are a special element of the interior. It is often produced with chic and luxury in order to match the atmosphere of relaxation, sophistication, and glamor reigning in the restaurant. For such establishments, they often order exclusive bar counters made of valuable wood with different types of finishes: gilding, patina, laser cutting of wood, etc.
The bar counter for a billiard room is often designed in such a way as to accommodate not only the contents of the bar, but also accessories for the game. Such racks will be vital and comfortable both in billiard rooms in private houses and apartments, and in professional billiard establishments.
As for the prices of bar counters for cafes, restaurants and bars, they are naturally higher than for home ones, because they are made taking into account many of the requirements for furniture for public catering establishments: hygienic, strength, ergonomic, design, etc.
Exercise technique
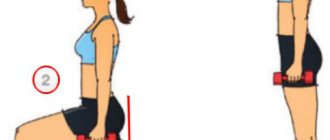
Before moving on to mastering an unsupported handstand, you should learn how to perform the exercise against a wall.
It is better to start training against the wall.
An important stage of training is overcoming the psychological fear of falling when going into a stand. Therefore, even athletes with good physical fitness are recommended to initially do the exercise with support on the wall or use the help of a partner who can provide backup in case of loss of balance. You can place a gymnastics mat in front of you so that if you fall forward on your back, it will soften the blow. But in any case, hands should only be placed on a hard surface.
Standing technique.
Handstand against a wall:
- Stand facing a wall two steps away. Bring one leg forward. The leg you are currently standing on will be in a straight line with your body throughout the entire movement.
- With a quick movement, springily step onto your forward leg and sharply bend with your straight body, rotating at the hip. At the same time, the second leg rises straight back, making a swinging movement. Hands should be on the floor 10–15 cm from the wall. The head should be lowered.
- With your other leg, push elastically off the floor. The force of the push and the inertia of the swing will allow you to throw your pelvis and legs up and go into a handstand. Try to stand as straight as possible, without sagging your shoulders or arching your lower back. The body needs to be pulled into a string. Direct your gaze in front of you.
- When lowering from the stance, lower one leg first, then the other.
If you want to learn how to stand on your hands without support in the future, it is not recommended to practice handstands near a wall for a long time. This is due to the fact that when leaning against a wall, the weight of the body is not distributed quite evenly and a deflection involuntarily forms in the lower back, which ideally should not exist. Therefore, as soon as you have mastered the technique of getting into a stand against the wall, begin to gradually lift your legs off it, and then completely stand on your hands without touching the wall with your feet.
A handstand without support is technically somewhat more difficult. Exiting into it is performed in the same way as when performing the exercise against the wall. The difficulty lies in keeping the body upright.
Important technical details.
Therefore, having skipped the moment of entering the stance, we will focus specifically on maintaining balance. How to learn to stand on your hands without support:
- To maintain balance, your body must be strictly perpendicular to the ground.
- The shoulders are fully open, that is, the arms and body should not form an angle. Remember about the straight line.
- The fingers are open and pointing forward. The center of the load falls not on the hands, as it seems at first glance, but on the fingers and at the junction of the fingers with the palm.
- Your back should be kept straight. At first glance, it seems that arching in the lower back helps to balance, but this is not so. If there is a deflection, the head involuntarily moves forward, and an additional load is applied to the lumbar region, which should not be there.
- Legs extended upward.
- The head is between the hands, the gaze is directed straight, and not to the ground.
Arms, body and legs form a straight line.
It’s difficult to assess your position subjectively, so ask someone to take a photo or film you. This will make it easier to correct errors.
Change in balance when bending the lower back.
What materials are bar counters made of?
What the bar for an apartment kitchen is made of will influence its appearance, price, durability and quality. Today there are many materials, namely:
- The cheapest option is chipboard (postforming). But the material allows you to imitate any expensive material, be it marble or stone. In the “wood” version, chipboard looks better, while the appearance is completely in harmony with the material, while the look of marble and wood causes confusion to the touch. The quality of the material matches the price.
- Natural stone is expensive, durable, and moisture resistant. The price of a rack in this design is high, but by fitting it into your interior, the owner will make it even more expensive. A smooth, cool surface pleasant to the touch is another advantage of such countertops.
- Acrylic or imitation stone. This is a suitable material for bar counters that are connected to the countertops of the set. Thanks to the smooth base, joining is carried out without seams, creating the appearance of a monolith of kitchen furniture.
Exit from the rack
If, when you take a stand, you feel that you are losing your balance, first try to fix the position by using the force of your fingers or changing the position of your legs. Try not to do steps on your hands until the handstand itself is perfect. If you perfect the technique of the exercise, you will not need additional training in walking on your hands - everything will work out by itself.
Exit with a turn in the direction of the fall.
You can exit the handstand backwards (the same way you stood up, only in reverse), to the side or forward (to the side where your back is pointing).
- In the first case, you simply lower one leg back, followed by the other.
- If you are pulled to the side or forward (there is a danger of falling on your back), try to turn in the direction of falling sideways and place first one foot on the ground, then the other.
- The most difficult technically is the exit from the stance forward into a somersault. Do not attempt this element without prior practice or if you are generally unfamiliar with proper tumbling technique. Under no circumstances should you fall on your head or neck. The chin is pressed to the chest, and the shoulders first touch the ground, and then the roll goes along the rounded spine. The inertia of the somersault should be enough to get to your feet. To learn how to do such an exit, you should practice on a gymnastics mat, having previously practiced standard forward somersaults.
Exit to somersault.
Stage two: sanding and decorating
The next step is sanding and decorating the wooden parts of the stand. Since round wooden sticks are used in the manufacture of the product, sanding should be done with a belt machine. If it is not there, you need to use sandpaper.
-100 kg: Maxim Fadeev admitted to his subscribers that his diet bore fruit
Private terminal in New York looks more like a ski chalet than an airport (photo)
Not only tasty, but also very healthy: prepare strawberry-ginger lemonade
Of course, if the work uses industrially processed, already sanded sticks, you will not need to use either a machine or sandpaper.
The prepared wooden parts should be coated with polyurethane or furniture varnish. If you want the stand to become colored, you need to use tinting impregnations or paint.
An equally important step is decorating PVC tees. To do this you need spray paint. This project uses black enamel.
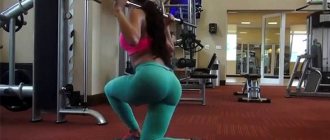
Complicated exercise options
If you have already mastered the classic stance, there are many options to complicate and diversify this exercise.
On the uneven bars
First of all, you can try to learn how to perform it on parallel bars or on special supports that are placed on the floor. In this case, getting into a stand becomes more difficult due to a decrease in inertia; you rise to a greater extent due to the effort of the core muscles. However, the hands on the uneven bars are in a more natural position, which makes it somewhat easier to maintain balance.
Use of special stops.
Pirouette or turn
The “pirouette” exercise is a turn on the uneven bars without leaving the stance. To learn how to do it, first practice holding yourself steady on your hands and not arching your back, shifting your weight in the direction of the turn. When this starts to work out calmly, move your hands from one support to another. Once the turn is complete, level off and stabilize your position. Only then leave the stand.
Turn or pirouette.
To the horizon
Try changing the position of your body relative to the ground, until you reach the horizon. This position or exercise is called a planche. The body tilts by changing the angle of the shoulder joint and shifting the weight forward. Elbows should be pressed tightly to your sides. Aerobatics is to push yourself back into a standing position from a horizontal position.
Transition to horizontal position.
On one hand
Another complication option is a one-arm stand. To learn how to do it, first get into a standard stance, and then try to lift one hand off the ground. In this case, the weight is redistributed, and maintaining balance becomes much more difficult. And the load on the working arm and shoulder doubles.
Based on all of the above, we can say that success in performing a handstand is 40% general physical preparation and 60% well-developed technique for performing movements. Learning this exercise will not require much difficulty if you overcome the psychological fear of falling. Go ahead, have a little patience and everything will work out!
Third stage: rack assembly
Assembling the stand is the very last step in the work. You need to lubricate the inner surfaces of the plastic tees with glue and insert wooden sticks into them.
In this project, in addition to glue, wooden sticks are held in PVC tees with screws. There is no particular need for such reinforcement of fastening if the poles fit tightly into the plastic tees. But if the wooden elements of the rack do not fit into the holes of the plastic tees particularly tightly, screws are necessary.
If you are using regular bolts, you will need a drill. You need to drill not only the plastic, but also the wooden elements of the rack. Add a little glue to the drilled holes. But if you use self-tapping screws, you will only need to drill through the plastic.
Found a violation? Report content
Final touches
By this point, you can already roughly imagine what materials and what design you need a rack from. All that remains is to add a few details to the image to make it complete.
First you need to decide on the sizes
Dimensions
- Height . At a classic bar counter this is a meter and fifteen centimeters. This height is perfect for an “island” and for zoning - it will qualitatively separate one zone from another. But you will need special high chairs, and short people may find it uncomfortable. “Peninsulas” are usually lower because they coincide in height with the rest of the set. They don't need special chairs. The remaining structures can be varied in height depending on the situation.
- Width . Already thirty centimeters is bad manners, since there will be nowhere to even place a plate comfortably. The classic width is sixty, but for a large spacious kitchen you can make it all eighty to ensure you can fit comfortably.
- Length . Depends on how many people will be sitting at the counter. Ideally, each of them should have sixty centimeters of free space. If the kitchen is small, only family members should be taken into account in the calculation - those who will eat at the counter every day. In a large kitchen, you can afford the luxury of calculating how many people can be in the largest possible company. In any case, in addition to counter space in the kitchen, there should be free areas where you can walk.
Scheme for assembling a bar counter
Tip If you are unsure about the length, draw the outline of the future counter with chalk on the floor and try to prepare something without stepping into it. Based on the results, you will definitely understand how comfortable it will be for you later.
Level
The stand can be:
- Single-level . In this case, the height is the same throughout the entire surface.
- Multi-level . It can combine several surfaces of different heights - most often there are two of them, one serves as a bar counter, the other as a dining table of normal height.
“Peninsulas” often turn out to be multi-level - this happens if the stand, even if attached to the headset, is slightly higher than its overall height.
Multi-level surface in the kitchen
Form
- Rectangular . This is a kind of classic that will fit well into any interior. However, it can seem a little boring, and sharp corners are always a little dangerous - you can accidentally bump into them and get a bruise.
- Rounded . The counter can be oval or round only if it is an “island”. But no one is stopping you from making the table top of the wall stand semicircular or at least rounding its corners. A little more original, plus there's nothing to hit.
- Original . These are racks in the form of waves, in the form of a soft surface falling to the floor, racks with recesses, racks with convexities that look like flowers, like blots and any other non-standard shapes that come to your mind. They are usually made from acrylic.
Original oval stand
When choosing a shape for a counter, you need to remember that in order for it to look correct and appropriate in the interior, it needs to match everything else. That is, so that there are other elements in the kitchen that repeat it.
It could be:
- Finishing . For example, a figured ceiling with a semicircle highlighted by lamps goes especially well with a semicircular stand. You can highlight a circle on the floor with tiles or carpet, or you can make a suitable pattern on the wallpaper. The main thing is that the motive is the same.
- Other furniture . First of all, the kitchen set. If it has smooth lines, you can make the stand round. But if it consists entirely of sharp corners, they will not harmonize.
- Textiles . The easiest way is to include the desired motif in the textiles. Curtains, carpet, if there is one, towels, tablecloth, if available - all of them can significantly affect the perception of the room and the shapes in it.
Don't forget about the overall interior
In addition, you need to take into account the overall style. Smooth lines don’t fit well into hi-tech; you can’t fit a stand of an original shape into a classic.
Color
- Natural wood . It doesn't matter whether it's truly natural or beautifully made of plastic. It is important that it brings comfort to the interior and gives it a warm shade. Combines with warm colors, smooth patterns, classic style, and Provence style. It looks unnatural in cool shades.
- A natural stone . It doesn't matter if it's truly natural. It is important that it gives the interior solidity and makes it somewhat more austere. It harmonizes with any colors, depending on what specific stone the countertop is made of. It won’t look good in high-tech, but it’s suitable for gothic.
- Metal . It is not imitated with plastic. It is distinguished by severity and gives the interior a cold feel. Goes well with strict lines and dark colors.
- Glass . It goes well with metal, the effect is approximately the same - severity, coldness. It is ideal for high-tech, as well as for modern. But stained glass (especially if the design is floral) will look good in eco style.
- White . It will fit well into Provence, but if it is presented a little incorrectly, it will be associated with an operating room. In general, it very much depends on the surrounding colors - they are the ones who give white the main shade.
- Black . An excellent option for gothic, although somewhat gloomy. Can be balanced with other colors.
Snow-white design with blue accents
In general, the stand can be either in the colors of the interior or in contrast to them.
At the same time, it makes sense to create a contrast only if there are no more large bright objects in the kitchen, otherwise it will turn out to be overloaded.
Advice If you like the idea of making the stand contrast with everything else, choose the color not by eye, but guided by tables that can be found on the Internet. After all, only a perfect hit will look good. Even just the wrong shade will destroy all harmony.
Contrasting black counter with chairs
Features and Benefits
Currently, designers offer a wide range of techniques for introducing a bar counter into the interior of the kitchen and living room. The size of the kitchen and its shape determine which model you should give preference to. It is absolutely clear that you cannot install a massive structure in a small kitchen.
Let's see if a small kitchen with a bar counter is possible.
There is a belief that bar counters are generally only suitable for large rooms, but this is completely untrue. On the contrary, a light bar counter is the optimal solution for a small kitchen; with its help you can distribute the space as profitably as possible!
For example, if the small kitchen and living room are separated from each other, then by dismantling part of the partition and installing a bar counter in its place, you can kill two birds with one stone.
This technique will immediately increase the free space in both rooms. And, in addition, you will immediately set the basis for a stylish and modern interior
The bar counter in the kitchen can be used in different ways:
- additional work surface for cooking;
- tabletop for quick snacks;
- for bachelors or young couples, this may well be a full-fledged dining table.
In a narrow kitchen, this element can be placed near the wall. In some cases, you can use the free space by the window, which is also very convenient. One clever and economical option is to use a window sill as a tabletop for a bar counter.
If you approach the matter wisely and involve design and renovation professionals, then such furniture will effectively save a lot of space.
If necessary, you can install cabinets at the base of the bar counter to store dishes and other kitchen utensils.