What is it and why is it needed at all?
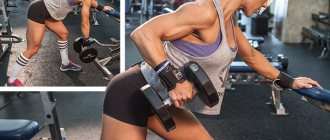
The bench press is considered one of the main exercise machines in any gym. Only a power rack, a rack and a couple of other exercise machines can compete in terms of demand. This is not surprising, because up to 60-65% of all exercises can be performed on the bench.
And I'm not just talking about basic exercises. We are talking about many movements: from barbell presses and flyes, to lunges, and even cardio exercises. You can also do various exercises for small muscle groups: we are talking about flexion/extension on the forearms, supermen with weights and other movements.
Benches are different, so first let’s look at the structure of the simulator. The classic horizontal bench is a single structure that includes a bench and a barbell rack with locks. The rack and bench can be separate, although this is more often typical for economy models and equipment for training at home. The bar itself is not a necessary element of the bench, although many models are sold with an Olympic bar and weights.
I would like to draw your attention to the fact that there are several types of benches and they have significant differences. This applies not only to models from different manufacturers (mainly height and overall dimensions), but also to functionality. If we talk about the main purpose, then the bench is aimed at developing the muscles of the chest and shoulder girdle.
Advantages and disadvantages
The advantages of making sports equipment yourself are obvious. It is possible to adjust the projectile to the dimensions of a specific room. Weights, barbells, dumbbells and benches can be made from scrap materials lying around the country house. If desired, more complex equipment can be manufactured. Even if the family spends the summer in the city, there are probably friends who have a dime a dozen of unnecessary shops and metal structures.
There is no need to spend cosmic sums on the purchase of equipment, and the cost of fastening materials or weights for the barbell will cost adequate money. Many amateur athletes claim that making exercise equipment at home is quite possible.
Beginning athletes see the downside of this idea in the time investment.
After all, you will have to tinker with it yourself. There are fears that while you are doing the exercise machine, all desire to exercise will disappear. You can compensate for this shortcoming by turning to friends or acquaintances for help.
A more serious disadvantage of this idea is the need to purchase electric welding equipment (if you plan to install a power frame). However, such devices are sold not only in expensive specialized stores, but also through bulletin boards. Nobody bothers you to go to Yula or Avito, contact the seller and purchase the necessary tools for real money.
When all the pros and cons have been thought through, you can begin the preparatory work.
Advantages and disadvantages
It is very difficult to evaluate the pros and cons of the bench, if we talk about the exercise machine in general. It is much easier to consider each model separately. However, there are general evaluation criteria that include both advantages and disadvantages.
The main advantages include:
- Wide possibilities for training (a bench with a barbell and a pair of dumbbells allows you to train almost all the muscles of the body).
- Easy to install in your home even in limited space.
- High safety when performing exercises (considered one of the safest exercise machines).
- Easy to use and clear exercises. Even beginners understand how to properly use the bench for presses and other movements.
- Durability and wear resistance. The entire structure is usually purchased with long-term use in mind.
- Financial benefit. Even professional models are cheaper than other exercise machines, which makes the bench as affordable as possible.
Now let's look at the possible disadvantages. The main disadvantage is reliability. But this depends on the desire to save money on the part of gym owners, and not on the athletes themselves. Naturally, a loose or unstable structure should be a concern, especially if you are lifting heavy weights.
The second disadvantage is considered to be the “disease” of most cheap models with a separate design. In such simulators, stability deteriorates, and the frame itself can “float” back and forth. Also, a drawback can be the inconvenient clamps on the rack, which either do not hold the bar securely or interfere with returning the bar to its place.
Kinds
There are several types of bench presses that differ in their functions. Let's look at them and find out the main advantage of each type:
- Universal. Allows you to adjust the level of backrest tilt (from horizontal to upward tilt). Suitable for pressing at any angle, but not particularly durable.
- Horizontal non-adjustable bench. A classic model that can be found in any room. Consists of the bench itself and the frame. Most often it is not regulated in any way.
- For pressing at any angle. The backrest can go up or down depending on the exercise.
- Bench without frame. Usually consists of a lounger with an adjustable backrest. Used for power racks and Smith machines.
- A regular bench without an adjustable backrest. The simplest design in the room. Can be used for various exercises.
- The seated bench press machine features a seat with a vertical backrest and a high frame.
Based on the type of design, exercise machines are divided into monoblocks and transformers. The first ones are distinguished by their structural integrity; here the frame and the lounger are one. Transformers are block-based multifunctional structures. Such models are equipped with additional removable blocks for performing various exercises (abdominal exercises, hyperextension, dips and others).
In gyms, they prefer to install one-piece structures due to their reliability, while I recommend transformers more for home gyms. With their help, you can expand your arsenal of training capabilities.
Buy or make it yourself
I often welcome home-made exercise equipment, especially where you can save money without losing quality. For example, making a jumping stand, a step platform and other exercise equipment. But with the athletic bench things are completely different. You must understand that this is not just a structure for holding a barbell - it is a machine that ensures the safety of the press. Nothing should be loose in it, and the maximum permissible load on the fasteners should be many times greater than the actual weight of the athlete.
Just imagine what the consequences could be if a leg or a lounger breaks under an athlete and a frame with a barbell falls on him. And if at the same time you squeeze out an impressive weight? That’s why I always insist that a sports bench is not a piece of equipment you need to skimp on.
If you have limited finances, especially if you are equipping a home gym, it is better to choose budget models. They feature cheaper materials but still provide a robust design. Moreover, making a good simulator on your own will require a lot of effort and expense: metal profiles, clamps, welding, etc. In this case, the choice is obvious: it is better not to take risks, but to use ready-made factory models.
Power bench for home selection criteria
To choose the right bench and not overpay, you must decide what you will train. If you only bench press, then the simplest monoblock will be the best choice. But for other exercises, a folding block design is better suited. It will allow you to add the necessary modules and turn a regular simulator into an analogue of a multifunctional station.
To make a successful choice, pay attention to the following criteria:
- Size. Select a place in the house and select a simulator taking into account the permissible dimensions.
- Price. Too expensive models are most often produced for halls, so they are not worth considering, but you should not choose the cheapest ones either. Stick to average options.
- Manufacturer. It is better to order a budget line from a well-known manufacturer than other models from unknown brands.
- The structure must be completely metal with the exception of soft upholstery.
Quality and reliability
As I already mentioned, this is not the case when you need to save money. The combination of quality and cost is the main criterion when choosing. Appearance plays a role in the gym. For your home, a bench should be functional and durable, not pretty.
What determines reliability and quality? First of all this:
- Material. The frame and main parts must be steel.
- Textile. Choose a seat with vinyl upholstery, it is the most reliable and durable.
- Rollers. If they are installed, the material should be moderately soft. Regular foam wears out quickly.
- Wide legs. The wider the legs at the bottom, the better the training fixation.
It is also highly preferable to choose models with reinforced fastenings.
Functionality
A standard bench is not a functional exercise machine because it is intended for highly specialized exercises. However, both at home and in the gym, athletes can perform a variety of movements from dumbbell pullovers to Bulgarian lunges. Therefore, try to choose those models in which the back is at least adjustable. This bench will allow you to perform presses at different angles and will replace three exercise machines at once.
I consider designs with additional rollers to be a good option for the home. They are good for training your abs, lower back, and even allow you to do some leg exercises. Add modules with bars only when the equipment is produced by a well-known brand. Otherwise, the fasteners in such structures will quickly become loose and the lounger will dangle.
Monoblock or transformation
If the size of your home gym allows you to place several exercise machines, then I always recommend using monoblocks. This is the most reliable and time-tested type. If space is limited, then you should pay attention to transformers. But it is important to remember that they are often designed to work with light weights. That is, if you are training for health and do not exceed the work with your own body weight, multi-component designs are suitable. If you plan to develop strength indicators and bench press more than your own weight, it is better to choose a reliable monoblock.
Additional blocks
Block exercise machines belong to the home category, so they are rarely installed in gyms. However, in conditions of limited space they have a big advantage: you can additionally purchase the necessary blocks and expand your training capabilities. A great advantage of block models is that each module is removable.
Comfort
In most cases, comfort is determined by two criteria - upholstery material and fasteners. Therefore, I advise you to pay special attention to these details. Most models are available with vinyl fabric. It is reliable and pleasant to the skin. In the case of clamps, try to give preference to those located at an angle. Horizontal clamps on the stand are less convenient. The difference is especially noticeable when you train at home without a partner. Throwing the bar onto the brackets at an angle is much easier (and anatomically correct) than placing it on horizontal clamps.
Simplicity and ease of operation
If you value ease of use highly, then you should probably only look at all-in-one PCs. This machine is extremely simple and does not require intervention after installation in the house or hall. An alternative would be a frame with a removable bench. This choice helps save space. After training, you simply move the bench to the side, and the machine will become less cumbersome.
Price
It all depends on the manufacturer, budget, preferences and other criteria. There is a certain standard for houses and halls, which I will write about.
Models with an average price-quality ratio for the home start from 15 thousand rubles and above. This is if you don’t take into account the barbell and plates, which are already quite expensive. The optimal price range is from 20 to 25 thousand. In case of purchasing additional modules – up to 35 thousand. For halls, this price tag increases by no less than 2, or even 3 times. Prices for professional equipment start from 100 thousand and reach 200–300 thousand rubles.
TOP 5 most popular models
I want to immediately clarify that these are not the most advanced models (most of which have a very high price tag), but those that are most often chosen for fitness clubs and at home. That is, this is the top 5 in terms of practicality and price/quality ratio.
- AEROFIT IF IFOFB is a simple and reliable monoblock with low cost.
- The “Uncle Vova” bench is an inexpensive but high-quality equipment from a domestic manufacturer. There are models with adjustable backrest.
- BODY SOLID ProClub SFB349G is a professional model with a very low price for exercise equipment in this class.
- The ELEIKO bench is the best choice for weightlifting, PA and crossfit.
- Inter Atletika has a good selection of benches for every taste and the lowest prices.
How to make a homemade barbell and bench for bench press
The bench press can be used to develop the pectoral muscles as well as other accessory muscles. This is one of the most common and effective exercises.
The article offers a drawing and a guide that will help you do everything you need to do this exercise at home. This option is relatively cheap and simple, but at the same time very reliable. In addition, it will look high quality.
In addition to how to make a barbell at home, this article will also describe how to make a bench press. After all, in order to perform this important exercise, both are necessary. To begin with, it is advisable to read at least the introduction of the article “How to make exercise equipment yourself at home,” as this will help you learn the main nuances and difficulties of making sports equipment at home, incl. and where you can get the material.
It should be understood that the specifics in the question of how to make a barbell with your own hands or how to make a rack for a barbell are not very important. The main thing is to understand the essence, dimensions, proportions and approximate appearance. The Internet is full of drawings for making a bench press bench and the barbell itself in the same form as it is sold in the store. But if you need to exercise yourself, or just make a small home gym, then there is no need for such a complex and expensive option. Here is a durable, effective and easy-to-manufacture option. This is what you should get (Fig. 1):
Rice. 1. DIY barbell and bench press
Of course, it is not the most basic, because you can also find how to make a barbell from wheels, bottles, or one where instead of pancakes there is a poured concrete mold. But if you want to exercise seriously, then it is better to make a barbell at home and a bench for the bench press so that it is normal, and not such that you will not even be in the mood to exercise over time.
In order to make a barbell at home and make a bench press bench, the main thing you need is:
- standard steel pipes (preferably square);
- tools that most people have at home (a grinder or a hacksaw, an electric drill or even a hand drill, a screwdriver, screws);
- knowledge of the basics of metal cutting;
- knowledge of basic welding or a familiar welder.
As for knowing the basics of welding, you can do without it if you fasten everything with screws or cheat something and simplify it (I’ll give an example of how later).
Now let’s take a more specific look at how to make a barbell at home and a bench for it for bench press. Let's start with the bench.
In the notation (Fig. 2), the upper number means the serial number of the part in the table, and the lower number means the number of exactly the same parts.
Rice. 2. Homemade bench for bench press.
Materials needed to make a bench press:
1. Square pipe 50x50x4. That is, the sides are 50 mm and the metal thickness is 4 mm. We need approximately 8.2 m, this is already with a small margin (8 cm). If everything is done carefully and exactly according to the drawing, then it should be enough almost right next to each other. The price of such a pipe is about 5-6 USD. per meter That is, you will have to spend approximately 45 USD on it. You can replace it with wooden blocks if you do not plan to train with very heavy weights. This will help save money, but increases the risk of injury if the tree fails. It is worth choosing strong wood species.
2. A wooden sheet or just a board measuring approximately 1.3 x 0.3 m. It is necessary to lie on while performing the exercise. You can upholster it with dermantine or leatherette, placing a layer of foam rubber or some fabric folded several times underneath. But it shouldn't be too soft.
3. Holders , as in the drawing (10), which can be made from a strip of steel. Or simply arches in the form of stags in the form of the letter “U” or “Y”, which will be easier. These stags can be made from reinforcing rod. The main thing is that the bar lies securely in them. You need 2 of them.
4. Covers or, so to speak, plugs - small metal plates measuring 50x50 mm (thickness is not important). You can do without them, they are only for aesthetics. But there is (11) on the diagram. If you decide to use them, you will need 6 pieces.
5. Fasteners , as shown in the figure (Fig. 2), welded from rectangular and triangular plates. This is practically the only place where welding is necessary if you do them as in the picture. But you can do without this. Instead, you need to take 3 metal or wooden plates measuring approximately 90x40 mm. Or you can have other sizes, the main thing is that the pipes to which the board is attached protrude a couple of centimeters on both sides. We fasten these plates with screws to this pipe, drill holes in them and screw the board on top. What is meant is shown in the figure below (Fig. 3).
Rice. 3. Simplification of attaching the board to the bench frame.
6. Screws, nuts and spring washers (grovers) 12 pcs. each to keep the homemade bench press bench in the pile.
All these parts are shown in the figure above (Fig. 2).
Dimensions that are missing from the images above can be found in the additional drawing at this link.
Now it’s time to make a homemade barbell.
Rice. 4. DIY barbell.
Materials needed to make a barbell at home:
1. A round pipe with a diameter of 32 mm, with a metal thickness of at least 6 mm, a length of 1.6 - 1.8 m. A standard steel bar is 2.2 m long and weighs 20 kg. Unfortunately, using available materials, that is, a round pipe, it will not be possible to achieve the same weight and strength as his. The maximum that can be found is a metal thickness of 8 mm. But even with this thickness, the weight and strength will not reach those of a standard bar. With a steel thickness of 6 mm (the most common pipes), the weight will be about 7 kg if its length is 1.8 m. Why you should not take a pipe length for the bar more than 1.8 m to make a barbell at home, I think it’s clear . After all, as already mentioned, its strength is less and its weight is the same as a standard bar will not withstand. It is better to take a pipe, of course, with as thick a metal as possible, but this will not add much weight, although a homemade rod will be stronger. Look at the price and the ability to get it. Round steel (“pipe without a hole”) is an expensive option, although more effective and reliable, because the main disadvantage of the pipe is that it will not withstand a lot of weight, unlike it. But, for example, a crowbar found in the yard is unlikely to be suitable due to its insufficient length. To make a homemade rod, you will need to cut a 20 cm thread on the edges of the pipe on each side.
2. So-called dividers , that is, 2 obstacles for pancakes so that they do not cross the territory allocated for them. These delimiters can be implemented in different ways. The most reliable way, of course, is to weld pieces of steel onto the pipe in the right places. But you can do without welding, for example, make small holes and carefully wind wire or electrical tape in the right places. If appearance is not very important, then simply drill 2 through holes in the pipe and insert screws there, screw nuts on them, and the pancakes will not jump over such an obstacle. The distance from the edge of the neck (pipe) to the separator should be 20 cm.
3. Pancakes . The picture shows pancakes that have a total mass of 51 kg. But, when doing a barbell at home, it will be difficult to guess with the weight. And also the weight of 51 kg of pancakes + 7 kg of the bar will be too small for a homemade barbell. If not now, then soon. But it is important not to overdo it so that the pipe can withstand it. Also, the pancakes are the most expensive part needed. The recommended steel thickness for them is 3 cm. You can buy such a sheet, but not cheaply, or you can look for suitable pancakes or their substitutes in the yard or scrap metal collection points. The main thing is symmetry in weight. That is, so that a load of 25 kg does not hang on one end of a homemade barbell, and 30 on the other.
4. Nuts for fixing pancakes. Two nuts suitable for the selected pipe. If the pipe is 32 mm, then the nut is 32 mm, respectively. The second option is to drill several through holes with a small distance between them, and insert screws into them - into those holes that are as close as possible to the inserted pancakes. The third option (the most aesthetic and simplest) would be to buy 2 special spring clamps for the neck. They are not very expensive, but it will be very practical.
Everything is shown put together in the picture above (Figure 4).
After this you can be proud. There are, of course, some disadvantages to a homemade barbell and bench press. Besides, it won’t be that cheap, but in any case it’s much more economical than buying it in a store. And doing the exercises will be no less beneficial than using purchased equipment. And most importantly - the incentive that the work put in and pride in your creation will give. Also remember that no one claims that this is how you need to make a barbell at home; you can make your own adjustments based on the available materials and budget. Just remember about safety and reliability, and not think about how to make a bench press bench and barbell quickly and haphazardly.
Poor quality homemade exercise equipment can cause serious injury.
Another option on how to make a homemade bench press bench with an adjustable barbell stand is given here.
Making a bench with your own hands step by step
From a safety point of view, a homemade design is not the best option. But it's better than nothing. In addition, making a bench yourself allows you to save a lot.
What materials are best to make it from?
You will need the following materials:
- Metal profile pipes (optimally 4x4 cm).
- Metal strip (for fastenings).
- Pins for clamps (if you want to make a moving backrest).
- Wooden plank.
- Sheet foam rubber.
- Upholstery material.
If you add beams to the structure, you will need 3.5 x 3.5 cm pipes. I want to dot all the i’s right away: no wooden supports, clamps or other parts. What is allowed when creating a gymnastics bench is not allowed in a power rack. The body must be entirely made of metal, and nothing else. Wood is allowed only in a simple version.
Required Tools
To complete all the work you will need a drill, a welding machine, and bolts. A sharp knife is also needed for cutting leather or fabric for upholstery.
Drawings and diagrams
Photos of the finished drawings will help you do the job correctly. You don’t have to plan and draw everything yourself; it’s enough to have an understanding of the operation of a welding machine and be able to use a drill. Choose the appropriate instructions depending on your preferences, collect the necessary materials and tools.
Work progress
Select the desired drawing and start making parts. To begin, cut the pipes in the required quantity. If the board for the bench is larger, then saw off the unnecessary parts. It is advisable to sand the edges. After this, it is necessary to assemble the structure, weld all the parts as indicated in the drawing, and bolt the board to the finished body. Next, all that remains is to lay a layer of foam rubber and cover the lounger with fabric, leather or other upholstery material.
Covering boards and seats
Remember that it is better to take plywood or boards no thinner than 12 mm, otherwise it may break. The base is preferably made of hardwood, this will increase reliability. After this, you need to install foam rubber on the board. For secure fixation, use glue over the entire surface. Leather or fabric upholstery is attached with a regular gun. The upholstery material is cut depending on the width of the board.
Production video
You can see the process and result using video. It will give an understanding of what the capabilities and appearance of the manufactured bench will be. I recommend adding additional elements right away, making an improved bench. We are talking about bars, side clamps for belaying and other improvements. It’s better to think through everything at once, because not all drawings allow you to add new elements to the design.
Improved bench model
The bench can be improved - for example, by adding bars to it. This will provide an opportunity to additionally load the muscles of the chest and triceps.
Materials and tools
In order to install parallel bars onto an existing bench press, you don’t need a lot of tools.
The following materials are needed:
That's all. Installing beams is not as difficult as it seems at first glance.
Assembly work
It will take 20-30 minutes to weld the bars to the bench press.
- Get a welding machine and a special mask to protect your eyes.
- Weld the beams to the bench.
The improved bench model is ready. Now there is an opportunity to diversify your home workouts.
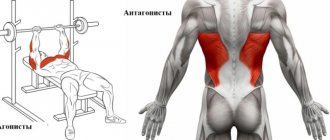
Basic bench exercises
Let's look at what you can do at home on a bench and why you needed to buy a machine or create a structure yourself.
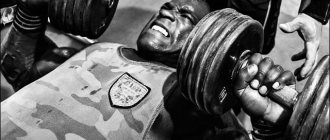
Bench press
I’m not the only one who considers this exercise to be the main movement for the bench press, so it’s not surprising that it always comes first. If you have an adjustable backrest, you can additionally do bench presses at an angle.
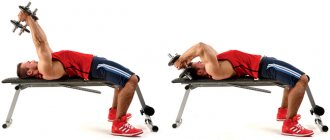
Dumbbell flyes and presses
Even without a barbell, but with a bench, you can almost fully train the pectoral muscles. Dumbbell presses and flyes are great for this.
Push ups
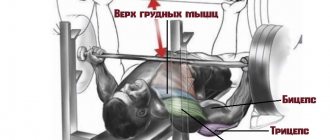
If you have a regular bench (even one without a frame), you can easily develop your pectoral muscles by doing push-ups from the surface of the bench. This option switches the load to the upper part of the pectorals, which most often lags behind.
Exercises for the abs
You can do most of your abdominal exercises on a bench, although if you do so, I recommend adding a bolster module. With their help, the body is securely fastened during body or leg raises, lateral twists and other exercises.
Bulgarian lunges
If in the gym there are many exercise machines for working on the legs, then working the lower body at home is much more difficult. The best options for this are squats (air or weighted) and lunges. Particularly popular are Bulgarian lunges, which require a bench.
Video
This video shows you how to make an incline bench press.
Full strength training at home is impossible without using a bench press bench . This sports machine, used in combination with dumbbells and a barbell, allows you to effectively and fully pump up your muscles and make your training as varied as possible. It is universal, practical, compact, mobile, and has a relatively affordable price. Due to its high functionality, it can be used to perform many different exercises involving all muscle groups.