The king of exercise. All about burpees, which are called fitness hell
“The king of exercises,” “the infernal thresher,” and “the arbiter of destinies” are not all about the deadlift, bench press, and squats. This is about the burpee, the push-up-and-jump exercise. It does not require any equipment, but is considered the most difficult and productive in modern fitness.
Sovsport found out what kind of animal this burpee is and what it is eaten with.
“I love everything about fitness. I can do deadlifts, squats - I enjoy it. But what I hate is burpees,” admitted “the toughest athlete on earth,” CrossFit Games winner Ben Smith, in 2020. In response, T-shirts with the slogan “Burpee hates you too” began to circulate among athletes.
Burpee - “fell, do push-ups, jump.” This multi-joint exercise is a fusion of basic movements - squats, push-ups and jumps. This cocktail only looks light from the outside. Doing it more than once is terribly difficult, but avoiding it is impossible. All methods of modern fitness, be it running, bodybuilding or fashionable circuit training, take burpees as one of their foundations.
Why? “Burpee is a real sadist. It will hurt you, but it will also take your body to another level,” says Greg Glassman, founder of CrossFit (more about CrossFit at Sovsport.ru).
Burpee increases endurance, accelerates metabolism, and improves the cardiovascular system. And, yes, don't forget about the muscles: burpees load all the major muscle groups, making them elastic, strong and ready for growth.
Story
The history of burpees leads us to the 30s of the last century. American physiologist Royal Hudston Burpee from Columbia University in New York conducted tests on athletes.
He discovered that the symbiosis of squats and push-ups is an excellent functional exercise that makes a person more resilient. The idea was picked up by the US armed forces.
Already before the Second World War, “burpees” were included in the training program for infantrymen.
Attention!
At the end of the 20th century, Greg Glassman invented CrossFit. He took burpees out of the Army physical training manual and made them part of a new discipline.
Glassman, a former gymnast, improved the burpee: to the two components - squat-push-ups, he added a third - jumping. This is how the burpee got the name “hell’s grinder.”
Because of the jump, it became even more difficult, even more effective, and in this form it found its way into the fitness industry.
Technique
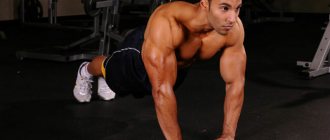
This is how you should do burpees. Stand with your feet shoulder-width apart. Bend forward, slightly bending your knees, and touch the floor with your palms. At the same time, jump your legs back, taking the starting position for push-ups. Do push-ups from the floor. Then jerk your legs towards your palms and jump up.
You've done one burpee. Within the framework of various methods, they will have to be done from 20 to 150 per workout.
Burpee Variations
There are many variations of burpees for athletes of all levels. Here are some of them:
- light burpee. Exercise for beginners, without jumping. You squat, kick your legs back, do push-ups, and stand up. Repeat again. This is actually an exercise in its original form, invented by Dr. Royal Burpee.
- combat burpee. For advanced athletes. At the end of the movement, you don’t just jump out, but make a high jump, trying to raise your knees as much as possible.
- frog burpee. If you decide to replace the regular burpee with this exercise, you are a machine, not a person. After the push-up, you return your feet to your palms, but do not jump up as usual, but make a long jump.
How to incorporate burpees into your workouts
Burpees can be used as a warm-up, as a main exercise, or as part of a cardio session after weight training.
Burpees are used as the main exercise in weight loss programs. It is included in circuit training, which combines strength and aerobic exercises, and is performed without interruption (or with minimal breaks, if necessary).
You can do a certain number of circles - for example, 10 circles of 10 pull-ups, 10 burpees, 20 crunches. Or you can do the maximum number of circles in a given time: for example, complete as many approaches as possible in 20 minutes.
As a cardio session, burpees are done after your main weight training session. For example, having finished your main complex with a barbell, do Tabata ( read about what it is on Sovsport.ru
).
Important!
If you want to understand how burpees work, take a selfie. In a couple of months you won't recognize yourself. Hell's Thresher will make you human.
A method for independently compiling crossfit programs
Let's try to create your first effective training program, starting from the exercises listed above, the distribution of which in the complex is carried out according to the following principle:
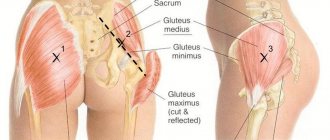
You may be interested in The most effective exercise for pumping up the buttocks
Firstly, the specifics of each exercise and which muscle groups they affect are taken into account. They are divided into the following subgroups:
- pushing – push-ups (from the floor/on parallel bars); presses (lying/standing).
- pulling – pull-ups (any style) and various rows (with a barbell/on a block).
- crossfit exercises for legs – squats (simple/with a barbell/with other types of weights); lunges, jumping, jumping.
- press – Sit ups, leg lifts (hanging/lying), bringing knees to chest.
- cardio – sprint, bicycle, jump rope.
Recommendation: distribute the exercises in a complex so that identical subgroups are not located next to each other, for example, do not follow the pull-up with a pull-down block.
Example
We perform 3 circles for a while:
- 1) pull-ups on the horizontal bar 10 times (pulling);
- 2) push-ups with clapping 10/15 times (pushing);
- 3) Sit ups 20 times (press);
- 4) jumping onto a box (60 cm) 10/15 times (legs + cardio).
Secondly, the desired goal of the load is determined: Training focused on completing a specific task. You have a fixed weight, as well as a required number of repetitions and circuits to complete in a given time. You record your results and try to improve next time by reducing the time.
Example
We perform 5 circles of the complex for a while and 10 repetitions in each exercise:
- 1) simple push-ups;
- 2) bring your knees, from a push-up position, to your chest;
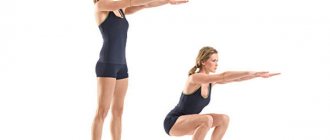
- 3) Sit ups;
- 4) jumping out of a squat with clapping overhead.
Functional training for a while.
In this case, there is a given amount of time, and the amount of work depends on you. The more laps you can do in the designated time interval, the better.
Example
We perform the maximum number of circles in 20/25 minutes (1 minute for each exercise):
- 1) “Burpee”;
- 2) performing freestyle pull-ups;
- 3) push-ups (with your chest touching the floor);
- 4) squats;
- 5) Sit ups.
We rest for one minute and start a new circle.
Ab exercises
Twist.
We lie on our backs, legs straight, arms behind our heads, hands clasped. We bend our legs, pulling our knees towards us, at the same time we twist and raise our torso, the left elbow goes to the right knee, then vice versa - the right elbow to the left knee.
A rivet.
The starting position is the same. We raise our straight legs up, at the same time we raise our torso, trying to meet our hands and feet at the highest point.
I recommend doing the following series: twist to the right side, twist to the left, rivet. And so on until there is enough strength. You've done one series, move on to leg raises.
Leg lift.
Lying position on your back, resting on your elbows. Raise your legs to a height of 45 degrees. Then there are options. Can be held for a while. You can hold your legs in this position for 5-10 seconds, but do more repetitions. You can do scissors: an exercise where you perform crossing movements with your legs. You can draw today's date or the name of your beloved girl in the air. I raised my legs, wrote, and put it down. Picked it up, wrote it, put it down...
Let's hit the upper abdominal muscles with short lifts.
We tear off only the shoulder blades from the floor, the lower back is on the floor. We try to arch our back as much as possible.
CrossFit exercise "Burpee"
1) lie on the floor in the position of the lowest point during push-ups (maximum, pressing your pelvis and chest against it);
2) do push-ups and pull your knees to your chest;
3) take a squat position;
4) jump up and clap our hands above our heads;
5) then again take the “lying” position, etc.
Execution technique
It is important to imagine how to do the exercise so as not to get injured and achieve results in a short time. If you do gymnastics correctly, you can actually develop the target muscle groups in just a week so much that it becomes noticeable
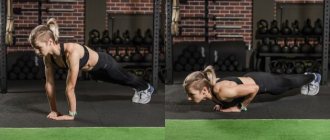
The technique for performing the simplest push-ups with a jump is as follows:
- Take the starting position by crouching and placing your hands on the floor.
- They jump their legs and take the same position as with a regular push-up.
- Doing push-ups.
- Jump your legs and pull them towards your stomach, lowering your feet to the ground and returning to the starting position.
- They get to their feet.
- They immediately jump up and down.
- Repeat the cycle.
This method will benefit women, while more complex options may cause harm. To begin, squat down and rest your palms on the floor. As soon as the latter firmly rest, they immediately lean on them and jump, lifting their feet. In this way, move to the classic push-up position.
However, there is a slight difference compared to the starting position for a regular push-up. And it lies in the fact that as soon as the feet touch the floor, the person begins to do push-ups. At the same time, his pelvis is still pushed back, because it did not have time to take the classic position during a simple push-up.
But in the process, the pelvis lowers and in the middle of the lowering trajectory towards the floor takes the position that is considered correct in the classic version of the exercise. Otherwise, do push-ups from the floor in the usual way.
When they rise, the same feature: the pelvis prepares to make a jump and moves back (up) from the middle of the trajectory. Then, they jump with their feet, resting on their palms, and return to their starting position. From there they rise to their feet and immediately jump.
This is a regular jump up, after which they immediately return to their starting position without delay. Pause for one second. And then they repeat the cycle.
However, such gymnastics often means something else: A person starts the exercise in a lying position, does it once and immediately jumps, pushing off with his arms and legs. At first, just bouncing a little after each time is enough. “Explosion” is what this type of jumping is called in CrossFit.
Then they complicate the technique: Move your arms forward in the air and pull your legs back. Another option is to spread your legs and arms to the sides while jumping.
Finally, perform jump and clap push-ups. Moreover, at first they do the clap by holding their hands in front, and then they practice the technique with the clap behind their back.
The most difficult method is “explosive” jumping, which is combined with touching your toes with your hands. Even with experience from previous exercises, before performing such gymnastics, it is worth asking a trainer how to learn how to perform the method correctly. It is advisable that he monitor the process and point out errors. Otherwise there is a high risk of injury.
It turns out that the person is grouped in the air and his hands go to his feet. After which he manages to return to a position from which he can continue doing push-ups before landing. Advanced techniques will be more beneficial for men who are sufficiently trained.
Variations of the exercise
In addition to the classic running while lying down, there are several variations of this exercise, which are performed using sports equipment:
- Running while lying down with twists. Take a horizontal position. Hands slightly wider than shoulders. Straighten your back. As you exhale, bend your leg and reach your chest. Twist the waist a little to the side. Pull the bent leg towards the opposite shoulder. Inhalation is the starting position. Repeat with the opposite leg. In this version of the exercise, the main thing is to bend your waist to the side as much as possible. The main muscles are the abs and belt, the auxiliary muscles are the muscles of the buttocks and thighs.
- Exercise with an expander. The technique is identical to the classic version, only sports equipment is tied to the legs (just above the knee joint). The main load falls on the muscles of the buttocks, the secondary load is on the hip muscles.
- Two-legged running in a prone position. Starting position: lie down on the floor and straighten your arms at the elbows. As you exhale, simultaneously bend both knees and jump to your chest. As you inhale, take the original position. The main load falls on the abs, triceps and spinal muscles, the additional load falls on the core and deltoids muscles.
- The exercise can also be performed on a sports ball (fitball) or a bench. Execution technique: classic or with twists.
Benefits of exercise
This exercise is used not only in “female” weight loss complexes. Those training for the purpose of gaining muscle mass will “surprise” their muscles with its help, powerlifters will train their triceps in a fairly easy mode, and crossfitters will receive a fairly convenient auxiliary exercise for all pressing movements.
For beginners
The biggest problem for bench and bench press beginners is their elbows being angled at the wrong angle. Many people try to bench press heavy weights with their forearms at right angles to their body, which is not optimal. This method of pressing is also dangerous, so everyone should avoid it.
The second point is the lack of a sufficient level of training to work with a barbell. Starting with reverse push-ups with our own body weight, we can strengthen not only the muscles, but also the ligaments so that we can press the barbell without distortions and tremors.
The third point is the lack of habit of controlling the depth of movement. This triceps exercise cannot be “remade”, like, for example, dips. Excessive depth in the movement will not prevent you from training, and your shoulders will be fine.
The exercise also develops mobility in the shoulder joint, which is good for beginners who plan to master gymnastics.
For CrossFit beginners, movement helps improve results in a variety of exercises, from clean and jerks to simple push-ups.
In general, for beginners, push-ups from a bench are a universal option.
For the pros
Experienced athletes can perform this exercise not only with simple support on two benches, but also with weights. There is no fundamental difference - some prefer to put weight plates on their hips, others prefer sandbags
It is important to load the muscles so that the exercise is performed in a forceful manner
Bodybuilders like to do this exercise “for a pump,” that is, in a high-repetition mode, at the end of a workout, so that the results of working on themselves are immediately visible.
For girls
Girls are often “prescribed” this exercise, since not all of them can do push-ups on uneven bars without compensating part of their body weight with rubber. But push-ups are not a “special women’s” exercise, and cannot be considered as such. Moreover, it does not replace other exercises in women's training.
In aesthetic sports, it is often used because athletes have breast implants and find it uncomfortable to perform other movements. Well, and of course, you need to pump up your triceps because those who don’t pump them up don’t have the best looking arms. The flabby back of the arms adds age and spoils the overall appearance, even if the figure is slender.
Almost every person can choose an adequate triceps exercise technique for themselves. For some, only the option with legs on a bench and body parallel to the floor is suitable, for others – with a “feet on the floor” stance. Both can be done with weights. In fact, standing with your feet on the floor is not a beginner's attribute or a sign of muscle weakness or anything like that. This is just an option for those who are uncomfortable with excessive shoulder flexion.
Benefits of Exercise
The advantages of this type of training are the following:
- effectively affects the muscular system of the core (abdominal muscles, gluteal and dorsal region, shoulders and hips);
- exerts dynamic and static load on the press;
- reduces excess weight by promoting calorie burning;
- strengthens the cardiovascular system;
- can be performed in the form of a warm-up, which is aimed at warming up the muscles before performing other types of training;
- does not require special equipment, so the exercise is easy to perform at home.
AIR ALERT II
The program was developed by TMT sports. This is one of the most popular programs for increasing jumps today. The program requires a serious approach and attitude to the exercises. After completing the full course (12 weeks), you will increase your jump by 20–30 cm. During 3 months of completion, you should ensure yourself good sleep and nutrition. Execution order:
Stretching
Before performing it, it is necessary to stretch all muscle groups that are involved in the program. The calves are stretched with exercises similar to step-ups (put your foot on a book or ladder and try to reach your heel to the floor). To stretch the anterior thigh muscle, place your foot on a chair or table and tilt your body toward that leg. The popliteus muscle is stretched by simple bending.
High jump
Feet shoulder width apart. Jump straight up as far as you can. Once down, squat down to about a quarter—that’s one jump.
Note: The speed of the jump is most important when performing the exercise. The point is to jump out as quickly as possible. The time spent on the ground should be equal to fractions of a second. Note: You should feel your anterior thigh muscles tightening more than your calves. Rest between sets: 3–4 minutes
Calf raises
Stand on something so that your heels do not touch the floor (stairs, thick book ~10cm). Lift up on one leg as high as possible using only your calves, then on the other leg. Rest between sets: 25 seconds.
Step-ups
Place one foot on a strong platform (chair, bench) and push up with your supporting leg. In the air, change your supporting leg and repeat the same. Rest between sets: 3–4 minutes
Jumping on toes
Stand on both feet and push up as hard as possible using only your calves. The point of the exercise is to jump as high as possible and “stay on the ground” as little as possible (the faster you jump after landing, the better)
Note No. 1: make sure that your legs do not bend at the knees when performing the exercise.
Note #2: 1 minute break between sets
Burnout
The exercise is named this way because when performed correctly, you will feel a burning sensation in your leg muscles. The technique is approximately the same as in the previous exercise. Standing on two legs, you need to jump, using only your calves. Here you need to jump only 1–1.5 cm, and put the main emphasis on the speed of execution and be careful not to fall on your heels.
Relaxation (stretching)
Air Alert II must be performed 5 days a week and preferably at the same time. The program takes 12 weeks in total.
It is best to perform the program at 13-15 hours of the day (peak muscle work).
Legend: 2x25 means you need to do two sets of 25 repetitions.
| A week | High jump | Toe lifts | Step-ups | Half squat jumps | Burnout |
| 1 | 1×50 | 2X10 | 2x10 | 2×15 | 1×50 |
| 2 | 1×100 | 2×20 | 2×15 | 2×20 | 1×100 |
| 3 | 1×125 | 2×25 | 2×15 | 2×25 | 1×150 |
| 4 | 1×150 | 2×30 | 2×20 | 2×30 | 1×200 |
| 5 | 2×100 | 2×35 | 2×20 | 2×35 | 1×250 |
| 6 | 2×125 | 2×40 | 2×25 | 2×40 | 1×300 |
| 7 | 2×150 | 2×45 | 2×25 | 2×45 | 1×350 |
| 8 | 2×200 | 2×50 | 2×30 | 2×50 | 1×400 |
| 9 | 2×250 | 2×55 | 2×30 | 2×55 | 1×450 |
| 10 | 2×300 | 2×60 | 2×35 | 2×60 | 1×500 |
| 11 | 2×350 | 2×65 | 2×35 | 2×65 | 1×550 |
| 12 | 2×400 | 2×70 | 2×40 | 2×70 | 1×600 |
I advise you to monitor your progress every week.
| A week | 1 | 2 | 3 | 4 | 5 | 6 | 7 | 8 | 9 | 10 | 11 | 12 |
| date | ||||||||||||
| Bounce |
What you will need to do: All exercises must be performed on the carpet.
The program must be performed in sneakers with FLAT RUBBER soles.
A chair or other object for step-ups, a book or something else for raising on your toes
The program does NOT require the use of weights of any type
The increase in jump occurs only due to your weight!
Nutrition is an important part of the program. A minimum of 2 meals a day is required.
You need to eat 1–2 hours before execution
Don't overeat and good food is a must not only on performance days, but also on rest days.
Food should contain enough proteins, carbohydrates (fruits and vegetables) and calcium (milk).. UNDER PROGRAM
UNDER PROGRAM
| # | Quantity | Description |
| 1 | 10 times - 5 episodes | Jumping on one leg (we try to press our leg in the air to our chest) |
| 2 | 10 times - 5 episodes | Frog (jump as far as possible) |
| 3 | 30 meters - 15 times | Acceleration |
| 4 | 80 times (must be divided by approaches according to how you feel, example: 10–10–15–20–25) | Jumping in place (press 2 legs to chest) |
| 5 | 1 minute on each leg, then a minute on both – 3 series | We jump on one leg using our calves (we try to jump as often as possible) |
| 6 | 10 min in total | We sit with our backs to the wall so that our legs are bent at the knees at 90 degrees. |
| 7 | Jumping, jumping, jumping | Jumping, jumping, jumping |
Methodological features of teaching the exercise “lifting legs while hanging on the bar”
Since December 2020, the departmental divisions of the Ministry of Internal Affairs have been discussing the draft Manual on the organization of physical training, which regulates in detail a new control exercise for strength “bringing straight legs while hanging to the crossbar.”
The introduction of a new exercise creates a number of problems, especially for senior cadets who have not specifically worked on the abdominal muscles.
Additionally, cadets who re-enter the academy will also face the same problem. This is due to the fact that there is no continuity with the school curriculum, which also did not include this exercise.
In our article we consider the methodological features of teaching this exercise, i.e. how to teach and train cadets, both in practical classes and in self-study.
The essence of the technique of this exercise is to lift the legs from a hang on straight arms until the feet touch the crossbar. This exercise requires significant strength and endurance in the abdominal muscles and high flexibility in the hamstrings and hamstrings.
The main muscle groups involved in this exercise are the abdominal muscles and hip flexors, as well as auxiliary muscles that help maintain the grip: deltoids, back muscles, and triceps brachii.
Thus, one of the reasons affecting the quality of this exercise may be insufficient grip strength.
In junior and senior courses, we train pull-ups on the bar, from which there is a positive transfer to bringing the legs to the bar, since the same muscles are involved. There is also a positive transfer from bending and extending the arms while lying down (push-ups from the floor), since in push-ups the muscles of the torso and legs are involved in holding the torso and legs, which is also necessary for lifting the legs while hanging (in the phase of lowering the legs).
However, the mode of muscle work in pull-ups on the bar and push-ups is different from the mode of muscle work in the hanging leg tray.
The boys did not have control exercises in which the abdominal muscles were to a greater extent involved, so the second, and probably the main reason influencing the quality of performance is the actual insufficient strength of the abdominal muscles. Also, do not forget that you need to lift your legs straight to the bar, which means that you need to develop significant flexibility in the hamstrings and the muscles of the back of the thigh.
From this we can formulate some factors that may interfere with the exercise. And in particular:
1) Poorly developed rectus abdominis muscle;
2) Weak grip of the hand on the crossbar;
3) Lack of flexibility.
Now let’s take a closer look at the mechanism and mode of muscle work in this exercise.
It is well known that the development of muscle strength occurs when overcoming resistance that occurs when lifting weights, or during yielding work, or under static stress. In our case, the muscles work both in the overcoming (the phase of bringing the legs to the crossbar) and in the yielding mode (the phase of lowering the legs), that is, the tension is maintained throughout the entire exercise. But cadets will need to do the exercise at least 6-8 times, so such a psychophysical quality as strength endurance manifests itself.
Strength endurance refers to the muscular ability to perform heavy exercise for long periods of time without visible technical impairment. This type of endurance shows the ability of muscles to contract again after a minimum period of time. Strength endurance has two types: dynamic and static [1, 2].
Dynamic strength endurance is characterized by performing heavy muscle exercises at a relatively slow pace, but for a fairly long time [1].
Static endurance allows you to maintain muscle tension for a fairly long period without changing your posture.
The most applicable method in mass work is the repeated method of developing strength endurance. It is characterized by the use of both standard and varying intensity approaches, repeated at unplanned rest intervals. The execution speed is the same. Rest intervals are arbitrary. Subjective feelings of readiness for the next load determine the duration of rest intervals. In this case, it is not necessary to wait until full functionality is restored. The main thing is to perform the load with a certain number of repetitions and the planned speed.
To improve, you can use the competitive method. For example, all the boys in the group, from a hanging position, perform exercises at the teacher’s expense, strictly observing the correct technique. The last one remaining on the crossbar is the winner.
Since it will be difficult to perform the exercise correctly right away, I offer several simplified options for learning:
1) Raise your legs while lying on your back to your head, making sure that your legs are straight throughout the entire execution.
2) Perform a “corner” on a wall bars, or on a machine with similar characteristics.
After you have completed the learning exercises, you can proceed directly to the training:
1) Tray of bent legs hanging on the bar
2) Maintain the position of the legs raised to an angle of 90° at the hip joint for 15 to 30 seconds.
3) Perform the exercise with the help of a partner. The partner stands on the side, provides belay, holds the lower back (to avoid swaying of the body), and helps in the final phase of lifting the legs by pushing the shin up.
4) And another option for performing the hanging leg tray is with weights on the legs. Perform several approaches as many times as possible, keeping your legs straight (do not bend the knee joint).
Safety precautions must be observed: when performing the exercise directly on the crossbar, there is a danger of falling. Therefore, the person performing the exercise must be secured and mats placed under the crossbar. In addition to actually repeating the hanging leg lift multiple times, at the end of the session, be sure to perform a complex to develop flexibility, paying great attention to the hamstrings and the muscles of the back of the thigh.
It is also necessary to perform pull-ups and push-ups. These exercises wonderfully develop the muscles of the back, chest, arms and shoulders, which is necessary for developing a strong grip of the hand and holding the hands on the bar for a long time. It is recommended to perform push-ups with various types of supports: on the fingers, fists, and the back of the hand.
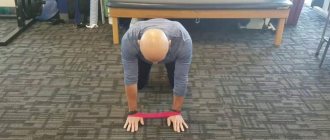
In addition, we recommend performing the plank exercise. This exercise involves resting on your forearms. The body should form a straight line from the top of the head to the heels of the feet. Support yourself only on your forearms and toes. The elbows are directly under the shoulders. This exercise develops static endurance, it strengthens the rectus and oblique abdominal muscles, deltoids and triceps muscles, as well as the back muscles, that is, the same muscles that are necessary to hold on to the bar. It also strengthens the “core” muscles - the internal abdominal muscles, whose task is to stabilize the spine, pelvis and hips, and which are directly involved in bringing the legs to the bar. Any exercise begins with the contraction of the “core” muscles, and only then, when the “core” is turned on, the force is transmitted through the arms and legs to the object on which we are acting, or is put into the blow. Weak muscles can only send weak signals. We recommend performing this exercise at least 3-4 approaches for 1-1.5 minutes [2].
To perform the exercise technically correctly, it is necessary first of all to repeat it many times, under different conditions, including in a lighter version. It is imperative to insure your partner, both in order to help in the initial stages, and also because there is a possibility of the grip breaking. At the end of a lesson or independent workout, perform a set of exercises to develop flexibility, aimed primarily at the muscles of the back of the thigh and hamstrings. Stretching can also be done with the help of a partner. And do not forget about the general development of the muscles of the back, arms and shoulders.
It is also very important that the positive side of performing the exercise is that by strengthening the abdominal muscles, and especially the internal area, that is, the “core” muscles, we improve the speed and strength of signals transmitted to the muscles. Also, there is a positive transfer to improving the performance of pull-ups and push-ups.
The practical purpose of the hanging leg lift is that:
1) This exercise ensures the comprehensive development of the trunk muscles, because pull-ups and push-ups mainly develop the muscles of the arms, back, chest and shoulders.
2) As a preparatory exercise for overcoming natural and artificial obstacles when pursuing an offender.
Nuances
Before starting this technique, it is important to make sure that the body is ready for this. It’s not difficult to determine: a person should not be more than ten kilograms of excess weight
Regular push-ups should ideally be easy, as should regular jumping jacks. Then it is possible to do such gymnastics.
Push-ups with jumping from the floor sometimes fail at first because the person’s vestibular apparatus is not sufficiently developed, and it is difficult to land straight, maintain balance and continue gymnastics.
It is possible to improve this apparatus in special simulators, but if you practice a little in standing on one leg with your eyes closed, this will also give results.
During such training, there is a high risk of hitting your face. That's why you shouldn't rush and immediately start complex gymnastics. It’s better to first master a basic exercise where you don’t need to jump with your arms and legs at the same time. It will develop approximately the same muscles, but will not be as dangerous.
Common mistakes when doing the exercise
The most common mistakes that novice athletes make when performing this exercise:
- Deflection of the lower back and pelvis. Being in this position, the spine receives maximum tension, which increases the risk of injury. And the load on the press is significantly reduced.
- Active body movements. This not only reduces efficiency, but also makes training easier.
- Incorrect placement of the upper limbs. Hands should be placed at the correct distance. If the upper limbs are too wide, the maximum force will go to the shoulder joints. If the hands are placed close to each other, the load will be placed on the spine.
- Rocking of the hip joint. While bending your legs, try not to rock your pelvis. Movements should be in the plane of the body. This will create the necessary load on the press.
- Make sure that your knee does not touch the floor during movements. Weighted legs ensure the effectiveness of the workout.
- Incorrect breathing movements. Make sure you are breathing correctly. No delay allowed. As you exhale, make an effort, and as you inhale, return to the starting position.
If you don’t make mistakes and strictly follow the technique of running in a prone position, you will be able to achieve the desired result in a short time. If you can’t do this on your own, start training with a professional trainer at a fitness club, and after mastering the rules, continue training at home.
Dips
A popular exercise that gives excellent results for the development of the pectoral muscles and triceps. Simple to perform, push-ups develop the entire chest muscles. Requires a gradual transition and an increase in the number of approaches.
Technique: Stand between the bars, leaning on your hands. Hang on the uneven bars and, while inhaling, lower vertically down. After reaching a position where your elbows are bent at a right angle, hold for a couple of seconds and return to the starting position. The depth of the lowering and the speed of execution contribute to the development of various muscles. Therefore, the standard exercise can be modified for individual purposes.
CrossFit exercises used in programs for men and women
To create complexes yourself, you will need the information provided below; if you have it, you can easily create training plans for yourself for a month or more. Typical functional CrossFit training programs may include:
Working with your own weight and/or using gymnastic equipment (gymnastics):
- push-ups on parallel bars, on gymnastic rings, simple, for advanced athletes - from the floor with clapping, for girls - from the floor from the knees, from a bench or wall;
- pull-ups on the horizontal bar, on rings, power-ups;
- climbing a rope on one hand, with the help of legs;
- various squats from a medium or wide stance, on one leg (the second leg is straightened);
- jumping onto high objects (benches, pedestals), jumping rope (with one or two rotations), alternating leg lunges;
- compound exercise “Burpee”;
- lifts/inversions on the crossbar;
- press: Sit ups, bringing the knees to the elbows, bringing the legs to the horizontal bar, bringing the knees, from a push-up position, to the chest, etc.
Exercises consisting of various cyclic movements:
- cardio sprint over a distance of 100 meters;
- rowing on a simulator;
- exercise bike;
- repeated jumping, etc.
3. Functional training with weights:
- deadlift (lifting from the starting position: sitting), on a block machine to the chest or behind the head;
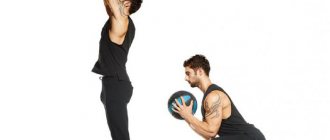
- push of a heavy ball, barbell from the chest (up/forward);
- squats with a barbell, with a medicine ball, “swings” with a kettlebell.
Push-ups with hands shoulder-width apart
These are classic, well-known push-ups. In this case, the middle pectoral muscles, triceps and deltas work.
Execution technique: take a lying position, place your hands strictly shoulder-width apart. The body should be parallel to the floor, legs together. The head does not bend, it is held straight, like an extension of the spine. Then we bend our arms, smoothly, without jerking, and return to the starting position. At the lowest point you need to linger for a few seconds. When bending, we inhale, when straightening, we exhale.
Push-ups with your head down (with your feet resting on a fitball, medicine ball, BOSU, bench, chair, TPX loops)
When performing push-ups, in which the head is directed down and the legs are placed on a support, the upper part of the pectoral muscles is worked out. A fitball, medicine ball, bench and other objects that provide solid support are used as support.
Fitball: the load allows you to develop the muscles of the chest, back and triceps. The abdominal muscles are also loaded. After bending your arms to a 90-degree angle at the elbow, you should hold for 2-3 seconds and return to the starting position.
Medicine Ball: Placing your feet on a medicine ball requires a lot of muscle tension in your mid and lower body. When working, you should carefully monitor your balance.
BOSU: Place your feet on the dome and do push-ups. It is not difficult to maintain balance, but the load goes to the upper body.
Bench: allows you to intensively train your arms and upper chest muscles.
Chair: the tilt height is large, so a lot of load is placed on the arms.
TPX loops: it is convenient to adjust the height, so when performing an exercise you can set the optimal inclination. Balance should be carefully monitored.
Execution technique: completely corresponds to the standard one, with the difference that the legs are higher than the head.