The health benefits and harms of swimming
Benefit
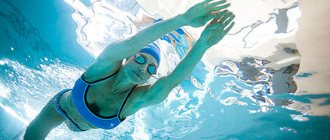
Swimming is good for everyone - from babies to seniors. It helps adult men and women get good exercise and relieve stress. Swimming doesn't put stress on your joints and uses all muscle groups. It's like athletics, only more effective and less traumatic.
Health benefits of swimming:
- develops strength and endurance;
- helps the spine become more flexible;
- promotes weight loss;
- improves joint mobility;
- trains the lungs and heart;
- restores healthy sleep.
It is worth noting that the benefits of swimming for the spine, lungs and muscles are felt if you swim correctly. To do this, you need to learn to dive, paddle and glide through the water, without stopping at the achievement of “I can swim like a dog.”
Harm
It is no coincidence that a doctor’s certificate is required to swim in the pool: there are a number of diseases for which swimming is contraindicated.
For example, dermatitis, furunculosis, eczema and fungus are aggravated by water contact. In addition, skin diseases can be dangerous to others.
You also need to understand that swimming is a great physical activity for the whole body. Therefore, it is better for people with heart disease or cancer to consult a doctor.
Some chronic diseases of the lungs and intestines may also be a contraindication. Swimming is not recommended for people with epilepsy or seizures.
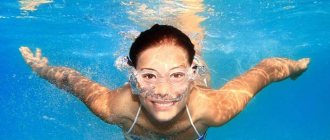
Helps burn large amounts of calories
How is swimming in a pool beneficial for women? The answer to this question is related to a very current topic for women all over the world, namely losing weight. Losing weight is a very labor-intensive process, but not with swimming. Swimming breaststroke for just 30 minutes burns about 360 calories, depending on your intensity level, your speed, and your weight. A 30-minute walk will only burn 99 calories, while cycling will burn 240.
People are often mistaken in believing that they will not be able to burn as many calories in water as in the gym, for example, since the water temperature is lower than the average human body temperature.
However, modern research refutes this guess and classifies swimming as a high-calorie activity that can outperform many intense workouts in the gym, thanks to the minimal stress on the joints. 30 minutes in the pool is equivalent to an hour in the gym.
Just because you're not sweating doesn't mean you're not burning calories - have you seen the Olympic swimmers?!
Where to learn to swim?
Methods of teaching swimming are theoretical and practical. To learn the theory, you can read articles or books, watch training videos on the Internet. From theory you need to move on to practice - training on the water.
In a swimming pool
It is better to take your first lessons in the pool - in still water it will be easier for you to control your body position. Moreover, it is better to do this with a coach, so that later you do not have to correct errors in technique.
Often students do not know how to breathe or how to lie on the water. The trainer will show and tell you how a person should feel in a certain position of the body. I train in the water: I show by example, and then I observe the student.
Natalya Pulcheva, swimming coach
Tips for those who want to learn to swim in the pool:
- Pay attention to group classes. It's not only cheaper and more fun, but also more effective. You gain like-minded people, and with them the motivation and habit of going to the pool.
- If you are serious, then immediately sign up with a trainer. The main advantage of individual lessons is that all the attention is on you. This way you will master the technique much faster.
- At first, stay close to the side. You need to gradually get used to the water and feel that you are safe.
Advantages and disadvantages
A swimming pool is a specially organized place for learning to swim. This means that here you can not only safely gain your first skills, but also get rid of the main obstacle - the fear of water. Plus, training is available all year round. And this is a big plus, because regularity of classes is an important factor of success.
But you still need to find a good pool. And you will have to pay for the subscription. But there is a hidden advantage to this: financial motivation works. By giving the money, you will probably attend classes.
On open water
There are not many alternatives to the pool - a lake, river, sea or reservoir. And they are available mainly in the summer.
Advantages and disadvantages
Experts do not recommend learning to swim in a lake, river or sea for several reasons.
- Rivers and lakes have cold currents and springs, and uneven bottom topography. For an inexperienced beginner, swimming can turn into a tragedy.
- In the sea, the water is denser, it will “hold” you, and you won’t be able to feel the movements.
- Training will be irregular, from time to time.
- It is difficult to learn to swim in open water, because there are usually a lot of swimmers near the shore.
But open water also has its advantages: you can learn to swim and relax in nature. And you won’t have to pay like you do for visiting the pool.
At home
If no body of water, even an artificial one, is inaccessible to you, you can try to learn to swim at home. Of course, you can't do this in the bath. But there is so-called “land swimming” - training that helps prepare the body for the stress of water.
Advantages and disadvantages
Obvious advantages: you don’t need to travel anywhere, you can train in the comfort of your own living room. But there are more disadvantages: learning to swim at home without an instructor is almost impossible. Or rather, it is impossible to do it correctly. You won’t see yourself from the outside and even after a dozen videos you won’t be able to understand that you’re making technical mistakes
.
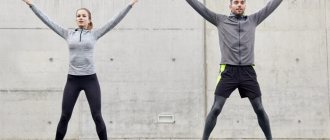
“Dry swimming”, or exercises for swimming on land
Dry swimming is a dry swim workout that mimics the movements of a swimmer. Exercise improves your fitness and helps you achieve results faster on the water. Many coaches give the dry-swimming routine as homework.
For dry swimming, athletes use their own body weight, fitballs, TRX loops and special exercise equipment - rubber. Exercises can be done at home or in the gym.
The training is structured according to the following scheme:
- Warm up and warm up muscles.
- Swings - swinging your arms to increase shoulder mobility.
- Strength exercises and working with rubber bands.
- Flexibility exercises that increase range of motion.
- Stretching and cool down.
It is best to find out whether you need dry swimming lessons from a trainer. Typically, such techniques are required by professional athletes, but can also be useful for adult amateurs. For example, to understand the principle of movement in water and practice the technique of swimming breaststroke, crawl or butterfly.
Breathing while swimming
You need to learn to breathe correctly from the very first training. This is the key to success in mastering more complex techniques.
Breathing is the most important point in swimming. With the correct technique, take a deep breath through your mouth and exhale through your nose into the water. If we inhale and exhale through our mouths, we will be able to float on the water, but the air supply in our lungs will be used up faster.
The biggest risk of using the wrong technique is that water can get into your nose. This is something many people who learn to swim are afraid of. Exhaling through the nose provides protection from water entering the lungs.
Inga Sologub, swimming instructor
You need to train your breathing in a pool or in shallow water, if we are talking about open water.
There are several exercises for this.
- Inhale through your mouth, drawing more air into your lungs, not through your cheeks. Submerge your face under the water and exhale through your nose. Try to gradually increase the duration of exhalation and decrease the inhalation.
- Repeat this exercise while lying on the water. To begin with, it is better to stick to the side. Take short breaths and slow exhales into the water.
- A more advanced type of breathing training when swimming: sharply raise your head above the water, take a short breath and exhale slowly.
- If you have a swimboard, you can do this exercise: hold on to it with one hand and use your legs. Every three seconds, turn your head to one side to inhale quickly and to the other to exhale long.
Such exercises not only help you understand the principle of proper breathing while swimming, but also develop your lungs.
I want to be able to swim: where to start?
Before learning how to swim in a pool properly, prepare everything you need for training:
- Buy a sports swimsuit or swimming trunks, a head cap, glasses;=. Please note that glasses sometimes sweat, and you need to be prepared for this situation.
- Find a good sports complex where, in addition to the main one, there is a shallow pool in which you can learn to stay afloat. The maximum water level is chest-deep. In this case, you will feel safe, which means you will behave freely and relaxed. Learning to swim will be more comfortable;
- At this stage you should learn to breathe correctly. In all techniques, inhale through the nose, and exhale through the mouth and nose into the water. By the way, remember, it is the air in the lungs that keeps the body on the surface.
We recommend performing a special exercise that develops the lungs: take a deep breath of air, filling your lungs to capacity, then immerse yourself vertically in the water and slowly exhale the oxygen. Do 10-15 repetitions.
- Before starting your workout, warm up - on land and in the pool. 10 minutes is enough for the muscles to warm up and warm up.
How to float
Our body itself knows how to float on water: thanks to our lungs, we can stay afloat and not drown. Once you realize this, it will be much easier for you to learn. And to consolidate the skill, there are simple exercises.
Exercise "star"
The “star” is performed on the back or chest. The exercise helps you understand that with the correct body position you can lean on the water. The “star” on the chest is done like this:
- Go into waist-deep water.
- Raise your hands and take more air into your lungs.
- Push off the bottom and lie with your chest on the water.
- Extend your arms and legs to the sides. The face should be facing down.
Don't be afraid - the air in your lungs will keep you on the surface. The main thing is to straighten your limbs and spine. In this position, like a starfish, you will increase the area of pressure of your body on the water and will not sink under your own weight.
The exercise can be complicated: raise your head while lying on the water. Buoyancy will decrease, but you will understand that swimming with your head under the water is much more convenient.
For the “star” on your back, the execution algorithm is approximately the same: inhale deeply, lie on your back in the water, stretch your arms and legs in different directions. This option is a little more complicated, but it is a good way to overcome your fear of water.
Float exercise
“Float” helps you feel that thanks to the air in your lungs, your body can stay afloat regardless of your weight. Despite this, experts advise doing the exercise at shallow depths: the water should reach up to your chest, so that if something happens, you can immediately straighten up and rest your feet on the bottom.
You need to do the exercise like this:
- Take a deep breath.
- Pull your knees to your chest, clasp your hips with your hands.
- Lower your head under the water and press it to your knees.
- Don't panic, let the water push you to the surface.
Thanks to the air in your lungs, your body will turn its back upward and you will begin to float up like a float. You just need to find balance and slowly exhale the oxygen supply. And to avoid the temptation to take a breath, you can pinch your nose with a special clothespin.
How to stop being afraid of water?
Learning to swim for beginner adults from scratch always starts with overcoming their fear of water. Consider the following tips:
- Conduct your first lessons in a shallow pool;
- Get used to being in the water, first go waist-deep, then chest-deep;
- Do simple exercises - walking, bending your body, swinging your legs, arms, jumping, etc. Feel the resistance of the liquid, its temperature, density, consistency and other physical parameters;
- Sit down, immerse your head under the water, stand up;
- Next, it’s time to learn to hold your breath;
- Find a companion who has already learned to swim. Let him do nothing, just be nearby. This will make you feel more comfortable;
- Purchase or borrow from the sports complex special equipment for learning to swim - boards, loops, rollers. At the initial stage, they will help to overcome fear, and in the future, to perfect the technique;
- If possible, hire a trainer. At least for the first 2-3 lessons.
What you need for swimming: equipment and accessories
There are not so many mandatory things to do in the pool:
- swimsuit or swimming trunks;
- cap;
- towel, shampoo and shower gel;
- rubber slippers.
Young swimmers are advised to take children's swimming goggles. For training in the sports section, you can even buy a good model with a seal.
Some accessories are not required to be purchased. To figure it out, we made a table.
| Swimming trunks or swimsuit | Necessarily | It is better to choose a sports model. Beach shorts and swimsuits impair maneuverability in the water. |
| Mask | Not necessary | This is an accessory for scuba diving. |
| A tube | Not necessary | Accessory for snorkeling and diving. Newbies to the pool don't need them. |
| shoulder blades | Not necessary | Needed to practice the stroke, increase its speed and strength. |
| Board | Not necessary | With a board you don’t have to think about how to stay on the water. You can focus on moving your legs. |
| Vest | Required only in open water | The main means of safety in open water. |
| Wetsuit | Not necessary | Useful for diving. |
| Flippers | Not necessary | Can be used when learning to swim breaststroke and crawl. |
| Glasses | Not necessary | They will come in handy to see better under water and protect your eyes from irritation. |
| Oversleeves | Not necessary | Can be useful for learning to swim in open water, especially for children. |
| Nose clip | Not necessary | Prevents water from entering the nose. |
| Earplugs | Not necessary | Prevents water from entering the ear. |
Swimming styles and techniques
There are several basic swimming styles:
- Crawl or freestyle
. In this technique you need to constantly move your legs and make alternating strokes. You can swim crawl on both your front and back. - Breaststroke
_ The arms make powerful strokes underwater, and the legs move like a frog. - Butterfly
. The arms make a powerful stroke, and the legs move like a dolphin's tail.
Swimming instructors say that you can start learning with any style, but the easiest way to start is crawl swimming.
Crawl
Crawl, or freestyle, is the fastest type of swimming and most suitable for beginners. In addition, you can only swim the crawl on your back.
Front crawl swimming technique
When learning to swim front crawl, it is important to master the correct stroke, as well as learn to glide through the water and feel the balance of the body.
You need to keep an eye on the following things:
- Gather your fingers so that your palm turns into a “cup” and row alternately with your right and left hand. It is important not to hit the water, but to plunge your hand smoothly and confidently. To avoid splashing, the thumb should first touch the water, then the entire “cup”.
- Bend your shoulders and elbows at the beginning of the movement and fully straighten at the end. The main impulse of the arm movement should take place under water.
- Move your legs at the same time. The amplitude should be small, and the movements should be free and smooth. There are approximately two to three leg movements per stroke.
- Inhale air and release it into the water as you turn your head towards your raking hand. In this case, the face should always be lowered down, but the body should alternately turn in one direction or the other, depending on the phase of the stroke.
Backstroke swimming technique
Swimming crawl on your back is even easier than swimming on your front: you can row with straight arms, and you don’t need to immerse your face in the water. The main burden falls on the legs.
Basic Rules:
- To breathe correctly, turn your head towards the hand that is currently working above the water. For one inhalation there should be two or three cycles of hand work.
- Do not lift your head above the surface of the water - this will put additional stress on the spine.
- For an effective stroke, raise your elbow above the water.
- Make sure that your legs move evenly and without unnecessary effort. Start moving your legs from the hip, not the knee.
Exercises on dry land
One of the effective exercises for learning crawl on land is leg training:
- Lie on your left side and straighten your legs.
- Make small amplitude swings with your right leg. You should feel the anterior thigh muscle.
You can also work on your hands:
- Lunge forward and lean slightly towards your supporting leg.
- Imitate strokes using both hands alternately.
- Try combining the exercise with breathing.
It is important for professional rabbit climbers to develop strength and endurance. Therefore, there are sets of exercises for them not only on land, but also on water.
Water crawl exercises
To swim the crawl correctly, you need to hone your leg movement technique. Beginner swimmers are advised to use their legs, holding on to the side of the pool and lowering their head into the water.
Technique:
- Straighten your body, stretch your legs and relax them.
- Perform alternating swings with straight legs.
- Periodically raise your head to inhale and exhale slowly into the water.
The training can be gradually complicated: do the exercise with a board, with straightened arms, under water.
For the hands you can make the following link:
- Swim crawl using only one hand. Straighten the second one and press it to your body. The task is to swim 25 meters like this.
- Then swim, rowing with both hands alternately, but observing the following rules:
- Until one hand is completely out of the water to the fingertips, keep the other hand horizontal.
- When one hand reaches the top point, the second begins to move.
- Do not allow your arm to bend prematurely; keep it underwater, extended in front of you. One hand always rushes forward while the other works.
The exercises teach you to move your arms synchronously, maintain a constant speed and horizontal body position.
To practice hand technique, you can do alternating strokes with a board or train with the help of shoulder blades. This equipment helps increase stroke strength.
Advantages and disadvantages
The crawl technique involves constant movement. Because of this, you get tired quite quickly, even though the energy is spent evenly. For example, when swimming breaststroke, the swimmer gets less tired: he makes a movement that gives the body acceleration, and then glides through the water for some time.
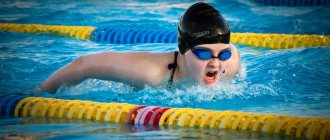
Breaststroke
Rhythmic and fast swimming style. Suitable for long distance swimming. Breaststroke is taught after the beginner has mastered the basics and learned to glide through the water.
Breaststroke technique
All movements are done quickly, almost without pauses. To master breaststroke swimming techniques and build proper breathing, you need to practice. There shouldn't be any problems with your arms, but the specific movements of your legs will take some getting used to.
Here are a few simple rules to help you master the technique:
- Bend your elbows, bring your palms together and raise them to approximately shoulder level. Then extend your arms and make a sharp stroke with your arms underwater.
- Simultaneously with the stroke, push off the water with your feet, like a frog. The legs will give the impulse to accelerate.
- The body will rise above the water - use this moment to inhale. Raise your head, inhale and exhale lower it into the water before your arms make the next stroke. Don't throw your head back, look straight.
The body should be under water in one smooth line from head to toes. To do this, you need to pull in your stomach and relax your spine. A common mistake when learning to swim breaststroke is to leave your head above the water after inhaling - while exhaling, your face should fall under the water.
Exercises on dry land
Imitation on a bench or floor helps to understand the principle of breaststroke swimming.
Practice your leg movements:
- Stretch out with your legs straight and closed.
- Bend your knees and pull them towards you, pointing your toes out.
- Push your legs and return to the starting position.
Exercises for swimming breaststroke in water
In the water, practice your leg movements by holding on to the side or using a board: “turning off” your arms, you focus on the movements of your legs. Remember to raise your head as you inhale and lower it under the water as you exhale.
Advantages and disadvantages
You can learn breaststroke swimming on your own if you have good coordination of movements. It is not easy to develop synchronicity between arms and legs; you need some experience in communicating with water.
Breaststroke works well on the shoulder girdle, pectoral muscles and legs. But the spine practically rests, which is especially useful for people with bad backs.
Footwork training technique
On the land
Imitation of movements
Lie on your stomach and try doing movements that imitate footwork :
- starting position - the body is completely horizontal and extended (ideally, arms are extended forward, but most importantly, legs are extended straight);
- knees should be closed ;
- the legs are bent and pulled up, the feet are spread apart and pulled away from you ( the knees do not spread! );
- a push is made ;
- the legs, being straightened, close and return to their original position.
Exercise “One-two-three”
A somewhat similar exercise, but allowing you to understand the dynamics of movements - we perform movements in three counts with a “one-two-three” rhythm:
- at once - pulled up,
- on two - they took a shot,
- on three - closed.
This method is well illustrated in this tutorial video:
In water
Training on board
We take the side with our hands, lower our head into the water, the body should move horizontally.
We perform the same strikes as we trained on land.
Swimming with a board
We take the board in our hands and begin to swim only by kicking .
At first you will swim very slowly - don’t be discouraged and continue to build up the distance. The more pools you swim back and forth, the more efficiently your legs will begin to work.
The plank in this exercise allows you not to worry about body position, arm movements and focus exclusively on the movements of the lower extremities.
Swimming with a board allows you to focus on lower body work
During this exercise, the face should be lowered into the water, and to exhale, rise out of the water.
A possible variation of this exercise is to swim with your arms extended forward, but without a board.
It is recommended to do this task until you feel that the kicking technique is working out - only then should you move on to learning strokes.
Butterfly
Butterfly is a type of swimming in which all parts of the body move simultaneously. Because the legs are closed and their movements resemble those of a fish's tail, this technique is also called dolphin swimming. This style is considered the most energy-intensive.
Butterfly swimming technique
When swimming butterfly, the body constantly moves up and down: when the shoulder girdle lowers for the stroke, the lower back rises. And as the shoulders rise, the lower back sinks under the water. The technique is quite complex, so it is better to master it with a trainer.
Here are the basic rules:
- Extend your arms forward with your fingers closed. Then spread your arms out to the sides, keeping your elbows higher than your forearms. A stroke will occur, the body will rise above the water. At this moment you need to inhale.
- Bring your hands closer to your pelvis, then lift them above the water and quickly move them forward for the next stroke.
- Push with your legs closed, slightly bending your knees.
- For each stroke there are 4 kicks - down-up, down-up. The first two movements raise the head and shoulders, the second - the lower back.
The swimmer periodically lifts his chest out of the water to inhale. At the same time, breathing should also be rhythmic.
Exercises on dry land
Exercises to better understand leg movements:
- Stand with your back to the wall on one leg. Pull the second one forward slightly.
- Squat down, bending your supporting leg at the knee.
- Straighten your supporting leg and tilt your pelvis back.
- Take your other leg back and move your pelvis forward.
The legs move underwater during swimming using the same principle.
Exercise to practice body movements:
- Stand with your back to the wall at a distance of 20 cm.
- Bend over so that your shoulder blades touch the wall.
- Round your spine and “roll” it along the wall from your neck to your lower back.
- Touching the wall with your buttocks, straighten up and then bend at the waist.
Such a wave will help you understand how the body should move from the chest to the tailbone.
Exercises in water
To teach wave-like movements, you can do the following exercise:
- Take air into your lungs and lie down with your chest on the water. Keep your head straight, look down, relax your neck, stretch your arms in front of you.
- Make a stroke, describe a semicircle with your arms and press them to your body. Then bend your elbows slightly.
- Make a wave with your body from head to toe and at this moment return your arms to their original position, moving them forward above the water.
Advantages and disadvantages of the butterfly style
This is a very beautiful type of swimming, but the technique is difficult to learn and perfect on your own. But the instructor can explain everything quickly enough.
Hand work
Correct hand technique when swimming freestyle consists of the following phases:
- Capture or support phase;
- Pull-ups;
- Repulsions;
- Exit;
- Carrying;
- Influx.
Let's take a closer look at each of the phases of hand work.
Capture phase or support phase
First of all, let's define the term “capture”. The grip is the moment of movement in which you cling to the water with your brush.
The capture phase is very short. It lasts from the moment the stroke begins until approximately the moment indicated in the photo below:
The hand in the grasping phase travels approximately 25-30 centimeters. Let's look at the sequence of movements and points to pay attention to:
- Starting position – the rowing hand lies on the water, representing a straight line of continuation of the body
- The beginning of the capture. The arm begins to bend at the elbow while grasping
- The hand remains level throughout the entire grip phase and does not bend in relation to the forearm.
- The elbow during the grip, when the forearm is already gripping, is kept as high as possible to the surface of the water
- When gripping, the hand passes close to the line of the middle of your body
During the grip phase, control of a straight hand is important. To strengthen your wrist, you can do the following exercise:
Pull-up phase
This phase of the stroke begins immediately after a few centimeters of arm movement in the catch phase.
It looks like this: imagine a swimmer lying horizontally in the water with his arms extended forward. Now this athlete begins to bend his arm at the elbow, but without bending the hand (the hand remains an even continuation of the forearm) and, very IMPORTANT , without lowering the elbow down or pressing it to the body. A small movement of the hand and forearm along the line of the middle of the body, turning into a bend of the arm with the shoulder. Let's look at the sequence of movements and the points that you need to pay attention to in the pull-up phase:
- Starting position - the rowing arm is bent 25-30 centimeters after the capture phase and is located on the line of the middle of the body
- The hand and forearm move along the line of the middle of the body towards the pelvis. The elbow remains higher than the hand
- The angle between the forearm and shoulder is 90 degrees.
Watch the video of the exercise for practicing the grip and pull-up phase with an expander and it will be easier for you to understand what exactly the points above are about (from the beginning to 36 seconds):
A couple of exercises to develop the technique of the pull-up phase.
Exercise with a rubber band expander (as in the video above)
- Attach the expander in front of you to a wall bars, or to a door handle, or to a tree. For anything in general.
- Pull back until you feel a moderate stretch.
- Lean forward so that your body is horizontal, as if you were swimming.
- Stretch your arm forward that holds the expander and imitate the grip phase. The expander creates additional resistance which helps the muscles remember the movement better. Video exercises:
Wall exercise
- Stand with your back to the wall
- Raise up the hand whose technique you will practice
- Press the elbow of this hand against the wall
- Perform the rowing motion without lifting your elbow from the wall
Repulsion phase
After pulling up, the hand continues its movement and strives for an even and parallel position relative to the body. What you should pay attention to when practicing:
- The hand is still level relative to the forearm
- The hand continues its movement along the line of the middle of the body
- In the final push-off phase, the arm is aligned at the elbow
A common mistake is to enter the swing phase early without completing the push-off phase. Only after the arm is fully straightened, when it is parallel to the body, can the push-off phase be considered complete.
In the Soviet Union, swimmers were specially smeared with brilliant green on their thighs. Those who correctly performed the push-off phase ran their hand along the thigh to emphasize the end of the movement. By the end of the training, proof of correct movement was the absence of green on the athletes’ thighs.
Video exercise for practicing the push-off phase with an expander:
Exit phase
The phase begins from the moment the hand appears above the water after the repulsion phase. The task of the exit phase is to prepare the hand for the carry.
The hand rises above the water from the elbow. First the elbow rises, and then the hand. At this time, the opposite arm lies extended and stretches forward in front of the body, which in turn creates a slight rotation of the body towards the outstretched arm. So, what to pay attention to:
- First the elbow comes out of the water, and then the hand
- At the moment the elbow comes out, the opposite hand is already reaching forward
- The body rotates towards the arm extended forward
Carrying
The sweep is performed at the same time as the other hand performs the stroke. This is a synchronized movement where the hand that carries out the sweep increases its speed from slow when the hand exits the water to fast at the moment of entry. The hand can be relaxed during the swing phase and does not need to be kept level with the forearm.
Key points of the carryover phase:
- Performed while the other hand is rowing
- The speed of the hand at the beginning of the stroke is lower than the speed of the hand at the end of the stroke
- The hand is relaxed until the hand enters the water
Rush phase
The influx occurs after the carry and before the capture begins. In this phase, the swimmer plunges the hand that completed the sweep into the water. First the hand goes in, then the elbow goes in. At the moment of immersion, the arm straightens, reaches forward, the hand tenses and becomes an extension of the forearm, preparing to begin the capture phase. At the same time, the opposite hand ends the push-off phase and the swimmer’s body performs a slight rotation towards the front hand.
Key points of the influx phase:
- First the hand enters the water, and then the elbow
- The hand reaches forward as far as possible after being completely immersed in water
- The hand tenses, becomes even in relation to the forearm
- The body makes a slight roll towards the front hand
A beginner who has mastered breathing and footwork techniques can begin to master hand techniques. If you are a beginner swimmer
Swimming: safety precautions
Follow simple safety rules in the pool:
- Listen to the instructor or coach. He will tell you when you can enter and exit the water.
- If you have to share the path with another person, keep to the right, as if driving a car.
- Swim with a cap.
- Do not jump into the pool from the side.
- You should also not push, make noise or create obstacles for other swimmers.
- To avoid slipping, wear rubber slippers and do not run along the pool.
In open water, you can swim only in specially equipped and marked places, without swimming beyond the buoys. You should not dive in unfamiliar places and try to compete with the waves. Remember that a pond is not the best place to learn to swim, especially without an instructor.
Why is swimming in the pool harmful?
There are usually a lot of people in the pool, so you should take care of your personal hygiene in advance. Be sure to bring slippers with you so as not to catch a fungus or other infection.
The second disadvantage of swimming pools is the chlorine used to purify the water. True, there are now other water purification systems, but this is quite rare. Bleach is bad for your hair, skin and nails, so wear a swimming cap and special goggles to avoid red eyes.
- 234 216
More details - 162
More details
- 540
More details
- 218
More details
Memo
- The best way to learn to swim is to practice constantly.
- The fastest way to learn to swim is to use the services of a coach.
- If you are afraid of water, use a circle, a board and other accessories until the fear passes.
- After training, dry the inside of your ears well to avoid developing otitis externa - “swimmer’s ear.”
- Swimming strengthens the muscles of the whole body, so at first they will hurt. To reduce pain, you can combine swimming training with stretching.
Strengthens the cardiovascular system
Swimming strengthens every muscle in your body, including your heart. The aerobic nature of swimming strengthens the heart and its job of pumping blood throughout the body. Water creates additional pressure on the body, which increases blood flow to the heart.
In addition, research shows that aerobic exercise enhances the body's immune response to inflammation, thereby reducing the risk of heart disease. If you swim just 30 minutes a day, you can reduce your risk of coronary heart disease by 30 to 40 percent, according to the American Heart Association. Doctors recommend swimming for pregnant women as a means of strengthening the immune system and improving blood circulation, which is very important during this period.
Additionally, aerobic exercise is considered effective in lowering blood pressure. According to numerous studies, 3 times a week for 30 minutes will be enough to significantly reduce blood pressure. Another study found that regular swimming could reduce a person's heart rate for 10 weeks.
Finally, regular swimming reduces the level of bad cholesterol (LDL) in the blood and increases the level of good cholesterol or HDL. Not in the pool yet?