The popularity of eccentric training began to increase in the early 21st century. Until the end of the last millennium, this type of training was practiced much less frequently. This is due to the fact that athletes suffer the most injuries during eccentric loads. Today, eccentric training is used not only as an effective way to build muscle mass, but also in rehabilitation or injury prevention.
Initially, interest in eccentric loads was aroused in the 70s of the 20th century by articles by Arthur Jones published in popular sports magazines. There Jones described the tactics of eccentric training, and later even developed special simulators.
Eccentric training - what is it?
Conventionally, all exercises are divided into two stages - concentric and eccentric. Both stages involve muscle contraction, only at the concentric stage the muscle shortens, and at the eccentric stage the muscle lengthens.
The simplest example is an exercise with a barbell - when lifting the barbell, a concentric contraction occurs, and when lowering it, an eccentric contraction occurs.
Both stages are designed to provoke an increase in muscle volume, but the effect of eccentric loads is more productive. Research shows there are two explanations for this:
- Phosphatidic acid is a chemical compound produced by the body when a muscle is stretched. The compound activates the production of muscle protein, which promotes muscle gain;
- satellite cells are “dormant” cells located in the outer region of the muscles. During eccentric exercise, tissue is often damaged. It is the damage that “awakens” the satellites - the cells are attracted to the affected area and are transformed into muscle fibers, becoming part of the muscles.
Special ballistic exercises at different stages of sports training
It must be said that maximum muscle work in ballistic mode requires preliminary strengthening through strength and stretching exercises. The first stage of the preparatory period is especially suitable for this.
It is especially important to strengthen muscles through special ballistic exercises performed in a very large volume, but with moderate and slightly higher intensity.
This will create a special foundation, allowing on its basis to significantly increase the level and effectiveness of movements performed in ballistic mode with maximum effort.
Such a foundation should be laid in the second stage of the preparatory period.
Ballistic exercises at maximum intensity should be used to a small extent at the end of the preparatory period and significantly more during the competition period.
During the competitive period, it may be advisable to alternate stages with an increased number of special ballistic exercises and devoted primarily to work of a strictly competitive nature.
At the stage of immediate pre-competition preparation before the culminating competition, the use of special ballistic exercises should be limited, as they can contribute to an excessively high increase in nervous excitability.
Advantages of the training
Eccentric training is an effective tool for building muscle, preventing and relieving the consequences of injuries. Main benefits of exercise :
- increase in muscle volume . To hypertrophy, muscles must first be damaged. During intense eccentric training, damaged areas are repaired by satellite cells. They donate their nucleus, increasing the concentration of myosin and actin in the sarcomere. Thus, the muscle grows in diameter;
- increase in muscle strength. During eccentric training, power and explosive strength increase;
- improved flexibility. Regular eccentric loads can increase the range of motion of the joint, as well as the length of the muscle;
- injury prevention. Training provokes muscles to adapt to new loads. Over time, the muscles reach an acceptable stretch, which reduces the risk of injury;
- acceleration of metabolism. Eccentric training speeds up your metabolism. This feature of the training will be useful for those who want to lose weight through strength exercises.
Eccentric training is also effective for athletes who have reached a training plateau. Studies have proven that the “awakening” of satellite cells contributes to a rapid shift in muscle hypertrophy towards increase.
Optimal eccentric phase stretch time
During experiments with eccentric training, many athletes slowed down the negative phase by up to 6 seconds. But such delays did not bring the expected results; excessive hypertrophy could not be achieved.
Scientists have come to the conclusion that fast eccentric repetitions are much more effective than slow ones and are better at stimulating growth factors - the reproduction of satellite cells and the production of muscle protein.
This phenomenon is explained by “cross bridges” formed when myosin joins actin. Without this connection, muscle contraction is impossible. A large number of “bridges” protect muscle tissue from damage. With slow movement in the eccentric phase, the body has more time to create “bridges.” Reduced tissue trauma leads to a reduction in muscle protein production and a decrease in the number of active satellites.
Based on these facts, experts have established the optimal “stretching” time for the eccentric phase – from 1 to 3 seconds.
Optimal eccentric lowering weight
An experiment was conducted in which powerlifters participated.
They pressed the same weight, first focusing on the concentric phase, then on the eccentric phase. When comparing training results, it turned out that the difference in muscle mass growth tends to zero. This proves that in order to be productive with eccentric training, you must lift more weight than can be lifted during concentric training. A person is able to lower a projectile approximately 70% heavier than the one he can lift.
The weight recommended by trainers for eccentric training is 100-170% of the working maximum.
Incorporating eccentric loads into your training program
Virtually any exercise can become eccentric, you just need to increase the period of muscle stretching. Examples of exercises:
- push-ups - slow down the lowering of the body, speed up the rise;
- pull-ups - grab the horizontal bar while jumping, then slowly straighten your arms, holding your own body weight;
- squats - slow down, hold the squat briefly, then quickly stand up.
To avoid injury to muscles and joints, the concentric phase must be performed quickly but smoothly.
If the athlete’s goal is to achieve an increase in muscle mass and an increase in absolute strength, then the emphasis is on exercises with lowering maximum weights.
Do not immediately start with your maximum weight - this can lead to serious injuries.
Experts recommend starting with developing the skill of “controlled lowering.” Simply put, you first need to learn how to lower the weight in the time that you planned in advance.
After acquiring the skill of lowering the weight under control, you can begin eccentric exercises using 70% of the maximum weight. Gradually increase the weight to the eccentric limit.
Since the training takes place using super-heavy loads, it is necessary to work in pairs. For example, in an exercise with a barbell, a partner first helps lift it and then controls its lowering.
Intense training of this kind causes delayed pain that can last for several days. Therefore, until the muscles fully adapt to the loads, it is not recommended to repeat the exercises more than once a week.
Overcoming mode of muscle work
Since the effectiveness of sports actions is determined primarily by the overcoming mode of muscle work , it should be the main thing in the development of strength. At the same time, in the inferior mode, you can demonstrate a force of 120-140% or more relative to the maximum. This is of great interest for teaching the ability to manifest such enormous power. However, progress in the development of strength in this mode is somewhat lower than in the overcoming mode (A.S. Medvedev, A.N. Vorobyov). It is believed that the greatest effect in developing the ability to show strength can be achieved with a yielding-overcoming mode, including the use of muscle elasticity.
Force. Guidelines for developing strength // Ozolin N. G. Coach’s handbook: The science of winning / N. G. Ozolin. - M.: Astrel-AST, 2003. - 863 p. (Profession: trainer).
Comparison of eccentric and concentric training
There have been many studies comparing the effects of concentric and eccentric strength training.
Each demonstrates the benefits of eccentric training for accelerating muscle gains and power. For example, one study found that one day after eccentric training, the number of satellite cells increased by 27%, while after concentric training it remained unchanged. In this case, satellites are formed exclusively in muscle fibers capable of rapid growth, that is, they contribute to rooted hypertrophy.
Eccentric training is effective for building muscle mass and absolute strength, and can adapt and protect muscles from serious injury. At the same time, such training is dangerous and should be done exclusively under control, using the recommendations of a trainer. With the right approach to training, the result will not take long to arrive.
ECCENTRIC EXERCISES
Classification
Eccentric exercises (EC) can be divided into three groups:
Group 1. Eccentric contraction (EC) with deceleration, that is, the highest contraction speed at the beginning of the movement. The exercise approach ends when movement control deteriorates. An example is Heavy Eccentric Training (HET).
Group 3. Cyclic eccentric exercises.
The main difference between the first two groups of exercises is the use of the energy of elastic deformation of tissues. In the first group, SSC is not used or its influence is limited. For health training, especially at the first and second stages, it is advisable to use exercises of the first group. The second group of exercises will not be considered in this book, since it includes motor actions related primarily to sports training.
The third group of exercises has not yet found wide application in health training. Specialized bicycle ergometers are not offered by exercise equipment manufacturers, and negative treadmill incline angles are rarely used by trainers to train clients, despite the obvious advantages of this type of exercise and the opportunity to add variety to the training process.
The first group of exercises can, in turn, be divided into eccentric and combined exercises. In eccentric exercises proper, only eccentric contraction is performed, and combined exercises involve a combination of concentric (CS) and eccentric contraction with an emphasis on ES. Combined exercises are more suitable for self-study. One of the main limitations due to which eccentric exercises themselves are not included in the training process is the need for at least one assistant to perform them.
Practical use
Eccentric exercises of the first group became widespread in rehabilitation, as well as in the conservative treatment of tendinopathy, in the 90s. Currently, research into the effectiveness of EC is ongoing. A factor that has a negative impact on the use is the need for a high level of motivation of the client (patient) using ES, as well as the lack of recommendations regarding the frequency and progression of the load, the influence of the intensity and volume of the load
The study compared two work-equivalent load schemes performed in 12 sets: 10 maximum contractions per set and weighted at 50% of the maximum eccentric force. Differences were found only in muscle performance, which was greater in the group with high EI intensity. Soreness and increased muscle stiffness were similar in both cases. The authors concluded that exercise volume has a greater impact on subsequent muscle recovery than intensity. Thus, when including ES in a lesson, it is advisable to adhere to the minimum volume values and maximum intensity values. For example, in a workout aimed at increasing muscle mass - 2-3 sets of 2-3 exercises with a load of 90% RM.
Biomechanical features of eccentric exercises
According to the results of one of the latest literature reviews, the force produced during ES is independent of the speed of contraction. The reason for the discrepancies in the force-velocity relationship between in vivo and in vitro models are factors that accompany contraction under real-world conditions, such as differences in neural activation of antagonist muscles, biomechanical force arms, and/or antagonist co-contraction.
Muscle activation by the central nervous system during SE likely contributes to higher force efficiency. The cortex is active earlier and at a higher intensity during ES, while the EMG signal amplitude is lower during ES compared to concentric isokinetic and cycling exercises, which are performed at similar mechanical power. Thus, the tension developed by each active muscle fiber and/or the tension generated in the connective tissue structures is higher during ES, resulting in a greater overall force output.
influence on metabolism and the response of the cardiovascular system
With similar mechanical power, cardiac output and heart rate response are lower during ES compared to concentric muscle work, due to the lower metabolic demand during ES. If eccentric and concentric exercises are performed with similar cardiac output and heart rate response, it is higher with EC than with traditional concentric exercises. The immediate response depends on the type of exercise and appears to be greater with a stationary bicycle (perhaps the optimal form) than with walking or running. Particular attention should be paid to this when the intensity of the load is controlled by FGS.
BAR SQUAT
INITIAL POSITION
Stand with a barbell resting on your shoulders and trapezius muscles. Hands and feet shoulder width apart. Keep your head straight and maintain a natural arch in your lower back.
MOVEMENT
Bend your knees and hips and squat down, pushing your butt back. When your thighs are parallel to the floor, begin the reverse movement, pushing vigorously through your heels to straighten to the starting position.
FRONT SQUAT
INITIAL POSITION
Stand with a barbell across your shoulders and upper chest, grasping the bar with an Olympic or crossover grip. Hands and feet shoulder width apart. Keep your head straight and maintain a natural arch in your lower back.
MOVEMENT
Perform a squat by bending your knees and pushing your pelvis back until your thighs are parallel to the floor. Then vigorously straighten your legs, rising to the starting position.
SQUATING IN THE SMITH MACHINE
INITIAL POSITION
Stand in a Smith machine with a barbell resting on your shoulders and trapezius muscles. Hands wider than shoulders. Rotate the bar to release it.
MOVEMENT
With your chest out, head up, and back slightly arched, bend your knees and hips as if you were sitting in a chair until your thighs are parallel to the floor. Begin the reverse movement by pushing vigorously through your heels and pushing your hips forward to straighten to the starting position. Note: This exercise can be performed with a barbell in front.
SQUAT WITH DUMBBELLS
INITIAL POSITION
Stand with dumbbells with a neutral grip. Hands shoulder width apart. Keep your head straight and maintain a natural arch in your lower back.
MOVEMENT
Bend your knees and hips and squat down, pushing your butt back. When your thighs are parallel to the floor, begin the reverse movement, pushing vigorously through your heels to straighten to the starting position.
ONE LEG SQUAT
INITIAL POSITION
Stand with a barbell resting on your shoulders and trapezius muscles, with your hands shoulder-width apart. Place the top of your left foot on a bench placed behind you at a distance of 2-3 feet (about half a meter to a meter). Keep your head straight and maintain a natural arch in your lower back.
MOVEMENT
Bend your right knee and hip and squat down until your thigh is parallel to the floor. Begin the reverse movement by vigorously pushing through your right heel to straighten up to the starting position. Complete the required number of repetitions and then repeat the exercise with your left leg.
Note. This exercise can be performed with dumbbells.
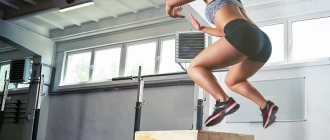
JUMP SQUAT
INITIAL POSITION
Stand with a barbell resting on your shoulders and trapezius muscles. Hands and feet shoulder width apart. Keep your head straight and maintain a natural arch in your lower back.
MOVEMENT
Bend your knees and hips and squat down, pushing your butt back. When your thighs are parallel to the floor, begin the reverse movement by pushing vigorously through your heels and balls of your feet, trying to jump as high as possible. Land with your knees slightly bent and immediately squat down for the next rep.
Note: This exercise can be performed with dumbbells.
HACK SQUAT WITH A BAR
INITIAL POSITION
Stand with your feet shoulder-width apart. Hold the barbell shoulder-width apart and lift it from behind to hip level. Keep your head straight and maintain a natural arch in your lower back.
MOVEMENT
Bend your knees and hips and squat down, pushing your butt back. When your thighs are parallel to the floor, begin the reverse movement, pushing vigorously through your heels to straighten to the starting position.
JEFFERSON SQUAT
INITIAL POSITION
Stand so that the barbell lying on the floor is located between your legs. Grab the bar with one hand from the front, the other from the back, with your hands wider than shoulder-width apart, and lift the barbell.
See also: Exercise machine for home: how to choose it?
MOVEMENT
Bend your knees and hips and squat down, pushing your butt back. When your thighs are parallel to the floor, begin the reverse movement, pushing vigorously through your heels to straighten to the starting position.
ZERCHER SQUAT
INITIAL POSITION
Place the barbell in the crook of your arms, crossed at waist level, with a shoulder-width grip.
MOVEMENT
Bend your knees and hips and squat down, pushing your butt back. When your thighs are parallel to the floor, begin the reverse movement, pushing vigorously through your heels to straighten to the starting position.
LEG PRESS
INITIAL POSITION
Sit in an incline leg press machine and place your feet at shoulder height on the foot pad. Release the stoppers and support the weight with your legs.
MOVEMENT
Slowly lower the weight, bringing your knees closer to your chest, and stop when your knees are bent at a 90-degree angle. Hold this position and then lift the weight back to the starting position, keeping your legs completely straight but not locking your knees.
ONE LEG PRESS
INITIAL POSITION
Sit in an incline leg press machine and place your left foot in the center of the foot pad and place your left foot on the floor. Release the stoppers and support the weight with your left leg.
MOVEMENT
Slowly lower the weight, bringing your left knee closer to your chest, and stop when your knee bends at a 90-degree angle. Hold this position and then lift the weight back to the starting position, fully straightening your leg without locking your knee. Complete the required number of repetitions and then repeat the exercise with your right leg.
LEG PRESS ON A HORIZONTAL MACHINE
INITIAL POSITION
Lie down on a horizontal leg press machine with your back flat on the mat and your shoulders under the shoulder pads. Place your feet at shoulder level on the footrest. Release the stoppers and support the weight with your legs.
MOVEMENT
Slowly lower yourself toward the foot pad, bringing your knees toward your chest, and stop when your knees are bent at a 90-degree angle. Hold this position and then rise to the starting position, fully straightening your legs without locking your knees.
HACKENSCHMIDT SQUATS
INITIAL POSITION
Sit in the Hackenschmidt machine and place your feet at shoulder level on the footrest. Release the stoppers and support the weight with your legs.
MOVEMENT
Slowly squat until your knees are bent at a 90-degree angle, a little more. Push through your heels to rise to the starting position and fully straighten your legs, but do not “lock” your knees.
LUNCHES
INITIAL POSITION
Stand with a barbell resting on your shoulders and trapezius muscles. Hands shoulder-width apart, feet together. Keep your head straight and maintain a natural arch in your lower back.
MOVEMENT
Step forward with your right foot, starting from your heel, and squat down, controlling the speed of your movement. Lower yourself until your left knee is close to the floor. Then push off with your right foot and return to the starting position. Repeat the exercise with your left leg and perform the required number of repetitions, alternating legs.
Note. This exercise can be performed with dumbbells.
WALKING LUNCHES
INITIAL POSITION
Stand with a barbell resting on your shoulders and trapezius muscles. Hands shoulder-width apart, feet together. Keep your head straight and maintain a natural arch in your lower back.
MOVEMENT
Step forward with your right foot, starting from your heel, and squat down, controlling the speed of your movement. Lower yourself until your left knee almost touches the floor. Then push your right foot forward and stand on your right foot. Place your left leg and repeat the exercise with your left leg. Perform the required number of repetitions, alternating legs.
Note. This exercise can be performed with dumbbells.
LUNCH SQUAT
INITIAL POSITION
Stand with a barbell resting on your shoulders and trapezius muscles. Hands shoulder-width apart, feet together. Keep your head straight and maintain a natural arch in your lower back. Take a wide step forward with your right foot. The left heel should lift off the floor.
MOVEMENT
Squat down, bending your right knee and lowering your left knee toward the floor. Rise to the starting position. Complete the required number of repetitions and then switch legs.
Note. This exercise can be performed with dumbbells.
STEP
INITIAL POSITION
Place a step platform or knee-high bench in front of you and hold dumbbells in both hands. Feet hip-width apart in a comfortable position.
MOVEMENT
Place one foot on the platform and use your thigh muscles to lift yourself up. Place your other foot on the platform and then step down in reverse order. Make sure to keep your torso upright and maintain a natural arch in your lower back. Alternate legs with each repetition.
LEG EXTENSION
INITIAL POSITION
Adjust the seat back and foot platform of the machine so that your knees are at the edge of the seat and your ankles are under the foot rests or rollers. Press your back firmly against the back of the seat.
MOVEMENT
Grasp the handles or the edge of the seat at your hips with your hands and, keeping your torso upright, lift your legs until they are fully extended. Tighten your quadriceps muscles and then slowly and smoothly lower your legs to the starting position.
LEG EXTENSION ON A CABLE TRAINER
INITIAL POSITION
Place the strap around your left ankle and attach it to the lower pulley. For stability, grab the machine's counter with your hands and lift your hip at a 45-degree angle. The knee should be bent at a 90 degree angle.
MOVEMENT
Extend your lower leg forward and upward until it is completely straight. Squeeze your quadriceps muscles for a second and then return your leg to the starting position. Complete the required number of repetitions and then repeat the exercise with your right leg.
ROMAN DEADLIFT
INITIAL POSITION
Stand with your feet shoulder-width apart and your knees slightly bent. Using an overhand grip shoulder-width apart, grab the barbell and lift it to hip level.
MOVEMENT
Lean forward, bending at the hips and pushing your pelvis back, and lower the barbell to the middle of your ankles. Slowly straighten up while lifting the barbells? to the starting position.
ROMAN DEADLIFT WITH DUMBBELLS
INITIAL POSITION
Stand with your feet shoulder-width apart and your knees slightly bent. Using an overhand grip shoulder-width apart, grab the dumbbells and lift them to hip level.
MOVEMENT
Lean forward, bending at the hips and pushing your pelvis back, and lower the dumbbells to the middle of your ankles. Slowly straighten up, raising the dumbbells to the starting position.
LIFTING THE TORSO
INITIAL POSITION
Kneel on the floor with a soft pillow to protect your knees. Place your ankles under a support or have a partner press your ankles to the floor. The torso and hips should be in an upright position, with the knees bent at an angle of 90 degrees.
MOVEMENT
Slowly straighten your legs, tilting your torso and hips forward. Using your biceps muscles, return to a vertical position.
Note. There is a special machine for this exercise, but it can only be found in a few gyms.
REVERSE HIP EXTENSION
INITIAL POSITION
Lap face down on a horizontal extension bench. Grasp the footrests with your hands to support your upper torso on the bench. Your legs should hang freely over the edge of the bench at a 90-degree angle.
MOVEMENT
Extend your hips to raise your legs parallel to the floor. Hold this position for a second and then lower your legs to the starting position.
LEG RAISES ON A CABLE TRAINER
INITIAL POSITION
Stand facing the cable machine and place the cuff attached to the lower pulley on your left ankle. For stability, hold on to the stand of the machine with your hands.
See also: Learning breaststroke swimming techniques: photos and videos
MOVEMENT
Keeping your back straight, push your hip back as high as possible. Pause for a second at the top, and then lower your leg to the starting position. Complete the required number of repetitions and then repeat the exercise with your right leg.
LEG BENDING ON A LYING MACHINE
INITIAL POSITION
Lap face down on a machine bench. Place your Achilles tendons under your foot pads so that your knees extend beyond the edge of the bench. For stability, hold onto the handles or the machine bench with your hands. Bend your knees slightly.
MOVEMENT
With your hips flat on the bench, use your biceps femoris to bend your knees and lift your feet toward your butt. At the top point, tighten your thigh muscles, and then slowly lower the lever of the machine to the starting position.
LEG BEND WITH DUMBBELL LYING
INITIAL POSITION
Wrap your feet around the dumbbell and lie face down on a flat bench with your legs fully straightened. For stability, hold your hands on the cushion or legs of the bench.
MOVEMENT
While bending your knees, slowly raise your legs with the dumbbell until they are almost vertical. Slowly lower the dumbbell to the starting position.
LEG BENDING ON A SIMULATOR SITTING
INITIAL POSITION
Sit in the machine with your knees extending over the edge of the bench and rest your ankles on the foot pads. For stability, hold the handles with your hands.
MOVEMENT
Bend your knees, bringing your feet under you and bringing them as close to your buttocks as possible. Hold this position for a second and tighten your biceps femoris muscles. Return your feet to the starting position.
LEG BENDING ON A STANDING MACHINE
INITIAL POSITION
Get into a standing leg curl machine with your left leg under the pad. For stability, grab the handles of the machine with your hands.
MOVEMENT
Slowly raise the weight as high as possible and contract your biceps femoris muscle at the top. Slowly lower the weight to the starting position. Complete the required number of repetitions and then repeat the exercise with your right leg.
LEG BENDING ON A CABLE MACHINE
INITIAL POSITION
Stand facing the cable machine and place the cuff attached to the lower pulley on your left ankle. Step back two or three feet (half a meter to a meter) and lift your left leg at a 45-degree angle.
MOVEMENT
Slowly bend your knee to a 90-degree angle. Hold this position for a second and then return your leg to the starting position. Complete the required number of repetitions and then repeat the exercise with your right leg.
STANDING TOE RAISES
INITIAL POSITION
Stand with your toes on the edge of the foot pad of the calf machine. Rest your shoulders on the pads of the lever device. Straighten your legs and lower your heels as low as possible to the floor to stretch your calf muscles.
MOVEMENT
Using your calf muscles, lift your heels, rising as high as possible on your toes. Hold this position for a second, tensing your calf muscles, and then lower your heels to the starting position.
CALF RAISES IN A POWER FRAME IN A STANDING POSITION
INITIAL POSITION
Stand under a barbell mounted in a power rack just below your shoulders. Grasp the bar with an overhand, shoulder-width grip and lift the barbell up through your shoulders and trapezius muscles.
MOVEMENT
Using your calf muscles, lift your heels as high as possible on your toes so that the bar slides along the racks of the power frame. Hold this position for a second, tensing your calf muscles, and then lower your heels to the starting position.
CALF RAISES IN THE SMITH MACHINE
INITIAL POSITION
Stand under a barbell in a Smith machine. Grasp the bar with an overhand, shoulder-width grip, release the stops, and lift the barbell up over your shoulders and trapezius muscles.
MOVEMENT
Using your calf muscles, lift your heels as high as possible on your toes so that the bar slides along the guides of the Smith machine. Hold this position for a second, tensing your calf muscles, and then lower your heels to the starting position.
FOOT PRESS ON A MACHINE
INITIAL POSITION
Sit in a leg press machine with your feet on the bottom of the leg support so that your heels are lower than the support. With your legs straight, press the footrest away from the stoppers, but do not unfasten them. Point your toes toward your ankles to stretch your calf muscles.
MOVEMENT
Using your calf muscles, lift the weight by pressing the support with your toes. Hold this position for a second, tensing your calf muscles, and then return to the starting position.
DONKEY TOE RAISES
INITIAL POSITION
Stand on the foot platform of a special exercise machine. Bend over so that your torso is parallel to the floor. The forearms rest on the pillow, and the back pillow rests on the lower back. Lower your heels as low as possible to stretch your calf muscles.
MOVEMENT
Using your calf muscles, lift your heels, rising as high as possible on your toes and lifting the pillow resting on your lower back. Hold this position for a second, tensing your calf muscles, and then lower your heels to the starting position.
CALF RAISES IN A MACHINE IN A SITTING POSITION
INITIAL POSITION
Sit in the machine and place your toes on the foot pad so that your heels hang over the edge. Place pillows on your knees and release the weight. Lower your heels as low as possible to stretch your calf muscles.
MOVEMENT
Using your calf muscles, lift your heels as high as possible, resting your toes on the platform. Hold this position for a second, tensing your calf muscles, and then lower your heels to the starting position.
SETTING CALF RAISES WITH DUMBBELLS
INITIAL POSITION
Sit on a horizontal bench with your feet hip-width apart and place your feet on the footrest or block placed in front of you. Place a dumbbell on each knee, supporting them with your hands. Lower your heels as low as possible to stretch your calf muscles.
MOVEMENT
Using your calf muscles, lift your heels as high as possible, resting your toes on the platform. Hold this position for a second, tensing your calf muscles, and then lower your heels to the starting position.
CALF RAISES IN A POWER FRAME IN A SITTING POSITION
INITIAL POSITION
Place a horizontal bench in a power rack and place a foot pad or block (if you don't have one, you can use 25-pound plates) one foot from the bench. Position the stops so that the bar rests on your knees or slightly below when you sit on the bench. Sit on a bench with the bar resting on your thighs (approximately four inches from your kneecaps). The balls of your toes should be on the footpad and your heels on the floor.
MOVEMENT
Using your calf muscles, lift your heels as high as possible, resting your toes on the platform. Hold this position for a second, tensing your calf muscles, and then lower your heels to the starting position.
CALF RAISES IN A SMITH MACHINE IN A SITTING POSITION
INITIAL POSITION
Place a flat bench in a Smith machine and place a foot pad or block (if you don't have one, you can use 25-pound plates) one foot away from the bench. Sit on a bench, release the bar and place it on your thighs (approximately four inches from your kneecaps). The balls of your toes should be on the footpad and your heels on the floor.
MOVEMENT
Using your calf muscles, lift your heels as high as possible, resting your toes on the platform. Hold this position for a second, tensing your calf muscles, and then lower your heels to the starting position.
Authors: Jim Stoppani, Dmitry Sillov
Similar articles
- POSTACTIVATION POTENTIATION (PAP)
- SUPER SERIES
- Research results