Rules for performing the exercise
- Lie on the floor with your feet immobilized or have a partner hold them. Legs are bent at the knees.
- Place your hands behind your head, clasping your fingers at the back of your head. This is the starting position.
- As you exhale, lift your upper torso so that your body assumes a V-shape position.
- Hold for a second and inhale as you return to the starting position.
- Repeat as many times as necessary.
Variations: To make it more difficult, you can work with additional weight, holding it with crossed arms at chest level.
Short description
Lie down on the floor. Legs are bent at the knees. Place your hands behind your head, clasping your fingers at the back of your head. As you exhale, lift your upper body about 45 degrees. As you inhale, return to the starting position.
Kip-up from the back (frog jump)
⇐ PreviousPage 3 of 25Next ⇒Initial position.
The student sits on the floor, straight and joined legs extended in front of him, toes also extended, hands near the knees.
Execution.
Leaning the body back to the “lying on the shoulder blades” position, the student simultaneously raises his straight legs up through himself, almost touching his toes to the floor behind his head, and places his hands behind his shoulders. With a sharp swing of the legs from bottom to top forward and emphasis on the ground with the shoulder blades, the student lifts the body off the ground; at the moment of separation, he pushes off with his hands, separates his legs to the sides, bending them at the knees, puts them under himself and straightens up.
This exercise is described with the knees bent as a preparatory exercise for the same exercise with the legs straight, which is considered a completed exercise. In this variant, the legs do not diverge at the moment of the swing, but are placed straight on the ground through a bend in the lower back, and the student stands on his feet with his arms raised above his head and his head thrown back (Fig. 9).
For faster assimilation, the exercise is learned using a manual lounge.
The described rise from the back with an extension is the simplest in execution. More complicated variations of the same exercise are:
1. Kip-up from the back with hands on knees without lifting hands from knees.
2. Lifting with an extension from the back through the front somersault without lifting the hands from the knees.
3. Kip-up from the back with arms crossed over the chest.
4. Kip-up from a handstand, bending your arms, bending your head, and lowering onto your shoulder blades.
Forward rollover with support on hands and head (kopfsprung)
Initial position.
The student does a deep squat, places his hands in front of him on the floor shoulder-width apart, and places his head on the floor on his forehead in front of his hands.
Execution.
The student bends his body forward, straightens his legs without lifting them off the floor.
At the moment of loss of balance, he makes a sharp swing with his straight legs from the bottom up, pushes off the floor with his hands, then separates his legs to the sides, bending them at the knees, puts them under himself and straightens (Fig. 10).
This exercise is initially studied with the legs bent, as described above, and then performed with the legs straight (see exercise “Rising from the back with an extension”).
After mastering this exercise, you should proceed to performing several (three to four) flips one after another, i.e. at a pace (with the exception of the last flip, which should be performed with straight legs, all previous ones are performed with bent legs) .
For faster assimilation, the exercise is learned using a manual lounge.
Kopfsprung is also performed without support from the hands (this will be described later).
Valset
Valset has no independent meaning. It is necessary when performing various acrobatic jumps, as it gives the acrobat’s body inertia, direction and enhances the push from the ground.
Execution.
Standing on his right leg, the student slightly raises his left leg in front of him and slightly bends it at the knee. Jumping on his right leg, he slightly tilts his body forward and transfers the center of gravity from his right leg to his left leg, which is placed forward and slightly bent at the knee. As he comes to his left leg, he pushes off the ground with it, while simultaneously swinging his straight right leg from bottom to top.
The valset can be used both from a standing start and from a running start.
Note. The waltz can be performed on the left foot, as described above, or on the right, but it is recommended to do it on the left foot.
Flip forward with support on straight arms (fordersprung)
Execution.
With a slight run-up, the student does a valset with his left foot;
bending the body forward, places straight arms in front of you on the floor shoulder-width apart, keeping your head straight; then he pushes off with his left foot and makes a sharp upward swing with his right foot; through a handstand, pushing off the ground with straight arms, bending at the waist, the student comes on straight legs to the ground with his arms raised up and his head thrown back. At the moment the body passes through the handstand, the left leg joins the right and both legs straighten (Fig. 11).
A more complicated version of this exercise is a forward rollover supported by straight arms (fordersprung) with a running start and
jump. In this case, the student makes a short run-up, slightly jumps on two legs and puts his hands in front of him; tilting the body down forward, makes a sharp swing of the arms from top to bottom. Having pushed off the floor with his feet, the student, through a straight arm stand, comes to the floor on straight legs with his arms raised up, with his head thrown back.
For quicker mastery and protection, both exercises are learned using a manual longe.
Curvet
Courbette consists of two parts (semi-curbets). The first part is the transition from feet to hands; the second part is the transition from hands to feet. The second part - the transition from hands to feet - should be studied first, since it is less complex and, in addition, is an integral element in some other acrobatic exercises.
The second part of the curbette.
Execution.
The student pushes into a handstand. Having marked the stance on the hands, he slightly lowers the entire stance (i.e., the body with legs), as if intending to step off it onto the floor. Then, slightly bending the body at the waist and simultaneously bending the legs at the knees, he sharply straightens his legs, at the same time pushes off the floor with straight arms and, slightly bending the body, stands on his feet with his arms raised up.
Note. You should pay special attention to learning this exercise.
The first part of the curbette.
Initial position.
Standing, arms freely, without tension, lowered at the seams, legs slightly apart, feet parallel.
Execution.
The student does a shallow squat, simultaneously moving his arms in front of him, slightly lifting his heels off the floor. With a free swing of relaxed arms from top to bottom behind oneself, at the same time sharply tilting the body down, with a sharp push of both legs the student places straight arms on the floor and goes into a handstand.
Notes. 1. Pay attention to the swing of the arms (behind oneself), when the arms, when tilting the body down, rise as high as possible and when pushing, they should pull the body behind them into the rack. 2. Hands should be placed on the floor in place of the original position of the legs.
Having entered the handstand, the student performs the second part of the courbette described above. When both parts are combined in one movement, a complete courbet is obtained. A complete curbette is an independent exercise and is usually performed at a tempo, i.e. several times in a row (Fig. 12).
The exercise is learned on the bench.
Rondad
To perform acrobatic jumps with a running start, in addition to a front somersault, you must be able to do the so-called rondade, with the help of which the inertia obtained from the run-up facilitates the body’s upward take-off to perform a somersault and contributes to the acquisition of speed (sharpness) when performing backward movements in length (for example, flick- flask).
Execution.
Taking a running waltz with his left leg, the student tilts his body and arms down while simultaneously extending his arms straight out in front of him. Having placed his hands on the ground (first the left, then the right) with his hands turned to the left, the student, with a push of his left leg and a swing of his right, goes into a handstand; Moreover, the left hand becomes on the line of the right leg, and the right hand is slightly raised to the left and placed on the line of the left leg. Hands are placed shoulder width apart. As you enter the handstand, the left leg joins the right and the body rotates 180°. (Right hand skid when
the student places it on the ground, should facilitate the rotation of the body, performed by the movement of the shoulders.) After the turn, the student performs the second part of the courbet and stands with his legs straight on the floor with his arms raised up (Fig. 13).
Note. When placing his feet on the ground (the second part of the courbette), unlike the courbette described above, the student should not bend them at the knees.
Arabian wheel
⇐ Previous3Next ⇒
What muscles work
This complex can be performed by both fragile women and courageous representatives of the stronger half of humanity. The main requirement is constant training, performing the required number of times. Only in this case will it be possible to achieve the desired result over time. It's worth starting with the classic form.
The effect of the exercises can be felt within two to four weeks. When performing, all the muscles of the anterior abdominal wall are involved, especially the upper part. The main load falls on the rectus abdominal wall muscle, in particular on its upper part.
A static load is placed on the group of oblique abdominal muscles and spinal column extensors. Thanks to this, the stomach becomes toned, strong, and flat. The muscle corset is strengthened.
Fitness trainers say that workouts that involve performing exercises at high speed are considered more productive.
Why, when and how many times to do the exercise
Why pump up your abs? There are several reasons why you definitely need to pump up your abs:
| Beautiful, straight posture | Strong, toned muscles support the body in the correct position. The elastic muscle corset of the anterior abdominal wall maintains an even posture in any body position. |
| The functioning of internal organs and systems improves | During exercise, there is a rush of blood and oxygen to all cells and tissues. However, there is an important condition - compliance with breathing techniques. Lifting is done with exhalation |
| Psychological factor | A beautiful, toned abs will give men confidence, and a thin, flexible waist is always an adornment and asset to a woman’s figure |
| Slenderness | With regular training, sit-up strengthens and tightens muscles. This is not only the consumption of calories and the breakdown of fats, but also the prevention of stretching of the gastric walls. It curbs excessive food consumption |
| Helping a woman during childbirth | Women who constantly train and perform exercises according to all the rules find it much easier and faster to give birth to a baby. |
The regularity of training depends on the physical fitness of the person. Those who are not new to sports, who regularly jog and visit the gym, are recommended to perform classes according to the following scheme: 2 days of training alternate with one day of rest.
If a person is just starting to train and play sports, it’s worth starting with two workouts a week. A prerequisite is the availability of days off. This is necessary for complete muscle recovery after exercise.
The best option is to perform sipaps closer to the end of the workout.
How many times should you train your abs?
The optimal number of lifts is 30, that is, three sets of ten times. It's better to start at ten. Over time, you can gradually increase the number of times and complicate the technique. Before actually performing the exercise itself, it is worth doing a warm-up.
Options for lifting your torso
The most common version of the sitap is the classic one. It can be performed at home.
Classic body lift on the floor
Beginners are advised not to rush or make sudden movements.
- Take an emphasis lying on the floor face up.
- Bend the lower limbs at the knee joint.
- Place your feet on the floor. If necessary, support yourself against a heavy object, dumbbells or barbell.
- Close your hands at the back of your head.
- Raise the body as you exhale so that the body takes the shape of the letter V. The back remains straight, the feet are firmly adjacent to the floor surface.
- In a sitting position, you can touch your feet with your fingers.
- Return to the starting position while inhaling.
Option 1 - simpler
Place your arms crosswise on your chest. This allows you to relieve the spine during movement.
- The initial position corresponds to that in a simple classical sitap.
- Lifting the body is performed while exhaling.
- While inhaling, return to the starting position.
The optimal number of repetitions is 30, three times ten.
Bodymaster.ru recommends Fitness Trainers:
Option 2 - more complicated, with body rotation
With a cross-shaped rise. There are two options for lifting the body in this version. Both options are similar to the classic version, but each of them has its own distinctive features.
As a result of lifting the body, try to touch the opposite knee with your elbow. The arms are either folded crosswise on the chest or clasped at the back of the head.
Another execution option involves lifting the body and alternately touching the opposite knee with the elbow as it lifts.
Option 3 - as safe as possible for the lower back
To minimize the load on the lumbar spine, you need to perform the movement according to the classic pattern with your arms crossed over your chest. It is also necessary to place a bolster under the lumbar spine, or raise the lower limbs 90 degrees.
Thanks to the roller, the possibility of pinching nerve endings and blood vessels is eliminated.
With weights. Lie down on the floor. Knees bent. Hold the weight with both hands near your chest. Begin to lift your back off the floor and lift your torso. At the top of the movement, raise your arms with the disc above your head. As you move down, lower the weight back toward your chest.
Lifting from a lying position (Sitap) with a disc
Execution technique
The technique for performing this exercise is quite simple. When performing, the back should remain straight. The chest is open. A natural arch remains in the lower back. Don't forget to breathe. Breathing should be synchronized with movements. Only in this case can you combine the number of repetitions with the quality of the exercise. As you lower your body down, keep your back straight and don’t let your shoulders drop. This body position will help not only strengthen your muscles, but also avoid unnecessary injuries.
Let's devote a few lines to the abdominal muscles. They help the body stay in the correct position. Keep them tense throughout the entire exercise cycle.
Now let's talk about accents. If the task is to work the gluteal muscles, then the main attention should be directed to moving the pelvis back and straightening the back. Weighting can be of two types: upper and lower. In the first case, it is a barbell or gymnastic stick on the shoulders, in the second - a kettlebell or dumbbells. In both options, the back remains straight, the gaze is directed forward.
In order to stretch the tendons and the back of the thigh, you need to slowly lower yourself down. Here, too, there are so many options: touch the floor with your hands or hug your legs under your knees. The back should always remain straight.
Bends forward from a lying position maximizes the use of your abs. The back, as in all other options, remains flat. The main movement looks like lifting the body. Only in this case the main movement comes from the lower back. You can raise your hands up. How, the movement will be easier to do. After just a few repetitions, you can feel how the abdominal muscles work.
Options for doing it in the gym
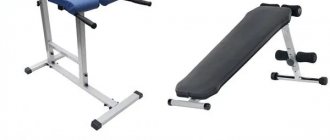
The technique of performing a sit-up in the gym involves the use of special sports equipment, attributes, and exercise equipment for better muscle development. Most commonly, the Roman chair and incline bench technique is used.
On a Roman chair
- Sit on the seat of a chair.
- Choose the optimal distance from the seat to the legs - bolsters in the ankle area.
- Legs straight, feet behind the rollers.
- The hands are folded on the chest or closed at the back of the head.
- As you exhale, the body lowers down until it reaches the level of the shins.
- As you inhale, smoothly raise your body to the starting point.
- Repeat as many times as necessary.
This variation of execution does not involve the use of weights, especially at the initial stage due to the high range of motion.
On an incline bench (with or without weights)
Lie on an incline bench at the desired incline. Secure your feet to the bolsters. Grasp the barbell disc with your hands. As you exhale, lift your body perpendicular to the floor. As you inhale, lower yourself to the starting position.
Lifting on an inclined bench (Sitap) with a load
Different angles and load severity
The higher the angle of the bench, the higher the load on the muscle frame. As the angle of inclination increases, the load on the spine decreases. The smallest inclination is 15 degrees. If the angle of inclination is from 40 to 60 degrees, performing a situp is considered especially difficult and does not require additional weighting in the form of dumbbells or pancakes.
When choosing the severity of the load and the angle of inclination, it is necessary to take into account the level of physical fitness and age category. Lifting the body with the head end down can provoke dizziness, changes in blood pressure, and tinnitus. The optimal tilt angle is 30 degrees. Let's consider several versions:
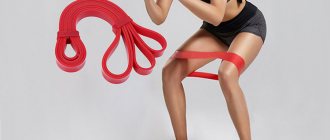
On an incline bench with rubber. Secure a resistance band around an incline bench. Lie down and grasp the handles with your palms facing forward. Pull them up near your collarbones and turn your wrists with your palms facing your torso. As you exhale, lift your body perpendicular to the floor. As you inhale, lower yourself to the starting position.
Raising the torso on an inclined bench (Sitap) with an expander
Oblique situps on an incline bench. Lie down on an incline bench. Place one hand on the back of your head, the other on your thigh. As you exhale, twist, turning your body to the left until your right elbow touches your left knee. Repeat as many times as necessary and switch sides.
Oblique crunches on an incline bench (sitap)
Press while lifting the body from a lying position (sitap). Lie on an ab bench, holding a barbell to your chest. Tighten your abdominal and buttock muscles. As you exhale, do a regular abdominal crunch and at the same time press the barbell overhead. As you inhale, lower your upper body and the barbell back to the starting position.
Bench press from a lying position (sitap)
Lead-up exercises
In order to confidently perform a rivet on the horizontal bar, it is necessary to provide a reliable “background” in the form of physical training. Then mastering the element will be achieved quickly. Without lifting exercises, lifting will take much longer, in which case the process can take months.
Main supply elements:
- Swinging on the horizontal bar is a simple movement that involves the ability to swing the body. It is mainly necessary to strengthen the grip and shoulders.
- Horizontal pull-ups on a horizontal bar (an alternative is rows on TRX loops).
- Hanging leg raises to the bar.
These are the three basic movements that are necessary to learn how to do a pull-up on a horizontal bar. Also good for strengthening your shoulders (and especially your hands) are push-ups on your fists or fingers, pull-ups in any variation, as well as all exercises for the abdominal muscles.
How can you replace sitaps?
Many exercises in the base on the abdominal muscles will allow you to replace sit-ups. Here are just a few of them.
Vacuum of the abdominal cavity. A simple and accessible alternative to everyone is a vacuum. It can be performed at home, at work, while walking, while driving, etc. You can make a vacuum in any position of the body. You need to exhale, pull your stomach in, feel your abdominal muscles, and stay in this position for 20 seconds.
Then relax, breathe in air and repeat the exercise several more times.
Abdominal vacuum
Fitness instructors also recommend several unusual movements that can replace sit-ups:
Body lifts using the Janda method. Lie on the floor, bend your knees at an angle of 90 degrees, feet on the floor, arms crossed over your chest. As you exhale, tightening your buttocks and hamstrings, slowly lift your body. As you inhale, return to the starting position.
Body lifts using the Janda method
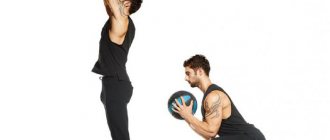
Throwing a ball with both hands while lying on the floor. Lie down on the floor. Legs are bent at the knees. Hold the ball at arm's length behind your head. Throw the ball forward from the shoulder, while simultaneously taking a sitting position. Have a partner catch the ball and throw it back to you, or it can bounce off the wall.
Throwing a ball with both hands while lying on the floor
Limb raises for those who are trained
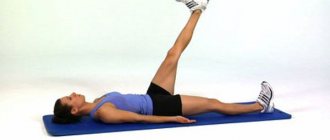
Raises legs to arms. It is especially valued among experienced athletes as it simultaneously loads the upper and lower abdominals.
- lie on your back;
- stretch your legs and arms;
- Exhaling air, rise slightly and raise your limbs. The arms are raised parallel to the legs, the torso does not touch the ground, the lifting angle is 35-45 degrees;
- Exhale and lie down on the floor again. The load is focused on all muscle groups of the anterior abdominal wall.
Raising legs to arms from a lying position
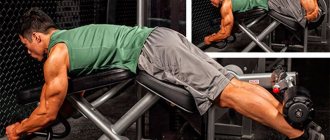
Leg raises to the chest on a straight bench. Sit on a bench, straighten your legs, and hold onto its surface with your hands. Bend over slightly and then pull your knees towards you while lifting your torso. After a second pause, return to the starting position and repeat the exercise.
Leg raises to chest on a straight bench
Muscle atlas
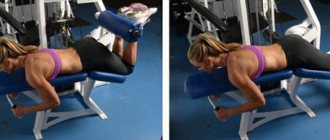
Back extension is an exercise that is aimed at working the erector spinae muscle. The latter includes the following - the longest, spinous and iliocostal. The work also involves the semiaxial and deep muscles of the spine.
As for the auxiliary muscle groups when performing hyperextension while lying on the floor, these include the triceps, lats, abs, buttocks and hamstrings.
Basic equipment: fitness mat.
What to pay attention to
When performing movements, you need to pay attention to the following nuances:
- The back should always be straight.
- You should not exercise immediately after eating.
- While lifting the body, the feet are pressed tightly to the floor surface.
- If the rollers from exercise machines leave marks on the body, use foam inserts.
- Raising the body from the initial position - a lying position - is performed while exhaling. Return to the starting position while inhaling.
- During the lift, the head should be on the same plane as the back. Tilts and turns are excluded.
- The load is added gradually. Starting with complicated versions of sitap can lead to health problems and lower back injuries.
Alternative Exercises