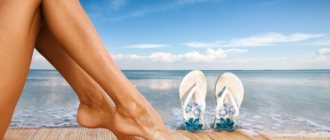
Stretching the gluteal muscles at home
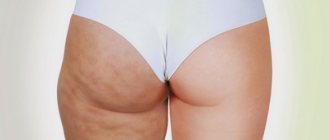
Competent and regular stretching of the gluteal muscles is useful both before and after training. In the process of training, aimed at stretching this muscle group, the whole body is strengthened, tension is relieved after a long static position, especially a sitting one. Regular stretching of the buttocks helps prevent so-called “lugs” on the thighs, the appearance of orange peel, sagging skin and loss of muscle tone.
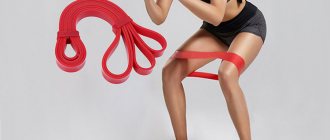
Exercises for stretching the gluteal muscles are simple and varied and do not require special preparation. They are easy to perform at home. You won’t need weights for training, at least at the start you can definitely do without them.
Important! Choose quality workout clothes and shoes. This is a guarantee of safety and comfort, as well as a motivator not to quit training.
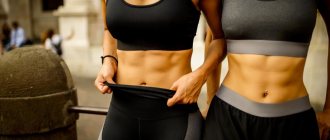
When choosing which exercises to perform, you should focus on yourself and your level of training. It is a big misconception to think that the heavier, the more effective. The right thing to do is to gradually increase the load, duration and frequency of training. As a result, you won’t get tired of training, the training process will be a joy, and the result will not take long to arrive.
Monthly training program for home
To achieve beautiful relief and make the back of the thigh toned, you need a training program. For the results to become noticeable, it will take about 2 months of training at home. The training program below is aimed at beginners.
| Exercise | Number of repetitions | Approaches | Interval between sets |
| One leg squat | 15-20 | 3 | 45 sec. |
| Jumping lunges | 10-15 | 2 | 30-50 sec. |
| Leg curl lying on the floor | 20 | 3 | 50 sec. |
| Gluteal bridge | 15 | 3 | 50 sec. |
The minimum time for muscle rest is 3 days.
Stretching while lying down
Exercises are best performed on a hard surface. A sofa or bed won't do. You should warm up a little first. If you study at home, you can dance a little to dynamic music.
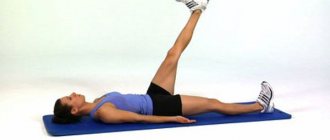
- Lie on your back, pressing tightly to the surface, bend one leg, leave the other straight; throw the bent leg over the straight leg and gently press the hands on the knee, pull the gluteal muscle, trying to lower the knee onto the mat. Repeat for the second leg, relax and do several times.
- Lie on your back, bend your knees, raise them so that your knees are at eye level; Place the toe of one foot on the other, then press on the toe with the other foot. During the execution, you need to feel the tension in the gluteal muscles. Do the same for the second leg.
- Lie on your stomach, bend one leg at the knee, the other lies straight; Take the toe of the bent leg with your hand and pull it towards you. Repeat for the second leg, then roll over onto your back, bend your knees and use your hands to pull your knees towards you. Stay in this position for a minute and relax.
Attention! When performing exercises, do not make jerks or sudden movements. Keep your abdominal muscles tense.
In the gym
You can also work out in the gym. There are several more opportunities there, as special simulators are installed. In addition, the gym has more equipment and you can train in a frame that allows you to safely take a barbell for squats, Romanian deadlifts, etc.
In the gym you can perform all the exercises that are suitable for home exercises. Besides this, there are a few more additional ones.
Leg bending in the simulator
Almost all gyms have a lying leg curl machine. To pump up your hamstrings with its help, you need to customize the design to suit you. This should be done in such a way that your knees hang slightly over the edge of the machine, and the roller is above your ankles.
After this setup, you can proceed directly to the exercise. Correct technique:
- lie down on the exercise machine bench, place your legs under the bolster;
- as you exhale, bend your knees, almost touching your buttocks;
- “squeeze” the biceps at the top and then straighten your legs;
- There is no need to completely straighten your knees so as not to damage them and maintain tension in the muscles.
It is important to hold the handles tightly and not arch your lower back, as this shifts the emphasis of the load from the muscles of the back of the thigh to the lower back.
The leg curl machine is of the block type, when the weights are placed in tiles (blocks). It can also work with free weights when adding plates is required.
You can use a similar design to perform this exercise while standing. The technique will be almost identical.
Less commonly, you can find a seated leg curl machine. Its advantage is that there is no pressure on the lower back.
Hyperextension with round back
Another exercise that targets the hamstrings and glutes is hyperextension. It is performed in a special simulator, which first needs to be adjusted to suit you. To engage the necessary muscles, and not the lower back, the cushions of the exercise machine should be lowered as low as possible.
Technique for performing hyperextension:
- take a position on the simulator;
- cross your arms over your chest or behind your head;
- while inhaling, lower yourself, rounding your upper back so that the angle between your legs and body is 90 degrees;
- the gaze should be directed downwards;
- as you exhale, you should rise so that the body becomes parallel to the floor;
- perform the required number of repetitions.
Hyperextension with round back
It is advisable to lower slowly, and rise sharply due to the efforts of the rear muscles of the thigh and buttocks.
There is an opinion that this exercise negatively affects the back. To avoid problems, you can only slightly round your upper back and keep your lower back straight. Once the technique has been learned, you can pick up a barbell plate and press it to your chest. But you shouldn’t use a lot of weight in this exercise.
Gym training program
The workout plan at the gym will be slightly different. An example of a training program is shown in the table.
The last two exercises can be performed as a superset. That is, you first need to do the required number of repetitions of hyperextension, and then immediately, without interruption, proceed to performing the gluteal bridge.
You should exercise in the same way as at home: 1–2 times a week. The next workout cannot be carried out until the muscle pain from the previous one has passed.
Stretching while sitting and kneeling
Effective stretching of the gluteal muscles at home can be performed not only in a lying position. We offer several simple exercises that are suitable for different levels of training.
- Kneel (on all fours), place the ankle of one leg behind the knee of the other and move your pelvis as far back as possible. Stay in this position, then return to the starting position and repeat 3-4 times.
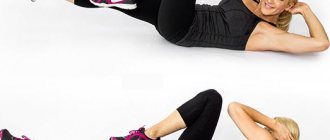
- Take a sitting position, your back is straight. One leg is straight, bend the other at the knee, turn it to the side and use your hands to pull it to your chest. Try to make sure that your calves cover your chest. Stay in this position for a few seconds, stretching your gluteal muscles. Relax and perform for the second leg.
- Sit on the floor, take one leg back and the other forward, bending it slightly at the knee. Bend your arms at the elbows, smoothly lower down and forward, focus on your elbows and slowly slide your arms forward. Having reached maximum tension in the gluteal muscle area, stay in this position for a few seconds. Repeat for the second leg. Perform this exercise carefully to prevent injury to the gluteal muscle when stretching .
- Sit on the floor, one leg straight, the other bent at the knee. Place the elbow of the opposite hand behind the knee and forcefully pull it to the side, while simultaneously moving the body towards the bent leg. Stay in this position. Then return to the starting position and repeat for the second leg.
All of these exercises are especially effective when you need stretching for the gluteal muscles after a workout , as they allow you to consolidate the results of a strength session, properly relax the muscles and speed up their recovery.
Deep squats
A deep squat is a variation in which the pelvis is lowered as low as possible, until the thighs touch the calves. A fundamental exercise that is extremely effective and gives a powerful workout to the lower body.
The technique for performing this exercise is as follows:
- Take the starting position: take the barbell, sit under it, bending your knees. Feet are shoulder width apart.
- Place the projectile on the rear deltoid.
- Bring your elbows and shoulder blades together.
- Lock the bar and take a step back. Keep your back straight and look ahead.
- As you inhale, maintaining a straight body position, slowly lower by moving your pelvis back.
- The legs bend at the knees, the knees do not move inward.
- Lower yourself until your hamstrings touch your calf muscles.
- As you exhale, tense your muscles as much as possible and in one powerful movement return to the starting position, straightening your knees.
If you typically squat to parallel with the floor, your quadriceps will bear the brunt of the load. And the buttocks are included in the work after parallel with the floor and below. Therefore, it makes sense to take a lighter weight and go deeper.
This exercise requires good physical fitness, stretching and flexibility. Deep squats will be useful for girls seeking an ideal buttock shape, as well as athletes to increase strength.
Stretching while standing
You can effectively stretch the muscles of your buttocks while standing. To do this, you can resort to dynamic and static exercises.
- Stand straight next to the support (trained people can do without it), raise one leg, bend it at the knee and pull it to the chest with your hands. Gently increasing the pressure on the knee to stretch the muscles of the buttocks, stay in this position for a few seconds. Repeat for the second leg.
- Deep lunges: stand straight, arms straight at your sides, take a wide step, moving your leg bent at the knee forward, place your palms on the floor, tilt your body onto your knee; hold, then repeat again. Do 5-8 times for each leg.
- Standing straight, take one leg forward and kneel with the other. With your hand, take the toe of your foot, the knee of which is on the floor, and pull it forcefully towards your buttocks. Repeat for the second leg.
- Stand straight, bend your knees slightly, raise your arms up. Gently tilt your body forward, stretching your tense arms forward, clasping your hands together. Stretch your arms forward so that you feel a stretch in the buttocks.
Stretching the muscles of the hamstrings: standing
The exercise is aimed at relieving pain in the buttocks and back of the thighs
A) Place your foot on a bench or any other elevated surface
B) By tilting your body towards the foot of the leg located on the bench, reach for it.
C) Hold this position for 15-20 seconds, and then change your leg to the other.
Advice:
choose the right elevation - it should not be too high. Keep your knee straight, and you can move your pelvis slightly forward - this will enhance the effect of the stretch.
Leg stretching exercises: description and video
Other articles about stretching and flexibility:
Beautiful healthy legs are probably the dream of all women. To achieve it, the fair half of humanity is ready to spend hours working out in gyms, fitness clubs, and performing training programs at home. However, in all cases, leg stretching exercises
. This is due to the fact that before you start directly stretching, you need to warm up all the muscles. For this reason, as a rule, leg stretching exercises should only be performed after completing the main training program.
Front Thigh Stretch
General rules
Any stretching of the rear and anterior muscles requires compliance with the rules, first of all, so as not to damage your health, and secondly, so that the achieved result is maintained for a long time.
Classes are conducted systematically. The number of classes should not decrease. You will need to learn how to properly relax your leg muscles, otherwise you may end up with chronic fatigue syndrome.
Before stretching the thigh muscles, it is recommended to warm up, otherwise injury may occur. Exercises that are often suggested as stretching include rotation of the pelvis and ankle joint of the legs.
Consider going for a run as a great way to exercise. You need to run at a normal pace, jumping from foot to foot with swinging movements. You can warm up by jumping in place, on one leg or both.
Warming up the leg muscles before stretching will prepare the ligaments for the exercise.
The minimum time spent in a stretching pose is 10 seconds, gradually increase to 60. Stretching for less time will not give results. To achieve success when stretching, you need to breathe deeply. You can't hold your breath! Important! Remember, muscle stretching is not supposed to be painful.
Some discomfort is acceptable, especially in the initial stages, but not pain. To harmoniously stretch your thigh muscles, it is recommended to create a muscle stretching program.
Good muscle stretching is the result of many years of work on the body. You will need to have a considerable amount of patience to engage in this type of activity.
A set of exercises for stretching legs
Exercise 1. Stretching the hips and buttocks
- Lie on the mat with your back down. Bend your knees. The upper body is relaxed.
- Raise your right leg over your left knee.
- Hug your left knee with both hands and begin to slowly pull it towards you.
- Change the relative positions of your legs and repeat the exercise.
The entire exercise should not take more than 5-7 minutes.
Exercise 2: Hamstring stretch
- Starting position: lying with your back on the mat. Legs are bent at the knees.
- Straighten one leg and begin to smoothly pull towards yourself. You can hold on to your ankle, thigh, or calf.
- Repeat similar steps with the other leg.
Time to complete – 5 minutes.
Exercise 3. Lunges
- Place one knee on the mat and place the other at a 90-degree angle.
- Start doing soft lunges forward, pulling your stomach in. You should feel a slight stretch in the thigh area.
- Swap your legs and repeat the exercise.
After lunging forward, start lunging backwards.
- Place one knee on the mat. The second leg is straightened.
- Move backwards with smooth movements. At the same time, tilt your body forward.
- Do the exercise until you feel your thigh stretch. After that, change legs.
Exercise time – no more than 7 minutes.
Exercise 4. Stretching the piriformis muscle
- Lie on the mat with your palms and knees facing down.
- Extend your right knee forward until it is between your palms.
- The left leg is in a straightened position behind.
- Lean forward.
Time to complete – 5 minutes.
Exercise 5. Knee to chest
- Lie on your back. The body is relaxed.
- Stretch your legs. Bend your right leg at the knee and bring it towards your chest.
- Pull until you feel a stretch in your thigh.
- Repeat this exercise with the other leg.
Time for stretching is 5 minutes.
Exercise 6. Calves
- Place your feet and palms on the mat.
- Pull your stomach in and straighten your back.
- Begin to step gently on the mat with one/two feet.
Exercise time – 4 minutes.
Exercise 7. Spinal twist
- Lie on the mat with your back down.
- Place your left foot on your right knee.
- With your right hand, lower your left knee towards the floor.
- Shoulders and hips on the floor.
- Switch sides.
Yoga poses for stretching thigh muscles
Backbend
In addition to stretching, this position will help open the chest and increase the flexibility of the spine. The exercise also tightens your waist and strengthens your arms and shoulders. Yogis believe this pose helps open up your airways so you can take in more oxygen. They also believe that this exercise helps open the heart chakra, which helps them feel more connected to the world and be able to forgive where necessary.
Vertical frog pose
This pose will help relax your muscles and improve your balance. This pose also increases the flexibility of your hips and ankles while you are trying to achieve your main goal. If squatting is too difficult for you, try sitting on a chair and leaning your body forward between your legs. Make sure your feet are on the ground and that your knees form a 90-degree angle if you are using a chair.
Frog pose, lying on your back
This simple pose will stretch your groin muscles and inner thighs and open up your chest. Make sure your spine is not arched when you do this pose. If you need help, place pillows up to your knees to reduce stress and make stretching easier, or you can place a pillow under your head to avoid stress on your neck. This pose also helps with fatigue, depression and insomnia.
Siddhasana pose
This pose increases hip eversion while stretching muscles and improving posture. This pose is also used for meditation and you can stay in it for as long as you like. Yogis believe that this pose neutralizes bad energy and helps people with illnesses such as asthma. Ancient yogis believed that this pose helps one gain superpowers.
Eye of the Needle Pose
Lie on your back and bend your knees. Place the ankle of your right foot on the knee of your left. Using your hands, pull your left leg toward you to feel a stretch in your thigh. Do the same with the other leg.
Frog pose, lying on your stomach
This pose, under the pressure of your weight, will stretch the inner thigh muscles. To make stretching easier, place a pillow or small towel under your knees or ankles. If you feel pain in your legs, close them rather than keep spreading them.
Home stretching complex for the hip adductor muscle
Stretching your hip muscles will help keep your hips flexible, which is important for preventing injury.
- Sit on the floor with your legs as far apart as possible and in full contact with the floor.
- Keeping your back straight, lean forward at your hips.
- Hold for 10-30 seconds.
Muscles involved: Gracilis muscle. Major adductor. Long adductor.
In the video, the instructor shows how to correctly perform this exercise from the complex:
Piriformis muscle - stretching
The piriformis muscle can be very troublesome and cause sciatica symptoms, including leg pain. Training this muscle, especially in combination with other exercises, will maintain its elasticity and prevent damage to the sciatic nerve.
- Lie with your shoulder blades on the floor.
- Bend your right leg and cross the ankle of your left leg over your right leg.
- Cross your leg over your upper thigh.
- Pull your leg as close to you as possible to increase the pressure.
- The exercise time is 10-30 seconds.
Muscles involved: Piriformis.
Try doing the same as shown in the video below:
"Good morning"
The “Good morning” exercise, or, in other words, bending over with a barbell, allows you to effectively pump up the lower body - provided, of course, that it is performed correctly. If the technique is not followed, there is a high risk of injury.
Since we want to primarily work with the gluteal muscles, we need not just bend over, but abduct the pelvis back. And so that the main load is taken not by the spinal extensors or the back of the thigh, but by the buttocks, is our goal.
The technique for performing this exercise is as follows:
- Place your feet shoulder-width apart.
- Gradually begin to move your pelvis back while inhaling, stretching your gluteal muscles, and synchronously with the abduction, release your body until it is parallel to the floor.
- Once completed, return to the starting position as you exhale.
Stretching flexor muscles
This is an effective set of exercises for beginners that can be performed at home; This stretch is typically used on the muscles of the front of the thigh, including the rectus femoris.
- Kneel on one leg. The other leg should be in front with the knee bent.
- Shift your weight to the front of your body.
- Tighten your hips during the exercise for 10-30 seconds.
Muscles involved: Rectus femoris. Iliopsoas muscle.
Repeat after the instructor: