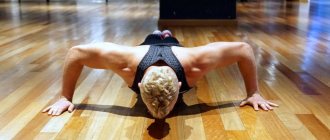
Not everyone can do handstand push-ups, because the exercise requires not only muscle strength, but also the ability to maintain balance. This type is also called vertical push-ups; they are performed against a wall, and experienced athletes do push-ups without any support.
Before moving on to the technique of performing the exercise, let's look at its anatomy, advantages, disadvantages, and safety precautions.
Vertical push-ups can lead to injuries and bruises, especially if untrained athletes practice them without the support of a coach or colleague.
What muscles are involved in the process?
We are not exaggerating at all if we say that handstand push-ups affect almost all the muscles of the body (except the legs):
- Target muscles: triceps, anterior and middle deltoids, clavicular part of the pectoralis major muscle, trapezius;
- The core muscles - the abs, gluteals, and spinal extensors - are responsible for maintaining balance and a stable position of the body in space. A similar muscle group will be used if you do a wall squat.
- The shoulder, elbow and wrist joints, as well as ligaments and tendons, actively work.
So now you know what the upside down push-up is and which muscles get the most stress. Let's move on to the advantages and disadvantages of the assignment.
Pros and cons of the exercise
Vertical push-ups, as mentioned above, have a comprehensive effect on the athlete’s entire body, so they will be useful for representatives of any strength and acrobatic sports. Among the main advantages of this exercise are:
- Powerful, rounded shoulders, since the main load falls on them;
- Strong, functional triceps. Yes, functional ones, because in this exercise they not only push the athlete’s body upward, but also play a vital role in maintaining balance;
- Well-rounded core muscles. Like the triceps, the core muscles help control the position of the athlete’s body in space, constantly being under an unusual load for the body.
However, due to the difficulty of performing, handstand push-ups also have several disadvantages:
- Load on the vestibular apparatus. People who have any problems with it need to approach this exercise with caution;
- Increased load on the elbow joints and shoulders;
- Risk of injury if you are unable to control your body in space.
Benefits and harms
Push-ups while standing on your hands against a wall require excellent muscle coordination, a developed sense of balance, trained stabilizer muscles, and, of course, remarkable strength in the hands. Just imagine, a person will have to not only stand upright, but also do push-ups, that is, push his entire weight upside down, and more than once.
The benefit of this exercise lies in the high-quality training of all the above muscle groups; also, the athlete increases the level of his endurance, strength, and learns to better feel balance. In a way, this is an accepted and successfully overcome challenge to oneself, because not everyone will be able to master this exercise. Thus, a person trains willpower and character, increases self-esteem, and experiences emotional satisfaction.
If the athlete is poorly prepared or has health problems, the exercise may harm him. Let's find out the contraindications:
- Pregnancy;
- Exacerbation of chronic diseases;
- Acute inflammatory processes;
- Blood pressure surges;
- Injuries to ligaments, joints, tendons of the upper shoulder girdle;
- Visual impairment, eye diseases;
- Mentally unhealthy conditions and diseases;
Please note that in addition to the risk of not being able to stay in a handstand and falling, thereby getting injured or seriously bruised, you can damage your spine if you place your head on the floor. Under no circumstances should this be done. Firstly, the spine in this position is extremely unstable. Secondly, the cervical spine becomes vulnerable. Third, you can injure your head without even realizing how it happened.
Handstand Push-Up Guide
Initial position:
- Stand in front of a wall at arm's length.
- Bend over, placing your arms straight at a distance slightly wider than shoulder-width to the floor, approximately halfway between the wall and your toes.
- Transferring your body weight to your arms, inertia throw your legs up and rest your heels against the wall.
- Make sure that in the starting position the palms of your hands are parallel to each other or slightly turned outward. The support is applied to the entire palm and fingers.
- The buttocks and abs are tightened and tense, the legs are placed together.
- Arms are straight, do not straighten your elbows completely, inserting them into the joint.
Movement:
- Inhale and begin to slowly bend your arms at the elbow joints, thereby lowering your body down.
- At the lowest point, lightly touch the floor with the crown of your head.
- As you exhale, with the combined effort of the muscles of the shoulder girdle and arms, powerfully push yourself up until your elbows are completely straightened.
- Complete the planned number of repetitions.
Attention! Recommendations! Execution options!
Preparation stage
Hand push-ups upside down from a wall are easier to do than without vertical support. However, despite the simplification, the exercise still remains difficult to coordinate and requires solid preparation from the athlete. Try doing a regular handstand (as if you were going to walk on your hands). Happened?
Below are some great exercises to get your body ready for the new technique.
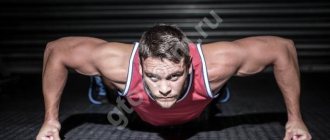
- Traditional push-ups with a delay at the bottom. It is important to hold for 3-5 seconds, using the triceps muscle as much as possible (do not spread your elbows too far);
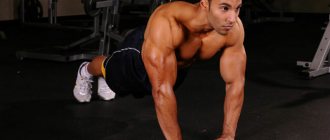
- Push-ups in a closed horizon. Bend your knees and hips, touching your knees to your chest. Place your palms on the floor and transfer your body weight to your arms. Bend your elbows so that your folded body is horizontal, with your hands touching your hips tightly. Start push-ups;
- As soon as the previous exercise becomes easy for you, try to move your legs back and up from its starting position into a handstand. Start small, raise your legs to the height that your muscles allow. Gradually bring the body position to a vertical position.
- Vertical wall push-ups begin after you learn how to do a handstand. The same goes for push-ups without support.
As soon as you master the exercises listed above and begin to do them confidently and boldly, you can move on to handstand push-ups, the benefits and harms of which were described above.
Why can't you put your head on the floor?
It is not surprising if you learned about such an exercise as handstand push-ups from sources related to CrossFit. In this discipline it is used very actively in training and competitions. And everything would be fine, but there is one controversial point that should be paid attention to first. This is, in fact, kipping.
Surely you have noticed that when performing push-ups upside down, CrossFitter athletes stand on their heads during the last repetitions and push themselves up from this position by vigorously extending their legs. Then they lower themselves onto their heads again and push themselves out again using their legs. This is called kipping.
The number of repetitions in the exercise increases, but the damage caused to the cervical vertebrae is incomparable with any competitive awards. Therefore, if you are not a professional athlete and are not chasing awards in CrossFit, forget about kipping forever.
In order for the handstand push-up to be safe, you should not touch your head to the floor at all, under any circumstances.
The fact is that the cervical vertebrae, unlike, for example, the lumbar vertebrae, are small and very fragile. They are like this not because nature overlooked something, but because the strength and size of the elements had to be sacrificed to ensure the mobility and flexibility of the structure. No wonder you can rotate your head, bend your neck in all directions, raise and lower your chin.
Of course, if at the bottom of the exercise you lightly touch your head to the floor, nothing bad will happen. But can you say with complete confidence that you always time the effort perfectly? Hit a little harder and you could end up with problems for life. Therefore, it is better to learn not to touch the floor with your head right away. In addition, many people have more or less pronounced curvature of the cervical spine. This means that when your head touches the floor, your spine will experience not only compression, but also shear load.
In general, since our goal is a beautiful, strong and healthy body, always follow the above recommendations.
Execution technique
- Do a warm-up;
- Do a handstand (against a wall or from the horizon), place your palms on the floor shoulder-width apart, your body tense, your spine slightly arched in the lumbar region, your pelvis slightly protruding in front of your head, your feet strictly above your head;
- As you inhale, gently bend your elbows, while your chest should seem to go into a horizontal plane. The shift in the center of gravity should compensate for the deflection in the lumbar region.
- As you exhale, slowly rise up, pressing your palms into the floor. The chest returns to the vertical plane, the pelvis helps control balance.
- Do the required number of repetitions.
If you are interested in learning how to do handstand push-ups against a wall, do the same thing, but you can rest your feet on a support. You can lean on your heels, toes, or full feet. In this case, there is no need to control balance with the pelvis. The distance from the wall to the athlete is approximately 1 step.
This exercise is quite difficult to do. So don't be discouraged if at first you don't succeed. You can start with more familiar variations (including push-ups from the wall in the usual position, not upside down).
How to learn to stand on your hands and do push-ups. Workout. Video
The handstand is a spectacular, but quite difficult exercise. If you are in good physical shape, you can even do push-ups in a handstand. To do this you need good physical shape and a desire to learn. For those who are ready to try, fitness trainer Manvel Mamoyan
tells you how to learn a handstand. Manvel himself does 73 handstand push-ups.
How to learn to do 100 push-ups in a row in 5 weeks. Trainer's program
We'll tell you how to start doing more than 100 push-ups in just a month. Nothing complicated!
Handstand push-ups require strong arms, a back, and toned abs. In addition, it is necessary to develop balance and coordination.
The most difficult push-ups: only a few people do them in the world
New world records from workout athletes from Russia. Did you think you could do push-ups?
Preparatory exercises
Frog
The exercise is designed to develop a sense of your own weight, balance and coordination. Take this position and try to hold it for at least 30 seconds.
Exercise "frog"
Photo: Manvel Mamoyan
Handstand against a wall
Find a suitable vertical surface, cross your legs and hold a handstand for up to 1 minute. When you learn this, do the same exercise, but with your elbows bent.
Handstand against a wall
Photo: Manvel Mamoyan
Right angle push-ups
Find a suitable support, cross your legs and bend your body so that they form a right angle. Try doing push-ups in this position.
Right angle push-ups
Photo: Manvel Mamoyan
Handstand push-ups against a wall
Take a handstand against a wall and try to do gentle push-ups up to 15 times.
Handstand
At this stage, you can already try to stand on your hands without the help of a wall and try to hold yourself up for up to a minute.
Handstand push-ups
If you want to not only stand on your hands, but also start doing push-ups, then continue training.
Handstand with bent arms
The last preparatory exercise is a handstand with your elbows bent. Aim to hold yourself like this for up to 1 minute.
Handstand with bent arms
Photo: Manvel Mamoyan
Now you're ready to do handstand push-ups—try it!
Not for the weak: the most beautiful girls on the horizontal bars
Workout is not just a man's activity. And here's the best proof.
The most difficult push-ups. 5 types that not everyone can do
Few people can do these push-ups. Can you repeat it?
How to learn to do more pull-ups. Coach tips
Increasing the number of pull-ups is easy. The main thing is to avoid common mistakes.
Variations of the exercise
We've looked at how to learn to do push-ups while standing on your hands upside down, let's also list the variations of the exercise:
- In a handstand against a wall;
- In a handstand without support;
- Kipping push-ups - at the bottom point, before going up, the athlete bends his knees and brings them to his chest, and at the very moment of pushing up, sharply straightens his legs. Thus, he creates a forward jerk, making it easier for himself to reach the starting position;
Now you know how to learn to do push-ups upside down, let's also look at the nuances of safety precautions.
Technique
Initial position
Half the success when performing push-ups upside down is to take a starting position in which your legs are thrown over the wall and your hands are on the floor.
- Get on all fours facing the wall at a distance of half a meter.
- Lift your pelvis up and take a runner's stance so that your supporting leg is closer to the wall and bent, and the other is behind the straight line.
- Place your palms on the floor. The width between them should be greater than the width of the shoulders. There should be about 20-30 centimeters between your palms and the wall. Elbows should be above hands.
- Push off with your supporting leg so that the weight instantly transfers to your arms, keeping them slightly bent at the elbows. Push off with enough force so that your legs reach the wall by inertia.
This whole mess looks like this:
Doing the exercise
- Take the starting position. The body is elongated in a straight line, only the heels are in contact with the wall. You need to look in front of you. The arms are barely bent at the elbows.
- Slowly bend your elbows, lowering yourself down. Elbows go to the sides.
- When your head is 10-20 centimeters from the floor, take a short pause and begin to slowly squeeze your body up to the starting position.
- Do several approaches and push off from the wall to return your body to a horizontal position.
Safety precautions
- Do not make sudden jerks, work smoothly;
- Do not place your head on the floor, if this does not work, in no case do not put all the weight on it and your neck;
- Place a soft mat under your head;
- During lowering, the elbows are slightly spread to the sides;
- The body should be collected, tense in every muscle;
- The fingers should be spread as wide as possible to increase the area of support in the stance.
In conclusion, we recommend that you prepare thoroughly for the exercise. Doing a vertical push-up is very difficult, and you should only begin the task when you feel ready. Good luck to you and your sporting achievements!