Today, many people suffer from back pain. First of all, this happens due to the fact that a person leads an incorrect lifestyle. For example, many people spend most of their time at the computer, steering wheel, or office desk. Also, the reasons include intense physical activity. Because of this, the spine is exposed to higher pressure, which causes discomfort and pain. But there are several effective methods that can easily help cope with such a problem as back pain.
What is an inversion table and what is it for?
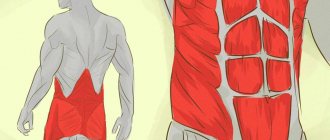
The table is a stable structure made of metal or plastic in the form of a flat bench (table top) with leg clamps and two handles; there are both mechanical and electromagnetic exercise machines. The essence of the table is to change the angle of the body, up to a vertical position (upside down). When the position of the body in space changes, the spine lengthens due to stretching of the intervertebral discs. The inversion therapy method provides relief from pinched nerve endings and treatment of spinal diseases (protrusions, hernias, pain associated with displacement of the vertebrae and changes in posture).
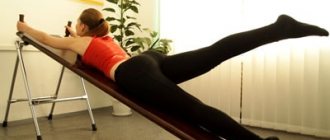
When training on a gravity table, it is important not to just hang upside down at a comfortable angle, but to perform various techniques, including slight bending and twisting to stretch not only the vertebrae, but also the muscles.
Gymnastics has a positive effect if, at the initial stage of training, the technique is observed by a specialist in the field of physiology, a neurologist, a chiropractor, and so on. You should not start the exercise on your own ; especially if spinal diseases worsen, you should consult a doctor.
Before considering the benefits and harms of an inversion table, let’s study a little about the effects of traction on the spine and their feasibility.
- What happens when you stretch for a long time? Intervertebral discs are subject to tension, which increases the risk of injury to the capsule of the intervertebral joints. That is, by stretching the spine, trying to alleviate the syndromes of some diseases, you can get new problems.
- Does traction solve spine problems? Let's look at the example of a rubber band. Use force to stretch the rubber on the sides - it will lengthen, weakening the impact - the tape will return to its original position. The same is true with the spine, the problem does not go away after returning to its natural position; if a disc in any department was bulging before, it will remain so; if a muscle was pinched (or nerve endings), it will remain in the same place and get pinched again. Therefore, temporary symptom relief is not the solution.
- Does an inversion table solve the problem? By stretching and simultaneously strengthening the muscles that hold the spine (stabilizers), a therapeutic effect can be achieved. If the muscles are weak, they will not be able to hold the vertebrae in a stable position after traction, and strengthening them will serve as a kind of corset to maintain the normal position of the vertebrae between the joints, reducing negative factors.
Microsurgical spinal decompression: what is it?
Microsurgical decompression of the spine is a surgical intervention aimed at eliminating factors that compress the neurovascular structures of the spinal canal. It involves the use of optical intraoperative devices and minor trauma to soft tissues, which significantly reduces blood loss during surgery, facilitates and speeds up rehabilitation, and also allows one to achieve a good cosmetic effect.
Modern decompressive microsurgical operations are performed through incisions measuring 1–4 cm, and optical equipment provides a high degree of visualization of the surgical field. Therefore, they are among the least traumatic surgical interventions and at the same time allow for the effective release of compressed spinal roots and blood vessels.
The essence of the operation is the surgical removal of pathological defects that provoke compression of the spinal canal, nerve roots and vascular formations. These roles are often played by:
- intervertebral hernia;
- vertebral osteophytes;
- hypertrophied ligaments;
- adhesions formed after previous operations;
- hematomas;
- benign and malignant formations.
Their removal allows the release of compressed nerves and blood vessels, which creates the preconditions for their rapid recovery.
The operation can be performed in two ways: using microsurgical instruments under the control of a microscope or using endoscopic equipment. Both decompression surgery techniques are effective, but differ in the degree of tissue trauma. Each of them has its own indications and limitations. Therefore, the choice of spinal decompression tactics remains with the neurosurgeon.
Endoscopic decompression surgery
This type of surgery has long been widely used around the world and is recognized as the most gentle way to remove pathologically altered tissue. It involves making incisions whose dimensions do not exceed 1–1.5 cm.
Through them, a telescopic probe and an endoscopic tube are inserted into the patient’s body, which is a conductor for all the necessary surgical instruments, through which the altered tissue is resected to the required extent. Modern equipment makes it possible to achieve the highest level of magnification of the surgical field with high-definition images transmitted from a video camera inserted into the body to the monitor in real time.
Spinal decompression using the endoscopic method is recognized as the most gentle for healthy soft tissues. Therefore it allows:
- reduce blood loss;
- facilitate and also speed up the body’s recovery process;
- minimize intra- and postoperative risks.
The endoscopic surgery takes about 45 minutes and can be performed under local anesthesia. But with a high level of patient anxiety and a number of other cases, general endotracheal anesthesia is used.
Spinal decompression using the endoscopic method can be performed using three approaches:
- TESSYS (transforaminal) - a lateral posterior approach is used through the so-called Cambin triangle, with the patient lying on his side or stomach. It is suitable for the removal of various herniated discs and in a number of other situations, including Cauda syndrome.
- CESSYS (anterolateral) – used to eliminate pathologies of the cervical spine and involves creating access to the spine through the anterolateral surface of the neck.
- iLESSYS (dorsal) – used to remove pathological formations in the lumbar spine and implies access to it through the anterolateral surface of the abdomen.
The essence of the operation is as follows:
- The skin is treated with an antiseptic solution, and an incision is made in the projection of the vertebra that provokes the development of neurological symptoms.
- Through an incision, an expander is inserted into a safe area of the spinal space under the control of an image intensifier. The working sleeve is immersed along it, through which the endoscope tube is passed. Its diameter is 6–8 mm. An LED and a camera are connected, which immediately begins broadcasting the image to the monitor.
- Under multiple magnification with the help of special instruments inserted into the surgical field through an endoscope tube and replaced during the operation, the neurosurgeon performs resection of pathologically altered tissues. It consistently eliminates the formation that caused the development of vertebral compression syndrome. Thus, special nippers are used to resect bone osteophytes, and a microprobe is used to remove a herniated intervertebral disc.
- The removed fragments are removed from the body through a special compartment of the endoscopic system, and the resulting cavity is thoroughly washed with saline solution.
- The equipment is removed and stitches are placed on the postoperative wound.
But endoscopy may not be performed in all cases of vertebral compression syndrome. Due to technical limitations, it is not able to solve the problem:
- severe lateral and circular stenosis of the spinal canal;
- bilateral caudogenic lameness;
- medial hernias;
- severe paresis;
- paravertebral tumors.
Decompression surgery using a microscope
If it is impossible to perform endoscopic surgery or it is necessary to perform a number of complex manipulations, surgery with a microscope is used to decompress the spine. It is recognized as the most productive tactic of decompression surgery and can be used for a huge number of different diagnoses.
Modern microscopes provide a magnification of the surgical field up to 40 times, which 100% covers the surgeon’s visualization needs and allows each action to be performed with the highest precision in all parts of the spine.
This type of surgical intervention has all the advantages of classical open operations, but is significantly less traumatic, which makes it possible to classify operations with a microscope as minimally invasive.
The surgeon performs all actions through an incision of about 3–4 cm. Surgery is performed only under general anesthesia and requires from 1 to 3 hours. Its essence can be described as follows:
- The skin is treated with an antiseptic solution, and an incision is made in the projection of the stenotic lesion with convenient access. It is chosen so as to provide maximum protection from damage to the structure of the musculoskeletal system.
- Monitoring his every movement, the neurosurgeon takes the nerve away from the protruding part of the vertebra to a safe place and begins to remove fragments of modified joints, ligaments, vertebrae, intervertebral discs, etc.
- If necessary, a stabilizing metal structure is installed.
- The postoperative wound is washed, disinfected and sutured.
After surgery with a microscope, you can get up and move independently on the same day or the next. The patient will have to stay in the hospital for at least 4 days. If there are no complications, he is discharged home and sent to undergo a rehabilitation course.
Disadvantages of exercising on an inversion table
- It is not the only way to solve problems associated with spinal diseases.
- It gives only a temporary effect that does not last without exercise.
- Allows you to perform a limited number of exercises that do not fully affect all important stabilizer muscles.
- It can aggravate the problem; if you use the exercise machine incorrectly, there is a risk of getting new injuries.
- It has a large list of restrictions and contraindications.
In what cases and for what diseases is it used?
An inversion trainer for the spine can be used for many pathologies, but it is important to remember that with arthrosis, as well as ankylosing spondylitis, use can become dangerous due to stiffness of movement.
The simulator can be usefully used both for treatment and for preventive purposes for the following pathologies:
- Poor posture.
- Scoliosis 1 or 2 degrees.
- Spasm of muscle fibers.
- To prevent varicose veins and blood stagnation in the pelvic area.
- Impaired blood flow and lymph movement.
- For relaxation amid stress.
- To strengthen muscles and ligaments.
After a working day, an inversion board for the spine will help relieve excess fatigue.
Top 3 manufacturers of inversion tables
Inversion table OPTIFIT
Home budget exercise machines with soft, comfortable bolsters and clamps, can withstand user weight up to 136 kg, and are mechanically fixed in three positions. There are models with massagers. The cost varies from 11,800 to 14,500 rubles.
DFC inversion table
A brand of home exercise equipment, including inversion tables, offering a huge selection of exercise equipment of various characteristics and a wide range of prices. Exercise machines with a folding design can withstand user weight from 110 to 150 kg, depending on the model and cost, and are adjustable in several positions: 40, 60, 90, 180%. There is a model with a massager and remote control (price about 24,000 rubles). Prices for all models vary from 10,400 to 50,000 rubles.
Inversion table Z-UP
A more expensive nonsense, representing a wide range of professional high-quality electric inversion tables. The simulators can withstand load weights from 120 to 136 kg. Folding design, the exercise equipment runs on electricity and is controlled by just two buttons. In the event of a power outage, the table returns to its original position automatically. The cost of products ranges from 100,000 to 200,000 rubles.
What effect does it give?
A simulator for stretching the spine upside down is not a panacea for any pathology. It helps treat diseases, but does not eliminate their root cause, so it should only be used in combination with other methods of therapy.
Regular exercises give the following effect:
- Relieving muscle spasms.
- Increased blood flow to brain cells.
- Strengthening the ligamentous apparatus.
- Increased intervertebral space.
- Reducing pressure on nerves.
- Improved blood circulation.
- Developing flexibility and improving posture.
- Elimination of edema.
- Acceleration of metabolic reactions in the body.
- Strengthening the immune system.
- Weight adjustment.
The exercise machine is perfect for preventing varicose veins on the legs.
What exercises can you do?
The purpose of the board is to stretch the spine, but the simulator allows you to do others:
- Train your abdominal and back muscles. The upper part is fixed and the legs are raised from the table.
- Fixing your legs, raise your head and chest.
- When performing a rotation, lower your head down and stretch your legs up.
- In the same position, bend your legs at the knee joints, trying to touch your feet with your hands.
Constant training will help eliminate pain, make muscles stronger, and develop flexibility.
How to do it yourself?
If you decide to save money and know how to use carpentry tools, then you can make a simulator with your own hands. The step-by-step instructions are as follows:
- Cut the prepared board in accordance with the dimensions of the future simulator.
- Sand the slats.
- Apply varnish to the surface.
- Drill holes at the joints of the parts.
- Insert pieces of metal pipe.
- Connect the slats together using bolts and nuts.
- Install and secure the cross bars.
- Restrictive cords are attached to the legs of the exercise machine with screws.
- In the lower part and in the area of the hip joints, fasten loops from the belt for fixation.
- Straps are attached to hold the chest.
- Attach pieces of rubber to the end of the table legs to prevent slipping.
The homemade exercise machine is not designed for heavy weight, so it is better not to use it for training people weighing more than 80 kg.
Drawing and dimensions
Unfortunately, the price of such simulators, despite their simplicity, turns out to be quite high. For example, in Moscow the cost ranges from seven to ten thousand. However, many craftsmen say that there is nothing difficult in producing such a board. Indeed, a little dexterity, the ability to handle tools, as well as the necessary materials - and the trick is in the bag, a useful healing prophylactic is ready.
- Pine timber (150x50) for the base of the simulator with cabinet chipboard (16 mm) attached to it. The length is, according to our drawing, 2 meters 40 centimeters.
- For the carriage there is the same beam (length 27 centimeters). It is advisable to choose durable types of wood.
- Two meters of mounting rail (2x40).
- Three meters of metal chain, 4 mm thick.
- The lower base (length 0.6 meters) is easiest to saw off from the blank for the handle of a shovel or hoe.
- The carriage crossbars are made from the same cuttings (length 0.55 meters)
- Screws with a diameter of 5 millimeters for securing slats and beams.
- Nuts and washers, 8 mm in diameter.
- Screws with washers, diameter 6 millimeters (length 10 centimeters).
- Bolt Ø 8, L 70.
- Dowels and hooks for the wall.
- Carbine.
- Nails of different sizes.
- An electric drill, preferably with a screwdriver.
- A set of cutter attachments for drilling large holes.
- Wood saw and metal hacksaw.
- Screwdriver Set.
- Hammer.
Manufacturing method
To prevent your board from slipping, we have come up with a simple and effective life hack. To do this, a piece of rubber is cut to size, for example, from an old camera, and then fixed to the lower edge of the simulator.
- In order to secure the board from below, drill a large hole into which the base will be recessed. Coordinate all dimensions with the presented drawing.
- On the other side, a hole is drilled at an angle. It must be end-to-end and is intended for the securing chain.
- Make holes in the base for the bolt heads so that they do not damage the floor surface during exercise.
- Two more holes are drilled at the base of the carriage, which will be used for fastening.
- It is better to cut the ends of the carriage (200×320) from a durable board. It should easily support the weight of the person who will exercise on the machine.
- Make holes at the ends for the crossbars (handles).
To make working out on such equipment not only useful, but also enjoyable, its base must be covered with thick fabric. The easiest way to secure it is with a stapler. Experienced people advise using an old overcoat or something similar for this.
Assembly
First, the carriages are assembled. To do this, you need to glue the ends to the base and connect them through a through hole in the base. Be sure to tighten the connecting nuts thoroughly to prevent the structure from becoming loose with regular use. The top crossbar can simply be nailed to the ends. The bottom one just needs to be inserted - it will be adjustable and there is nothing to secure it to.
- Thread the chain through the hole in the beam.
- Secure the beam itself with chipboard screws.
- The lower base is attached to the screws.
- On the back side it wouldn’t hurt to screw some slats on which you can adjust the carriage.
Lastly, you need to drive dowels onto the wall or ceiling to which the chain will be attached. By rearranging the carabiner along the links of the chain, you can easily change the inclination of the board. Pay attention to the drawing of the assembled Evminov board, how it will look when attached to the wall.
However, there are people who do not want to suffer for a long time, but just get up and study. They take an ordinary board, attach a crossbar to it, and then simply lean it against the wall. This simplified version also has a right to life. However, keep in mind that the stability of such a simulator leaves much to be desired, so you can easily fall off it, causing yourself further injuries.
If you purchase a factory table, it has height adjustment, which allows more than just one family member to study. You need to select a size 10 cm larger than the tallest person. When creating your own simulator, you should also add 5-10 cm to the parameters of the table top and support legs.
In the standard scheme for making an inversion table made of wood, the height is 2 m, the angle between the supporting legs is 40 °, the width is about 1.5 m. For the tabletop, it is recommended to take 4 wooden slats 3 cm thick or glue two sheets of chipboard (1, 6 cm). When changing the dimensions of the product, you should adhere to the angle between the supporting legs.
How to choose?
In order for a reversible table for the spine to bring benefit and not harm, it is necessary to take a responsible approach to its choice. When purchasing, you need to pay attention to the following points:
- Model weight. Lightness allows you to quickly and conveniently transport the table. But this design becomes not so stable.
- Quality of material. The table must be inspected, all wear parts must be made of durable metal, the handles are made of non-slip material, and the plastic back must have holes for ventilation.
- Table category. It can be stationary or portable. The first option is more reliable and stable, it will last longer, but there is no way to transport it after installation.
- Table management. It can be mechanical or electronic. The first option is cheaper in cost, and the electronic mechanism is more convenient to use.
- Possibility of regulation. When purchasing, it is important to pay attention to the possibility of adjustment to a person’s height.
- Pay attention to the number of adjustable positions. With a large number of them, it is possible to diversify your workouts and regulate the load.
- Availability of clamps. They must be reliable. You need to pay attention to their width; narrow ones can dig into the skin and cause discomfort and pain during exercise.
- Before choosing, you need to carefully study customer reviews about manufacturers and models.
If you decide to purchase such a simulator, then you need to get acquainted with the features of the models existing on the market.
Patient reviews
Reviews from doctors and patients about the spinal inversion table are mostly positive. A negative effect is possible if the rules for using the simulator are violated, or if a person has contraindications.
Olga, 40 years old, Penza. The diagnosis of lumbar disc protrusion was made three years ago. After a year and a half, pain began to occur periodically. I started using inversion stretching on the advice of my attending physician. The condition has improved, the pain occurs less frequently and is not as intense.
Igor, 51 years old, Volgograd. I have been suffering from a spinal hernia for 6 years. I bought an inversion table two years ago and I work out regularly. I noticed that the attacks of pain are not so acute, and the periods of remission have increased. I will continue my studies.
An inversion table is not a panacea; it does not cure the disease, but only temporarily alleviates the symptoms. Its use does not exclude other methods of treating spinal diseases, both conservative and surgical.