≡ September 26, 2020 Category: Mind & Body
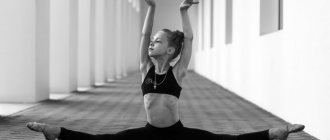
The main thing in yoga is meditation. However, during classes you have to perform unusual exercises, balancing and stretching. These positions are called asanas, which literally means “place to sit” in Sanskrit. All yoga asanas are performed consciously, with pleasant effort and without unnecessary tension. During practice, the human body takes on forms that resemble different creatures. Thus, the cobra pose in yoga is very popular - Bhujangasana. No less famous is Baddha Konasana, a classic butterfly pose in yoga that helps pregnant women prepare for childbirth. In addition to simple basic asanas, there are also intricate ones, such as Mayurasana. The difficult peacock pose in yoga even has several levels of difficulty. There are other positions that no less contribute to the balanced physical and psycho-emotional development of a person. Let's look at what they are next.
Why are yoga poses named after animals?
Each name consists of several parts. “Asana” is the second element of the word. The first part can mean an object, the name of the inventor, a plant, a living creature (for example, Bakasana - crane or crow pose in yoga). Images of animals are noted both in the Sanskrit names and in the translated English ones.
Yoga mentions: swan, frog, snake, dove, cat, scorpion, rabbit, turtle, locust, camel. This is not the entire list of living creatures from which a person can learn a lot: wisdom, agility, quick reaction, patience.
According to ancient treatises, before receiving a human body, people live a series of lives in the bodies of living beings. The soul must fulfill the commandments of each animal, for which it is rewarded with its positive qualities. If the instructions are violated, then vices and diseases are transmitted to the person. This is how a person’s karma is formed.
Asanas help eliminate unwanted imprints of past lives. A person who regularly practices yoga burns out his negative karma over time and receives positive karma in return. At the beginning of the path, the yogi neutralizes negative tendencies and illnesses fade into the background. But as soon as he stops practicing yoga at the initial stage, everything returns to normal.
How many asanas are there in yoga?
In Indian practice there are as many postures as there are types of living beings. According to ancient texts, there are 8.4 million. Interestingly, the conclusions of the ancient sages are close to the calculations of modern scientists, who estimate that approximately 8.7 million species of living organisms now live on the planet.
Shiva, the great deity from Indian mythology, was able to do all 8,400,000 poses of ancient yoga, because he had an unusual body with four arms. Such a number of asanas is beyond the power of a person, so Shiva outlined the main 84 that people can use.
In 1975, the famous yoga veteran Sri Dharma Mittra decided to find all the poses from ancient yoga. He devoted several years to studying the treatises and found 908 different asanas with descriptions. Together with all sorts of variations, there were 1300 of them. He repeated each pose, explained its meaning and developed a diagram with detailed photos.
Teachers continue to invent new asanas, and add their own elements to the old ones. But it is not necessary to study all existing poses. The main thing is to follow the basic provisions, without which practice will not be productive and complete.
How to perform asanas correctly?
Professional athletes have excellent flexibility and regularly stretch in training, but are often unhappy with themselves and suffer from health problems. This is because they only train their body, leaving their mind and psyche untouched.
You cannot achieve enlightenment and get maximum benefit from asanas by mindlessly repeating the movements. To turn inside yourself, you need to follow the rules:
- immobility (except for some sitting positions);
- mental silence;
- maximum relaxation;
- correct yogic breathing and smooth filling of the lungs with air.
For each asana you need to do from 3 to 10 breathing cycles (inhalations and exhalations). During classes, unbearable pain is unacceptable, which in yoga is considered the suffering of the body - physical torture does not contribute to achieving internal balance and harmony.
A huge advantage of the classes is that a person with any level of physical fitness can practice yoga. Each pose has a basic version, a simplified version and many complex modifications. In addition to asanas, part of the practice are:
vinyasas – dynamic movements (for example, preparatory asana “rotating the mill”);- pranayama - breathing exercises;
- shatkarmas - a set of cleansing practices for the body and mind (rinsing the nose, cleansing the stomach, concentrating on the flame, etc.);
- meditation – relaxation with going beyond the limits of the body and consciousness.
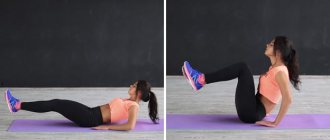
Dolphin pose. Dolphin (Dolphin pose.
Dolphin pose is an asana that will prepare the physical body to safely perform sirshasana (headstand), one of the most powerful exercises in hatha yoga. The dolphin pose strengthens the muscles of the back and arms, and corrects curvature of the spine. Blood supply to the brain improves and the functioning of the nervous system is stimulated. In terms of energy, it affects ajna and sahasrara. Starting position - sitting on your knees (vajrasana - diamond pose.
Execution technique - the body leans forward, the top of the head rests on the mat. The hands are placed behind the head, the fingers are clasped together, the palms are pressed to the back of the head. Elbows rest on the floor. Hands act as supports to help maintain balance. When the head and arms are securely fixed on the mat, the legs are straightened, the pelvis is lifted upward, and the toes remain on the mat. Touching your toes, you need to bring your feet closer to your head so that your torso assumes a vertical position. You should breathe slowly and deeply, mentally repeating the mantra so - ham (inhale - so, exhale - ham. It is enough to be in the pose from 9 to 18 breaths.
You need to exit the dolphin pose correctly. First, the knees are lowered to the mat, and only after that the head is lifted off the mat. But you can sit back in the diamond pose only after a special rest - your hands are clenched into fists and placed one on top of the other. And the forehead rests on this stand. In this position you should rest for 3 to 9 breaths. Rest in shavasana (18-27 heart beats) will completely normalize blood circulation and relax the body. As soon as the body is ready, you should leave the practice of the dolphin pose and begin to master Sirsasana.
Classification of asanas
There are many different classifications of asanas, since teachers from different schools of yoga (Iyengar, Bikram, Ashtanga Vinyasa, Kundalini, etc.) may have their own vision on this matter. In general, yoga poses can be divided into universal groups:
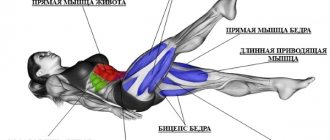
- In a sitting position. These poses improve mobility of the hip joints, relieve tension in the throat and diaphragm, and are often used for meditation. From the outside they seem simple, but they require good stretching and preparation, so they often cause discomfort for inexperienced yogis. When performing it, it is important to ensure that your back remains straight. The sitting pose of the hero and camel in yoga (Ushtrasana), as well as the sitting bend with feet wide apart (Upavistha Konasana), are easy for beginners. No less useful are the sitting poses of diamond, lotus, heron, cow, boat, garland, and wand.
- Standing. Such positions appeared later than others. They strengthen the leg muscles, improve the functional characteristics of the immune system, develop the ability to concentrate and allow you to do yoga poses that are difficult for a beginner without pain or injury. Some of them are: good warrior pose in yoga, eagle, stork, chair, extended side angle.
- With the torso bent forward. In such positions, flexibility of the back develops and the abdominal organs are massaged. The most famous are: Paschimottanasana (seated forward bend), Janu Shirshasana (stretching forward to one leg) and Ardha Shirshasana (dolphin pose), Uttanasana (standing bend to the legs).
- Backbends. The main effect is to straighten and increase the mobility of the spine. It is important to avoid extreme positions and pain in reverse backbends. To protect your lower back, roll your pelvis forward and tighten your glutes. The best backbends: fish pose, camel pose, cow pose, dove pose, Sphinx pose, dancing dog pose, cobra pose, fish pose, bridge pose.
- Twists. In positions with body rotation, even breathing is of great importance. If it is difficult to breathe, then the asana is being performed incorrectly. The pose of the sage Bharadwaja, the god of fish, the inverted triangle energizes, stimulates the internal organs and relaxes the mind.
- Inverted asanas. This group includes all stances in which the head is lower than the body and legs. The most popular is the candle pose (“birch tree”). The practice of inversions has a beneficial effect on the lymphatic, endocrine, cardiovascular, and respiratory systems. However, these asanas can also be harmful and have many contraindications: high blood pressure, spinal diseases (especially prolapsed discs, hernias), intoxication, pregnancy, women's periods.
- Balance poses. Asanas that are difficult for beginners require a lot of concentration and decent physical fitness. They help you better control your body and reduce the risk of injury. To hold a tiger, spider, tree, rooster, eagle or table pose on one hand for a long time, you will need coordinated work of trained muscles.
- Power asanas. Power yoga perfectly develops endurance, strengthens muscles and accelerates metabolism. Such activities are suitable for men who want to strengthen men's health and improve potency. They are also preferred by trained women who love unusual strength training. Especially revered by experienced yogis are high forward lunges and poses of a horseman, sumo wrestler, sage, seven points, boat, grasshopper, bird of paradise, mountain.
- Relaxation positions. Downward and upward facing dog, standing bends, plow, camel, cobra, crane, crocodile, extended child and plank poses are ideal for performing in the evening. They relax muscles that are tight in the shoulder and neck area, stretch the spine, and improve blood circulation in the pelvic area.
- Combined. Some asanas combine strength work with the ability to maintain balance. Crow and Prosperity Shoulder Pose, Reverse and Folded Staff Pose and other advanced asanas can be done by real gurus and inspire awe in beginners. After stretching and squeezing different parts of the body, blood circulation improves, which has a positive effect on the functioning of all organs and systems.
In Antigravity Yoga, the listed poses are performed not on the floor, but with emphasis on a hammock. There are also special poses for two and even three people. Master them, as well as poses for one, preferably with an experienced teacher in an individual lesson or in a group. Self-studying asana techniques at home using visual photos or videos can lead to injury.
Dolphin Pose - preparation for Headstand
Practicing inverted poses, whether Adho Mukha Vrksasana (Handstand) or Sirsasana (Headstand), can feel incredibly freeing. Inverted poses generally have a lot of advantages that manifest themselves on the physical, mental, and emotional levels. But their implementation requires strength, flexibility and lack of fear of the unusual position of the body in space, which often becomes a serious obstacle to the practice of these poses. If your body and mind are not yet ready to perform inverted poses, incorporate Dolphin Pose into your practice. It will help open the chest, stretch and strengthen the abdominal and back muscles that support the spinal column in an upright position - in short, it will prepare you for inverted poses, and in addition, it will become a worthy alternative to them.
| wrong Don't round your back | Correctly move your shoulders up from your elbows |
In the first variation of Dolphin pose, the arms are positioned in the same way as in classic Shirshasana, but the head does not touch the floor.
Get on your knees and interlace your fingers, “hiding” one little finger behind the other, to evenly press the ribs of your palms to the floor. With your hands on the floor, spread your elbows shoulder-width apart. Make sure that the inside of the wrist is positioned exactly above the outside: the palms and forearms should not turn outward. Press your hands firmly to the floor from palms to elbows. To make the contact between your forearms and the floor really tight, try lifting your forearms, leaving your elbows on the floor, and then suddenly lower them to the floor in a motion similar to a karate chop. The ability to create truly strong contact makes the pose holistic and alive, and only by properly pressing your hands to the floor can you stretch upward. As you actively press your forearms into the mat, lift your shoulders up off the floor to avoid excessive compression in the shoulder girdle and neck.
Then tuck your toes and move your pelvis back and up, as in Adho Mukha Svanasana (Downward Facing Dog Pose). Push your forearms off the floor so that your shoulders and pelvis move away from your elbows, and your body extends into one line. Straighten your knees and stretch your heels towards the floor. Relax your neck and back of your head. Extend the front and back surfaces of the body evenly. If you are flexible, do not push your front ribs toward the floor; instead, point them inward toward your spine. If the back is rounded, most likely the reason is insufficient elasticity of the popliteal ligaments. And since your main goal is to stretch the spine as much as possible, if necessary, you can slightly bend your knees. Stay in this position for 10-15 breathing cycles.
The next stage is a variation of the Plank pose, which strengthens the shoulders, abdominal and back muscles. Here the position of the hands is the same as in Pincha Mayurasana (Forearm Stand). To prevent the palms from coming together and the elbows from moving apart - and this happens quite often, especially with those with a rigid shoulder girdle - we will use auxiliary materials. Place the belt around your arms, just above your elbows. Place the brick on its widest edge, parallel to the front edge of the rug. Place your palms on either side of the brick so that your thumbs and forefingers are pressed against its edges. Now step your feet back until your body is in a straight line.
Spread your feet hip-width apart and press the balls of your toes to the floor. Once you position your pelvis in line with your shoulders, your shoulders will be directly above your elbows. To engage the abdominal and back muscles that keep your spine upright, push your heels back and push your sternum forward. At the same time, pull your tailbone inward and point your upper thighs up toward the ceiling. Gently look forward. Stay in this position for 10-15 breathing cycles.
The full Dolphin pose combines the main work of the first option with the position of the hands of the second. Lower your forearms onto the mat, placing them parallel to each other and spreading your wrists and elbows shoulder-width apart. Tuck your toes and move your pelvis back and up. If your elbows move to the sides, use auxiliary materials. Otherwise, the heads of the humerus will “fall” forward, and this will create additional tension in the muscles of the neck and upper back.
Press your forearms to the floor from your wrists to your elbows, pushing with them so that your shoulders and pelvis rise as high as possible towards the ceiling. Draw your shoulder blades inward and direct your chest towards your hips - this will help open your upper back and shoulder girdle. However, if you are flexible enough, do not push your front ribs and armpits towards your hips. Instead, lengthen the front and back of your body evenly, softening the front ribs and engaging your triceps to lock your armpits into proper position. Press your hands firmly into the floor to lengthen your spine and bring your pelvis as high as possible toward the ceiling. If you can straighten your legs without rounding your back, push the front of your thighs back. Otherwise, bend your knees slightly and try to lengthen your spine while maintaining the same position. Relax your neck and back of your head. Hold the pose for 10-15 breathing cycles. Try to feel a pleasant stretch in your spine and shoulder muscles and at the same time feel the strength that helps you lift your body up off the floor with ease. This is precisely the essence of yoga - in merging together what at first glance seems completely opposite in meaning. In this case, creating an asana that combines stability and strength with extension and space. Patanjali wrote: “By experiencing both stability and lightness, a person gets rid of the influence of opposites.”
Effect
- Opens the chest
- Improves digestion
- Calms the nervous system
- Strengthens arms and legs
- Relieves symptoms of menopause
- Prevents the occurrence of osteoporosis
Contraindications
- Hypertension
- Glaucoma, inflammation of the retina
- Injuries to the wrists and shoulder muscles
Photo: istockphoto.com