The benefits and harms of handstands
A handstand against a wall or in a free position (without support) is a gymnastic element. The exercise gained maximum popularity in CrossFit, where headstand and handstands are used in many complexes.
Key benefits and reasons to do handstands:
- One of the most impressive tricks that demonstrates a high level of physical fitness.
- Develops almost all the muscles of the upper body.
- Creates flexible and strong shoulders, core muscles, and back.
- At the same time, it combines dynamic and static loads, giving maximum preparation when performing the element.
- Strengthens the muscles that fix the spine and is an excellent prevention of intervertebral hernias and protrusions (only with a competent approach and not during periods of exacerbation of disc problems).
- Develops a sense of equilibrium and balance.
The exercise has almost no disadvantages, with the exception of some features:
- Technically, the handstand is a very complex movement. Therefore, mastering it requires a high level of training.
- The exercise can be traumatic for the shoulders and back (if the technique is not mastered sufficiently).
Multi-stage training can
also a drawback To learn how to stand on your hands, you need to perform a number of exercises to strengthen some muscles, as well as gradually complicate the technique, from the easiest level to the moment when you can do a handstand in the classic version.
Before you can run, you need to learn to walk
Practicing handstands is not the only way to learn how to do them. If you can already perform a headstand or forearms, then you are halfway there.
Until you are confident, practice against a wall for support, keeping your hands shoulder-width apart with your fingers and elbows pointing forward.
Focus on stretching your body in a straight line from head to toe, squeezing all your muscles for stability and better control. Maintain balance by adjusting the weight on your fingers and palms.
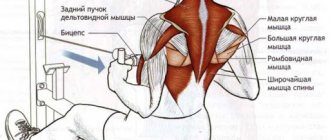
What muscles work during a handstand?
Before learning how to do a handstand, you need to understand which muscles work during the execution of the element. This will tighten weak and limiting muscle groups and strengthen the main working areas with additional exercises.
Dynamics involves:
- Deltas – front and middle beams.
- Triceps.
- Pectoralis major muscle.
- Trapezoidal.
In static mode the following work:
- Spinal extensors.
- Gluteal.
- Core muscles.
- Forearms.
In general, to stand on your hands you need to engage almost all the muscles of the body, which is why this movement is one of the most difficult gymnastic elements.
Why stand on your hands?
In addition to the fact that the handstand itself looks very impressive and allows you to demonstrate the athlete’s physical fitness, it is a very useful exercise in terms of training.
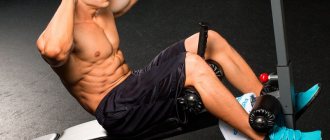
Muscles working during the exercise.
An argument for learning how to perform this exercise can be any of the following points:
- A handstand gives a powerful workout to the muscles. The main emphasis is on the shoulder girdle, arm muscles and core.
- Coordination of movements and a sense of balance are trained, and the overall level of control over your own body increases. The benefits of such training are obvious not only in the gym, but also in everyday life.
- The inverted pose helps improve blood circulation. Blood rushes to the brain, increasing the supply of oxygen to its cells.
Handstand technique
There are two main techniques:
- With a fully straightened body - a “straight” pose. Recommended for athletes weighing less than 80 kg, as the simplest and safest option.
- With a back bend or “banana” - holding a position with a bend in the lower back. Athletes with a body weight above 80 kg are recommended to start mastering the technique with this technique, as this option will reduce the load on the lumbar region. This technique prevails in CrossFit.
Despite the difference in the position of the body, there are no differences in the technology of the racks. Therefore, if you have learned to stand on your hands correctly in one position, the second option will also be available (the only difference is the load and balancing).
Technique:
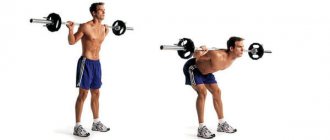
- Bend at the waist and place both hands on the floor so that your palms are directly under your shoulders. Spread your fingers to the side, this will provide additional stability. When performing against a wall, your hands should be 20-23 cm behind.
- Swing your leg sharply to gain momentum. After this, make a powerful push with your other leg and fix your legs in the air.
- Hold the position for as long as possible, then return to the starting position in the same order.
- In the exercise, it is important to control the force of inertia when throwing your legs. With a strong push, there is a high risk that the legs will not be able to be fixed at the top point.
- When holding a position with a bent back, the correct position in the lower back is assumed after throwing the legs (immediately before fixation).
Benefits of headstand
Exercise benefits the spine and the entire body as a whole. At first, the body experiences stress from the unnatural inverted position, but this state is useful because... activates metabolic processes in the body.
Relieves swelling . Regularly performing handstands or headstands helps relieve swelling. This is due to the redistribution of blood and lymph throughout the body, due to which the swelling gradually disappears.
Rejuvenates the body . Activating blood flow to the face improves complexion, tightens the skin and fights wrinkles. Increased blood flow to the brain has a positive effect on the functioning of the hypothalamus. It better regulates the functioning of the thyroid and adrenal glands.
Prevention of varicose veins . The stand is useful for varicose veins and an increased risk of dilation of venous vessels, because When performing the asana, venous outflow from the lower extremities to the head improves.
Has a positive effect on visual acuity . Performing a stance has a positive effect on visual acuity. Blood flow improves nutrition of the organ of vision. Stagnation in the retina passes, and vision gradually improves.
Improves the functioning of the digestive system . A person who regularly performs the asana improves digestion and relieves constipation.
Promotes conception . Women's reproductive function improves, thereby increasing the likelihood of pregnancy.
Acceleration of hair growth . The stand improves hair nutrition, the rush of blood to the head promotes more active growth. Some women manage to achieve full and beautiful hair by doing yoga exercises.
Benefits for the cardiovascular system . Due to the inverted position of the body, blood flows away from the heart. It “reboots” and starts working correctly. In humans, blood clots and cholesterol plaques dissolve.
Yoga experts point out that asana redistributes the flow of internal energy. A person’s chakras open, and the body begins to work harmoniously
Recommendations
The exercise is a highly specialized movement. It is usually mastered in gymnastics, crossfit or calisthenics. The movement can provide powerful development of the entire upper body (with an emphasis on the shoulder girdle), but requires a long time to master all the technical features.
To learn how to stand on your hands without a wall as quickly as possible, you need to consider the following recommendations:
- It is more difficult for athletes with massive legs to master all the elements, so it will take more time.
- It is highly not recommended to start mastering the exercise without support. The wall option is not only safer, but also more effective for beginners.
- If you lose your balance at a support, keep your balance using your head, not your toes.
- The most difficult part of the exercise is considered to be maintaining balance, therefore, without powerful core and back muscles, correct execution is unlikely to be possible.
- If you feel that you cannot correctly perform all phases of the movement due to certain muscle groups, it is recommended to additionally perform exercises with weights to strengthen them.
- Keep your shoulders in a natural position. Lowering, lifting or rotating slightly can cause serious injury.
Errors
Beginners who don't know how to learn handstands will face a number of common mistakes.
Extend your arms over a long distance. This shifts the center of gravity and makes it difficult to maintain balance. Ideally, your palms should be shoulder-width apart.
Arms bent at the elbows. In this case, the main load falls on the elbow joint, which is likely to lead to injury. Your arms should be perfectly straight.
The body is tilted back and is behind the shoulders. You will never maintain your balance in this position. Try to keep your body straight. If you cannot control yourself, ask an assistant about it.
Bent spine. Another reason for your falls during your first workouts. Spread your shoulder blades and straighten your back.
By understanding how to avoid the most common mistakes, you will learn how to perform the exercise faster.
Exercise technique
The handstand push-up exercise is difficult to coordinate and requires you to be in extraordinary physical shape. Therefore, if you tried to perform this movement and you couldn’t even get into a handstand, let’s learn a simple set of exercises necessary to get yourself into the right condition.
Before you start the exercise
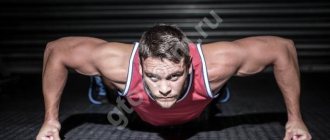
- Push-ups from the floor for 3 counts, with a delay in the lower position: from the starting position at the support, lying down, by bending the arms at the elbow joints, we lower ourselves down: the chest does not reach the floor literally a few millimeters. The elbows are located along the body - thus, the load falls on the triceps and anterior delta - the main muscle groups for us. In the lower position, we perform a distinct pause of 2-3 seconds, rise in three counts, that is, quite slowly. We start with 10 repetitions in three approaches. The goal is to reach 20 or more repetitions without feeling too much muscle acidification.
- Push-ups in a closed horizon. Starting position: in a handstand, legs bent at the knees and hips, knees touching the chest. Hands touch hips. Bend the elbow joints, keeping the body horizontal. We start with 10 repetitions (or as many as you can). The goal is 20 or more confident repetitions.
- Raising the body from the horizontal position. The starting position is as described above. The arms are slightly bent at the elbows. Our task is to move the body from a horizontal position to a vertical position as much as you can. The task is to bring the body with bent legs to a completely vertical position.
When you succeed, begin to smoothly straighten your legs, first spreading them apart, then try to keep your body “in line.”
Near the wall
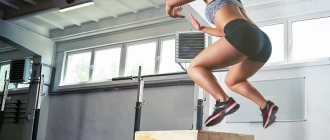
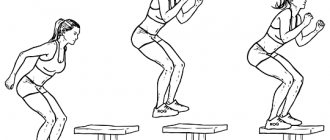
- Handstand push-ups against a wall. A movement that directly prepares you to perform a push-up upside down. Starting position: standing on your hands 20-50 cm from the wall. The body is stretched upward, the heels are “piled up” on the wall. Let’s make a reservation right away: you can swing the walls with your heels, you can swing with your toes, you can swing with your whole foot. The closer to the “socks”, the harder the option! Start with the simplest! Hands stand slightly wider than shoulders. Sliding the supporting part of the foot along the wall, we lower ourselves until the head swings to the floor, by bending our arms at the elbow joints. After this, resting our palms on the floor, we return the body to its original position due to the powerful combined effort from the triceps and deltoid muscles. The goal is to do 10 repetitions in at least one series.
© satyrenko — stock.adobe.com
- The last exercise is an attempt at a handstand. It is optimal to do this from a position of holding the “horizon”. It is fundamentally important to end this complex with this movement in order to consolidate the correct kinematics of movement against the background of muscle fatigue.
Systematic implementation of this complex at least three times a week will allow you to achieve a handstand in a fairly short time (1-2 months) and do your first push-ups from the floor upside down.
The exercise itself
Starting position : handstand, palms on the floor shoulder-width apart, or slightly wider. Body weight is evenly distributed across the entire surface of the palms and fingers. The spine is arched in the lumbar region, the pelvis is slightly in front of the head, the toes are directly above the head.
Let's go down...
We bend the elbows and shoulder joints, while the chest shifts slightly to a more horizontal position - this moment must be clearly grasped and the deflection in the lower back must be strengthened, thereby compensating for the shift in the center of gravity of the body.
...and we rise
As you lift your body, press your palms into the floor, returning your chest to its original position. Again, by shifting the pelvis, we compensate for the change in the position of the center of gravity.
An important technical point regarding the position of the legs: if the legs are spread apart, the center of gravity is closer to the hands; accordingly, maintaining balance becomes much more difficult. It is recommended to start mastering push-ups from the floor upside down with this option.
Step-by-step execution of a headstand
- Interlace your fingers at the top of your head, spread your elbows to the sides.
- Lean forward and lower your head and forearms to the floor in the same position. The neck is extended, the shoulders stretch upward towards the pelvis.
- Straighten your knees, place your toes on the floor, and come as close to your arms and head as possible so that your tailbone and pelvis are above the top of your head.
- The spine is elongated. When you get as close as possible and feel that the body weight is on your forearms, lift your leg off the floor and pull your bent leg towards your chest. Do not make a strong smell, otherwise the body may be pulled back by inertia and the body weight will be distributed incorrectly. Press the knee of the leg that participated in the push-off to the chest and slowly straighten it without losing balance.
- Take your time to straighten both legs until you feel confident in the position.
- Slowly move your legs up until your head, pelvis and legs form a straight line. Make sure that there is no arching in the lower back; to do this, tuck your tailbone forward.
The pose must be held for at least half a minute. You cannot leave the pose abruptly. Come out as gradually as when building up the pose.