There is one good saying: “yoga is 1% theory and 99% practice.” And in fact, it can be very difficult to study asanas that are not always immediately understandable from books or articles, especially for a beginner; it is better to see and hear once. That is why we offer you a selection of videos for beginners from experienced and trusted gurus - lessons at home.
- Yoga for Beginners at Home with Louise Seear and Rachel Zinman
- Video: Yoga for Beginners with Louise Seear and Rachel Zinman
- Yoga for beginners with Inna Vidgof and Ravi Kumar
- Video: yoga for beginners with Inna Vidgorf and Ravi Kumar, 1 online lesson
- Hatha yoga for beginners with Olga Bulanova
- Video lessons: Hatha yoga for beginners with Olga Bulanova. The very first poses, the best poses for women
- chilelavida: yoga for beginners with Elena Malova
- Video: Dynamic yoga for beginners 60 minutes
- Video: Vinyasa yoga in the morning 20 minutes - recharge your energy
- Video: Yoga before bed / relaxation of body and mind
- Andrey Sidersky. Yoga 23 for Beginners
- Video: Morning complex Yoga23
- Video: Andrey Sidersky, Yoga23 complex for beginners and more
- Video: Andrey Sidersky. Surya Namaskar. 1 time.
- Hatha yoga for beginners with Anton Ivanov
- Video: Yoga for beginners. Lesson 1. Introductory lesson. Safety precautions
- Video: Yoga for beginners. Lesson 2. Mastering balance
- Video: Yoga for beginners. Lesson 3 from. Asanas for the stomach
- Yoga for beginners with Ekaterina Buida
- Video: Malasana III / Garland Pose III / Yoga for Beginners
- Video: Yoga for women's health / yoga for beginners
- Video: Sukhasana / comfortable pose / yoga for beginners
- Joy Yoga: Yoga for Beginners with Joy Nielen-Groen
- Video: Jo Yoga for Beginners with Jo Neelen-Groen
- Irina Kutyina. Yoga for Beginners
- Video: Sculptor of your body
- Yoga for beginners with Tatyana Borodaenko
- Video: Yoga for beginners. Tatiana Borodaenko. 01
- Video: Yoga for beginners. Tatiana Borodaenko. 02
- Video: Yoga for beginners. Tatiana Borodaenko. 03
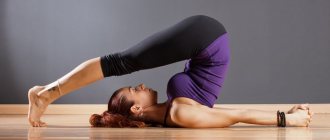
Malasana (garland pose)
For beginners, the Garland pose will greatly help in supporting the body. It can be easily done at home. It is very important to master it and systematically perform it, since it has a harmonious effect on the body:
- Refreshes and calms brain activity.
- Normalizes hormonal levels in women, so it can be performed during menstruation.
- Fat deposits in the lower abdomen are broken down.
- The abdominal organs become toned.
- Relieves arterial pain in the back and ankles.
- The spinal axis is strengthened.
- It is allowed to perform during diseases of the upper respiratory tract.
It is forbidden to perform Malasana if there are injuries to the back and knees.
To perform the Garland pose, you must:
- Stand straight, spread your legs shoulder-width apart.
- Sit down without lifting your heels from the surface. Turn your socks outward.
- Press your elbows to the inside of your knees, lower your tailbone to the bottom, put your palms together and squeeze.
- Extend the chest.
- Stay in the position for about 30 seconds, breathing using your stomach, evenly. then separate your hands and lower them to the surface.
- It is desirable that Malasana be present in all complexes for beginners.
Basic yoga asanas
Bridge Pose (Bandha Sarvangasana)
Bridge
Bridge pose is a gentle way to begin stretching the spine. This pose will help improve spinal mobility and help offset the effects that sitting for long periods of time has on the spine. If this pose seems too difficult at first, place a block under your back.
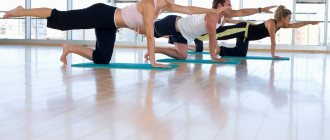
Chakravakasana
Bridge
This pose is great for both stretching and bending the spine. The back and forth movement awakens and warms up the back, improves well-being and is a good introduction to vinyasa, helping to synchronize breathing and movement.
Child's Pose (Balasana)
Rest
It would not be an exaggeration to call this pose the most important for beginners. Despite the fact that this pose perfectly stretches the back and hips, this is not its main advantage. Child's Pose is a resting time during yoga practice. You do not need to be instructed by an instructor to do this pose; you can do it at any time by listening to your body and acting in accordance with your own sensations. Wonderful, isn't it?
Shoemaker Pose (Badha Konasana)
Seated pose
Let gravity work to stretch your inner thighs in Cobbler Pose. If you find this pose difficult, prop it up - sit on a block or folded blanket so your hips are higher, this will allow your knees to open more naturally. It will take a lot of effort to keep your knees high, but your legs should be relaxed. To get the most benefit from stretching, place blocks or something supportive under your knees so they rest on them.
Cobra Pose (Bhujangasana)
Bridge
Cobra pose is performed many times during Flow Yoga classes in the sequence of Vinsyasa poses. A full-fledged cobra is performed on straight arms with a deep arch in the back, however, you can perform this pose in a version where you only arch your chest without supporting your arms, this will also allow you to secure your pelvis to the floor before you rise.
Dead Man's Pose (Savasana)
Rest
Every yoga class ends with a supine position in Mortuary Pose. This is an important transition from activity to everyday life. While your body is completely absorbed in performing the poses during a yoga class, your mind is freed. Bringing your body into a still position will make it difficult to feel a sense of calm at first, but over time it will become easier for you.
Downward Facing Dog (Mukha Svanasana)
Standing pose
We can't talk about yoga poses without talking about downward-facing dog pose. There is a reason why this pose is so common in pop culture; it is performed to achieve a variety of goals in almost every yoga class. It may be uncomfortable or challenging at first, but very soon the pose will become a natural place to rest and reset. Note that it is not so important to keep your legs straight; bent knees allow this pose to be accessible to many people.
Downward Facing Dog Pose
Standing pose, balance
Performing balance poses helps strengthen your core muscles. In this pose, it doesn't matter how high you can lift your leg, focus on not changing the position of your hips as you lift one leg off the floor.
Easy Pose (Sakhasana)
Seated pose
The fear of being in a cross-legged pose keeps many people from trying yoga, but in vain, it is not scary at all. It is wise to first use supports to make being in this position more comfortable. This posture can compensate for the negative effects of sitting on a chair for long periods of time.
Right Side Angle Pose (Utthita Parsvakonasana)
Standing pose
Although the picture places the hand on the outside of the foot, this is not the best option for many people. The hand can be placed on the block either outside or inside the foot, you can also place the forearm opposite the hip - this is good for beginners. Make sure that the position of your arms does not prevent your chest from opening towards the ceiling.
Garland Pose (Malasana)
Standing pose
Residents of modern cities in the 21st century rarely encounter squats, but this is a good exercise for stretching the pelvic muscles; in yoga it is often called a “opener” for the hips. Surprisingly, it is also good for your feet, which are often neglected. If squats are too difficult for you, use a support.
Half forward bend (Ardha Uttanasana)
Standing pose
Bend forward with a straight back is often performed during the Sun Salutation complex. As such, it is often rushed, but is worth working on separately. Feeling how flat your back is is an important part of developing body awareness. First, control her position in the mirror. Many people think that keeping your hands on the ground is preferable because it gives you a secure base, even if it rounds your back. This is not the case, place your hands higher on your legs in a way that allows you to keep your back straight.
Half Pose of the Lord of the Fishes (Ardha Matsyendrasana)
Seated pose
Crunches are an integral part of yoga. They help improve spinal mobility and also help the digestive tract function if necessary (for constipation, for example). You can straighten the lower leg if it is difficult to keep it bent in front of you.
Happy Child Pose (Ananda Balasana)
Rest
Happy Child's Pose is a wonderful way to end a yoga session. This is also a good example of the balance between tension and relaxation in yoga. You can press down on your feet to bring your legs closer to your armpits, but only until your tailbone begins to lift off the floor. Don't go to extremes, you need to find a middle ground.
Head to Knee Pose (Yanu Sirsasana)
Seated pose
Forward bends are difficult for those with stiff hamstrings (of which there are many). Avoiding bending will not help them stretch. Yanu Sirsasana is an accessible pose for most people because you only stretch one leg at a time.
Knees, chest and chin (Ashtanga Namaskara)
Bridge
This was one of the poses that beginners did as an alternative or preparation for the Chaturanga Dandasana pose. In recent years, the pose has become less popular, resulting in some students starting Chaturanga too early, when they are not yet ready. It belongs to the sun salutation sequence and is also a good way to warm up for deeper backbends.
Legs up along the wall (Viparita Karani)
Rest
It is impossible to do Viparita Karani pose incorrectly. This pose will be a real gift for those who spend a lot of time on their feet. You can remain in this position for several minutes to recuperate.
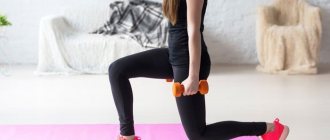
Lunge pose
Standing pose
Body position during a lunge is extremely important. Try to keep the correct angles - the knee should be strictly above the foot, and the thigh should be parallel to the floor. The back leg should be straight. Many people do not bend enough towards the front leg and, as a result, allow the rear leg to bend; check the execution technique in the mirror.
Mountain Pose (Tadasana)
Standing pose
You will see Tadasana pose in various lists of the most important poses and you will probably wonder why. Although it does not look difficult, it is difficult to explain the balance work that needs to be done and how important it is for other standing poses and for the overall sense of balance of the body. Taking this pose and staying still is the best way to start your yoga practice.
Plank
Balance pose
It may seem strange to call the plank a balance pose, since the danger of falling is negligible. However, this posture has another important meaning. It is needed for the development of the core muscles, and they, in turn, are needed for progress in other poses (standing balance poses or hand poses). Planking is a great way to build stability and endurance.
Pyramid Pose (Parsvottonasana)
Standing pose
While standing, lean forward like a pyramid. Place blocks on each side of your leg to raise the level to where you can comfortably place your arms. Your hamstrings will get enough load anyway and will thank you.
Raised Arms Pose (Urdhva Hastasana)
Standing pose
The pose is based on the mountain pose (see above). Urdhva Hastasana requires you to stand firmly on your feet while you reach your arms towards the sky. The result will be a full stretch of the body. This is a good way to start the strength portion of a yoga class.
Big Toe Retraction (Supta Padangusthasana)
Rest
In the "official" version of this pose, you have to hold your big toe with your hands. But this option is not suitable for beginners. If you go straight to a difficult variation, you may have to bend your knee and/or lift your shoulders off the floor. To prevent this from happening, use a belt.
Seated Forward Bend (Paschimottanasana)
Seated pose
It is no coincidence that in beginner poses there are so many exercises aimed at stretching the hamstrings. The fact is that in people who sit a lot, the muscles and tendons in this area shorten, which leads to back pain. Stretching them is good for both prevention and treatment.
Bend from a sitting position with legs wide apart (Upavistha Konasana)
Seated pose
Spreading the legs creates a different stretch in the legs compared to the Paschimottanasana pose (see above). It may seem like the goal is to get your chest to touch the floor, but this is an unrealistic task for most beginners. Concentrate on keeping your back straight and rotating your pelvis as much as possible in the direction of the tilt, instead of bending only through the curve of the spine, keeping your feet still. Follow your technique and then it will not be so important how deep you can bend.
Staff Pose (Dandasana)
Seated pose
It is often said that Dandasana is the seated equivalent of mountain pose. This is a fairly close description of this pose. If you have difficulty sitting with your back straight, place a folded blanket under you. This will lift the pelvis and tilt it forward slightly, which will allow the spine to feel more comfortable. You can do this in any sitting position.
Lying Twist Pose (Supta Matsyendrasana)
Pose on your back, rest
Passive trunk rotations are a good way to end a yoga class, although there are no hard and fast rules against doing this pose at the beginning of a class. The position of the legs is also not strictly regulated. If you have enough flexibility, you can straighten your upper leg and hold it. You can also rotate one leg in relation to the other, as in eagle pose, to stretch the outer thigh.
Tree Pose (Vrksasana)
Standing pose, balance
Tree pose is a good start to mastering balance poses. If you feel like you're losing your balance, just take a step. Try not to create a counterweight by artificially moving your hips too far to the sides.
Extended Triangle Pose (Utthita Trikonasana)
Standing pose
Most beginners can benefit greatly by having a block on hand. This extra height allows the front leg to straighten without locking the knee and also allows the chest to open towards the ceiling instead of facing the floor.
Warrior Pose I (Virabhadrasana I)
Standing pose
Warrior poses are classics and span many different styles and practices. Warrior I pose is slightly more difficult than Warrior II pose due to the position of the pelvis. In Warrior I pose, the pelvis faces forward as in mountain pose, although the position of the legs is different.
Warrior Pose II (Virabhadrasana II)
Standing pose
In Warrior II pose, the pelvis is in a different position. The back leg is positioned so that the pelvis faces the mat. Understanding the difference between an open (Warrior II) and closed (Warrior I) pelvic position is key for beginners; over time, your sense of body control will improve and you will be ready for more challenging poses.
Preparation for classes
To achieve your goals and avoid injuries, you need to prepare for each lesson.
Do some stretching exercises before class.
Correct breathing
At the beginning of the journey, you need to learn how to breathe correctly. This will reduce the chance of injury and help you achieve greater results from your workouts.
- Breathing occurs through the nose.
- When bending, exhale, and when bending, inhale.
- Breathing should be measured, slow and deep.
- During the process, the abdominal muscles are tense.
Breathing correctly is an important part of yoga practice.
Warm up for the body
Before training, it is necessary to warm up the ligaments and muscles to prevent damage. This can be done by going to a bathhouse or sauna, or doing physical activity (running, cycling, walking at a fast pace).
For this purpose, a special yogic complex “Salutations to the Sun” is used, consisting of 12 asanas.
Before trying yoga on your own, it is recommended to take a meditation course. Such training will help you properly relax before practice, get rid of tension in the body, and increase your ability to concentrate.
Lesson 1. Joint stretching. While the body is flexible, it is young
Before you begin complex yoga asanas, such as splits or lotus, you need to carefully work out your joints. After this, muscle stretching will be much easier.
In addition, a flexible body means youth, health, beauty, an inner feeling of lightness and freedom.
This short complex can be performed both as a warm-up before the main practice, and as an independent exercise.
It is best to perform it in the evening, when the body is more flexible and responds more easily to this type of load.
Don’t be upset if you can’t do some asanas, for example, if you couldn’t sit in the half lotus. For most people, even young people, this does not happen right away. Working on the hip joints takes time and patience. Practice to the best of your ability, have fun, and over time everything will work out.
Salamba Setu Bandha Sarvangasana (supported bridge pose)
Yogajournal.com
Few people like the traditional bridge pose. In contrast, the supported bridge pose, thanks to the supporting block, allows you to calmly remain in this position for quite a long time. This is a wonderful modification to the shoulder stand that helps relax the front of the body and the spine.
Easy difficulty level. To begin, place a block under your lower back, resting it on the longer, flatter side.
Medium level of difficulty. Now make it more difficult. Unfold the block and place it on a long, narrow edge. To do this, you may need to sit up on your toes and position it on your lower back. Hug yourself by the shoulders.
High level of difficulty. Final step: Unfold the block with a narrow, short edge and place it under your lower back. Stretch your arms to the sides and place them on the floor. You can try straightening your legs one by one, stretching them up, and stay in this position for a few seconds.
It is recommended to stay in a standard (without raising your legs) pose for 30–60 seconds.
Where to start doing yoga
Deciding to do yoga is the first step. Now you need to find the right yoga class or practice at home. Let's figure out what steps you need to take next to start enjoying and benefiting from your classes.
Select yoga type
As you'll see later, there are many varieties of yoga, some simply won't be suitable for you and your fitness level.
Take a few minutes to become familiar with the different styles of yoga. For most beginners, Hatha or Vinyasa will be the best choice, depending on whether you want to practice at a slower or faster pace. These are the basic styles, you can later try something more intricate.
Despite the huge number of books and videos available, nothing can replace a good teacher in a yoga class. If you are unable to attend classes, start with video lessons, as videos give a more complete understanding of the technique, unlike a book.
Find a class
You can find yoga classes in your city, just look at specialized resources on the Internet and local magazines and find the most convenient class for you. If you go to the gym, note that many fitness centers offer yoga classes with a membership. Start with the basics. Find a good instructor who will motivate you. If you don't like the instructor, try another one and search until you find the one that suits you best.
What to expect from yoga classes
On the first day you will not have to take anything with you except comfortable, breathable clothing. Most classes have their own equipment that you will need for your classes.
Typically, students place their mats toward the instructor, sometimes in a checkerboard pattern. This is due to the fact that you need to leave space next to you so as not to embarrass your neighbor; some poses will require more free space than others.
Students typically sit in a cross-legged position while waiting for class to begin or do some light stretching.
Usual order of practice:
- The instructor may begin the class by humming “ommm” three times. Some instructors start with breathing exercises or meditation.
- This is followed by warm-up poses, active poses, then stretching and final relaxation. If you are tired, take child's pose at any time during class.
- Sometimes the teacher will walk around his students during the final relaxation and give a little advice, at the end there may be another round of chanting “omm”.
- Remember that the day after your first class you may experience muscle pain.
30-day at-home yoga program for beginners
Yoga has been very popular lately, but it can be difficult to grab a mat and start doing poses in class together. The 30-day home training program is designed to give a start to your studies and reinforce the correct order of performing poses, which are arranged in order of difficulty. Once you start doing yoga, over time you will feel all the benefits of the classes and will no longer be able to quit; this will be the first month of your new life as a yogi.
Some useful tips
- You should spend about 15 minutes doing daily stretching and 30-45 minutes for an extended workout.
- Feel free to add new poses to your daily routine if you have time for them.
- You can take a group class instead of a long home workout if you prefer.
- Don't worry if you miss a day in your program, just pick up where you left off.
Yoga classes do not require a lot of additional equipment, but there are a few things that it is advisable to purchase in advance. First of all, this is a mat; also, to start practicing at home, it is advisable to have blocks, a belt and a comfortable blanket.
Sun salutations will form the basis of your longer sessions. This may be unusual at first, but over time, performing this complex will become more natural.
The first day
- Start your session with stretching.
- Add three cycles of sun salutations.
- Rest for a few minutes in the dead man's pose.
Week 1
During the first week of classes, stretch every day and do Sun Salutations every other day. Combine standing and sitting poses during your workouts for a longer session at least three times a week. Remember to rest in Repose Pose at the end of each session.
Think about what time works best for you to study. A good opportunity to do yoga in the morning, you can start the day with stretching, find the best time.
Procedure for the first week:
- Day 1: stretching + 3 times Sun Salutation complex.
- Day 2: stretching + 3 times Sun Salutation complex + stretching in a sitting position.
- Day 3: Stretching.
- Day 4: stretching + 3 times Sun Salutation complex + stretching in a standing position.
- Day 5: Stretching.
- Day 6: stretching + 3 times Sun Salutation complex + stretching in a sitting position.
- Day 7: Stretching.
For the remainder of the month, you will perform short stretches daily and add variations to longer sequences of poses.
Week 2
- Day 1: Stretching.
- Day 2: stretching + 3 times Moon Salutation complex + sitting stretching + standing stretching.
- Day 3: Stretching.
- Day 4: stretching + 3 times Moon Salutation complex + standing stretches + balance poses.
- Day 5: Stretching.
- Day 6: stretching + 3 times Moon Salutation complex + standing stretching + yoga for the abs.
- Day 7: Stretching.
Week 3
- Day 1: Stretching.
- Day 2: stretching + 3 times Surya Namaskar + sitting stretching + standing stretching.
- Day 3: Stretching.
- Day 4: stretching + Surya Namaskar + standing stretching + balance poses + sitting stretching.
- Day 5: Stretching.
- Day 6: stretching + 3 times Surya Namaskar + standing stretching + yoga for the abs.
- Day 7: Stretching.
Week 4
- Day 1: Stretching.
- Day 2: stretching + 3 times Surya Namaskar + sitting stretching + standing stretching + arm yoga.
- Day 3: Stretching.
- Day 4: stretching + Surya Namaskar + standing stretching + balance poses + sitting stretching.
- Day 5: Stretching.
- Day 6: stretching + 3 times Surya Namaskar + standing stretching + abdominal yoga + sitting stretching.
- Day 7: Stretching.
By completing this 30-day routine, you will acquire the habit of practicing yoga every day. Continue to stretch daily and do longer stretches three times a week. This routine will allow you to get into the workout routine, develop an exercise habit, and will improve your fitness and tone in the long run.
Some tips to prepare yourself for yoga classes in the classroom or at home.
Not recommended:
- eat heavily before class (try eating lightly a few hours before the start of class);
- drink water during class, drink enough fluids before and after class;
- wear shoes or socks during class.
Recommended:
- at the first lesson, inform the instructor about your level in yoga;
- contact the instructor for help if necessary;
- come back for the next session of your yoga class.