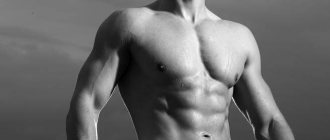
The beauty of your body is in your hands. By playing sports and maintaining a proper diet, you can create an appearance that evokes envy and admiration.
An integral attribute of this look, of course, is a toned stomach with sculpted abs.
The photo where you show it will always get a lot of likes. Because almost everyone likes such things, both men and women.
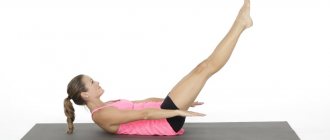
A set of exercises for the press
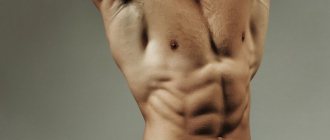
Training is needed to increase muscle size. Or, more precisely, one specific muscle - the rectus muscle, the one located on the front of the stomach.
It is she who, when inflated, looks like convex squares.
When not inflated, she, however, also looks like this, but under the layer of subcutaneous fat this is usually not visible.
There are many exercises for the rectus abdominis muscle. Here are just the most effective:
Drawing abs with a pencil
Abs drawn in pencil look realistic and sophisticated. Let's look at the drawing process step by step.
- If you already have a silhouette of a person on whom you will draw abs, proceed to the second point. If not, sketch out a body sketch with a pencil or draw a silhouette of an athlete or sportswoman.
- Using straight lines, mark on your character’s stomach where each abdominal muscle is located.
- Round your muscles.
- Use an eraser to erase the extra lines.
- Add shadows - this will make the abs look realistic.
Now you know how to draw abs. We offer you several sets to improve your drawing.
- Keep in mind that not everyone can draw beautiful abs the first time: it takes practice to achieve a good result.
- Learn the differences between a man's abs and a woman's abs. The muscles are located identically, but differ in size and how they stand out under the skin.
- Keep in mind that in women, every abdominal muscle cannot be clearly visible, even if we are talking about an avid athlete. This occurs due to the anatomical features of the female body. Exception: bodybuilders who take drugs with male hormones, but if you draw such a character, then she should have the shape of the whole body close to that of a man, and not just the abdominal muscles.
- When you draw, do not make very thick lines and do not press the pencil hard on the paper, otherwise traces of unnecessary sketches will be noticeable even after an eraser. You can make the lines thicker and bolder at the final stage of drawing.
"Corner" on the horizontal bar
Hang on the horizontal bar so that your toes do not touch the floor. Then lift your lower torso so that it is parallel to the floor.
Stay in this position for 3-4 seconds. Then lower your legs. Repeat the exercise until you feel a characteristic burning sensation in the abdominal area.
Note! No need to chase a lot of repetitions. It’s better to do a little, but slowly, the effect will be more noticeable.
Always remember that your task is not to set a record, but to load your muscles so that your abs look beautiful in the photo.
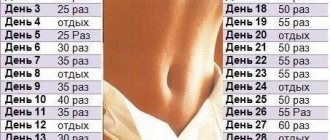
Press standards (lifting the torso)
The term “abs” does not exist in the discipline that studies the human body, anatomy as a definition. This is actually what the abdominal muscles are called. And this is one of the most widespread muscles that everyone wants to be in good shape. After all, everyone dreams of having a flat, elastic stomach with clearly visible cubes on it. However, not everyone manages to achieve this result.
Press standards in 1 minute for schoolchildren | ||||||
| Boys | Class | Girls | ||||
| 5 | 4 | 3 | 5 | 4 | 3 | |
| 30 | 25 | 15 | 1 class | 20 | 15 | 12 |
| 32 | 27 | 18 | 2nd grade | 22 | 18 | 15 |
| 33 | 30 | 20 | 3rd grade | 25 | 20 | 16 |
| 34 | 32 | 22 | 4th grade | 28 | 22 | 18 |
| 36 | 33 | 24 | 5th grade | 31 | 23 | 20 |
| 37 | 34 | 26 | 6th grade | 32 | 25 | 22 |
| 38 | 35 | 28 | 7th grade | 34 | 28 | 25 |
| 39 | 36 | 29 | 8th grade | 36 | 30er | 27 |
| 41 | 37 | 30 | 9th grade | 37 | 31 | 28 |
| 42 | 38 | 32 | Grade 10 | 38 | 33n | 29 |
| 45 | 40 | 35 | Grade 11 | 40 | 35 | 30 |
Press standards in 30 seconds in primary school | ||||||
| Boys | Class | Girls | ||||
| 5 | 4 | 3 | 5 | 4 | 3 | |
| 16 | 14 | 11 | 1 class | 14 | 12 | 9 |
| 18 | 15 | 12 | 2nd grade | 16 | 13 | 10 |
| 19 | 17 | 13 | 3rd grade | 17 | 14 | 11 |
| 20 | 18 | 15 | 4th grade | 18 | 15 | 12 |
| 21 | 19 | 16 | 5th grade | 19 | 16 | 13 |
This exercise is included in the GTO complex for all ages.
| Boys | GTO Raising the body from a supine position (number of times per 1 min) | Girls | ||||
| 21 | 24 | 35 | 1st stage (6-8 years) | 18 | 21 | 30 |
| 27 | 32 | 42 | Level 2 (9-10 years) | 24 | 27 | 36 |
| 32 | 36 | 46 | Level 3 (11-12 years old) | 28 | 30 | 40 |
| 35 | 39 | 49 | Level 4 (13-15 years old) | 31 | 34 | 43 |
| 36 | 40 | 50 | Level 5 (16-17 years old) | 33 | 36 | 44 |
| Men | Women | |||||
| 33 | 37 | 48 | Level 6 (18-24 years old) | 32 | 35 | 43 |
| 30 | 35 | 45 | Level 6 (25-29 years old) | 24 | 29 | 37 |
| 26 | 31 | 41 | 7th stage (30-34 years old) | 19 | 22 | 33 |
| 24 | 29 | 39 | 7th stage (35-39 years old) | 17 | 20 | 29 |
| 22 | 27 | 35 | 8th stage (40-44 years old) | 14 | 16 | 25 |
| 19 | 24 | 31 | 8th stage (45-49 years old) | 10 | 12 | 21 |
| 14 | 19 | 27 | 9th stage (50-54 years old) | 8 | 11 | 18 |
| 11 | 15 | 24 | 9th stage (55-59 years old) | 7 | 9 | 15 |
| 9 | 12 | 21 | 10th stage (60-64 years old) | 5 | 7 | 13 |
| 6 | 9 | 16 | 10th stage (65-69 years old) | 4 | 6 | 11 |
| 4 | 6 | 14 | 11th stage (70+ years) | 2 | 4 | 8 |
It should be noted that the press can be “upper” and “lower”. In other words, when performing physical activity, both the upper and lower abdomen can contract.
There is an opinion that it is much more difficult for women to get perfect abs than for men. And indeed it is. This fact is due to the fact that in the female body the level of testosterone, which is precisely responsible for building muscle, is significantly lower.
So, what needs to be done to achieve your desired goal?
Recommendations for strengthening the muscles in the abdominal area:
- First of all, make sure you eat properly. It is necessary to exclude or reduce to a minimum foods containing large amounts of sugar and carbohydrates. This group of products includes: sugar, sweets, flour, animal fats. On the contrary, protein consumption should be increased by eating low-fat cottage cheese, lean chicken, fish and other foods high in protein.
- After burning fat in the abdominal area, you can begin to regularly perform various physical activities in the form of exercises.
The most effective abdominal exercises:
- Landmine 180 – effective 180-degree torso rotation exercises combined with a barbell.
- “Spider” is an exercise primarily for men. This exercise is performed in a plank position. During this warm-up, three main actions are worked in the form of rotation of the legs in turns, as well as flexion and anti-extension.
- Hanging leg raises. This is the most effective hydration, which works all abdominal muscle groups.
- Raising the torso three-quarters from the initial lying position. This is the most common exercise performed by men, women and is even included in the school physical education curriculum. For those who already regularly do this, it is absolutely no big deal. You can increase the level of difficulty by moving your knees apart. Thus, the hip bend will be less and the exercise will be much more difficult to perform.
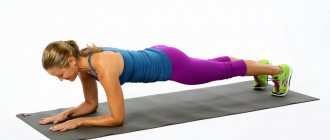
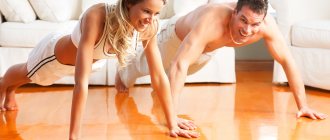
- Plank or push-ups while lying down. A classic exercise in sports that is present during almost any workout, especially among men. For those who find this too easy and simple, you can start the plank using only one arm and one leg. And during the execution, change hands and legs in turn.
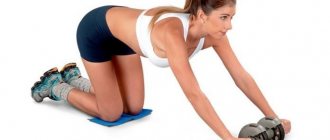
- Exercise on rolls is no less effective, where all abdominal muscles are involved. In addition, the muscles of the back and lower back are stretched.
- Exercise “birch tree”
- Squats without lifting your feet off the ground.
- A corner in support of the floor, beams or other available devices.
- A “vacuum” of the abdomen helps not only to pump up the desired muscles, but also to reduce the volume of the abdomen.
- The bicycle exercise focuses on strengthening the upper abdominal muscles.
In fact, there are a huge number of exercises for regular exercise with an emphasis on strengthening the abs. You just need to start by doing the most common and effective exercises, which are more suitable for each individual. The main rule for pumping up the press is consistency, regularity and, of course, determination.
| 21 | 24 | 35 | 1st stage (6-8 years) | 18 | 21 | 30 |
| 27 | 32 | 42 | Level 2 (9-10 years) | 24 | 27 | 36 |
| 32 | 36 | 46 | Level 3 (11-12 years old) | 28 | 30 | 40 |
| 35 | 39 | 49 | Level 4 (13-15 years old) | 31 | 34 | 43 |
| 36 | 40 | 50 | Level 5 (16-17 years old) | 33 | 36 | 44 |
| Men | Women | |||||
| 33 | 37 | 48 | Level 6 (18-24 years old) | 32 | 35 | 43 |
| 30 | 35 | 45 | Level 6 (25-29 years old) | 24 | 29 | 37 |
| 26 | 31 | 41 | 7th stage (30-34 years old) | 19 | 22 | 33 |
| 24 | 29 | 39 | 7th stage (35-39 years old) | 17 | 20 | 29 |
| 22 | 27 | 35 | 8th stage (40-44 years old) | 14 | 16 | 25 |
| 19 | 24 | 31 | 8th stage (45-49 years old) | 10 | 12 | 21 |
| 14 | 19 | 27 | 9th stage (50-54 years old) | 8 | 11 | 18 |
| 11 | 15 | 24 | 9th stage (55-59 years old) | 7 | 9 | 15 |
| 9 | 12 | 21 | 10th stage (60-64 years old) | 5 | 7 | 13 |
| 6 | 9 | 16 | 10th stage (65-69 years old) | 4 | 6 | 11 |
| 4 | 6 | 14 | 11th stage (70+ years) | 2 | 4 | 8 |
Twisting the body from a lying position
This is almost a classic abdominal exercise. Lie on the floor on your back, bend your knees, put your hands behind your head.
Then slowly bend your upper body, gradually lifting it off the surface. First the shoulders, then the back. The lower back should remain pressed to the floor.
Having risen, freeze in this position for 2-3 seconds. Then lower the body back down.
You need to repeat the movement, as in the case of the corner, until you feel that the muscles have received their load.
By intensively training your abs, you will notice results in about 3-4 weeks.
If you were already in good physical shape, had a low percentage of fatty tissue and in general are simply restoring what you already had in the past, the load will have an effect even earlier.
Instructions
Open an image of a person who needs to get beautiful abs
, in the Adobe Photoshop editor. On your keyboard, press Ctrl+O or in the File section of the main menu, select “Open…”. Specify the media and directory in the dialog that appears. Select the desired file. Click the "Open" button.
Add two new layers on top of the existing background layer. To do this, in the main menu, sequentially select Layer, New, “Layer...” or press Ctrl+Shift+N.
Fill the created layers with gray color. Click on the element that displays the foreground color in the toolbar. In the # field of the Color Picker (Foreground Color) dialog, enter the string 808080. Click OK. Activate the Paint Bucket tool. Click anywhere on the image. Using the Layers panel, switch to the second of the added layers. Click again anywhere on the image.
Change the blending modes of the top two (filled gray) layers. Make the topmost layer active. Change the blending mode to Linear Light. Set the second layer's mode to Soft Light.
Create a shadow base for the abs
A.
Switch to the layer with the Linear Light blending mode. Activate the Burn tool. Select a brush of a suitable diameter with a low (around 10%) Hardness parameter, using the window that expands when you click on the Brush element in the top panel. Mark the shadows of the protruding abdominal
.
Add a base of highlights on the abs
A. Activate the Dodge tool. Brush over the areas of the image that need to be brightened.
Finish the contours of the created base for the image of the press
A. Select Blur Tool. Change the brush settings if necessary. Blur the boundaries of shadows and highlights in those places where it is needed.
Make a press
more realistic. Switch to the layer with the Soft Light blending mode. Proceed in a similar manner to those described in steps 5-7, creating more precise and soft contours and outlines of the muscles.
Save the document in PSD format so you can come back to edit it later. Use the key combination Ctrl+Shift+S. In a similar way, you can export the image to the desired format.
Attention, TODAY only!
Everything interesting
With the help of Adobe Photoshop, you can not only significantly improve, but also literally breathe a second life into even very old photographs. For example, you can add a color element to a black and white photo. Such a detail will look very impressive. ...
Often, when artistic processing photographs, it is necessary to introduce some realistic detail into the composition. For example, coffee in a cup will look much more appetizing if you add steam above its surface. You can do this in the editor...
When creating collages in graphic editors, one of the most common operations performed by the designer is to extract and paste a fragment of one image into another. Often you just need to add a picture to a composition. Do it…
Digital photo retouching tools provided today by professional graphic editors allow you to bring imperfect photographs to perfection. Smooth the skin, increase muscles, remove the sides - all this can be done through...
The sequence of actions performed when separating a fragment from the background in Adobe Photoshop greatly depends on its type. So, if you need to cut out a seal, you should not use standard selection tools. Should be taken in…
What you need 200 g softened butter 300 g flour 200 g sugar 1 egg Zest of 1 lemon How to cook 1. Beat butter with sugar, add flour, egg and zest. Knead the dough. 2. Cover a baking sheet with parchment and use a pastry syringe to “draw” cobwebs with dough. 3. Bake at 190 degrees for about 10 minutes. 4. The finished cobwebs can be painted with red glaze: add any red juice (pomegranate, beetroot, lingonberry, etc.) to the powdered sugar.
BIG CREATIVITY This is a really big project - it is designed for a whole team of small artists, because making such a large picture alone is tiring and time-consuming. But using this principle, you can make small-sized paintings - A4 format, for example. The first step: draw a wide variety of shapes (circles, squares, emoticons, stars, hearts, etc.) on a large sheet of whatman paper with a black marker, then connect them with straight lines. Step two: paint the shapes in different colors, as well as the resulting fragmented space between them. This project is especially good in cases where there are a lot of different colors left, but a little at a time.
Old umbrella + package =... Swan! What can you make from an old umbrella and a trash bag? Swan! This original idea was proposed at one of the exhibitions in London in 2009. All that remains is to paint the swan’s beak, draw the eyes and send it to the flowerbed, sticking its tip deeper into the ground.
Spring cosmetic collection from Victoria's Secret Graphic Liner Pen Victoria's Secret. Do you want to line your eyes or draw the perfect arrow? This product with a quick-drying formula will come to your rescue! Released in black.
| 0 | 0 | 0 |
Rules for drawing arrows
The question of how to correctly draw arrows on the eyes worries many women. A beautiful arrow can be drawn only if it is done sequentially in several stages.
You need to draw an arrow with a “steady” hand, otherwise the line will not be straight, but wavy, which is unacceptable. To prevent this from happening, you need to place a mirror at eye level, and rest the elbow of the hand that is used to line your eyes on a hard surface. You don’t need to draw an arrow with your eye closed or open, it’s inconvenient. It is best if the eye is half closed. In this case, it will be immediately obvious how well the arrow is drawn. Whatever the width of the arrow you plan to draw, initially it should be drawn thin and gradually thickened if necessary. Most women believe that the arrow should be drawn with one solid line. But in this case it is almost impossible to draw a straight line. It is best to draw the arrow in two steps. From the inner corner to the middle, and from the middle to the outer corner. The inner edge of the arrow should be drawn along the eyelash growth line. If you leave a distance between the eyelashes and the eyeliner, it will look sloppy, and the eyelashes will not look impressive, even if they are very thick and beautifully painted. The arrows on both eyes should be the same length and width. Even the slightest deviation is unacceptable, since with different arrows the eyes will look asymmetrical, even if in fact the woman does not have such a defect. If eye makeup includes not only arrows, but also shadows, then the arrows are drawn on top of the shadows.
| 0 | 0 | 0 |
Please draw me a picture of the sea, so that quiet waves flash, so that the smells of happiness and will fill my chest to the brim.
Draw the sand under my feet, Yellow-yellow, like a ray of sunshine. And decorate the sky with clouds, just don’t paint clouds, please.
Draw me a kite so that the wind can play with it in a rebellious way. So that I, having nothing, continue to be kind and gentle.
Will you draw me the sea and the sky? And will you strew it with clouds? Can you draw me an eternal summer? And sand under your bare feet?
Draw, but don’t put a full stop yet, I didn’t tell you about the main thing, Please draw me a daughter, And draw yourself at the pier.
| 0 | 0 | 0 |
How to make a treasure map
Take a sheet of wrapping paper of the desired size. If the paper is white, it is better to tint it “antique”. To do this, you need to make the background light brown. Let dry.
Draw on a piece of paper a map of the area where the treasure has already been hidden or will be hidden. For example, draw a plan of a yard or summer cottage: buildings, paths, trees. Mark the place where the treasure is buried with a symbol. If you wish, you can encrypt the map - for example, instead of a picture of a house, draw a rebus in which the word “house” will be encrypted.
Carefully burn the sheet on which the map is drawn along the edges on all sides. Fold the card several times. Ready!
Which of us didn't play pirates as a child? Who hasn't dreamed of finding treasure? Everything is in your hands: hide your treasures, draw a map. Well, let the finder have a prize! - wrapping paper - gouache - brush - matches or lighter - felt-tip pens If you have a large card, for example, the size of a sheet of Whatman paper, it will be more convenient to tint it not with a brush, but with a dishwashing sponge. The sponge, of course, must be clean.
| 0 | 0 | 0 |
How to draw the correct oval
First, let's find out what an oval is (from the Latin ovum - egg): a convex closed flat curve without corner points, for example, an ellipse. Now let’s find any cup on the farm and place it at a short distance from us (up to 1 meter). If you are sitting much higher than the cup is, for example, you are sitting on a regular chair, and it was placed on a children's highchair, then you see the ellipse as almost not flattened. If you place the cup somewhere at eye level (the so-called horizon line), the oval will turn into a narrow strip with rounded edges. So, let's choose a position for the cup.
Now, armed with a pencil, let’s draw by hand (without the help of a ruler) two perpendicular lines. The one that is vertical is very important - it is called the axis of symmetry, and is the basis for all further constructions.
The next stage is related to the sighting method. It consists of covering one eye, extending your hand with a pencil and noticing on the pencil what the length is. It should be marked with two extreme points on the horizontal axis so that the distance on the left and right is the same.
Now, also using a pencil, we repeat the same operation, but now for the vertical axis, to determine the width of the future oval. We mark it with two extreme points, symmetrical with respect to the center.
We also draw the next pair of lines through two horizontal points parallel to those already drawn. According to the rules of perspective in a drawing, parallel horizontal lines receding into depth have vanishing points outside the sheet of paper. It is neither possible nor necessary to draw a continuation of these lines in order to trace where they will converge. In drawing, the directions of these parallel lines are determined by eye.
So we get the last missing point on the vertical axis. It was needed in order to draw an arc through it, which in the figure is farthest from us. We also draw the arc closest to us. Carefully erase the auxiliary lines (axes parallel to straight lines). Upon completion of the work, the figure clearly shows that the distance from the center of the cup to its back wall is much shorter than the distance from the front wall to the center. Look at nature, is this true? If you did everything according to the instructions, then drawing the lower oval of the cup (bottom) in perspective will not cause you any difficulties.
It's nice not to depend on computer programs, but to be able to draw by hand. This is still highly valued even among computer designers. What can we say about ordinary users, for whom mastering these programs is sometimes hard work, but hand-drawn
How to draw a cat with a pencil
The cat is one of those animals that evoke sympathy among people of different ages. Naturally, I want to draw it, and as realistically as possible. And what does it contain: four legs, a body, a head, ears, a tail, and all this grouped together - the cat is ready. It’s not difficult, but you need to do everything correctly and in order so as not to disappoint yourself and those around you with your creative talent.
First, as a rule, we make a sketch. We draw the basic shapes of the animal, that is, the head and torso. Draw a circle on the sheet for the head and a rough elongated oval for the body. Now we are working on the lines. They should not be rude, as we outlined at first. When giving the shape and position of our cat, we try to make smooth, smoothly flowing lines.
Next is the muzzle. Draw a cross on the circle that is the head. The cross is needed to show where the animal's eyes, nose and mouth will be located. We place triangles in the corners - these are the cat's ears, which are important for such a predator.
Next, draw the cat’s paws and draw a tail on top. To make it even more realistic, we also add some fur. The cat is almost ready. We erase unnecessary sketches and lines. Afterwards we finish some nuances (location of the hind legs, fur, shadow of the animal).
The last moment is to draw the antennae, remember what they are like on cats and reproduce the same ones. Your cat should turn out great, keep experimenting.
Drawing is an art that cannot be taken away from its owner. People, young and old, can create whatever they want on a piece of paper. If you are just learning and want to draw, say, a cat beautifully, then this is the place for you! A blank album sheet, pencils (colored).
| 0 | 0 | 0 |
How to draw a picture with paints
Choose watercolor paints. It's easiest to start painting a picture with them. They can convey all shades and add brightness when shined through. Choose what surface you will paint on - wet or dry. When drawing on a wet surface, the outlines of objects are blurred, which is useful in landscape compositions or when filling vegetables and fruits in the background.
Take drawing paper - it does not swell from excess water, and the places that need to be corrected can be easily washed off with foam rubber. Place the paper at an angle of 30-40 degrees to ensure the paint spreads evenly.
Make pencil sketches of the main objects. If this is a still life, then determine the location of the table or other surface and the fruit and vegetable composition. If this is a portrait, then take into account the proportions of the person, and if it is a landscape, then light sketches will be enough - the colors will play the main role. When painting with paints, especially watercolors, take into account the fact that you need to think through the shade of each stroke in advance. The error can be corrected only with the help of damp foam rubber. Then apply the necessary strokes on the already well-dried surface.
Paint the general background with foam rubber or a wide squirrel brush. When painting large areas, make sure there is enough paint on the brush. Apply the background from light to dark. Please note that the white effect when painting with watercolors is achieved only by unpainted or well-washed areas with water. Be careful not to tear or roll the paper.
Determine the sunny side and shaded areas in the picture. Based on this, sketch all the objects. Mix paints on the palette - in a drawing, overlapping color layers can lead to a simple distortion of the color of dark shades. Apply each subsequent stroke next to the previous one with a slightly moistened brush for a smooth transition.
Paintings have the gift of attracting attention over and over again. The unique play of shades allows you to convey everything down to the smallest detail. But how exactly to draw a picture with paints? - drawing paper, - pencil, - eraser, - paints.
| 0 | 0 | 0 |
Pastel drawing - Egyptian Mau cat
1) In this lesson I will tell you how to draw a cat of the Egyptian Mau breed. These are very beautiful cats with large eyes the color of currant green or yellow-amber. The Egyptian Mau has a wonderful and unique color. This is their distinctive feature. For this painting we will need a pastel sheet of dark blue A4 size. Let's make a sketch with a white, well-sharpened pastel pencil.
2) Let's move on to drawing the eyes and nose. For the eyes, use green, yellow, dark orange, and black pastel pencils. Carefully shade the eye, make the pupil black, and finally add highlights with a white pastel pencil. For the nose, use white, pink, black, red pastel pencils. Around the eyes and nose, shade lightly with a white pencil and rub with your finger. When drawing such small details, your pencils must be well sharpened!
3) Shade the ear first with a pink pastel pencil, and over it with a white pastel pencil. Rub everything with your finger. Add black shades and rub. Now sharpen a white pastel pencil well and draw white hairs with quick and light movements.
4) Shade the cat's head with a white and gray pastel pencil. You can add a few touches of blue somewhere. After this, rub everything with your finger.
5) We begin to clarify the details. Using a white pencil, using small strokes, we imitate the growth of fur. Draw the stripes with small strokes of black.
| 0 | 0 | 0 |
How to draw an anchor
Draw a modern anchor design with two sharp edges at the bottom. Draw a vertical line in the middle of the sheet, slightly narrowed at the top and widened at the bottom. This will be the anchor spindle. Draw a circle around the upper border of the spindle, the so-called. eye - a place where a cable or rope is attached for raising or lowering an anchor. At the top of the vertical, draw a horizontal line - the rod. Secure the lower part of the spindle with a large tick.
Draw the individual parts of the anchor in more detail. Draw the spindle in the form of two straight lines, draw each of which at the bottom pointing in different directions, forming an anchor, its main part. This way you will get two anchor horns. The junctions of the lines should be smooth. Make each horn three-dimensional by adding another line that follows the outline of the anchor. At the tips of the horns, draw lobes - wide plates with sharp outer peaks. Please note that the heel of the anchor must be quite sharp.
Draw the stem in detail. From the inclined straight line, at a short distance, draw another one with the same slope, but slightly convex, thus delimiting the side and lower parts of the rod. Connect both lines with several vertical strokes. Now draw another inclined line repeating the outline and continue the vertical strokes at an angle slightly greater than 90 degrees. Draw a neck above the upper border of the stem - draw a small rectangle and divide it in half with a vertical line. Make the eye ring double.
Darken certain areas of the anchor: the lower part of the blade and the right horn. Shade the stem and the neck and its right side with short lines. Also darken the section of the spindle that runs along the right border of the vertical - the drawn anchor is ready.
An anchor is a special metal structure that is designed to secure a ship in one place. It has many different types, but the base is always the same - a heavy bottom, which is fixed to a straight metal vertical. A drawn anchor is most often used as a maritime symbol. - landscape sheet; - pencil; - eraser.
| 0 | 0 | 0 |
How to draw a daffodil
Make pencil sketches in the middle of the sheet and arrange the individual details. In the upper part, draw a hexagon - the basis of the flower itself. To do this, draw two equal trapezoids that have a common base, with their convex parts facing opposite sides. Draw the middle in the form of an oval and depict the stem and leaf with simple strokes.
Draw the details of the daffodil more accurately. From each vertex of the hexagon, draw straight lines converging towards the middle. These lines will be the vertical axes for the flower petals. Mark the midpoints of the lines. Now draw strokes from each vertex, expanding to the designated points. Next, add strokes to the middle of the flower in the form of straight parallel lines.
To draw a daffodil, draw the flower petals with smooth lines - smooth out the main contours. Draw a slight curling of the petals with wavy lines located at their walls. Draw the middle of the daffodil. First, make the borders of the oval jagged with small steps. On the right side of the oval, draw a small dome, making the middle more voluminous.
Draw part of the narcissus stem in the form of a tubular arc connecting the flower itself and the straight thin stem with the wide side directed towards the petals. Draw the leaf of the plant as elongated and narrow with a pointed apex.
Draw the flower with a simple pencil. Densely shade the middle of the daffodil with straight, thin lines diverging from the middle to the borders of the oval. On the petals, draw rays running along the vertical midline. Shade both the left side of the stem and the top of the daffodil leaf.
How to draw an icon
How to draw an icon
In order to draw an icon, prepare the necessary equipment. Choose a desk as your workplace and see if it’s comfortable for you to sit at. After this, clear the table surface of unnecessary things, make room for a piece of paper, pencils, markers and paints.
First, think about how you would like to draw the icon. Concept or idea are very important components of a drawing. Ask yourself what your icon will symbolize. Come up with an interesting drawing. Make a couple of sketches. If you have no ideas, go online and look at pictures of different icons, maybe something will come to your mind.
Get to work, use a pencil to outline the shape of the icon. As a rule, the icon is round in shape, so to simplify your task and pay more attention to the content of the icon design, take a stencil. For these purposes, any round object that can be attached to paper and traced with a pencil can serve you. Use a jar of cream or saucer, depending on the size of your icon. You can also use a compass.
Once you have decided on the size, start drawing. You can draw your favorite animal or flower, write the name of a loved one or a favorite expression, whatever comes to your mind. Make a rough drawing with a soft pencil, and correct the extra lines with an eraser. After that, think about what color scheme suits your drawing, first take watercolors, when the paint is dry, take markers or gouache and make the drawing brighter.
https://vk.com/public34162826?w=wall-34162826_1581
Dandelions in watercolor.
Well, the first flowers have bloomed. Among them are my favorite dandelions. I have already ()
Dandelions in watercolor.
Well, the first flowers have bloomed. Among them are my favorite dandelions. I have already shown how to paint dandelions in oil, and now I want to paint them in watercolor.
First, we’ll just draw colored “blobs” of future colors using lemon and yellow paint.
Let's mark the place where the white balls of ripe dandelions will be located. To do this, use almost transparent paint and a thin brush to draw a circle and place small translucent spots in it. The dandelion ball in the center will be much darker than at the edges. For spots, you can mix gray, blue and then add a little light yellow paint for a tint.
Using yellow with the addition of ocher and light red paint, use a thin brush to paint the petals of yellow flowers, not forgetting where the light comes from.
Draw the background. You can first wet the paper, or you can simply paint over it with a thick brush, going around the flowers and balls, avoiding strong drips and drying. On the top and left of the yellow flowers, you should leave unpainted white areas of the paper, like a bright glare of light.
Mix pale green paint with yellow and paint the stems of dandelions. In some places you can add a red tint. Gradually we will begin to draw the leaves, leaving the stems unpainted.
With the next pass we will enhance the dark color, again leaving the leaves and new stems and blades of grass unpainted. At the same time, draw the background around the white balls with strokes, making their edges uneven and loose. For the background, it is better to take a thicker brush and mix dark green, pale blue, yellow, and a little purple.
| 0 | 0 | 0 |
How to draw a butterfly 1 Start your drawing by constructing auxiliary lines. First, draw a line that will become the axis of symmetry of the butterfly’s body; the head, chest and abdomen will be located along it. Secondly, mark a point in the middle of this line. Draw two lines from it on each side; these auxiliary elements will set the direction of the upper and lower wings of the butterflies. Make sure that the angles between the corresponding lines and the axis of symmetry are the same. 2 Draw an elongated oval located on the axis of symmetry. Divide it into three parts: the first, very small, corresponds to the head, the other two are approximately the same in length - the chest and abdomen of the lepidopteran beauty. 3 Select the eyes on the head, they are set on the sides, as well as rather long antennae and a proboscis, in a calm state it is curled into a spiral. If you are drawing a particular butterfly, make sure that it has a sucking mouthpart, and not, for example, a gnawing mouthpart, like some families of Lepidoptera. 4 Draw the chest. All the “limbs” of the butterfly, if you can call them that, are attached to the body in this area. Mark three segments on the chest. On the second and third from the head you will need to draw wings, but it is better to leave drawing them for later. Draw three pairs of butterfly legs in the form of dashes with clearly defined joints. 5 Draw the butterfly’s abdomen as an oval. Keep in mind that it is quite mobile. 6 Start drawing the wings. If you are depicting a specific butterfly, study its appearance, the shape of the plates, their colors, and the structure of the cells. If you want to draw a collective image, you can come up with the shape and venation yourself (the presence of cells on the wing plate), as well as the color. 7 Color the drawing. To color a representative of an existing butterfly species, use the necessary shades; look on the Internet to see what female and male individuals look like. For a fictional butterfly, combine the colors you like. In order to draw a butterfly, it is important to imagine the structure of its body, the shape and venation of its wings, and to take into account in the image the coloring features of a particular type of Lepidoptera. - paper; - a simple pencil; - eraser; - paints or pencils.
| 0 | 0 | 0 |
Already drawn +2 I want to draw +2 Thank you +50
In this step-by-step series, Star Wars artists and illustrators show you how to draw some of your favorite characters in the saga.
Steps 1-5 are taken lightly with a pencil. No pen, no dark lines. Finished lines and details will come at the end.
Step One: Using a pencil, start with very simple shapes and strokes. Start by creating an oval and some quick lines to provide a basis for where his head and neck will be. Draw a line in the middle where his face will be so that you know where to draw the eye, nose, etc. This faces linear guide objects should go approximately halfway down the oval. Remember that for these first steps, it is best to keep your lines very light. This way you can erase and redraw them if necessary.
Step Two: Start fleshing out the shape of Savage's head. Give him more defined, rounded cheekbones, as well as a square jaw. This is also a good time to draw in your ears and eyes. To make him look threatening and angry, make sure his eyes look squinted and narrow, and give him a fierce, arched eyebrow. Draw the mouth, which should be frowny and angry.
Step Three: Add in some details around Savage's mouth as well as his nose. For the nose, place it halfway between the eyes and mouth. Then add in some wincing lines that go from the sides of its mouth to the nostrils. They will help show the expression that he is frowning. Add a few "frown lines" under his lips. Again, make sure your pencil lines are very light. You don't want to do anything too final yet; you may still want to make a few changes to the sketch.
Step Four: Draw his horns. He has two smaller ones on the sides of his head, right on his ears, and then six larger ones sticking out from his head like a crown. If something looks strange or out of place, this is a great time to go erase it and redraw it.
Step Five: Although this tutorial is really only focusing on Savage Opress's head, it looks good to add some of his collar area. Drawing the lines that make up his shirt collar. And then you will be ready to start finishing this drawing.
Step Six: At this point, you should have a fairly complete picture. If you want your drawing to have a clean, finished look, then you can add ink above the pencil lines. This can be done with various pens or markers. Simply trace along the line you want to keep, and when you're done (make sure you let your line ink dry), go ahead and erase the pencil lines. This is also a great time to add in some fine details, such as the line texture on his horns, the pupils in his eyes, and some more forehead creases to show off his angry expression.
Step Seven: Finally, it's time to add the tattoos! Using a pencil first, shadow the area as shown in the picture and keep them very light. Once they are looking directly at you, you can darken the dark areas into heavier pencil lines, or you can use gray markers. You just want to make sure that his habitats are dark, but not completely pitch black.
Lesson on drawing a naked torso
Basically, it's watching me draw male torsos. I understand that not all of us often see clearly defined muscles, but for this tutorial I wanted to draw the body in such a way that the muscles were clearly visible... you can make them larger or smaller at your discretion. It all depends on the hero/style you prefer. :3
Also... I don't want to use medical/scientific terms here because well... they're hard to remember. This is a very simple and short explanation... or at least as simple as I could make it.
I started with the outline of the "skeletal" structure, just to outline the pose... I usually draw the whole body, but since this is a torso tutorial, I'll limit myself to the chest, back and hips.
Then I outline his muscle structure. This determines the size of his muscles. You can make them subtle or pronounced (XD) if you want. As you can see, I only outlined the pectoral muscles, abdominal muscles, shoulder width and waist with lines. There is no need to draw everything in detail, you will still be drawing on top of these lines.
My rule for the abdominal muscles (based on numerous observations) is that the belly button is located between the third and fourth row of abs. That's where he should be. Also, from about the third row of cubes, the V-shaped relief starts... sometimes I lower it a little lower if I don't want it to stand out too much, and if you start painting it, it can be smoothed out, depending on your desire.:3 Lines do not intersect in the middle, but are directed towards the groin area. At this stage, if you are going to dress him, you can immediately draw the lines of the clothing, since you already know where the folds of the fabric will be and where it will hug the body.
And now visual materials would be very, very useful. I recommend hiring male models/athletes. Draw as much from life as possible. The style can be borrowed from the artist, but the anatomy must be taken from real life... so you learn how to transform it to suit the style/exaggeration etc. ...a good knowledge of anatomy will make your transformations more...correct.
And these are the “boxing muscles” (those located around the chest) and “wings”. They are not always drawn in simple standing figures. I usually reserve the "boxing muscles" for the fighting/martial arts/athletic types of heroes. Again, I recommend that you use visual aids when planning your character's body.
At first glance, it seems that drawing the abdominal muscles is very difficult: they have a very complex structure. In fact, this is so: it is necessary to convey the entire muscular relief with the help of well-drawn chiaroscuro.
How to adjust your diet?
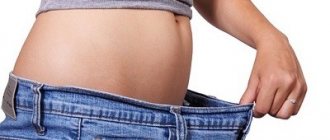
True, the opposite situation also happens, when you trained hard, and even notice to the touch that the muscles have significantly increased in volume... But in the photo you still can’t see the pumped-up abs.
The reason for this may be the fat layer. That is, you also need to lose a little weight so that all the beauty you have acquired with such efforts becomes noticeable. &
Nutrition programs that are aimed specifically at reducing the layer of subcutaneous fat so that muscle relief becomes more noticeable are called cutting diets. They may differ in details, but what they all have in common is:
What should you do to pump up your abs?
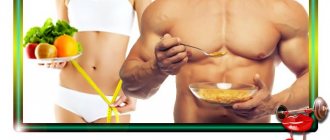
The secret to pumping up six-pack abs is not in exercises, exercise machines or miracle pills, but in proper nutrition, which will help remove excess belly fat.
The main secret to getting ripped abs, which many people and even trainers ignore, is proper nutrition.
The main rule to remember:
Abs are made in the kitchen, not the gym.
You can do the best ab training program all the time, but if your diet doesn't allow you to burn excess fat, then your six-pack won't show up on your belly. That is, they are already there, perhaps not as prominent as they can become after training, but they are there and hidden under a layer of fat that we have to remove.
Read in more detail how to remove belly fat to understand what needs to be done. There you will also find nutritional recommendations.
Your success in getting a six-pack is actually 90% dependent on your diet.
You can work your abs hard and they will be very strong, but almost invisible under the layer of belly fat. Instead of looking for the next miracle program or supplement, focus on the principles of proper nutrition. Well, you can’t do without the right training system either, so read our tips and put them into practice.
Low-fat dairy products
This could be cottage cheese, kefir, some types of yogurt. In a word, foods containing fats must be consumed, but in limited quantities.
It is recommended to eat in small portions, but often. Usually the figure is 1 time every 3 hours. In this case, you need to have dinner at least 4 hours before bedtime.
Note! It will not be possible to build muscle mass and reduce body fat at the same time. The first requires a significant intake of calories into the body, and the second requires a systematic reduction in their number.
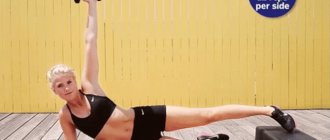
Physical exercises to burn fat
Another way to remove the layer hiding the aesthetic cubes is aerobic exercise. That is, those that are aimed not at building muscle mass, but at increasing the tone of the body as a whole.
Running, swimming, aerobics, dancing, skiing - all this, it seems, does not put a significant load on the abs.
However, these exercises can bring you closer to the appearance of sculpted abdominal muscles.
That is why, in order to get a spectacular photo of the abs, a guy or girl may need to not only do the “corner” and “bar”. But also jumping rope, waving your arms, pedaling a bicycle.
In a word, do not disdain types of activities that help burn calories and reduce the percentage of fat in the body.
To summarize, it is worth noting that in order for you to have beautiful abs as quickly as possible, you must do intense abdominal exercises for a month or two.
And then spend about the same amount of time burning excess fat by doing aerobic sports and adhering to the recommended diet.
At first, this whole process seems quite complicated. But gradually the training becomes more interesting, and my health improves. After the first weeks, you will feel that your body listens to you better.
And what a joyful, inspiring moment is that moment when you notice the first results!
We recommend keeping something like a diary. Take a photo of your abs at least once a week.
It can be quite unusual for men to move around with a camera in front of a mirror. But when, having lined up the resulting pictures in one line, you notice progress, you will feel new strength in yourself. Things like this really motivate me to continue.
Abdominal exercises for girls and men (guys) with their own weight
Exercises with your own weight have proven themselves at home; many girls (girls - women) choose this particular option for muscle training based on the fact that there is no time to visit the gym or it is simply convenient not to go anywhere and exercise at home! Men (boys) mostly train their abs on the street on the horizontal bar or go to the gym and pump up their abs there! Since many teenagers think that if they pump up their abs at home, then they can’t pump up beautiful and strong abs with six-pack abs! But this is all a myth. In fact, you can pump up your abs anywhere, the main thing is to know how to do it correctly.
The main mistakes that many girls and boys make when training their abs
- Doing the wrong number of reps
- Doing the wrong number of approaches
- Incorrect training program (set of exercises)
- Exercises combined incorrectly
- Not resting properly between sets
- Exercise your abs too often, for example every day
- They train the abs too rarely once a week, and this is not enough for the abs to appear.
How to properly pump up your abs so that your abdominal muscles appear, your belly and sides go away, and six-packs appear
Little tricks: how to make your abs photo more impressive?
One day that wonderful day will come when you understand - you have achieved your goal, hurray!
You can, of course, wait for those around you to notice the results of your titanic efforts. But it wouldn’t hurt to help them with this a little.
In the end, we all know that it’s not enough to achieve a great result, you also need to be able to present it well.
Abdominal strengthening exercises for little ones
Let's start by considering a set of exercises that is suitable for children aged 4, 5, 6, 7 years. At this age, the muscle corset is still very weak, so any load should be insignificant. Strictly speaking, it’s too early to pump up abs for a 3-year-old child. All strength training for preschoolers comes down to light physical exercise, but you can carefully shift the load on the abs with the help of certain exercises:
- Bike. The first simple exercise that children 4-6 years old and older like. The child should sit on the floor and place his hands on the floor behind his back to maintain balance. Then you need to raise your legs off the floor and begin to perform movements with them that imitate the rotation of bicycle pedals. The duration of the exercise is 10-15 seconds.
- Legs up. Static abdominal exercise, safe for children under 6-8 years old. The starting position is the same, but now the child must raise his straightened legs above the floor and hold them for 8-15 seconds, depending on physical fitness.
- Scissors. The starting position is the same, but now the legs raised and straightened at the knees need to be crossed in the horizontal axis, imitating the work of scissors. The exercise lasts 8-12 seconds.
- Leg raises with a ball. We do not change the initial position, but now the child must hold a small ball between his feet. Together with him, he should raise and lower his legs, but not lower them to the floor. 10-12 seconds is enough.
Choosing the right angle
To make the relief more noticeable, the body must be removed at a slight angle.
If we were talking about a portrait, we could say that we should prefer a three-quarter angle.
But full face or profile are bad decisions. For a photo of the abdominal press, all these terms are not entirely suitable. But they convey the essence.
The role of lighting in creating the perfect photo
Any professional photographer will tell you that light is very important. Oblique sunset rays lengthen the shadows, making the image more contrasting.
You can achieve the same effect by placing artificial lighting from above and to the sides of your subject or scene.
If you need to focus on the features of the shape, its relief, then just such a solution will be an excellent assistant.
That is, when taking a photo of the abs, girls and boys should sit on the side of the window. Or, for example, turn on a lamp on the wall. Then the shadows will turn out darker and deeper, visually increasing the convexity of the cubes.
Preparatory stage
In the visual arts, there is a very important rule regarding drawing people and animals. It is necessary to know the structural features of the muscles and skeleton in order to avoid disproportion and some unrealistic body shapes drawn.
Find two images: a drawing of the abdominal muscles and a photo of a person whose abdominal muscles are well pumped. Become familiar with how the muscles are positioned. If necessary, return to study as you draw.
Practice has shown that learning to draw abs with a pencil on paper is an easier and faster process than pumping them up yourself. But if you have abs, you're lucky. There is always somewhere to copy it from.
The magic of black and white photographs
Another well-known way to emphasize the shape of an object is to remove color. Black and white photographs make you pay more attention to curves, bulges, and texture.
Professional photographers actively use this. There is nothing stopping you from adopting this technique either.
Turn on the black and white mode, and the photo of the abs, male or female, is sure to become a little more impressive.
Of course, all these tricks won’t work if you don’t have beautiful cubes. But if you worked long and hard and finally got the coveted characteristic relief on your stomach, it’s somehow strange to carefully hide it under clothes, right?
Why don't girls need abs?
In modern reality, a “dried” torso looks wildly cool, but its presence only indicates a lack of fat in the body, and for us girls (unless genetics has awarded you a “dry” body), this is not healthy at all! For reference: 10-12% fat from total body weight is simply necessary for the proper functioning of our body.
13 Jan 2020 at 11:46 PST
I’ll add on my own behalf: many years ago, fitness testing showed an almost complete absence of fat in my body. “Three percent! – my doctor exclaimed. “Yes, professional athletes have even more!” Something had to be done about this. And I did. And now, with approximately the same toned shape as then, I look and feel much better. I wish the same for you. From my experience and conversations with specialists, I realized: there is only one way to get six-pack abs - by ruining your health...
As noted above, abdominal muscles appear with a low percentage of body fat, usually lean muscle fibers. In most cases, this fat content is not natural and leads to various health problems. First of all, low-calorie, low-carbohydrate nutrition affects brain activity, disabling the hormonal and reproductive systems (in the female body, the percentage of fat content is slightly higher than in men, precisely so that we can bear and give birth to a HEALTHY child). As a rule, in girls with six-pack abs, menstruation stops and the nervous system becomes unstable. Taking hormonal and contraceptive medications misleads them into believing that they do not have health problems. But that's not true. When taking hormonal drugs, the menstrual cycle is disrupted, as is ovulation. The hormonal system becomes imbalanced. And if you add active cardio and strength training to a low-calorie, low-carbohydrate diet, your metabolism will also be paused...
13 Jan 2020 at 10:13 PST
As soon as you begin to actively engage in sports and at the same time consume a small amount of nutrients, your metabolism immediately begins to slow down, and instead of getting the desired abs, you, on the contrary, gain weight. As a rule, also with a reserve. You may be able to achieve the desired relief for a short period of time, but very quickly the body will turn on self-preservation mode and begin to stock up. Such self-flagellation will only drive you into the framework of cyclical fasting-compensation, which can be observed among bikini competition participants who limit their calorie intake as much as possible for several weeks before the competition. This is done so that the relief is visible and the body appears as “dry” as possible, with a minimum amount of fat. After the competition, absolutely all participants in such competitions begin to overeat with high-calorie, usually unhealthy food.
Many girls, in pursuit of the body in the picture, begin to focus on food. This happens because the brain is constantly looking for additional calories that the body lacks. Therefore, the so-called “breakdowns” and “gorges” occur on the highest calorie foods - rolls, sweets, ice cream, fast food, chocolate bars. The brain is looking for any way to increase the percentage of fat in the body and not die from hunger. Perhaps everyone knows what people with anorexia and bulimia look like?!
Jun 16, 2020 at 2:56 PDT
And just imagine, you torture yourself with training, hunger, and finally, after some time, you achieve a sculpted, “dried” belly, like the girls on Instagram, and now the main task of your whole life becomes maintaining this result. You constantly think about what you can and cannot eat, you constantly think about training, afraid to miss it. In this way, you isolate yourself from society - instead of meeting with friends or going on dates, you choose to work out, you skip family dinners or going to a restaurant because you are afraid to “break out,” and you hate all those who can eat everything that you have forbidden yourself. Feelings of dissatisfaction, stress and hunger become your companions in pursuit of the ideal.
Believe me, six packs on your stomach will not make you better, happier or more desirable. Most likely, this will bring destruction to your life: starting with hormonal imbalance and ending with mental disorders. Love yourself, your body and act from a place of love and self-care. Respect your feminine side, leave hard, sculpted bodies to men - it’s more natural for them. Enjoy femininity. Strive for proportional, round, toned shapes. Exercise for fun, eat clean, healthy food and be happy and healthy above all!
May 8, 2020 at 11:10 PDT