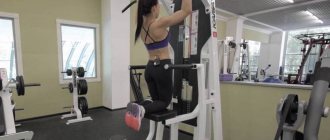
One-arm pull-ups are not just an exercise or a trick that you can use to surprise girls. By exerting efforts that can lift the weight of an entire person with just one limb, the athlete develops excellent strength indicators.
The nervous system responsible for energizing the muscles begins to work harder than before, which increases performance in other strength training activities.
The record for one-arm pull-ups belongs to our compatriot, Sergei Smirnov, who was able, while holding his weight on one arm, to pull his chin to the bar 22 times.
Preparation
Before you start training this technique, you need to understand that one-arm pull-ups are not two or three times more difficult than the classic style of execution.
Often athletes who can easily complete three dozen repetitions with two hands are not able to do even one with one.
The difficulty lies not only in muscle strength.
Here, all systems of the musculoskeletal system and the nervous system must work harmoniously, which must understand what command to give to the body and how much energy to direct to it.
Pull-ups on the bar: technique, mistakes, points table
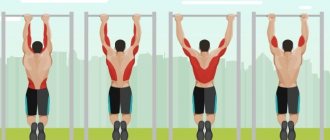
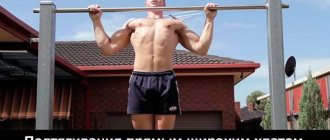
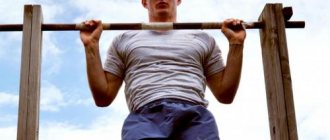
Pull-ups on the bar are performed from a hanging position (overhead grip, legs together). When bending your arms, you need to pull yourself up (chin above the bar), straightening your arms, and lower yourself into a hanging position. The hanging position is fixed.
Help with learning. Standing to the side and slightly behind, squat down slightly, grabbing the student by the front shin with one hand, and the thigh by the back with the other.
Help the student pull himself up so that his chin is higher than the bar.
Organization of insurance. Standing to the side and slightly behind the trainee and without touching him, hold one hand in front of the thigh, and the other in the back near the lower back.
Be prepared to hold the student if he falls off the crossbar.
Touching the student is allowed only to stop the swinging of the body.
Errors when performing U-FP-4 (pull-ups on the crossbar)
| Minor | Significant |
| Slight bending and spreading of the legs is allowed. | Hands on the bar are at a distance greater than shoulder width. Pull-ups are performed from a hanging position with a reverse grip. Jerks and swinging movements are made with the legs. The chin touches the crossbar. Pushing off the floor and touching other objects is allowed. A sharp upward movement of the head, interceptions and opening of the palm are performed. In the starting position, the arms are bent at the elbow joints, and when moving up, the legs are bent at the knee joints. The arms are bent alternately. The exercise is interrupted by a significant rest stop. |
Table of points for performing U-FP-4 (pull-ups on the crossbar)
| Ball. | Col. once | Ball. | Col. once | Ball. | Col. once | Ball. | Col. once |
| 100 | 30 | 84 | 22 | 66 | 14 | 34 | 6 |
| 98 | 29 | 82 | 21 | 62 | 13 | 30 | 5 |
| 96 | 28 | 80 | 20 | 58 | 12 | 26 | 4 |
| 94 | 27 | 78 | 19 | 54 | 11 | 22 | 3 |
| 92 | 26 | 76 | 18 | 50 | 10 | 16 | 2 |
| 90 | 25 | 74 | 17 | 46 | 9 | 6 | 1 |
| 88 | 24 | 72 | 16 | 42 | 8 | ||
| 86 | 23 | 70 | 15 | 38 | 7 |
Note: The standards presented in the table correspond to sportswear: 1C (swimming trunks, shorts, T-shirt, sports shoes). In this form, by decision of the commander (chief) of a military unit (military educational institution), under appropriate conditions, it is allowed to practice without a T-shirt and shoes; 2C (in shorts, T-shirt, sports shoes); 3C (in a sports (training) suit, sports shoes); 4C (in an insulated sports (training) suit, insulated sports shoes, a sports hat).
Corrections for the uniform of clothing to the results for performing U-FP-4 (pull-ups on the crossbar)
| Exercise | Exercise no. | Type of measurement | Amendments to the standard | ||||
| A | b | V | G | d | |||
| Pull-up on the bar | 4 | count once | 1 | – | – | – | – |
Note: simplification of the standard when performing the exercise in the form of clothing: (untucked trousers, boots or boots with high tops (yuft boots), without a headdress, with a naked torso (in a T-shirt); (everyday, the waist belt is loosened, boots or boots with high high boots (yuft boots), without a headdress, the collar is unbuttoned); (everyday, the waist belt is loosened, boots or boots with high tops (yuft boots), in a headdress, without an insulated jacket).
Preparing muscles for stress
To prepare your muscles for increased loads you will need:
Increase the number of pull-ups with straight arms to 15-20 times at least.
The student must achieve these results at least 4 times without much difficulty. This will indicate that the creatine reserve of the muscles in the arms has reached a sufficient level and you can begin high-intensity exercises.
Strengthen the tendons of the hand. Daily work with various expanders is perfect for this. They can be replaced by a regular hang on the bar.
To begin with, it is advisable to hang on two hands for a week, when you can easily hang for 2-3 minutes, you can remove one of them.
The main thing to monitor is the tension in the shoulder muscles. They must be tense and provide support to the joint, otherwise injury may occur.
To speed up the strengthening, you can hang from a pipe wrapped in a towel. This will increase the stress on your fingers.
This is something without which it will be extremely difficult for the body to carry out your plan. But the matter is not limited to simple physics; you also need to understand what type of force to apply to lift the body up.
Training one-arm pull-ups will eventually teach the nervous system to automatically perform the goal. But at first everything will not be so optimistic.
Technical points
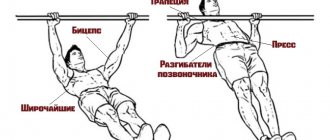
You can do 1-arm pull-ups with either a straight or reverse grip. It is better to alternate grips for uniform muscle development. Most of the aspects characteristic of regular pull-ups are preserved here. However, there are slight differences:
- When there is only one fulcrum, your body will involuntarily deviate away from the vertical position. Try to minimize this tilt and keep your body as straight as possible. In particular, to do this, you should keep your working hand closer to the body, and your free hand in front of the body, closer to the opposite side.
- Do not relax the shoulder of your working arm at the lowest point. The shoulder and elbow joints experience significant stress during the movement, so the muscles must always be toned.
- By slightly bending your legs and pulling them up, you will better stabilize your core and reduce the likelihood of swaying on the bar.
It is better to start performing the exercise on a horizontal bar, which you can easily reach by stretching your arm up. As you progress, you will be able to move to a higher horizontal bar and do the hanging exercise.
Try to monitor your well-being and avoid overwork. The exercise is really hard and puts significant stress on the ligaments of the elbow and shoulder joints. If you feel pain in your shoulder or elbow, you should reduce the intensity of your workouts on the horizontal bar.
Prepare in advance for the fact that it may take several months of hard training to perform the exercise correctly. Are you ready to work and in no hurry?
One-arm pull-ups are a spectacular exercise that requires strength and endurance that will allow you to exceed your own capabilities and prove, first of all, to yourself that you are in great shape!
Nervous system
The control of all muscles and nerves lies with the nervous system. Without her knowledge, not a single muscle will contract.
Athletes involved in a particular activity develop skills over time based on regular repetition of the same movements.
Their nervous system soon allows them to perform the desired movements without much conscious effort. This effect is also called muscle memory.
Everyone has experienced the fact that some movement is difficult for him at first, and then there is a feeling that he could do it from birth.
This happens due to the consolidation of the skill, due to the fact that the body’s control center understands how and what should happen to get the desired result.
To become comfortable with the one-arm pull-up program, it is advisable to slowly guide your body to the correct force.
To do this, you can perform special exercises. They are divided into two types, the first is to reach the highest point of amplitude with the help of outside help, and after that, try to perform the negative phase with one hand.
Many, even experienced athletes, cannot hold on one hand for more than two seconds. But after a week of such effort, they can freely lower slowly, straining the necessary tendons and ligaments.
The second type of exercise is making efforts with both hands, but with a gradual decrease in the load of the non-working hand.
During this training, the load on the working arm gradually increases, and it has no choice but to grow or become stronger, or find ways to bear the load. Both options will do.
The athlete gets the greatest effect when combining these techniques. To do this, you can use these exercises:
Perform classic pull-ups, while reducing the number of fingers on your non-working hand. There should be one little finger left at the end.
Make the support lower than the one the working hand is holding. The best option would be a towel thrown over the bar.
Having pulled yourself up, do the negative phase with support on one hand. In this case, you do not need to remove the second one to prevent a quick fall. It is necessary to gradually increase the load to prevent injury.
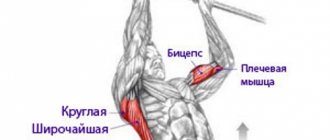
At the end of your workout, try doing one-arm pull-ups. First, the body will understand how to bend the elbow. Then, using the force of the press, the first push will be given, which will pick up the shoulder, and then the biceps.
My journey to one-arm pull-ups began almost 10 years ago, right after I personally saw one person who could do it. Before that, I had only heard stories about this - legends about such a possibility, but I never believed that it was possible in reality. The only time I've ever seen anything like this was when a person was doing a pull-up with one arm, and with the other hand he grabbed the wrist of the hand with which he was holding onto the bar. Contrary to my initial expectations, true unassisted one-arm pull-ups are actually possible.
In addition to teaching myself how to do one-arm pull-ups, I have had the privilege of training several very strong people to do their first one-arm pull-ups too. Although there are always several paths to any goal, through my trial and error I have determined that the following techniques and tactics are the most necessary and give hope that if you use them, you will one day be able to do this monstrously complex exercise:
Do a lot of pull-ups.
Before preparing for one-arm pull-ups, I highly recommend that you spend a lot of time getting comfortable with regular pull-ups. You need to get to the point where you can do at least 15 clean reps without jerking. Ideally, it is better for this number to be 20. This is the foundation for your future one-arm pull-ups.
Once you have reached the designated level, your next challenge will be to be able to hang calmly from the bar using only one hand. This requires serious grip strength as well as conditioned shoulders. If you do 15 quality pull-ups, then in theory you should be pretty close to this, but you still need to practice specifically.
The trick is that when you hang, you need to engage your lats and shoulders. In the beginning, just holding on for even a few seconds will be very difficult. Eventually you will get used to it. Hanging on one arm for 30 seconds is a sure goal, having achieved which, you can think about further ambitious steps. If you have access to monkey bars, I also recommend using them for additional exercise.
Statics and negative repetitions.
Just like someone learning to do a two-armed pull-up, you must first do static work, holding a static position at the top of the pull-up range, but using one arm.
Hang on the horizontal bar with two hands, chin over the bar, tense your entire body and carefully release one hand. I suggest doing this using a palm-facing grip - this will allow you to hold the bar closer to the center of your body, which creates more advantageous leverage. Although the load of supporting your entire body's weight may seem to be transferred to just one arm, your chest, lats, and abs are also important players in this process.
The first time most people try to hold on with one hand, they fall as soon as they let go of the other hand. Don't despair if the same thing happened to you during your first attempts. To help yourself hold on, just don't think about your hand; focus on tightening your entire body, especially your abs. You may find it helpful at first to keep your legs close to your body. Gradually, you will be able to learn to hold yourself with straightened legs.
Once you can hold the top on one arm for a few seconds, you can begin to work on doing controlled negative reps on one arm. The idea is to start from hanging at the top point on one arm, and then carefully and as slowly as possible lower your body to the bottom point (also on one arm). Performing the negative phase of one-arm pull-ups is a great way to prepare your tendons and ligaments for the stress they will experience when performing the full exercise, while training your central nervous system to become accustomed to the unusual movement.
The first time you try to do a negative on one hand, you will probably fall back down like a stone. When starting out, it will be helpful not to think about movement; just try to hold yourself up and let gravity take care of the rest. The closer you get to the bottom, the more difficult it will be to maintain control of your descent. Be prepared to spend a lot of time on this step. You need to learn to control every inch of the negative phase!
Give yourself a hand.
On the way to one-arm pull-ups, it is very useful to practice a similar movement, helping yourself with your other hand. This can be done in several ways:
The first method is often called the “archer pull.” With this variation, start as if you were going to do a wide-grip pull-up, but pull with one arm while keeping the other straight. This will force the working hand to do most of the work while still allowing itself to be helped if needed.
You can also pull yourself up by holding the wrist of the working limb with your other hand. As I mentioned earlier, this is sometimes considered a “one-arm pull-up.” Only the working hand holds onto the bar, but the other hand still helps to pull it. Over time, gradually reduce the assistance of your other hand, moving its grip closer to the elbow. The further away from your wrist you hold with your non-dominant hand, the more work your working hand is forced to take on. After all, you won't need the help of a second hand at all!
Training program and frequency.
Because One-arm pull-ups are a high-load movement, it is important for you not to overdo it. Starting one-arm training shocks not only your muscles, but also your connective tissue and central nervous system.
Training one-arm pull-ups can put a lot of stress on the elbows and shoulders in particular. Tendinitis (inflammation of tendon tissue) is a bitch... You need to respect your body or you will pay. Therefore, I recommend that you train one-arm pull-ups only 1 or 2 times a week (the first few weeks), eventually working up to three days a week.
In addition, I recommend using a small load volume. Think of one-arm pull-ups as analogous to the one-arm walk-through of basic barbell exercises. You can't do this all the time or you'll burn out!
Here is an example program for one-arm pull-ups for the first few times (use if you are already doing 15 clean regular pull-ups):
- Warm-up: standard pull-ups 2*5
- Warm-up: push-ups 2*10
- One-arm hang: 2 sets of 30 seconds (if you can’t hold it for 30 seconds, hang as long as you can). Rest 1-2 minutes between sets.
- Hold at the top on one arm: 2 sets of 30 seconds (if you can’t hold it for 30 seconds, hang as long as you can). Rest 1-2 minutes between sets.
- One-arm pull-ups with assistance: 5 times with each hand, using the archer technique or helping with the other hand, holding the wrists. Rest between reps for as long as you need.
After completing this program, finish your workout with an exercise of your choice, such as dips, presses, or hanging leg raises.
Twisting path to the crossbar.
Due to the unusual trajectory of the movement, when pulling yourself up with one arm, there will inevitably be some rotational movement of the torso. The body will rotate on its own during the ascent. You need to use this to your advantage first. As you lift and rotate your torso, your grip will change from palm-out to palm-out. If a one-arm pull-up is performed on gymnastic rings, then it is not the torso that rotates, but the arm with the ring.
Gradually, you will be able to perform pull-ups, rotating less and less, keeping your arm in one position throughout the entire amplitude.
The journey is years long.
While a one-arm pull-up is an achievable goal, it won't be achieved easily. This is a tough nut to crack, and the corresponding training will be rigorous. Even if you are already strong, learning how to do a one-arm pull-up will require a lot of dedication and specific practice.
When I decided to learn how to do one-arm pull-ups, it took me almost 3 years to do just one repetition. Sometimes I could do 2 repetitions without problems, and sometimes I could not pull myself up half the distance once.
Of all the lessons I've learned during this time, there's one that sticks out to me over and over again: take the process seriously and respectfully, and be patient. The one-arm pull-up is, unlike many others, a non-weight class competition. Only those who possess the rare combination of patience, strength and determination have a chance to join the elite of men and women capable of making this move. Are you ready for this challenge?
Original source
Translation:
- 8 Week Mass Pull Up Program
Liked? Share with your friends!
Possible problems
Many people don’t know what to do if their arms hurt after doing pull-ups. The problem is real and cannot be ignored.
First you need to understand what kind of pain. If it is caused by muscle pain after serious exercise, then there is nothing to worry about, it will hurt and get stronger.
You need to be wary of another type of discomfort, such as pain in the joint area, or aching point in the muscle. It can be caused by tissue damage.
It is necessary to resume training only in case of complete recovery and absence of pain.
You should not succumb to the provocations of your comrades who encourage you to continue exercising, otherwise you may get an injury that is incompatible with playing sports.
If the pain continues after a long period, you should consult a doctor.
Uneven-high pull-ups[edit | edit code]
Uneven-high pull-ups
Execution[edit | edit code]
Grab the bar with one hand using an underhand grip—this is the preferred hand position for this exercise—and place your other hand on the wrist of your working hand. The thumb of the non-working hand should be under the palm, and the fingers should be under the back of the hand of the working hand. Lift your feet off the ground, bend your knees slightly, cross your ankles. Keep the muscles of the shoulder girdle tight, do not relax. The working arm is slightly bent at the elbow, the free arm is bent at a large angle. This is the starting position (Fig. 53). Bend at the elbow and pull yourself up until your chin is above the bar. This is the final position (Fig. 54). Pause at the top, then slowly lower to the starting position. Pause briefly and repeat.
Cross-sectional exercise[edit | edit code]
Uneven-high pull-ups have been known for centuries, but they became popular after the release of the movie “Rocky II” starring Sylvester Stallone. The exercise works on the grip and prepares the hand for more complex pull-ups of the following difficulty levels. During the exercise, the biceps and back muscles also work intensively.
Training norm[edit | edit code]
| First level | 1 set of 5 reps (both sides) |
| Average level | 2 sets of 7 reps (both sides) |
| Advanced level | 2 sets of 9 reps (both sides) |
Improving technology[edit | edit code]
If you have enough strength for narrow pull-ups, then there will be no problems with uneven-high pull-ups. The main difference between these exercises is that the body weight is placed on only one arm. If the exercise is difficult for you, take time to work on your grip. You can hang by one hand after doing pull-ups, keeping your arms and body in the correct position.
Pull-up technique
There are two types of performing this exercise. They differ in the way they hold their hands when doing pull-ups. This is either a forward or reverse grip.
Performing each exercise involves different muscle groups, and to get the fastest results, it is advisable to alternate them during training.
What to pay attention to:
The body must be kept in a straight position relative to the bar. To do this, you need to apply a certain force to the shoulder muscles from the very beginning, and place your free hand behind your back.
You shouldn’t relax when you reach the bottom point after a successful approach. The shoulder tendons may not be able to withstand the load and become damaged. In addition, the body may begin to rotate, which will also not be beneficial for the joint.
Use your legs to stiffen your core. To do this, you can cross your ankles and bend your knees; the more muscles are concentrated closer to the abs, the better.
Exercises for tightening arms for women should be gentle. Although their ligaments and tendons are more flexible, their lack of genetic strength will not work to their advantage.
One-arm pull-ups: technique
After you can easily complete the entire set of exercises, you can proceed to the most complex technique.
- Grasp the bar with a reverse grip and place your other hand behind your back.
- Bend your legs at the knees, tense the muscles of your arms and torso, and with an explosive force and a sharp exhalation, perform a pull-up, bending your elbow as much as possible. Chin at the top point above the bar.
- Pause for a second at the peak, and slowly lower as you inhale.
- Repeat the same on the other hand.
At first, it is enough to perform at least one repetition on both sides, and then, as you become stronger, increase the number of pull-ups and series.
Progress
Once you suddenly do a one-arm pull-up, don’t stop there. The most important thing you have already done is learned how to pull yourself up.
This is not just about newfound strength. The brain finally understood the sequence with which the muscles should contract.
Further progress will be made faster until the limit is reached.
This period is a great opportunity to pump up your arms with pull-ups, as you're lifting weights with one arm that bodybuilders can't with the hardware they have.
Approximate training program for 4 weeks
Week I
The first day.
- Regular pull-ups with a reverse grip - maximum number of times.
- Asymmetrical pull-ups. 5 reps on each arm.
- Asymmetrical pull-ups. 3 reps on each arm.
- Hanging on the right hand - the maximum possible time.
- Hanging on the left hand - the maximum possible time.
Second day.
- Regular pull-ups with a straight grip - 15 reps.
- Multi-level pull-ups, grab the bar with your right hand, and grab your right hand with your left hand. – 3 repetitions
- Multi-level pull-ups, grab the bar with your left hand, and grab your left hand with your right hand. – 3 repetitions
- Quick pull-ups - 7 singles. i.e. Perform a repetition, release the horizontal bar, then do the next one.
- Quick pull-ups - 5 singles.
Day three.
- Maximum number of free-grip pull-ups (whatever is comfortable for you)
- Asymmetrical pull-ups. 7 reps per arm
- Asymmetrical pull-ups. 5 reps per arm
- Hanging on the right hand - maximum time.
- Hanging on the left hand - maximum time.
Week II
The first day.
- Maximum number of pull-ups with a reverse grip.
- Asymmetrical pull-ups. 7
- Asymmetrical pull-ups. 5
- Asymmetrical pull-ups. 3
- Hanging on both hands (at the same time, straight grip) - maximum time.
Second day.
- Multi-level pull-ups with the right hand behind the bar, with the left hand behind the right hand. – 3 repetitions
- Multi-level pull-ups, grab the bar with your left hand, and grab your left hand with your right hand. – 3 repetitions
- Multi-level pull-ups with the right hand behind the bar, with the left hand behind the right hand. – 5 repetitions
- Multi-level pull-ups, grab the bar with your left hand, and grab your left hand with your right hand. – 5 repetitions
- Maximum number of pull-ups with a straight grip.
Day three.
- Free grip pull-ups - maximum number of times.
- Weighted pull-ups - 5 times. (Weight weight from 10 to 16 kg)
- Weighted pull-ups - 3 times. (Weight weight from 10 to 16 kg)
- Lowering on one right hand - 3 times.
- Lowering on one left hand - 3 times.
Week III
The first day.
- Hanging on the right hand - maximum time.
- Hanging on the left hand - maximum time.
- Maximum number of pull-ups with a straight grip.
- Quick pull-ups - 7 singles.
- Quick pull-ups - 5 series.
Second day.
- Pull-ups with a narrow straight grip - 12 times.
- Multi-level pull-ups with the right hand behind the bar, with the left hand behind the forearm of the right hand. – 3 repetitions
- Multi-level pull-ups, grab the bar with your left hand, and grab the forearm of your left hand with your right hand. – 3 repetitions
- Asymmetrical pull-ups 5 reps.
- Asymmetrical pull-ups 3 reps.
Day three.
- Weighted pull-ups - 7 times.
- Weighted pull-ups - 5 times.
- Weighted pull-ups - 3 times.
- Lowering on one right hand - 5 times.
- Lowering on one left hand - 5 times.
Week IV
The first day.
- Maximum number of pull-ups with a straight wide grip.
- Try to do a jumping pull-up with your left arm.
- Try to do a jumping pull-up with your right arm.
- Asymmetrical pull-ups 10 reps
- Asymmetrical pull-ups 7 reps.
Second day.
- Multi-level pull-ups with the right hand behind the bar, with the left hand behind the shoulder of the right hand, 3 repetitions.
- Multi-level pull-ups, grab the bar with your left hand, grab the left shoulder with your right hand, 3 repetitions.
- Hanging on the right hand - maximum time.
- Hanging on the left hand - maximum time.
- The maximum number of pull-ups in a free manner.
Day three.
- Try to do a jumping pull-up with your left arm.
- Try to do a jumping pull-up with your right arm.
- Weighted pull-ups - 7 times.
- Weighted pull-ups - 5 times.
- Weighted pull-ups - 5 times.
Recommendations
After the first pull-up has been completed, be sure to begin intensive training of the other arm.
Otherwise, differences in biceps volume will not be limited.
After all, this exercise loads not only the arm. All groups, starting from the buttocks and abs, give a push that allows the elbow to overcome the first movement.
During preparation, you can use various equipment, such as additional weights and belts. They allow you to transfer the load from the hand to the main working muscles.
Hand position when pulling up
When you do a reverse grip pull-up, your palms wrap around the bar with your palms facing you. This position is called the supination position.
The pronation position is where you grip the bar with your palms facing away from you. This position is known as a regular grip.
There is also a mixed grip, when one hand is in supination and the other is in pronation.
To achieve better results, you need to constantly change the position of your hands. Thus, the strength of all muscles that are involved in the pull-up process will develop.
Note: Below you will come across terms and abbreviations that you may not understand right now. To make it easier to read, we present to your attention their transcript. “pull”, “OAC”, “OAP” and “chin” will all in this text refer to both a regular grip pull and a supinated pull. If necessary, clarifications will be made.