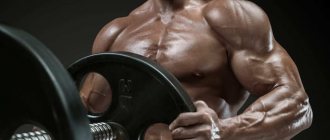
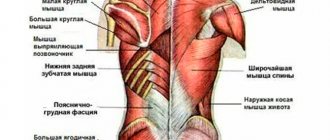
Fitness is becoming more and more popular. Every day more and more different exercises appear in it. This article will talk about a set of exercises with a stick for the back.
With their help, you can build muscle mass, maintain an even posture and spine, and also make your joints more mobile and flexible. With intense training, many people lose weight.
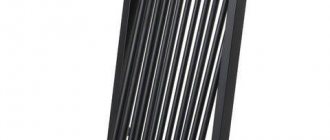
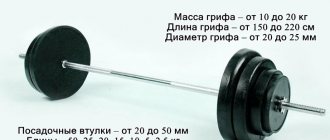
Characteristics of a gymnastic stick
This sports equipment comes in different sizes and may also vary in weight.
Depending on your preparation and training goals, you can choose the appropriate option:
- If the workout is strength training, then it is recommended to use a bodybar . It has a metal base that is covered with rubber. The size varies from 0.9-1.2 m, weight from 1.5 to 16 kg.
- When doing gymnastics, a light stick made of plastic is suitable. It's hollow inside. The length can be 90, 120 or 150 cm.
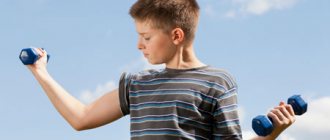
- There are gymnastic sticks of smaller dimensions. They are suitable for training with children.
SOS! Prolapse of internal organs: helping ourselves at the first call of the body!
This article was inspired by the increasing requests for help from women with a similar problem. Moreover, these were young and apparently absolutely healthy girls.
Someone had a problem after childbirth, someone had an “age problem” (I was always amused when a 35-45 year old girl starts talking about an “age problem”), someone felt discomfort after a long, chronic cough - the point is one. All of them faced varying degrees of “lapse.” I will not go into deep medical detail of this issue now - but we don’t need it. We now need to understand in general what prolapse of internal organs is, why it happens, and, most importantly, how we can cope with it, and even better, prevent it. So, prolapse of internal organs is a lower, compared to normal, location of one or more internal organs (stomach, liver, intestines, kidneys, pelvic organs).
Today our topic is prolapse of the pelvic organs (uterus, vaginal walls, bladder, rectum). Most often, women encounter this disease due to the lack of proper preparation for childbirth and proper recovery after childbirth, after the onset of menopause (hormonal changes), during heavy lifting or chronic cough (especially if there is already a postpartum predisposition), with metabolic disorders (overweight or sudden weight loss, diabetes), etc. The disease is also associated with weakness of the muscles and ligaments that hold the internal organs in their normal position.
And now “on the fingers,” so to speak. The human body is designed very wisely (especially the female body, which is also responsible for the small life in our stomach) - the main thing is to know and understand how to treat it competently. All our internal organs “are not piled up in one heap in the stomach and do not press with all their weight on the pelvic floor” - as many imagine. Each of the organs has its own suspending and supporting system of muscles and ligaments, fixing it at a certain height and allowing a certain movement according to the physiological processes in the body.
To make it easier to imagine, look at your stomach and imagine, instead of the cavity between the respiratory diaphragm and the pelvic floor muscles, a room (the ceiling is the respiratory diaphragm, the floor is the pelvic diaphragm, the walls are the abdominal and back muscles).
And the internal organs do not just stand on the “floor” as furniture, but are also attached to the “walls and ceiling”, on the “floor”, exerting minimal pressure. This is all with the correct physiology. Now imagine that the overall structure becomes “flimsy”, the ceiling begins to sag, the walls lose the necessary elasticity, and the fastening ropes stretch. What's happening? That’s right, now the “weight of the furniture” will fall more “on the floor.” And if the “floor” in the room is also weak, it will first “sag” too, and then... In general, from “sinking” you will have to move on to “fallout”.
Why am I drawing you all these pictures? Just so you understand that pelvic organ prolapse is not only a failure of the pelvic floor muscles. With the help of special exercises, we need to restore tone to all the muscles and ligaments of the abdomen, primarily the respiratory diaphragm (“ceiling”), the abdominal and back muscles (“walls”) and, of course, strengthen the pelvic floor (“floor”). And half-measures in the fight against prolapse will not bring the desired result or will only bring temporary relief (for example, only “Kegel exercises” or only pumping up the press, often also incorrectly, with an increase in intra-abdominal pressure). An integrated approach is needed here. However, not everything is as complicated as it seems.
A competent selection of a 30-minute set of exercises - and after just a month of regular work you will feel a clear improvement, and after two months you will forget about this problem (I’m not talking about difficult cases now).
Let's summarize. If you begin to experience sensations such as:
- periodic pain in the lumbar region,
- “pulling” pain in the lower abdomen and sacrum,
- episodes of urinary incontinence when coughing, sneezing, laughing, jumping,
- painful sexual intercourse,
- sensation of a “foreign body” in the vaginal canal,
- problems with the intestines and bladder,
- the possibility of prolapse of the uterus and vagina, which sometimes ends in their loss, cannot be ruled out. This is not a reason to panic. This is a reason to take care of yourself, with love and pleasure.
According to statistics, every 3rd woman faces this problem. You may never become that 3rd. Or consciously leave this category. The choice is yours!?
Below are the basic exercises (about the main exercise with variations) for prolapse of the pelvic organs. Let me make a reservation right away - we are talking primarily about the initial stages of prolapse. More serious cases require an individual approach. I cited signs of incipient prolapse in a previous article - and, of course, it’s good to also have a gynecologist’s report. So, what you need to do - and what you absolutely cannot do. First of all, you need to exclude everything that increases intra-abdominal pressure. To do this, first let’s figure out what kind of “beast” this is - “intra-abdominal pressure”.
Now I will again “explain with my fingers”, appealing to your imagination. Imagine that instead of a torso you have a large syringe - and the breathing diaphragm is the plunger in this syringe. What happens in a syringe when we push the plunger down? That's right, the medicine is “pushed” out due to increased pressure in the lower cavity. In our case, the lower cavity is the abdominal cavity, and the pressure in it is intra-abdominal (the chest cavity is the “upper part of the syringe”, and the pressure in it is “intrathoracic”). Physiologically, the play of these pressures (intrathoracic and intra-abdominal) plays a very important function, creating a powerful additional “pump” for the movement of fluids (blood, lymph) from bottom to top and providing massage to the internal organs, helping with childbirth and a host of other processes in the body (we’ll talk about this later). We'll talk in more detail someday). And, again, physiologically this “pump” is designed for a healthy system, that is, in the lower part of the syringe there is not an “atonic belly”, not a weak lower back, not weakened by childbirth ligaments and pelvic floor muscles. Do you see where I'm going with this?
In a healthy system, the piston can drop easily and often - the system will withstand, “dampen” - this is physiological.
In a weak system, an increase in pressure in the lower part (the piston has dropped) leads to a gradual “pushing” of the abdominal organs down (here gravity also helps). So, under what conditions does intra-abdominal pressure increase in normal life? Lifting weights - jumping and running - sneezing and coughing - acts of straining (by the way, current constipation is “future hemorrhoids”). Thus, we now understand what to avoid at the first symptoms of prolapse. Also, for a while, replace your favorite gym or step aerobics with yoga and swimming. Believe me, these are temporary measures - then you will come back again, but this time healthy. Again, temporarily (!) we replace the usual “abs pumping” while lying on the back (“classics of the genre” - hands behind the head, lifting to the knees - also increases intra-abdominal pressure) and various leg raises while sitting and hanging with “hypopressive” exercises, then eat by lowering intra-abdominal pressure. And the royal place among these exercises is rightfully occupied by the “vacuum abdominal retraction” exercise. In yoga it is called “Uddiyana Bandha” or “Empty Uddiyana”. The essence of it is to completely exhale the maximum volume of air, pull your stomach deep under the ribs and hold it there “as long as possible, without going beyond a comfortable state” (that is, you should not turn blue and bulge your eyes). I’ll give the technique below, but for now let’s talk about the effects of this exercise:
- The diaphragm, rushing up under the ribs, pulls up all the internal organs, including the pelvic organs, eliminating their displacement
- The abdominal organs are massaged. Thanks to this, constipation, problems with the intestines and pancreas are eliminated, and digestion is normalized. Abdominal massage is also beneficial for the kidneys, liver, spleen and adrenal glands.
- Beneficial effects on the circulatory system. Exercise helps remove venous congestion, improve blood supply to all internal organs and accelerate regenerative processes in various diseases.
- Stimulates the nervous system. Since there is an effect on the “solar plexus”, and many nerve endings are concentrated in the intestines, when performing uddiyana bandha, they are stimulated. This leads to calm and tranquility, nervousness and hyperactivity go away.
- Stimulates the hormonal system, adrenal glands and pancreas. In combination with Mula bandha (volitional contraction of the pelvic floor muscles) it affects the uterus and ovaries.
- The active effect on the genitourinary system is explained by the fact that the outflow of blood from the pelvic organs increases, blood supply is activated, excess fluid is removed, and in combination with Mula bandha, the pelvic diaphragm is strengthened and local immunity is stimulated. Uddiyana bandha is especially beneficial for those who suffer from pelvic and abdominal organ prolapse.
- Vital energy rises, which helps slow down the aging process and have an overall rejuvenating effect.
- Due to active “retraction”, the wide muscle layers of the abdominal press are activated, fat is removed from the abdomen, and the figure becomes more elegant, toned and slender. To put it simply, this seemingly simple exercise will replace many other variations of working the abdominal muscles, many times surpassing them in effectiveness. You can find a great variety of techniques on the Internet - the main thing is not to lose sight of the order of “closing the locks”: exhale - chin down, tuck the pelvic floor, pull the stomach inward. Hold for a comfortable amount of time, and in the reverse order we release everything - “stomach, pelvic floor - chin” and only then inhale. This sequence is important for the correct alignment of pressures inside the body.
I'll give a classic example below.
Technique for performing Uddiyana Bandha in Fisherman's Pose.
- Take the “Fisherman Pose” position with your hands on your knees.
- Take as full a breath as possible.
- Exhale as completely as possible, completing the exhalation by lowering your chin to your chest, while simultaneously moving the back of your head upward.
- Pull the pelvic floor muscles inward.
- Pull your stomach in and up (there should be a “vacuum traction” from above, your stomach should “suck”, “stick” to the “back wall and ceiling”).
- Hold for a comfortable amount of time (5–20 s.).
- Then relax everything in the reverse order: stomach, pelvic floor, lift your chin - and inhale.
And, as usual, there are two conditions: correct execution and regularity.
Because, as practice shows, for some reason we are ready to pump the press 3 sets of 20 times - and we consider this normal. But when we start doing the “vacuum in the stomach”, we expect magic from one approach of 3-5 times.
And now, depending on the state of our body at the moment, we are building our own “Uddiyana complex”.
- The easiest option (for those who have recently given birth) is lying in bed. In a horizontal position, we get the most “light” version of working with uddiyana.
- In ascending order - lying on the floor, legs bent at the knees. We do uddiyana with a raised pelvis (put a blanket rolled up under the pelvis), thus “turning off the gravity” of the internal organs, helping them rise up.
- In “Slide” or “Downward Facing Dog” (if it’s difficult, replace it with a position on your knees and elbows).
- Standing in the “fisherman’s pose”, with your hands resting on your knees, draw in as deeply as possible while exhaling as completely as possible.
We select several currently possible options and do 3 approaches 3–5 times. For example, 5 uddiyans in the floor position, 5 in downward-facing dog, 5 in the fisherman’s pose. Between sets there is rest and several full deep breathing cycles. Then every day we add 1-2 times, bringing it up to 10 times in a set. Or we divide the complex into stages, 2 times a day, 15 minutes. in the morning and 15 min. In the evening. A prerequisite is that the stomach must be empty! Therefore, the morning is the ideal time to study. And, of course, the faster the result we want to achieve, the more regular, accurate, and daily the classes should be. And also - “for starters”, so to speak. This exercise is a guide to various techniques of “Thai tricks” in bed. Therefore, it’s worth mastering - you definitely won’t go wrong. Be healthy and sexy!
Rules for performing exercises with a gymnastic stick
Doing the exercises correctly will give you the best results and will protect you from getting injured or sprained.
There are some starting positions for different workouts:
- The gymnastic stick is in front of you. This position involves arms straightened horizontally.
- Above your head - arms straight, positioned vertically. The projectile is in the palms.
- In front of the chest is a projectile in outstretched arms. The elbows are slightly apart. The stick is located at just below shoulder level.
- The gymnastic stick can be placed behind the head, resting on the shoulders . In this position it must be held with your hands. The projectile should not put pressure on the cervical vertebrae. He goes down a little lower.
- The gymnastic apparatus is located below, at the level of the lowered arms.
Also, different types of grip can be used for different exercises:
- Straight grip (or regular). Hands are placed palms down.
- Reverse grip - palms facing up.
- There can also be a wide or narrow placement of the palms.
- In some situations, you need to hold the gymnastic stick directly by the edges. Sometimes it should be positioned vertically, resting one end on the floor.
When and how to train?
There are no special restrictions on the use of such exercises. Everyone can create a program for themselves.
But, some points should be taken into account:
- To get the maximum effect, it is advisable to train with a gymnastic stick 3-4 times weekly. Their minimum duration is 30-40 minutes.
- It is advisable to take short breaks between workouts. For example, do exercises every other day. This regime will allow the muscles to recover and will not overload the body.
- For inexperienced athletes, it is necessary to gradually reach their maximum load. To begin with, it is important to master the correct technique. During the first workouts, it is recommended to perform each exercise 10 times (1-2 approaches). Taking into account how you feel, you can increase the number of repetitions, add approaches and increase the amplitude.
It is necessary to carry out training at least 1.5-2 hours after eating . If training is carried out in the evening, then the interval between its completion and sleep should be at least 2 hours.
Features of the complex of therapeutic exercises for patients with gastroptosis and enteroptosis
When compiling and performing a set of exercises, you must adhere to the following recommendations:
- training duration in the first 1-3 weeks is 10-15 minutes. 1 time a day, after – 15 minutes. 2-3 times a day [3].
- a set of exercises can be performed 2-2.5 hours after eating.
- the set of exercises should not be changed more than once a month; in case of insufficient load, it is necessary to increase the number of repetitions, which can range from 4 to 16 times.
- at first, the preferred starting position is lying on the couch with the leg end raised (or lying on your back with a pillow or blanket placed under the pelvis, height 20-30 cm), etc. lying on your stomach, on your side, on all fours (knee-elbow and knee-wrist poses).
- Gymnastic exercises in a standing position are possible only after strengthening the abdominal and pelvic muscles (approximately 3 weeks after the start of classes).
- the complex should include special exercises: walking with a “cross” step, body turns, various leg movements (abduction, adduction, rotation), retraction of the anus [2].
- Approximately from the fifth week, exercises for coordination and posture can be introduced into the complex.
- Running, strength exercises (especially with a weight of more than 5 kg), exercises that increase intra-abdominal pressure, and sudden bending of the body are not recommended [2].
- After training, you need to take a horizontal position for 20-30 minutes.
You can start performing a set of exercises only after agreeing with your doctor or exercise therapy specialist. The clinical effect of exercise therapy is achieved after 3 or more months. After this, it is recommended to engage in recreational exercises throughout your life to prevent relapses.
Rice. 2. Causes of prolapse of the intestines and stomach, as well as features of exercise therapy for raising these organs
What do you need to know before doing the exercises?
Before starting classes, it is recommended that you familiarize yourself with certain requirements that will help you carry out the training correctly and not harm the body:
- Be sure to warm up and warm up your joints.
- If you experience problems with the musculoskeletal system , spine, or other problems, you should consult your doctor. He must approve and approve the training program or adjust it.
- If your physical fitness is very weak or your body’s condition does not allow you to fully perform gymnastics, you can first perform several exercises without a stick so that your joints and muscles get used to it a little. Then use the gymnastic stick as provided in the health program.
Benefits of exercise
The benefits of training with this simple equipment are undeniable:
- Allows you to load different parts of the body.
- It has a beneficial effect on the spine and trains the back.
- Improves stretching and agility.
- Tones the body and helps in the fight against excess weight.
- Symmetrically loads the muscles and promotes good coordination.
- Strengthens the muscle corset.
- Helps normalize blood circulation.
- Used in rehabilitation and recovery programs.
Exercises while standing
Lesson plan and list of exercises:
- The feet are placed at the level of the pelvis. The gymnastic stick is located behind the head. It is necessary to turn the body from side to side. The pace of the exercise is smooth and measured.
- Stand up and place your feet at a distance from each other. The gymnastic apparatus is raised up and held above the head. Tilt your torso alternately left and right. The projectile must not move from the vertical plane.
- The gymnastic stick is again located above the head. Only now the torso is tilted forward. The body from the waist to the top is straightened in a straight line. Then you need to lean back.
- Place the equipment just above the lower back, holding it with your elbows. The feet are located nearby. Take one of them to the side and pull out its toe, resting it on the floor. Tilt your torso in the same direction as your leg is pointing. Take the starting position, repeat for the other side.
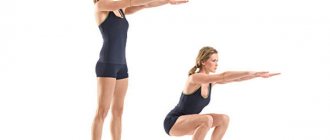
- Stand up straight, spread your legs to the sides. Gymnastic stick in front of you in straight hands. Leave the position of your hands unchanged, while doing squats. In this exercise, you can change the position of your feet, leave them parallel, or turn your toes slightly outward. Lunges are performed from the same starting position.
- Place the gymnastic apparatus in height at arm's length, resting one end on the floor. Place both palms on its upper edge. The elbows do not bend. Bend your body forward with emphasis on the gymnastic stick. A slight arch forms in the back. It needs to be increased by making several springy vertical movements. Climb back up. Do the exercise again.
Exercises while sitting
- Sit down with your legs stretched out in front of you. The feet are shoulder-width apart. Place the projectile on the shoulders. Bend your body, aiming for your legs. It is necessary to spring slightly, increasing the angle of inclination. The back is straight. Take the starting position, then tilt again.
- Sitting position, legs in front of you, feet not touching. You need to turn your torso to the side and move the gymnastic apparatus upward, straightening your arms. Turn around and lower the stick. Repeat the exercise on the other side.
Exercises while lying down
In lying exercises, the legs should not bend at the knees. If you are lifting your body or legs, then at the top point you need to linger for 2-3 seconds and fix the position.
- You need to lie on your stomach. Gymnastic stick in front of you in arms outstretched forward. Legs don't touch. Raise the projectile with straight arms. At the same time, raise your head slightly. Then raise your body above the floor, bending your lower back, and place the stick on your shoulders. At the point of maximum tension, linger for 3-4 moments. Take the starting position. Run several times.
- Lie on your stomach. Gymnastic stick in hands, behind back. It is located below the pelvis. Lift your body off the floor as much as possible and look forward. At the same time, raise your arms up. Stay in this position for a while. Then return to the starting point and repeat again.
- Starting position as in the second exercise. Perform the same lift of the torso and stick. In this case, you also need to raise one leg. The knee is bent. Try to reach the gymnastics stick with the toe of this foot. Return to a lying position and repeat the exercise.
- Lie on your back. Hold the gymnastic stick in your hands, at chest level. Lift it up. Bend your knees and bring them closer to the stick, then put your feet behind the apparatus. As a result, the stick ends up behind your back. Lay it on the floor. Stretch your legs up, performing a “birch tree”. Lower your knees to your chest. Take the stick in your hands and return to the starting position in the same way. Repeat several times.
Flexibility and stretching exercises
- Stand up straight. Feet shoulder width apart. Gymnastic stick in hands, behind back. Arms straight. Place your palms with a narrow grip in the middle of the projectile. Arch your back, keeping the position of your arms unchanged. When the muscles are as tense as possible, hold for a few seconds. Then relax and repeat again.
- Starting position as in the first exercise. The grip changes, in this case it is wide (wider than the shoulders). Palms turned outward. Slowly raise your arms up. The back remains straight. Perform the exercise slowly. With its help, the rear deltas are stretched.
- Stand up straight. Gymnastic stick in front of you. Lift one edge up while lowering the other. At the maximum point, the arms are crossed. Repeat with the other side. Advanced athletes can hold their arms overhead during this exercise. To do this, flexibility must be well developed and the joints must be prepared.
- From a standing position, lift the stick with outstretched arms. Swipe over your head and bring it as far back as possible. Bring your hands back and repeat. Perform the exercise slowly, without jerking. Do not force it if discomfort or pain occurs.
- Do everything as in the previous exercise. At the moment when your hands with the stick are behind your back, you need to raise one leg and reach the stick with its toe. Then reach with your other leg. After this, return to the starting position.
Is it possible to avoid surgery?
Many people have already avoided surgical intervention associated with displacement of the pelvic organs, including uterine prolapse. Special exercises will help increase the elasticity of the muscles of the pelvic floor, abdominal wall, back, and improve the condition of the whole body:
- Tilt your head slightly forward, take a deep breath, exhale, holding your breath using the chest, pull in your stomach and hold in this position.
- Strongly tense and relax the pelvic muscles. Repeat 5-6 times. This exercise is useful for lifting the organs located in the pelvis.
- While lying in bed, before going to bed, do this exercise: take a deep breath, and then take a long exhale. This should be repeated several times. The exercise will “put” the organs in place, make your abs strong and your waist thinner.
Exercises with a gymnastic stick for osteochondrosis
This set of exercises is therapeutic in nature, and not just recreational. People with a sedentary lifestyle are susceptible to osteochondrosis. In this mode, muscles gradually lose their elasticity.
The following exercises will help in the fight against this disease:
- Stand straight. Gymnastic stick in front of you. You need to hold it by the edges. From this position, turn your torso in different directions. Do not change the position of your hands throughout the execution.
- The position of the first exercise remains unchanged. It is necessary to raise your hands together with the stick above your head and return them back. Do not bend your elbows.
- Do the second exercise. At the same time, monitor your breathing. Inhale as you raise your arms, exhale as you lower them. Breathing is deep and measured.
- Stand up straight. Hands hold a gymnastic stick above your head. It is necessary to inhale and at the same time tilt the body forward. The lower back bends. You need to touch the floor with the stick. Then straighten back up, exhaling.
These 4 exercises are considered basic. They can be performed not only for treatment, but also as prevention.
Important: This set of exercises is prescribed by your attending physician. It takes into account which area of the spine suffers from the disease and calculates the norm of permissible loads.
Why do internal organs change location?
Pelvic organ prolapse is observed in a large number of women who have given birth. Internal organs can also move when losing weight, if the process of losing weight occurs in a short time.
If you look at the statistics, women under the age of fifty have varying degrees of prolapse - 15-30%. By the age of 50 - up to 40%; in older women, displacement and prolapse of the pelvic organs reaches terrifying proportions - 50 - 60%.
There are many reasons for this:
- Lifting weights.
- Long labor with complications.
- Sedentary lifestyle.
- Weak abdominal muscles.
- Excess weight and rapid weight loss.
- Various colds, constipation.
When a doctor makes a diagnosis of uterine prolapse, many women are offered surgery.
If the prolapse has not gone too far, then you can try 4 therapeutic treatment options. What are these methods:
- Losing excess weight, reducing heavy physical activity.
- Prevention of colds and constipation.
- Strengthening the pelvic floor muscles.
- Use of bandages and belts.
The emergence of modern technologies helps doctors carry out successful operations for prolapse of not only the uterus, but also all internal organs.
Exercises with a stick and expander
- The gymnastic stick is on the shoulders. The edges of the expander are attached to its edges. Feet shoulder-width apart, feet holding the middle of the expander on the floor. From this position, perform squats.
- Get on all fours with emphasis on your palms. The stick is held in the hands. The expander takes the form of a loop, the middle of which is hooked to the heels, and the edges are held on a stick. Swing your leg back and up, overcoming the resistance of the expander. Perform the exercise alternately for each leg.
- Perform deadlifts. Instead of a barbell, he holds a gymnastic stick in his hands. The expander is held by the feet. When lifted up, it stretches, providing resistance.
- Perform squats as in the first exercise. In a straightened position, you need to lift the gymnastic stick up above your head. At the same time, the expander stretches even more and provides greater resistance.
In addition to the expander, you can also use a fitball for exercise.
Massage and self-massage for prolapse of the intestines and stomach
The abdominal area is massaged by stroking and light rubbing. The movements proceed clockwise. Then they move on to massage the thoracic and lumbosacral areas of the back. Techniques used: kneading, stroking, rubbing with fists [2].
You can do self-massage, as shown in Fig. 3.
Rice. 3. Self-massage for prolapse of the abdominal organs
Exercises with a gymnastic stick for children
General developmental exercise therapy exercises with a gymnastic stick are useful for both adults and children of any age: small children, preschoolers and schoolchildren. Many preschool institutions conduct lessons with a gymnastic stick.
- Starting position standing. Gymnastic stick in lowered hands. Raise it in front of you. Then overhead. Again in front of you and lower down. While performing this exercise, the child can linger for a few seconds at each stage.
- Stand straight, feet together. Hold the stick down with a wide grip. Rise onto your toes and at the same time lift the projectile above your head. Stay a little longer. Return to starting position. Keep your heels together while performing. The gaze is directed at the stick at the highest point, above the head.
- From a standing position, raise the stick in front of you. Take one leg back. Raise the stick up without taking your eyes off it. Return to starting position and repeat on the other side. The working leg is pulled back without bending the knee, the toe is turned outward.
- Take a sitting position. Gymnastic stick in front of you in straight hands. Draw circles in the air first with one end of the stick, then with the other.
- Stand on one leg. The projectile is in a vertical position. One side rests on the floor, hold the other side with the opposite hand. Leaning on a stick, jump on one leg around it. Having described one circle, change sides while jumping and stand on the other leg. Repeat jumping on the second leg.
Exercises for the elderly
It is never too late to start exercising for older people, both for the general condition of the body and for posture.
List of exercises:
- In a standing position, hold the gymnastic apparatus in your lowered hands. Feet together. Raise the projectile up, lower your head. Take the starting position. Repeat the exercise.
- Feet shoulder width apart. Gymnastic stick in straight hands above your head. The grip is wide. Perform body tilts alternately in different directions.
- Starting position as in the second exercise. Instead of bending, turn your body in different directions.
Exercises in pairs
In order to work in pairs, you need to choose a partner who is suitable in terms of physical parameters. There shouldn't be too much difference in weight. It is desirable that the partners be of the same gender and with the same level of training.
Attention : All exercises that involve resistance must be performed taking into account the physical strength and capabilities of the partner. The exercise should not take on a competitive nature.
- Partners stand facing each other. Gymnastic sticks are held in the hands at chest level. Each of them tries to push the right end of the stick forward, while at the same time holding resistance with his left hand.
- Take a sitting position facing each other. Pull the gymnastic stick, holding it by the ends. You can perform this exercise with your feet shoulder-width apart. Or you can connect them together.
- Stand with a friend opposite the arch. Gymnastic sticks on the bottom sides. Each of them is held at different ends by both partners. Raise one stick sideways, the other up. Then change movements for the other side.
Exercises for arms, neck, posture and legs
- One of the simplest general exercises is to jump over a stick on the floor in one direction, then in the opposite direction.
- Place the stick vertically in front of you. Place both hands on the top. From this position, perform squats and return to the starting position.
- Stick in hands below, feet shoulder-width apart. Lunge forward. Raise the stick above your head and move your arms back, arching your back as much as possible. Return to the starting position and repeat for the other leg.
- Hold the gymnastic apparatus in front of you. Place your hands behind your head without bending them. Slowly move the stick in your hands in one direction, then in the other. The neck should not turn.
A set of Kegel exercises
In the 40s of the last century, gynecologist Arnold Kegel from America developed an effective complex for the treatment of urinary incontinence, which is observed in many women after childbirth. Subsequently, this gymnastics became a real salvation for women with uterine prolapse.
Contraindications to performing the complex
- Diseases of the cardiovascular system.
- Complete or partial prolapse of the pelvic organs
- Various tumors.
- Immediately after genital surgery.
Many women found this method to be the most effective. Exercise helps cure many women's diseases. It is also recommended to perform them for their prevention.
Kegel exercises
You need to start gymnastics with a small number of repetitions, gradually increasing their number:
- Lie on your back, bend your knees. Squeeze the vaginal muscles from bottom to top, holding for 30 seconds at each stage. Then relax the muscles in the reverse order. Eliminates uterine bending.
- Exercises to strengthen the muscles of the thighs, vagina and perineum. Performed while standing. Feet slightly wider than shoulder width, place your hands behind your head, sit down, tighten your vagina, hold for 10 seconds.
- In a lying position, alternately tense and relax the muscles of the anus and vagina. Useful to do after childbirth.
- Squeeze the muscles of the vagina and anus at the same time.
- Alternate fast and slow contractions of the muscles of the vagina and anus three times - 10 repetitions.
- Raise your pelvis up, hold it, lower it. Repeat - 5 times.
- Kitty. As you exhale, round your back, draw in your stomach and perineal muscles. As you exhale, bend your back.
Recommendations
Some recommendations will help make training comfortable and effective:
- If pain or discomfort occurs during exercise, you should temporarily stop training and consult a specialist.
- The room must be well ventilated so that the air is saturated with oxygen. The air temperature should not be too high.
- You need to perform movements smoothly and carefully until the correct technique is mastered.
- It is necessary to use comfortable clothes for training , which will not interfere with working at full amplitude and will not hinder movement.
Experts believe that exercise therapy and exercises with a gymnastic stick are considered a priority treatment method for scoliosis. Exercises with a stick strengthen various muscle groups. Gymnastics with a stick will ensure a slim body, prevent osteochondrosis, and also help you quickly lose a few extra pounds.
Alexandrova Anastasia
Nutrition and healthy lifestyle specialist and author of myfitnesblog.com. For many years, she has successfully helped women and men lose weight and maintain a beautiful figure.